介绍
这里是小编成长之路的历程,也是小编的学习之路。希望和各位大佬们一起成长!
以下为小编最喜欢的两句话:
要有最朴素的生活和最遥远的梦想,即使明天天寒地冻,山高水远,路远马亡。
一个人为什么要努力? 我见过最好的答案就是:因为我喜欢的东西都很贵,我想去的地方都很远,我爱的人超完美。因此,小编想说:共勉!
目录
3、在全局配置文件application.properties添加邮件服务配置
一、创建邮件发送任务管理的业务处理类SendEmailService
四、在项目启动类上添加基于注解的定时任务支持:@EnableScheduling
一、发送邮件的三种方法
1、发送纯文本邮件
2、发送复杂邮件
3、发送模板邮件
二、定时任务介绍
Spring框架的定时任务调度功能支持配置和注解两种方式Spring Boot在Spring框架的基础上实现了继承,并对其中基于注解方式的定时任务实现了非常好的支持。下面,针对 Spring Boot 项目中基于注解方式的定时任务调度的相关注解和使用进行介绍。
1.@EnableScheduling
@EnableScheduling 注解是 Spring 框架提供的,用于开启基于注解方式的定时任务支持,该注解主要用在项目启动类上。
2.@Scheduled
@Scheduled 注解同样是 Spring 框架提供的,配置定时任务的执行规则,该注解主要用在定时业务方法上。@Scheduled 注解提供有多个属性,精细化配置定时任务执行规则
| 属性 | 说明 |
| cron | 类似于 cron 的表达式,可以定制定时任务触发的秒、分钟、小时、月中的日、月、周中的日 |
| zone | 表示在上一次任务执行结束后在指定时间后继续执行下一次任务(属性值为long类型) |
| fixedDelay | 指定cron 表达式将被解析的时区。默认情况下,该属性是空字符串(即使用服务器的本地时区 |
| fixedDelayString | 表示在上一次任务执行结束后在指定时间后继续执行下一次任务(属性值为long类型的字符串形式) |
| fixedRate | 表示每隔指定时间执行一次任务 (属性值为 long 类型) |
| fixedRateString | 表示每隔指定时间执行一次任务(属性值为 long 类型的字符串形式) |
| initialDelay | 表示在fixedRate 或fixedDelay 任务第一次执行之前要延迟的毫秒数(属性值为long类型) |
| initialDelayString | 表示在fixedRate或fixedDelay 任务第一次执行之前要延迟的毫秒数(属性值为long类型的字符串形式) |
三、前期准备工作
1、登录QQ邮箱获取授权码
第一步:进入QQ邮箱
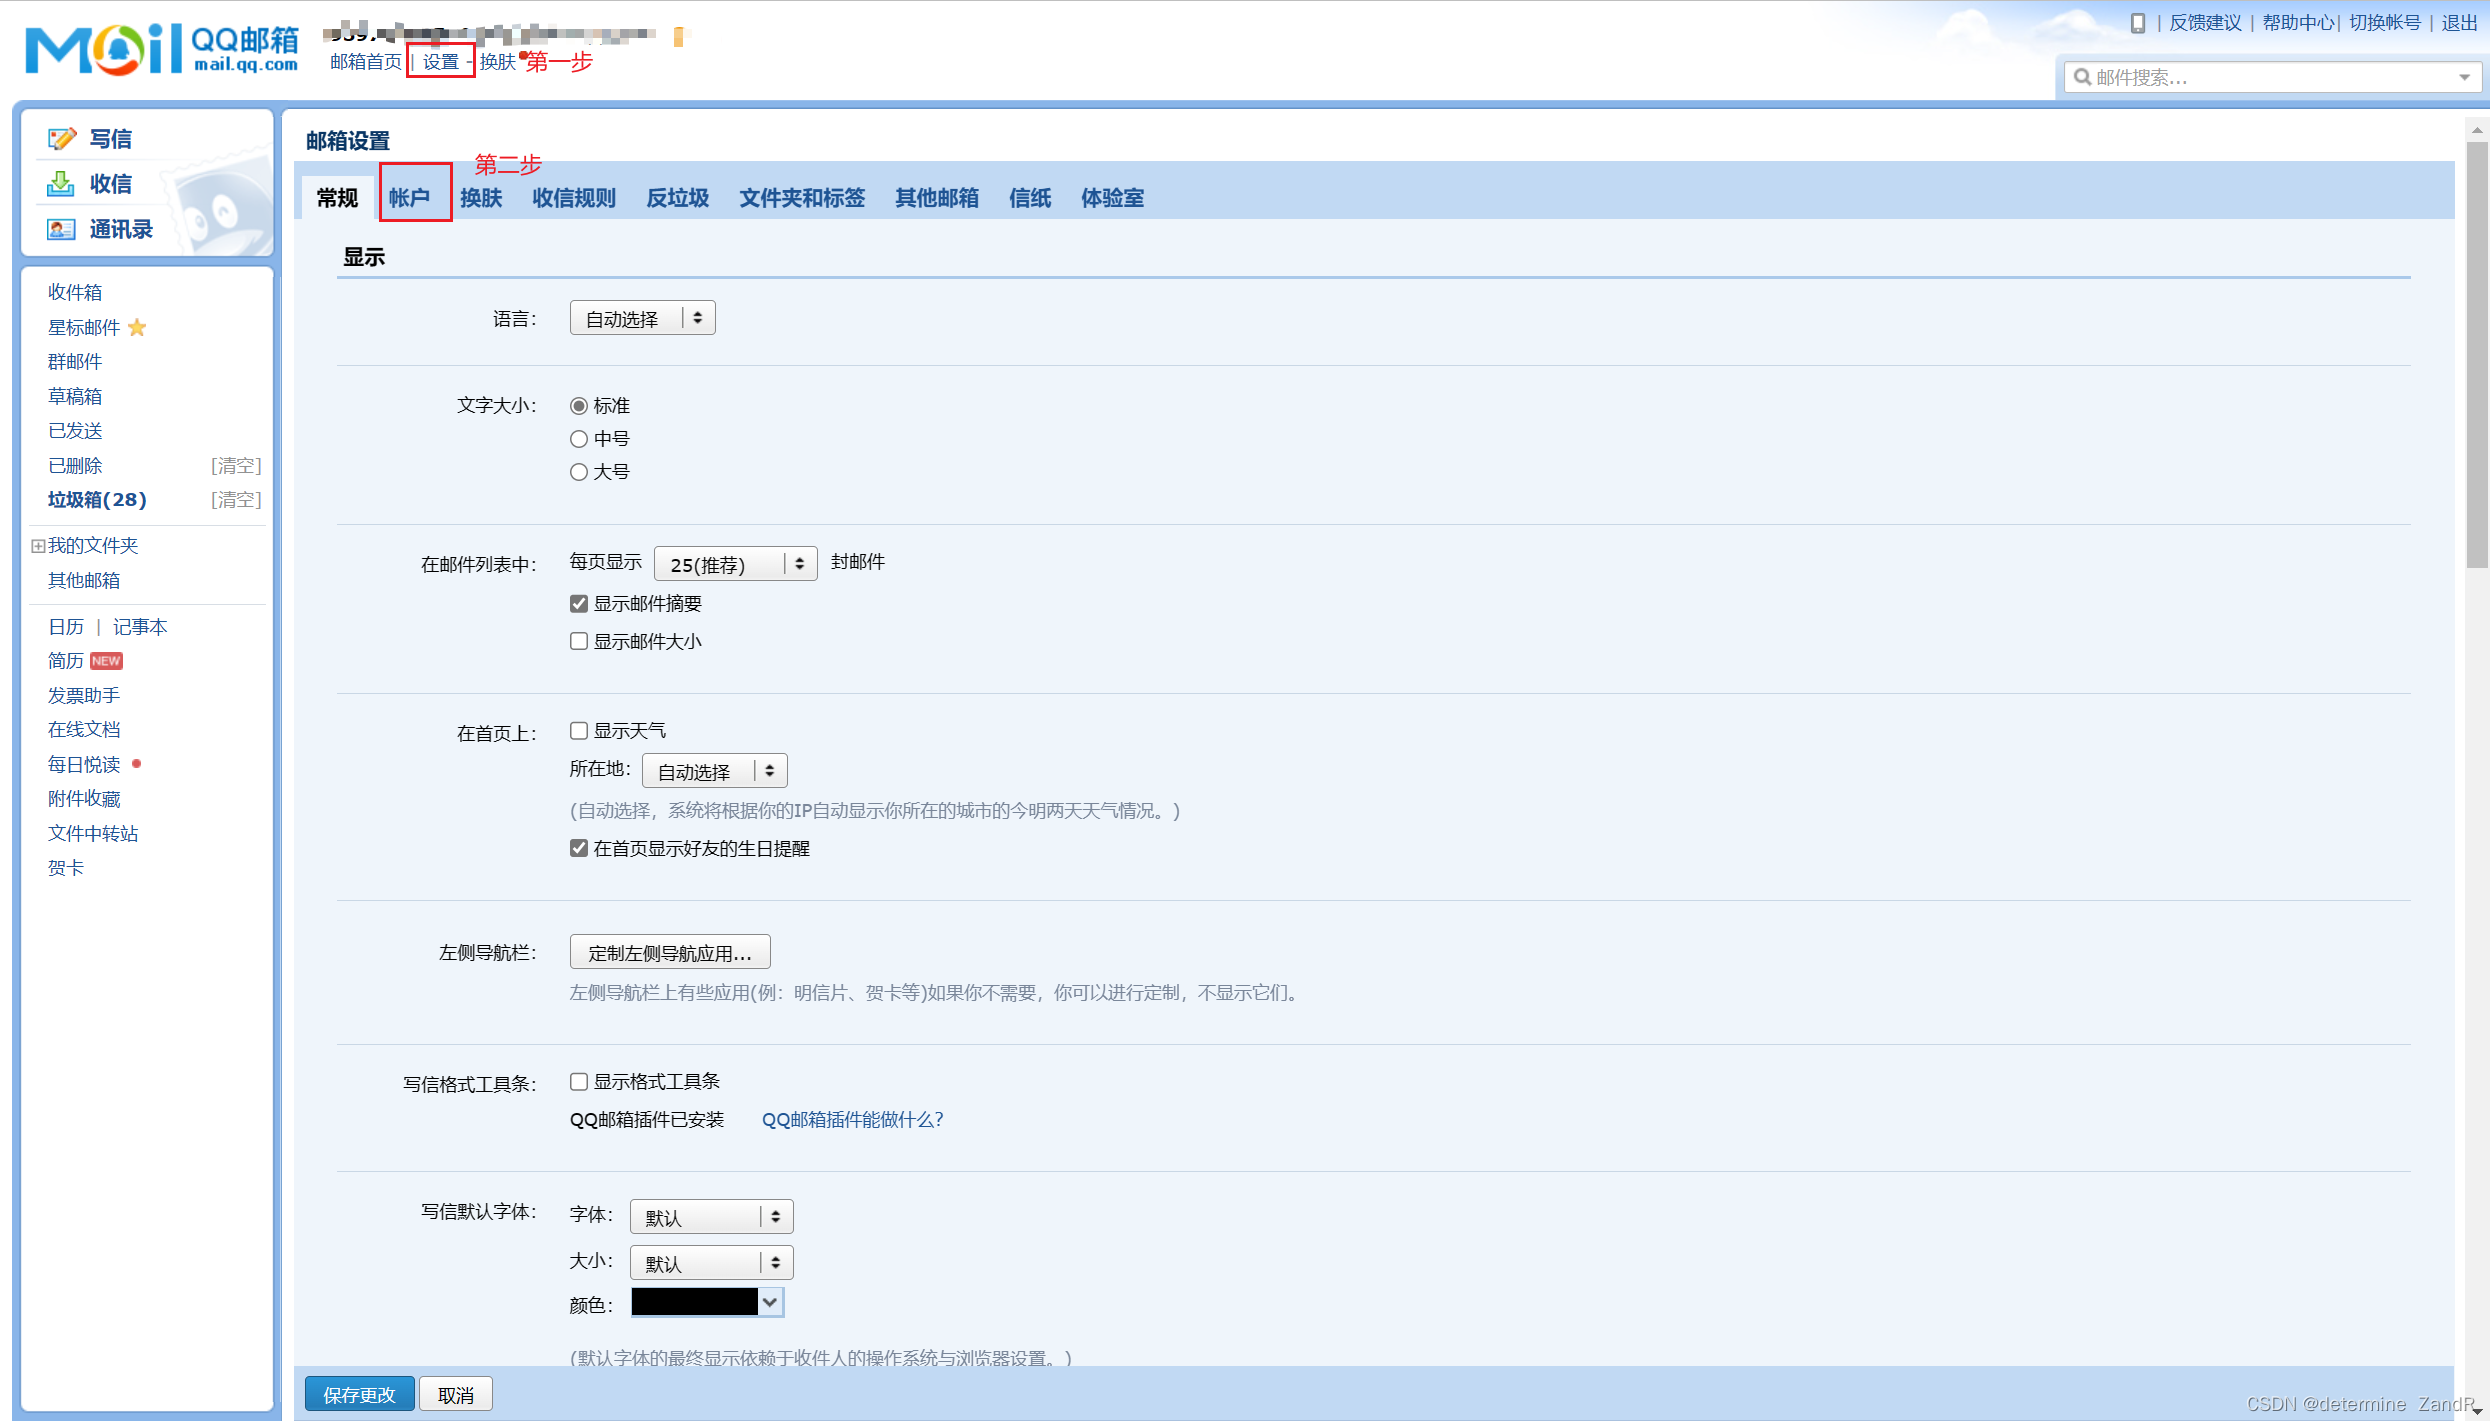
第二步:找到POP3/SMTP,并开启

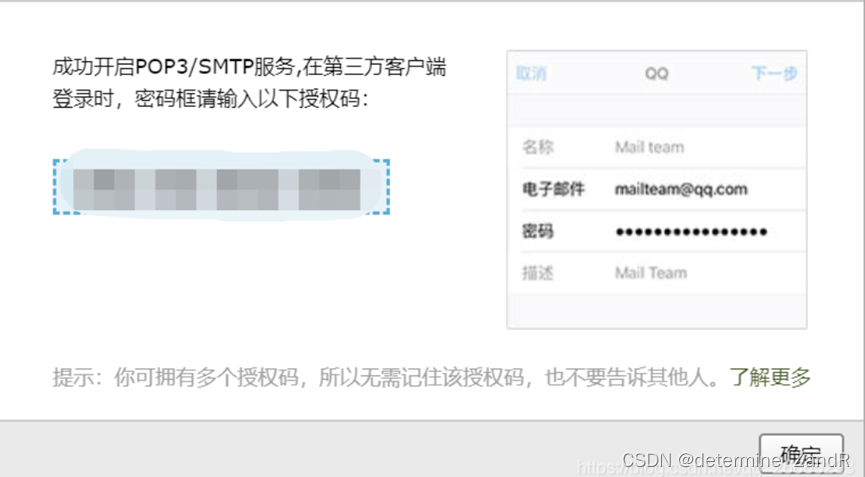
第三步:复制授权码
开启过程需要手机号码验证,按照步骤操作即可。开启成功之后,即可获取一个授权码,将该号码保存好,一会使用
2、pom.xml中的依赖
<dependencies>
        <dependency>
            <groupId>org.springframework.boot</groupId>
            <artifactId>spring-boot-starter-thymeleaf</artifactId>
        </dependency>
        <dependency>
            <groupId>org.springframework.boot</groupId>
            <artifactId>spring-boot-starter-web</artifactId>
        </dependency>

        <dependency>
            <groupId>org.projectlombok</groupId>
            <artifactId>lombok</artifactId>
            <optional>true</optional>
        </dependency>
        <dependency>
            <groupId>org.springframework.boot</groupId>
            <artifactId>spring-boot-starter-test</artifactId>
            <scope>test</scope>
        </dependency>
        <!--添加下面的依赖后,Spring Boot自动配置的邮件服务会生效,在邮件发送任务时,
            可以直接使用Spring框架提供的JavaMailSender接口或者它的实现类JavaMailSenderImpl邮件
        发送-->
        <dependency>
            <groupId>org.springframework.boot</groupId>
            <artifactId>spring-boot-starter-mail</artifactId>
        </dependency>
    </dependencies>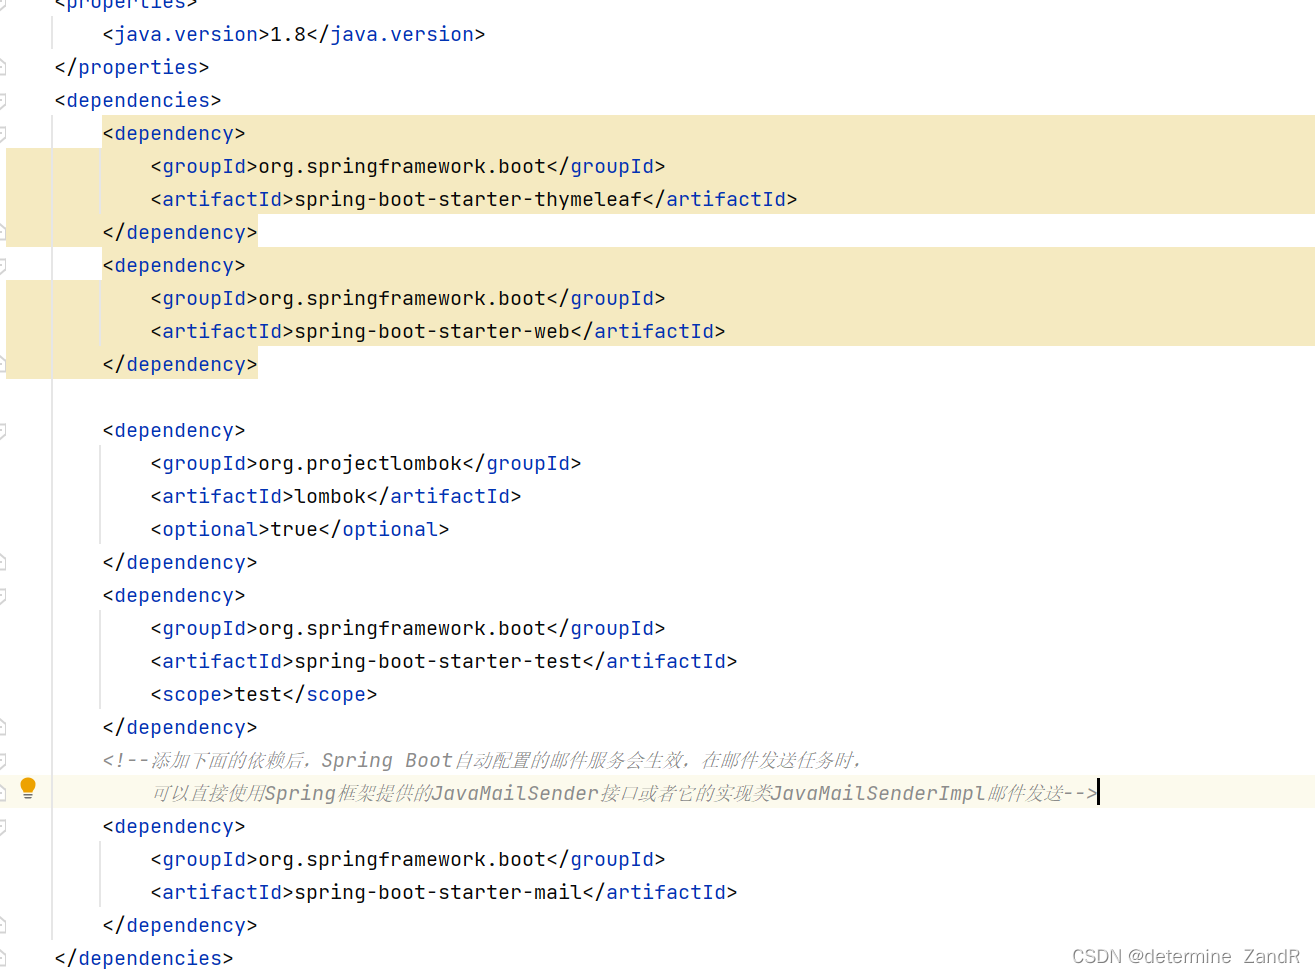
3、在全局配置文件application.properties添加邮件服务配置
# 发件人邮件服务器相关配置
spring.mail.host=smtp.qq.com
spring.mail.port=587
# 配置个人QQ账户和密码(这里需要大家修改为自己的QQ账号和密码,密码是加密后的授权码,授权码的获得后继讲解)
[email protected]
spring.mail.password=填入刚刚复制的授权码
spring.mail.default-encoding=UTF-8
# 邮件服务超时时间配置
spring.mail.properties.mail.smtp.connectiontimeout=5000
spring.mail.properties.mail.smtp.timeout=3000
spring.mail.properties.mail.smtp.writetimeout=5000
四、操作
一、创建邮件发送任务管理的业务处理类SendEmailService
注意:在方法上的注解@Async是需要搭配定时任务一起使用的,如果使用普通的test类时可以不用这个注解的
package com.lyn.service;

import org.springframework.beans.factory.annotation.Autowired;
import org.springframework.beans.factory.annotation.Value;
import org.springframework.core.io.FileSystemResource;
import org.springframework.mail.MailException;
import org.springframework.mail.SimpleMailMessage;
import org.springframework.mail.javamail.JavaMailSenderImpl;
import org.springframework.mail.javamail.MimeMessageHelper;
import org.springframework.scheduling.annotation.Async;
import org.springframework.stereotype.Service;

import javax.mail.MessagingException;
import javax.mail.internet.MimeMessage;
import java.io.File;

/**
 * @author:Lyn.R
 * @date:2023-02-21 14:54:36
 * @Description:
 * @note:
 **/
@Service
public class SendEmailService {
    @Autowired
    private JavaMailSenderImpl mailSender;//使用Spring框架提供的实现类JavaMailSenderImpl来实现邮件发送。
    @Value("${spring.mail.username}")//借助@Value注解读取全局变量中的spring.mail.username的值来作发件人
    private String from;
    /**
     * 第一种方法:发送纯文本邮件
     * @param to      收件人地址
     * @param subject 邮件标题
     * @param text    邮件内容
     */
   @Async
    public void sendSimpleEmail(String to, String subject, String text) {
        // 定制纯文本邮件信息SimpleMailMessage
        SimpleMailMessage message = new SimpleMailMessage();
        message.setFrom(from);//设置发件人
        message.setTo(to);//设置收件人
        message.setSubject(subject);//设置邮件标题
        message.setText(text);//设置 正文件内容
        try {
            // 发送邮件
            mailSender.send(message);
            System.out.println("纯文本邮件发送成功");
        } catch (MailException e) {
            System.out.println("纯文本邮件发送失败 " + e.getMessage());
            e.printStackTrace();
        }
    }
    /**
     * 第二种方法:发送复杂邮件(包括静态资源和附件)
     * @param to           收件人地址
     * @param subject      邮件标题
     * @param text         邮件内容
     * @param filePath     附件地址
     * @param rscId        静态资源唯一标识
     * @param rscPath      静态资源地址
     */
    //sendComplexEmail()方法需要接收的参数除了基本的发送信息外,还包括静态资源唯一标识、静态资源路径和附件路径
    @Async
    public void sendComplexEmail(String to,String subject,String text,String filePath,String rscId,String rscPath){
        // 定制复杂邮件信息MimeMessage
        MimeMessage message = mailSender.createMimeMessage();
        try {
            // 使用MimeMessageHelper帮助类对邮件信息封装处理 ,并设置multipart多部件使用为true
            MimeMessageHelper helper = new MimeMessageHelper(message, true);
            helper.setFrom(from);
            helper.setTo(to);
            helper.setSubject(subject);
            helper.setText(text, true);
            // 设置邮件静态资源
            FileSystemResource res = new FileSystemResource(new File(rscPath));
            helper.addInline(rscId, res);//设置邮件静态资源的方法
            // 设置邮件附件
            FileSystemResource file = new FileSystemResource(new File(filePath));
            String fileName = filePath.substring(filePath.lastIndexOf(File.separator));
            helper.addAttachment(fileName, file);//设置邮件附件的方法
            // 发送邮件
            mailSender.send(message);
            System.out.println("复杂邮件发送成功");
        } catch (MessagingException e) {
            System.out.println("复杂邮件发送失败 "+e.getMessage());
            e.printStackTrace();
        } catch (Exception e) {
            e.printStackTrace();
        }
    }

    /**
     * 第三钟方法:发送模板邮件
     * @param to       收件人地址
     * @param subject  邮件标题
     * @param content  邮件内容
     */
    @Async
    public void sendTemplateEmail(String to, String subject, String content) {
        MimeMessage message = mailSender.createMimeMessage();
        try {
            // 使用MimeMessageHelper帮助类对邮件信息进行封装处理,并设置multipart多部件使用为true
            MimeMessageHelper helper = new MimeMessageHelper(message, true);
            helper.setFrom(from);
            helper.setTo(to);
            helper.setSubject(subject);
            helper.setText(content, true);
            // 发送邮件
            mailSender.send(message);
            System.out.println("模板邮件发送成功");
        } catch (MessagingException e) {
            System.out.println("模板邮件发送失败 "+e.getMessage());
            e.printStackTrace();
        }
    }

}
二、在test类中发送邮件
package com.lyn;

import com.lyn.service.SendEmailService;
import org.junit.jupiter.api.Test;
import org.springframework.beans.factory.annotation.Autowired;
import org.springframework.boot.test.context.SpringBootTest;
import org.thymeleaf.TemplateEngine;
import org.thymeleaf.context.Context;

@SpringBootTest
class SpringbootHomeworkEmail0221ApplicationTests {

    @Autowired
    private SendEmailService sendEmailService;
    @Test
    public void sendSimpleMailTest() {
        String to="[email protected]";//这里修改为你能接收到的邮箱
        String subject="【纯文本邮件】标题";
        String text="嘟嘟嘟.....";
        // 发送简单邮件
        sendEmailService.sendSimpleEmail(to,subject,text);
    }
    @Test
    public void sendComplexEmailTest() {
        //根据前面定义的复杂邮件发送业务定制各种参数
        String to="[email protected]";//修改为你自己的邮件方便接收查看
        String subject="【复杂邮件】标题";
        // 定义邮件内容
        StringBuilder text = new StringBuilder();
        //对邮件内容使用了HTML标签编辑邮件内容
        text.append("<html><head></head>");
        text.append("<body><h1>二月二龙抬头!</h1>");
        // cid为嵌入静态资源文件关键字的固定写法,如果改变将无法识别;rscId则属于自定义的静态资源唯一标识,一个邮件内容中可能会包括多个静态资源,该属性是为了区别唯一性的。
        String rscId = "img001";
        text.append("<img src='cid:" +rscId+"'/></body>");
        text.append("</html>");
        // 指定静态资源文件和附件路径
        String rscPath="D:\\1.jpg";//注意这里修改为你的硬盘中有的资源
        String filePath="D:\\hahaha.txt";//注意这里修改为你的硬盘中有的资源
        // 发送复杂邮件
        sendEmailService.sendComplexEmail(to,subject,text.toString(),filePath,rscId,rscPath);
    }

    @Autowired
    private TemplateEngine templateEngine;
    @Test
    public void sendTemplateEmailTest() {
        String to="[email protected]";
        String subject="【模板邮件】标题";
        // 使用模板邮件定制邮件正文内容
        Context context = new Context();//Context注意正确导入“import org.thymeleaf.context.Context;”
        context.setVariable("username", "石头");
        context.setVariable("code", "456123");
        // 使用TemplateEngine设置要处理的模板页面
        String emailContent = templateEngine.process("emailTemplate_vercode", context);
        // 发送模板邮件
        sendEmailService.sendTemplateEmail(to,subject,emailContent);
    }
}
模板文件的html(emailTemplate_vercode.html)
<!DOCTYPE html>
<html lang="en">
<html lang="zh" xmlns:th="http://www.thymeleaf.org">
<head>
<meta charset="UTF-8"/>
<title>用户验证码</title>
</head>
<body>
<div><span th:text="${username}">XXX</span> 先生/女士,您好:</div>
<P style="text-indent: 2em">您的新用户验证码为<span th:text="${code}" style="color: cornflowerblue">123456</span>,请妥善保管。</P>
</body>
</html>三、发送定时邮件
下面类中的 @Scheduled(cron = "*/5 * * * * ?")表达式大家可以去下面的网址生成Cron - 在线Cron表达式生成器 (ciding.cc)
package com.lyn.controller;

import com.lyn.service.SendEmailService;
import org.springframework.beans.factory.annotation.Autowired;
import org.springframework.scheduling.annotation.Scheduled;
import org.springframework.stereotype.Controller;
import org.springframework.stereotype.Service;
import org.thymeleaf.TemplateEngine;
import org.thymeleaf.context.Context;

/**
 * @author:Lyn.R
 * @date:2023-02-21 19:55:01
 * @Description:
 * @note:
 **/
@Controller
public class MyScheduled {
    @Autowired
    private SendEmailService sendEmailService;

    @Autowired
    //模板引擎(Template Engine), 是用来解析对应类型模板文件然后动态生成由数据和静态页面组成的视图文件的一个工具
    private TemplateEngine templateEngine;

    @Scheduled(cron = "*/5 * * * * ?")
    public void sendSimpleMailTest() {
        String to="[email protected]";//这里修改为你能接收到的邮箱
        String subject="【纯文本邮件】标题";
        String text="嘟嘟嘟.....";
        // 发送简单邮件
        sendEmailService.sendSimpleEmail(to,subject,text);
    }
    @Scheduled(cron = "1 * * * * ?  ")
    public void sendComplexEmailTest() {
        //根据前面定义的复杂邮件发送业务定制各种参数
        String to="[email protected]";//修改为你自己的邮件方便接收查看
        String subject="【复杂邮件】标题";
        // 定义邮件内容
        StringBuilder text = new StringBuilder();
        //对邮件内容使用了HTML标签编辑邮件内容
        text.append("<html><head></head>");
        text.append("<body><h1>二月二龙抬头!</h1>");
        // cid为嵌入静态资源文件关键字的固定写法,如果改变将无法识别;rscId则属于自定义的静态资源唯一标识,一个邮件内容中可能会包括多个静态资源,该属性是为了区别唯一性的。
        String rscId = "img001";
        text.append("<img src='cid:" +rscId+"'/></body>");
        text.append("</html>");
        // 指定静态资源文件和附件路径
        String rscPath="D:\\1.jpg";//注意这里修改为你的硬盘中有的资源
        String filePath="D:\\hahaha.txt";//注意这里修改为你的硬盘中有的资源
        // 发送复杂邮件
        sendEmailService.sendComplexEmail(to,subject,text.toString(),filePath,rscId,rscPath);
    }

    @Scheduled(cron = "0 * * * * ? ")
    public void sendTemplateEmailTest() {
        String to="[email protected]";
        String subject="【模板邮件】标题";
        // 使用模板邮件定制邮件正文内容
        Context context = new Context();//Context注意正确导入“import org.thymeleaf.context.Context;”
        context.setVariable("username", "石头");
        context.setVariable("code", "456123");
        // 使用TemplateEngine设置要处理的模板页面
        String emailContent = templateEngine.process("emailTemplate_vercode", context);
        // 发送模板邮件
        sendEmailService.sendTemplateEmail(to,subject,emailContent);
    }
}
四、在项目启动类上添加基于注解的定时任务支持:@EnableScheduling
package com.lyn;

import org.springframework.boot.SpringApplication;
import org.springframework.boot.autoconfigure.SpringBootApplication;
import org.springframework.scheduling.annotation.EnableScheduling;

@SpringBootApplication
@EnableScheduling
public class SpringbootHomeworkEmail0221Application {

    public static void main(String[] args) {
        SpringApplication.run(SpringbootHomeworkEmail0221Application.class, args);
    }

}
注意:邮件发多了,可能会导致qq邮箱认为是垃圾邮件,就会出现报错,所以尽量不要进行邮箱轰炸
以上就是小编的实现过程,希望各位大佬可以多多指教,共同进步!!!