自定义SpringBoot的starter
引言
starter命名格式:
- 官方的 starter 的命名格式为 spring-boot-starter-{xxxx} 比如spring-boot-starter-activemq
第三方我们自己的命名格式为 {xxxx}-spring-boot-starter。比如mybatis-spring-boot-starter。
如果我们忽略这种约定,是不是会显得我们写的东西不够“专业“。
实战
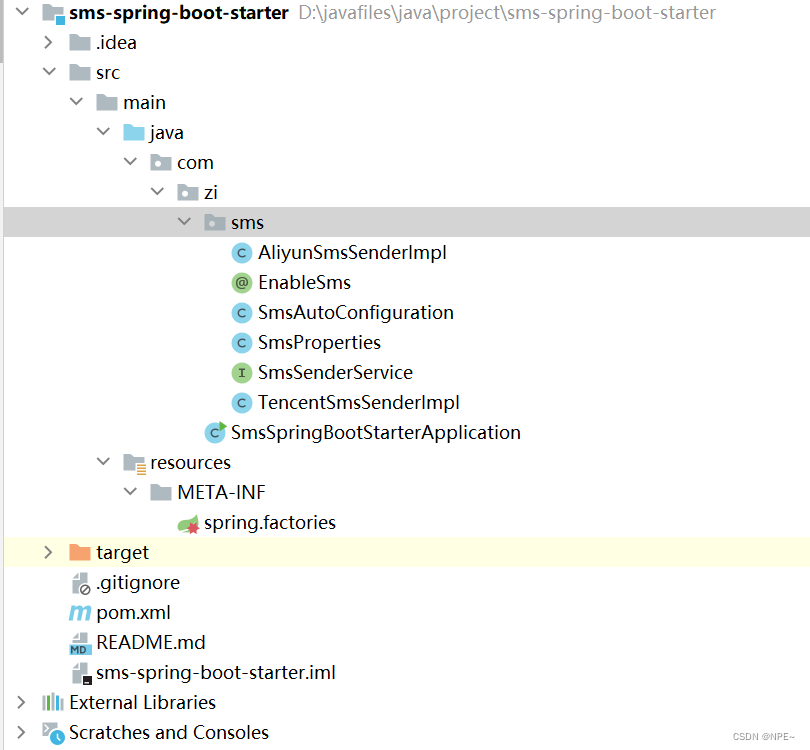
完整项目结构:
①导入依赖
<dependency>
    <groupId>org.springframework.boot</groupId>
    <artifactId>spring-boot-starter</artifactId>
</dependency>
<dependency>
    <groupId>org.springframework.boot</groupId>
    <artifactId>spring-boot-configuration-processor</artifactId>
    <optional>true</optional>
</dependency>
  <dependency>
    <groupId>org.projectlombok</groupId>
    <artifactId>lombok</artifactId>
    <version>1.16.18</version>
    <scope>provided</scope>
</dependency>
②编写配置文件类(SmsProperties)
@ConfigurationProperties(prefix = "sms")
@Data
public class SmsProperties {


    private SmsMessage aliyun = new SmsMessage();

    private SmsMessage tencent = new SmsMessage();

    @Data
    public static class SmsMessage{


        /**
         * username 用户名
         */
        private String userName;

        /**
         * 密码
         */
        private String passWord;

        /**
         * 秘钥
         */
        private String sign;

        /**
         *
         */
        private String url;

        @Override
        public String toString() {


            return "SmsMessage{" +
                    "userName='" + userName + '\'' +
                    ", passWord='" + passWord + '\'' +
                    ", sign='" + sign + '\'' +
                    ", url='" + url + '\'' +
                    '}';
        }
    }
}
@ConfigurationProperties注解上配置的
prefix属性,主要用来区别各个组件的参数。
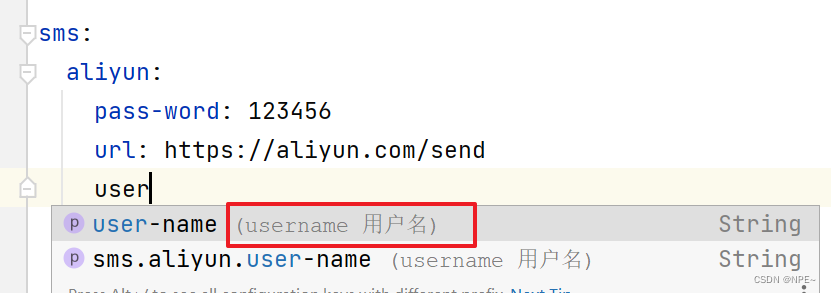
- 这里有个小知识点需要注意下当我们在配置文件输入sms我们的idea会提示这个sms有哪些属性可以配置,以及每个属性的注释都有标记,建议的话注释还是写英文,这样会显得你比较专业。
如果想要把此处字段上的注释展示出来,则需要导入
<dependency>
   <groupId>org.springframework.boot</groupId>
   <artifactId>spring-boot-configuration-processor</artifactId>
   <optional>true</optional>
</dependency>
效果:
③编写自动配置类
@EnableConfigurationProperties(value = SmsProperties.class)
@Configuration
public class SmsAutoConfiguration  {


    /**
     *  阿里云发送短信的实现类
     * @param smsProperties
     * @return
     */
    @Bean
    public AliyunSmsSenderImpl aliYunSmsSender(SmsProperties smsProperties){


        return new AliyunSmsSenderImpl(smsProperties.getAliyun());
    }
    /**
     * 腾讯云发送短信的实现类
     * @param smsProperties
     * @return
     */
    @Bean
    public TencentSmsSenderImpl tencentSmsSender(SmsProperties smsProperties){


        return new TencentSmsSenderImpl(smsProperties.getTencent());
    }
}
④接口及实现类
接口:
public interface SmsSenderService {


    boolean send(String msg);
}
实现类:
public class TencentSmsSenderImpl implements SmsSenderService{


    private SmsProperties.SmsMessage smsMessage;

    public TencentSmsSenderImpl(SmsProperties.SmsMessage smsProperties) {


        this.smsMessage = smsProperties;
    }

    @Override
    public boolean send(String message) {


        System.out.println(smsMessage.toString()+"开始发送短信==》短信内容:"+message);
        return true;
    }
}
public class AliyunSmsSenderImpl implements SmsSenderService {


    private SmsProperties.SmsMessage smsMessage;

    public AliyunSmsSenderImpl(SmsProperties.SmsMessage smsProperties) {


        this.smsMessage = smsProperties;
    }

    @Override
    public boolean send(String message) {


        System.out.println(smsMessage.toString()+"开始发送短信==》短信内容:"+message);
        return true;
    }
}
⑤让starter生效(应用集成)
starter集成应用有两种方式:
- 被动生效
通过SpringBoot的SPI机制
- resources目录下新建一个META-INF目录
- 在META-INF目录下创建
spring.factories- spring.factories写入:

注意两行都是顶格写
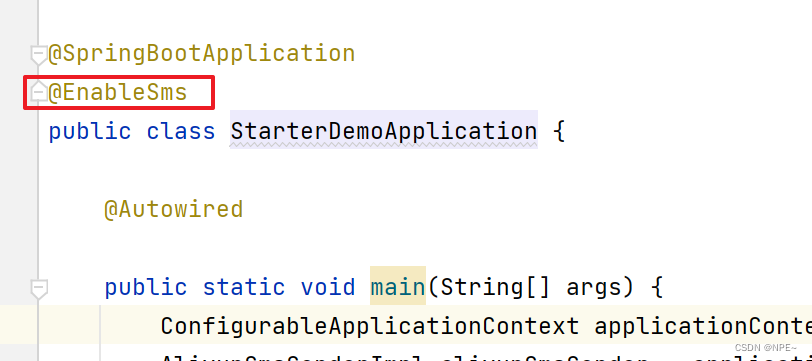
- 主动生效(注解)
在starter组件集成到我们的Spring Boot应用时需要主动声明启用该starter才生效
- 通过自定义一个@Enable注解然后在把自动配置类通过Import注解引入进来。
@Target({

    ElementType.TYPE})
@Retention(RetentionPolicy.RUNTIME)
@Documented
@Import({

    SmsAutoConfiguration.class})
public @interface EnableSms {


}
使用的时候需要在启动类上面开启这个注解。
⑥mvn install打包到本地仓库
记得需要打包到本地仓库(别忘记将settings中的maven配置修改为本地的maven)
BUG:如果我们引入了自定义的starter之后,仍然找不到,则需要在自定义starter项目中添加插件(因为多了BOOT-INF)
<!--找不到自定义starter-->
<plugin>
    <groupId>org.springframework.boot</groupId>
    <artifactId>spring-boot-maven-plugin</artifactId>
    <configuration>
        <skip>true</skip>
    </configuration>
</plugin>
⑦使用
- 新建项目,引入我们的starter依赖
<!--自定义starter-->
<dependency>
    <groupId>com.zi</groupId>
    <artifactId>sms-spring-boot-starter</artifactId>
    <version>1.0.0</version>
</dependency>
- 编写配置文件
server:
  port: 8080
# 自定义starter中的配置
sms:
  aliyun:
    user-name: ziyi
    pass-word: 123456
    url: https://aliyun.com/send
- 测试类中的启动类
@SpringBootApplication
//@EnableSms
public class StarterDemoApplication {


    @Autowired

    public static void main(String[] args) {


        ConfigurableApplicationContext applicationContext = SpringApplication.run(StarterDemoApplication.class, args);
        AliyunSmsSenderImpl aliyunSmsSender = applicationContext.getBean(AliyunSmsSenderImpl.class);
        aliyunSmsSender.send("用阿里云发送短信");
    }

}
- 启动Application,查看结果

参考:
https://developer.aliyun.com/article/893073