文章目录
摘要
One is to learn more about Informerd’s Decoder module code. The Decoder module has two inputs, one is the previous part from the data to be predicted, plus the part of the sequence that needs to be predicted. Input to the first multi-mask-probAttention layer of Decoder for processing; another input is the feature map output from the encoderstack layer, as K and V; use the upper layer of Decoder’s attention. The output is regarded as Q, and then input to FullAttention; finally, in the input FNN, the final predicted time series is output, that is, the sequence data is completed at the position of 0. The second is to use the official Baidu Map API to display a simple Demo map, create a form project in C#, and display functions such as map coordinate display, geographic framing, and geographic ranging, all based on the operation of baidumap.html.
一是Informerd的Decoder模块代码详细理解,Decoder模块有两个输入,一个是从需预测的数据的前段部分( X s t o k e X_{stoke} Xstoke),并加上需要预测的部分序列长(但是用0补全即可),将其输入到Decoder第一个 mulit-mask-probAttention 层进行处理;另一个输入是从encoderstack层中输出的feature map,将其当作K与V,而将Decoder上一层attention的输出当成Q,再将其输入FullAttention;最后在输入FNN,输出最后的预测时间序列,即是将0的位置进行补全。二是利用百度地图官方API,进行简单的Demo地图展示与在C#中创建窗体项目,进行了地图坐标显示,地理框定,地理距离测量等功能显示,都是基于baidumap.html的操作实现。
一.Informer代码部分(2)
这里放之前的回顾 informer代码理解(1)
1.1 Deconder模块代码
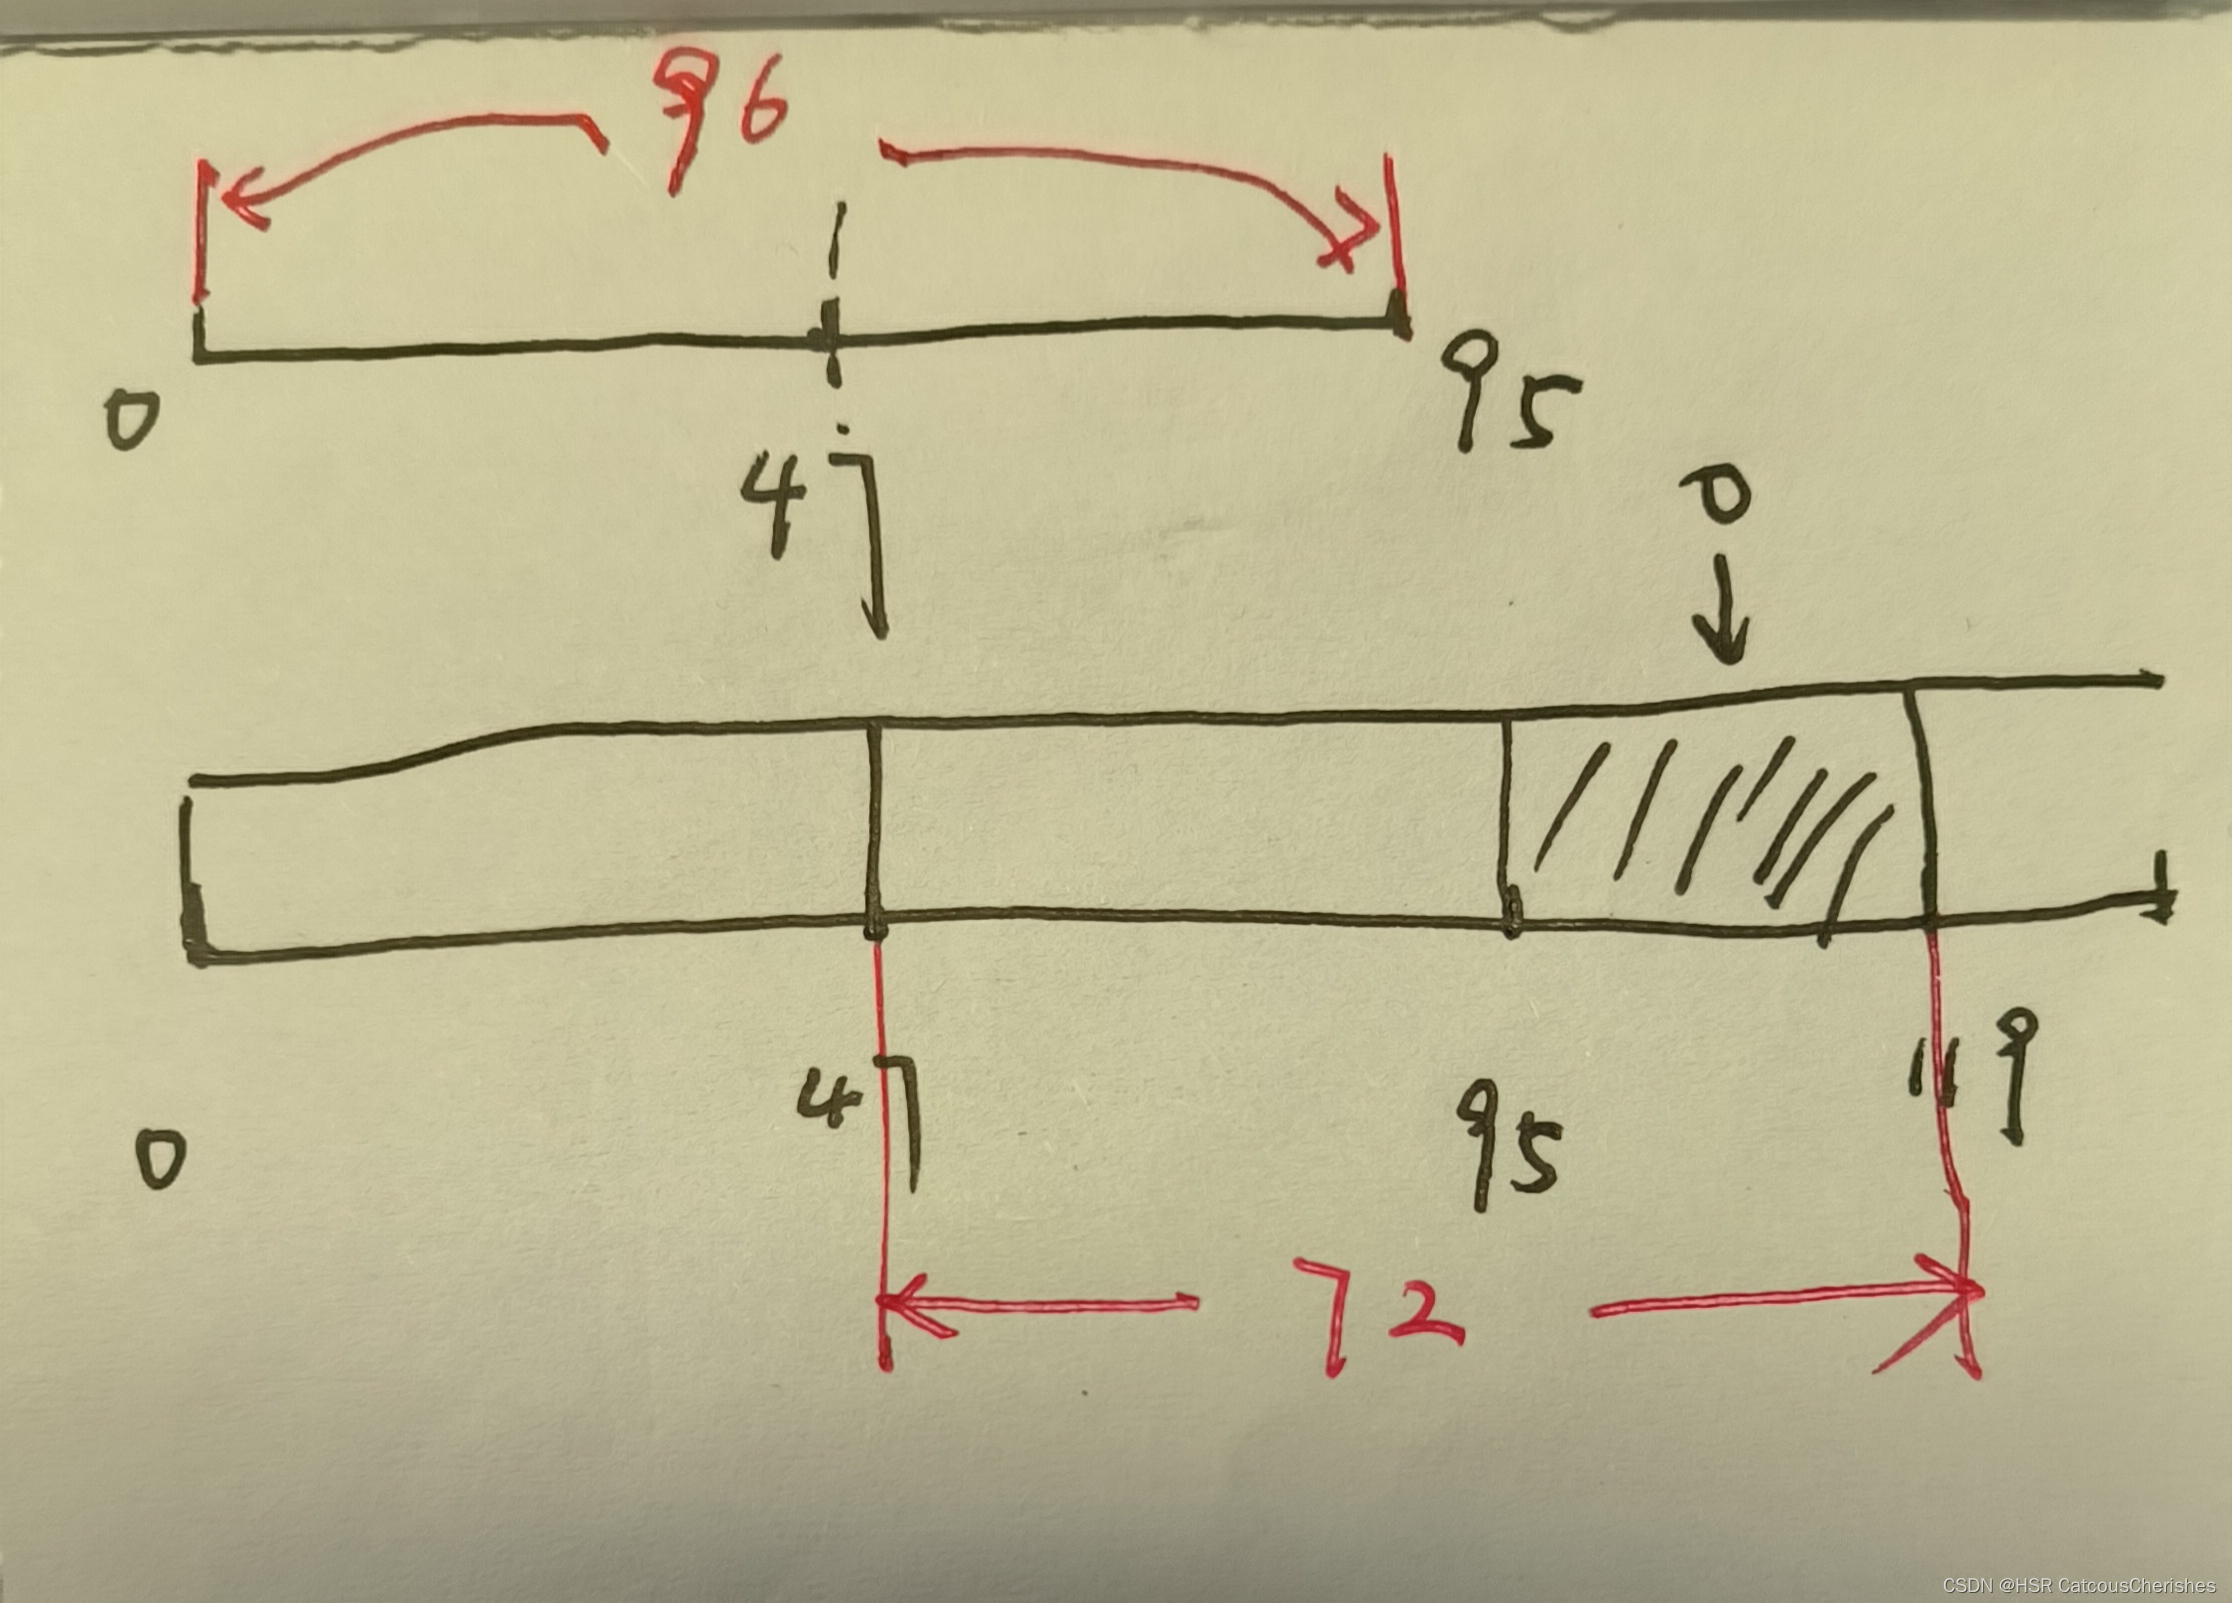
继续之前的例子开展输入输出的维度变化:
即seq_len=96,label_len=48,pred_len=24,batch_size=32。
decoder 的输入有两部分,即下图中有两个箭头出的两部分。
第一个 32 × 51 × 512 32 × 51 × 512 32×51×512是 encoder 的输出
第二个 32 × 72 × 512 32 × 72 × 512 32×72×512 是 embedding 后的 decoder 的输入,即用0遮住了后半部分的输入。
decoder 的第二个输入,维度为 32 × 72 × 512 32 × 72 × 512 32×72×512。从下草图中可以看出,上面的是encoder的输入,下面是decoder,decoder 的后半部分被0遮盖住。整个模型的目的即为预测被遮盖的decoder的输出的部分。
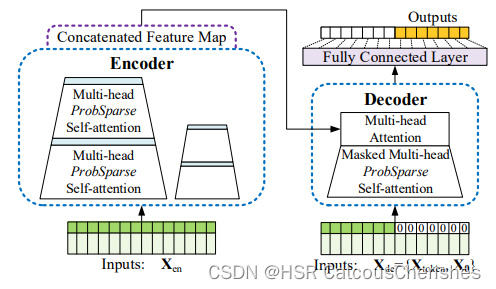
Transformer是一个encoder-decoder的结构,在训练阶段,我们可以用teacher forcing的手段让decoder一步就得到预测结果,但是Inference时,都是step-by-step。对这一块有疑惑的话,可以仔细阅读:深入理解Transformer及其源码解读。
Informer 提出了一种一步到位的预测,整个流程如下图所示:
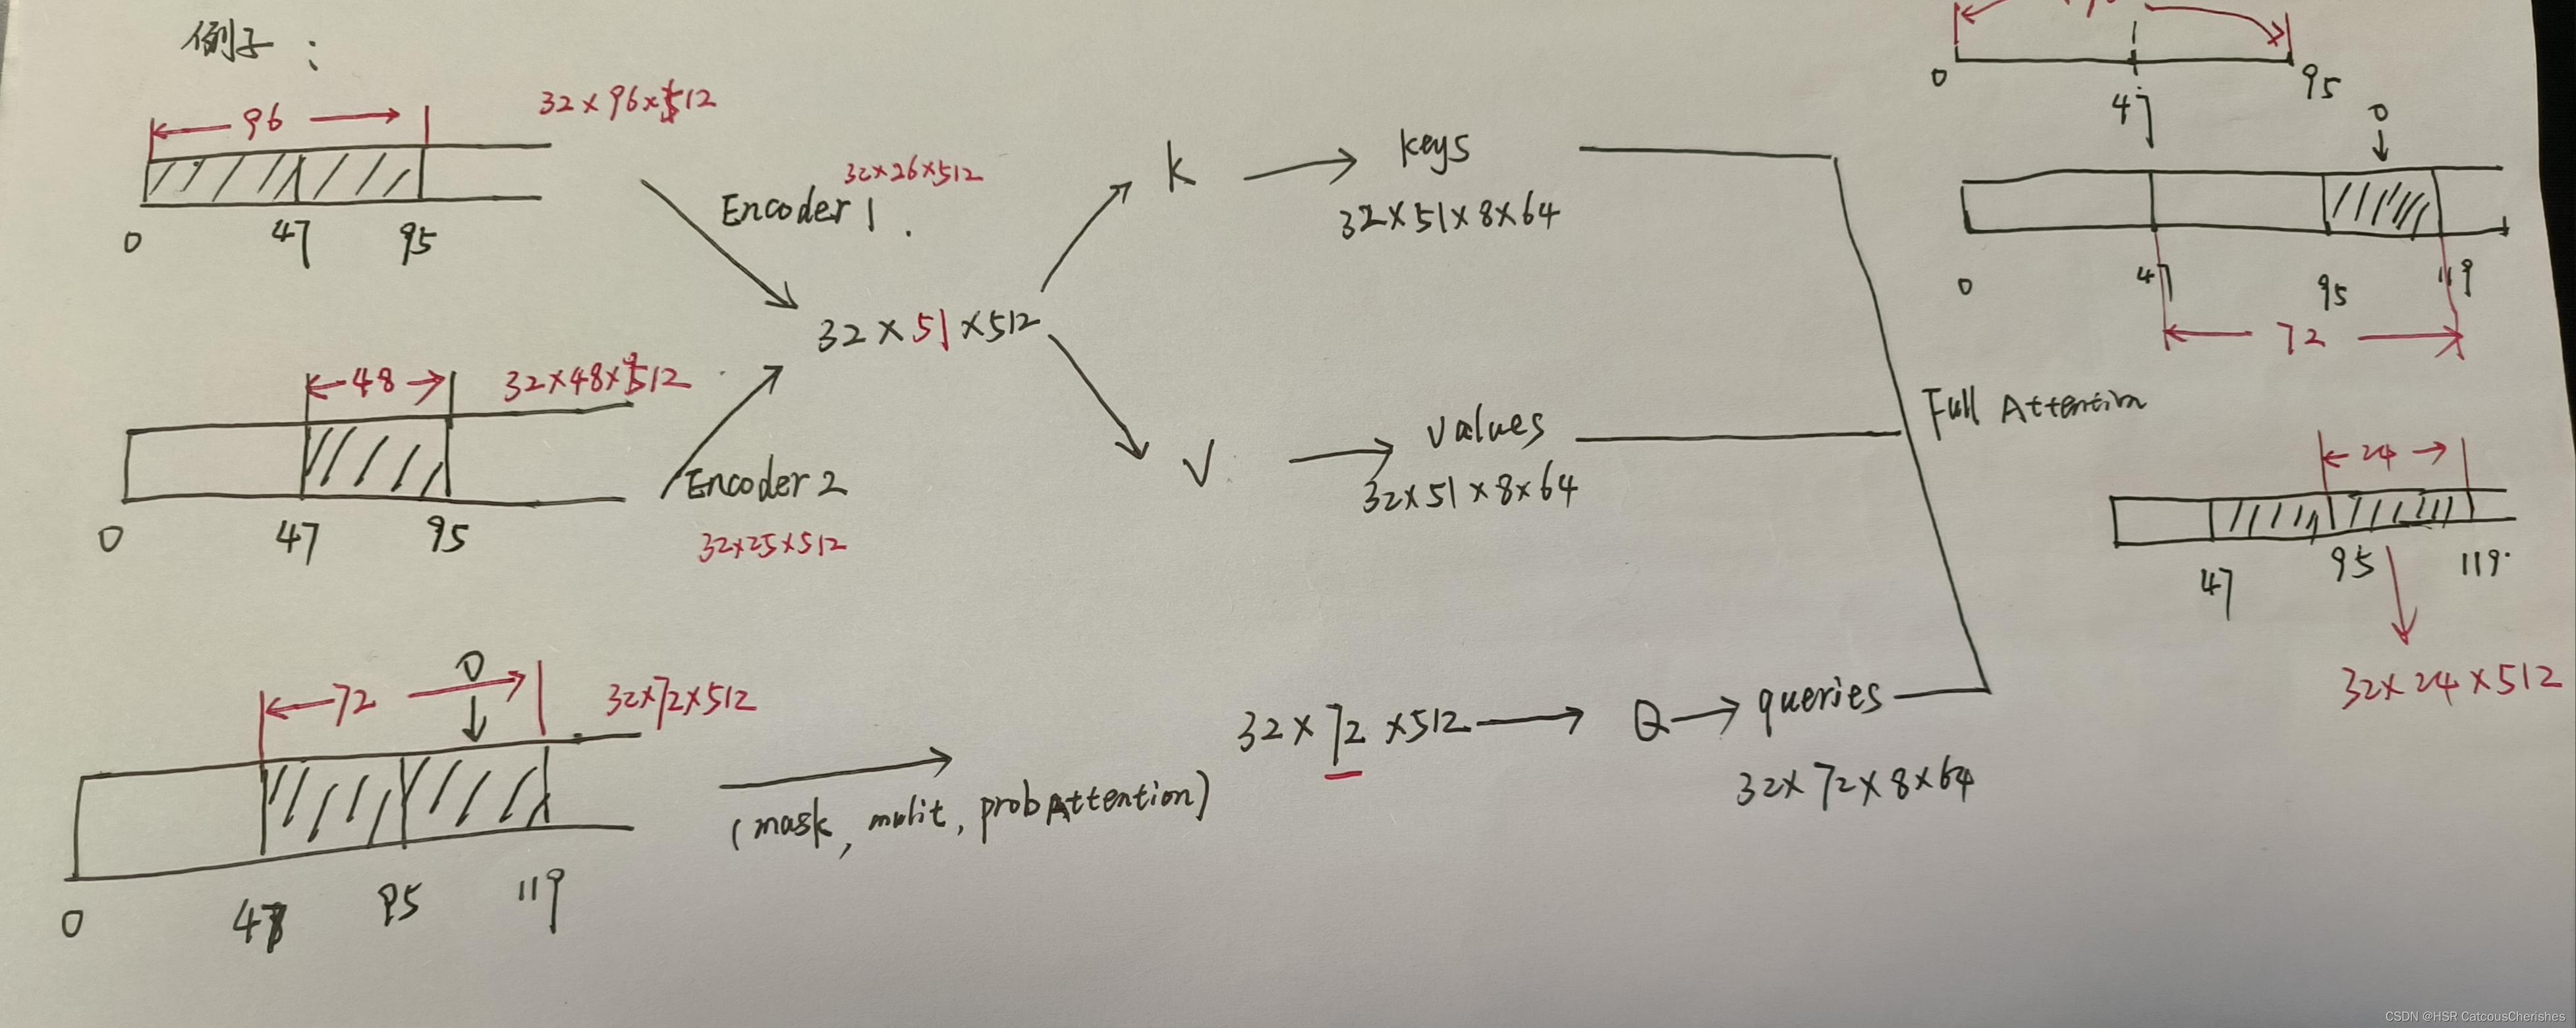
1.最上面的 Encoder1 对应的是Encoder Stack 里的主 Stack, 而 Encoder2 则是将输入减半后的第二个 Stack。
将他们的输出连接,得到 32 ∗ 51 ∗ 512 32 ∗ 51 ∗ 512 32∗51∗512 的输出。也就是decoder的一部分输入。用这部分输入得到 keys 和 values。
2.decoder 的第二部分输入,即将预测部分用0遮盖后的输入向量计算 ProbAttention,也就是和Encoder的 (mask)ProbSparse Self-Atteniton类似的操作,这里与encoder中不同的地方是 为了防止提前看到未来的部分进行了mask。
如上Decoder部分结构包括两层attention层和一个两层线性映射的Feed Forward部分。注意的是: 第一个attention层中的query、key、value都是根据Decoder输入的embedding乘上权重矩阵得到的,而第二个attention层中的query是根据前面attention层的输出乘上权重矩阵得到的,key和value是根据Encoder的输出乘上权重矩阵得到的。
Deconder整体代码结构如下:
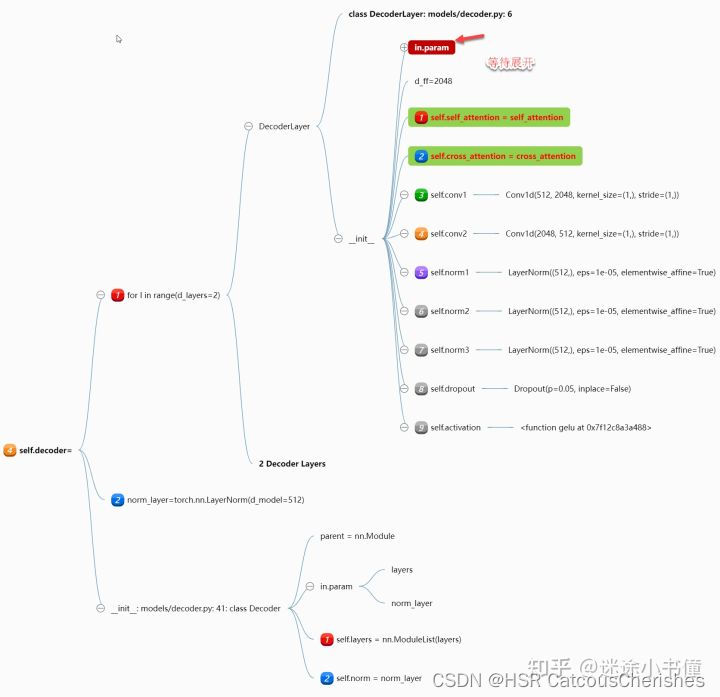
class Decoder(nn.Module):
    def __init__(self, layers, norm_layer=None):
        super(Decoder, self).__init__()
        self.layers = nn.ModuleList(layers) #DecoderLayer List
        self.norm = norm_layer #LayerNorm

    def forward(self, x, cross, x_mask=None, cross_mask=None):
        for layer in self.layers:
            x = layer(x, cross, x_mask=x_mask, cross_mask=cross_mask)

        if self.norm is not None:
            x = self.norm(x)

        return x
DecoderLayer的具体代码如下:
class DecoderLayer(nn.Module):
    def __init__(self, self_attention, cross_attention, d_model, d_ff=None,
                 dropout=0.1, activation="relu"):
        super(DecoderLayer, self).__init__()
        d_ff = d_ff or 4*d_model
        self.self_attention = self_attention
        self.cross_attention = cross_attention
        self.conv1 = nn.Conv1d(in_channels=d_model, out_channels=d_ff, kernel_size=1)
        self.conv2 = nn.Conv1d(in_channels=d_ff, out_channels=d_model, kernel_size=1)
        self.norm1 = nn.LayerNorm(d_model)
        self.norm2 = nn.LayerNorm(d_model)
        self.norm3 = nn.LayerNorm(d_model)
        self.dropout = nn.Dropout(dropout)
        self.activation = F.relu if activation == "relu" else F.gelu

    def forward(self, x, cross, x_mask=None, cross_mask=None):
        x = x + self.dropout(self.self_attention(
            x, x, x,
            attn_mask=x_mask
        )[0])
        x = self.norm1(x)

        x = x + self.dropout(self.cross_attention(
            x, cross, cross,
            attn_mask=cross_mask
        )[0])

        y = x = self.norm2(x)
        y = self.dropout(self.activation(self.conv1(y.transpose(-1,1))))
        y = self.dropout(self.conv2(y).transpose(-1,1))

        return self.norm3(x+y)
decoder核心和encoder的区别,就是增加cross-attention了。
1.2 model.py部分源码
model.py的部分源码如下:
class Informer(nn.Module):
    def __init__(self, enc_in, dec_in, c_out, seq_len, label_len, out_len,
                factor=5, d_model=512, n_heads=8, e_layers=3, d_layers=2, d_ff=512,
                dropout=0.0, attn='prob', embed='fixed', freq='h', activation='gelu',
                output_attention = False, distil=True, mix=True,
                device=torch.device('cuda:0')):
        super(Informer, self).__init__()
        self.pred_len = out_len
        self.attn = attn
        self.output_attention = output_attention

        # Encoding
        self.enc_embedding = DataEmbedding(enc_in, d_model, embed, freq, dropout)
        self.dec_embedding = DataEmbedding(dec_in, d_model, embed, freq, dropout)
        # Attention
        Attn = ProbAttention if attn=='prob' else FullAttention
        # Encoder
        self.encoder = Encoder(
            [
                EncoderLayer(
                    AttentionLayer(Attn(False, factor, attention_dropout=dropout, output_attention=output_attention),
                                d_model, n_heads, mix=False),
                    d_model,
                    d_ff,
                    dropout=dropout,
                    activation=activation
                ) for l in range(e_layers)
            ],
            [
                ConvLayer(
                    d_model
                ) for l in range(e_layers-1)
            ] if distil else None,
            norm_layer=torch.nn.LayerNorm(d_model)
        )
        # Decoder
        self.decoder = Decoder(
            [
                DecoderLayer(
                    AttentionLayer(Attn(True, factor, attention_dropout=dropout, output_attention=False),
                                d_model, n_heads, mix=mix),
                    AttentionLayer(FullAttention(False, factor, attention_dropout=dropout, output_attention=False),
                                d_model, n_heads, mix=False),
                    d_model,
                    d_ff,
                    dropout=dropout,
                    activation=activation,
                )
                for l in range(d_layers)
            ],
            norm_layer=torch.nn.LayerNorm(d_model)
        )
        # self.end_conv1 = nn.Conv1d(in_channels=label_len+out_len, out_channels=out_len, kernel_size=1, bias=True)
        # self.end_conv2 = nn.Conv1d(in_channels=d_model, out_channels=c_out, kernel_size=1, bias=True)
        self.projection = nn.Linear(d_model, c_out, bias=True)

    def forward(self, x_enc, x_mark_enc, x_dec, x_mark_dec,
                enc_self_mask=None, dec_self_mask=None, dec_enc_mask=None):
        enc_out = self.enc_embedding(x_enc, x_mark_enc)
        enc_out, attns = self.encoder(enc_out, attn_mask=enc_self_mask)

        dec_out = self.dec_embedding(x_dec, x_mark_dec)
        dec_out = self.decoder(dec_out, enc_out, x_mask=dec_self_mask, cross_mask=dec_enc_mask)
        dec_out = self.projection(dec_out)

        # dec_out = self.end_conv1(dec_out)
        # dec_out = self.end_conv2(dec_out.transpose(2,1)).transpose(1,2)
        if self.output_attention:
            return dec_out[:,-self.pred_len:,:], attns
        else:
            return dec_out[:,-self.pred_len:,:] # [B, L, D]
1.3 训练与预测阶段
下面对训练exp.informer.py 进行了详细的注释:由于篇幅过大,则另外记录一下:训练步骤的源码注释详情链接地址。
最后是informer模型的所采用的数据data,dataloader,各参数配置,以及所预测的变量模式:比如以下参数
    """
    enc_in: informer的encoder的输入维度
    dec_in: informer的decoder的输入维度
    c_out: informer的decoder的输出维度
    d_model: informer中self-attention的输入和输出向量维度
    n_heads: multi-head self-attention的head数
    e_layers: informer的encoder的层数
    d_layers: informer的decoder的层数
    d_ff: self-attention后面的FFN的中间向量表征维度
    factor: probsparse attention中设置的因子系数
    padding: decoder的输入中,作为占位的x_token是填0还是填1
    distil: informer的encoder是否使用注意力蒸馏
    attn: informer的encoder和decoder中使用的自注意力机制
    embed: 输入数据的时序编码方式
    activation: informer的encoder和decoder中的大部分激活函数
    output_attention: 是否选择让informer的encoder输出attention以便进行分析

    """
以及特别注意:
 """
    字典格式:{

    数据主题:{

    data:数据路径,'T':目标字段列名,'M':,'S':,'MS':}}

    'M:多变量预测多元(multivariate predict multivariate)',
    'S:单变量预测单变量(univariate predict univariate)',
    'MS:多变量预测单变量(multivariate predict univariate)'。
    """
小数据集的预测可以先使用默认参数或适当减小d_model和d_ff的大小!
下面继续简单描述一下训练预测的过程:
- 设置实验,将数据参数和模型变量传入实例
- 训练模型
- 模型测试
- 模型预测未来
- 存储实验的info信息
- 可视化预测结果对比
具体详细注解源码,同样由于篇幅比较大,另做一个记录:main_informer.py 源码注释详情记录。
1.4 小结
参考博客:
1.Informer源码分析
2. informer[3]逐行代码解析-训练脑图-天龙八部
对informer开源代码进行自定义数据集,就是如何修改代码以跑通自己的数据集,毕竟原代码仓库没有注释,代码的修改和代码流程解释。就需要全程掌握代码的架构,从时序数据的输入输出,embedding的方法,内部模型的编码详情,最重要的便是prob_Attention部分是精华所在,也就是informer所特有的attention模式。
基于以上学习,可以对informer源码进行自定义数据集,修改模型参数,优化训练预测,以及对自定义数据的预测进行可视化结果对比。但目前还有一点点bug!
二. C# 调用百度地图API 的Demo
2.1 简单的使用百度地图API的地图展示demo
百度地图API官方地址:百度地图开放平台
首先需要在百度创建账号成为其开发者,应用类型为浏览器端,然后获取密钥ak。
api的请求格式为: http://api.map.baidu.com/api?v=2.0&ak=您的密钥 v=2.0 即使用的版本。
HTML 页面嵌入一个简单的百度地图:
<!DOCTYPE html>
<html>
<head>
    <!-- //控制信息 -->
    <meta name="viewport" content="initial-scale=1.0, user-scalable=no"/>
    <meta http-equiv="Content-Type" content="text/html; charset=utf-8"/>
    <title>Hello, World</title>
    <!-- //css部分 -->
    <style type="text/css">
        body, html{


            width: 100%;
            height: 100%;
            overflow: hidden;
            margin: 0;
            font-family: "微软雅黑";
        }
        #container{


            float:right;
            width: 50%;
            height: 100%;
            overflow: hidden;
            margin: 0;
            font-family: "微软雅黑";
        }
    </style>
    <!-- //javascript部分 -->
    <script type="text/javascript" src="http://api.map.baidu.com/api?v=2.0&ak=jjsVgCxlrvbRjnHwdSUyYlAgIuqrftsk">

    </script>
</head>

<body>
<div id="container" ></div>
<script type="text/javascript">
    // 创建地图实例
    var map = new BMap.Map("container");
    // 创建点坐标
    // var point = new BMap.Point(102.857476, 24.860112);
    var point = new BMap.Point(110.282644,25.261595);
    // 初始化地图,设置中心点坐标和地图级别
    //地图级别用来显示缩放的级别
    map.centerAndZoom(point, 16);

    //开启鼠标滚轮缩放
    map.enableScrollWheelZoom(true);

    //不同控件的位置不同
    var opts = {

    anchor: BMAP_ANCHOR_TOP_LEFT};
    map.addControl(new BMap.NavigationControl(opts));
    var opts = {

    anchor: BMAP_ANCHOR_BOTTOM_RIGHT};
    map.addControl(new BMap.ScaleControl(opts));
    var opts = {

    anchor: BMAP_ANCHOR_TOP_RIGHT};
    map.addControl(new BMap.MapTypeControl(opts));
</script>
</body>
</html>
显示结果如下:

这里只是简单的对原始demo进行一点点的格式修改,并没有对百度API 进行二次开发。
2.2 C# 在百度地图上显示GPS坐标
主要方法就是在C#中对baiDuMap.html地图文件进行操作,在VS2019中创建WindowsFromsAPP窗体项目。
首先是设计From1:如图
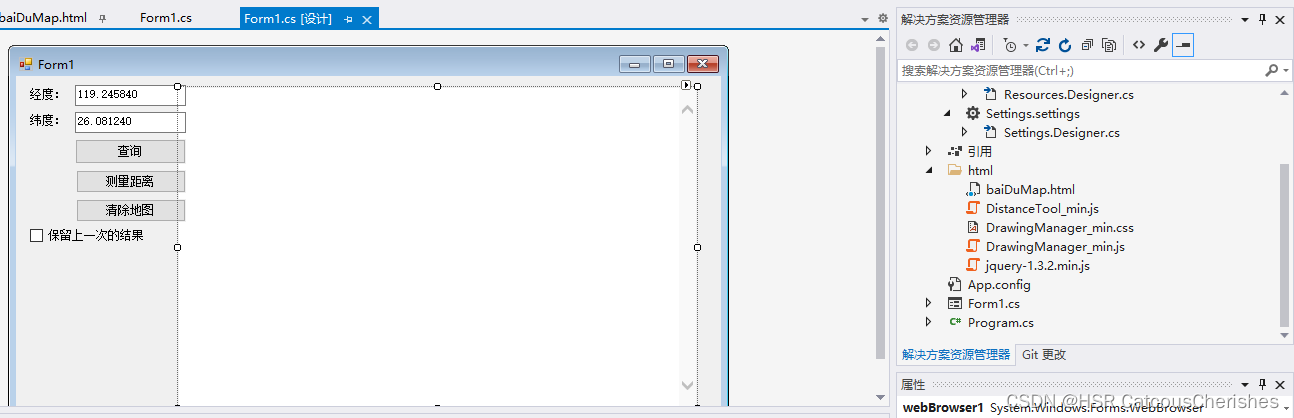
对From1得源代码进行编辑修改:需要实现坐标查询,清除地图,测量距离等主要功能。
其代码如下:
using System;
using System.Collections;
using System.Collections.Generic;
using System.ComponentModel;
using System.Data;
using System.Drawing;
using System.IO;
using System.Linq;
using System.Net;
using System.Runtime.InteropServices;
using System.Security.Permissions;
using System.Text;
using System.Text.RegularExpressions;
using System.Threading.Tasks;
using System.Windows.Forms;

// http://api.map.baidu.com/lbsapi/getpoint/index.html
// https://www.earthol.com/

namespace WindowsFormsApp
{


    [PermissionSet(SecurityAction.Demand, Name = "FullTrust")]
    [System.Runtime.InteropServices.ComVisibleAttribute(true)]
    public partial class Form1 : Form
    {


        public Form1()
        {


            InitializeComponent();

            // 这边把脚本错误的压制设置为true.
            webBrowser1.ScriptErrorsSuppressed = true;
            webBrowser1.DocumentCompleted += WebBrowser1_DocumentCompleted;
        }
        private void WebBrowser1_DocumentCompleted(object sender, WebBrowserDocumentCompletedEventArgs e)
        {


            // 对WEB浏览器错误的处理
            this.webBrowser1.Document.Window.Error += OnWebBrowserDocumentWindowError;
        }
        private void OnWebBrowserDocumentWindowError(object sender, HtmlElementErrorEventArgs e)
        {


            e.Handled = true;
        }
        private void Form1_Load(object sender, EventArgs e)
        {


            try
            {


                //webBrowser1.Url = new Uri("http://www.baidu.com");

                //baiDuMap.html文件和可执行文件放在同一目录
                webBrowser1.Url = new Uri(Path.Combine(Application.StartupPath, @"html/baiDuMap.html"));
                webBrowser1.ObjectForScripting = this;
            }
            catch (Exception ex)
            {


                MessageBox.Show(ex.Message);
            }
        }

        //清除地图
        private void button_FreeMap_Click(object sender, EventArgs e)
        {


            webBrowser1.Document.InvokeScript("clearAll");
        }

        public static bool IsFloat(string str)
        {


            if (str == "") return false;
            string regextext = @"^(-?\d+)(\.\d+)?$";
            Regex regex = new Regex(regextext, RegexOptions.None);
            return regex.IsMatch(str.Trim());
        }

        // 坐标查询
        private void button_search_Click(object sender, EventArgs e)
        {


            try
            {


                if (IsFloat(textBox_lon.Text) == true && IsFloat(textBox_lat.Text) == true)
                {


                    if (checkBox_head.Checked)
                    {


                        string lnglat = change(Convert.ToDouble(textBox_lat.Text), Convert.ToDouble(textBox_lon.Text));
                        if (lnglat != null)
                        {


                            string[] str = lnglat.Split(',');
                            webBrowser1.Document.InvokeScript("ListLocation", new object[] {

     Convert.ToDouble(str[1]), Convert.ToDouble(str[0]) });
                        }
                    }
                    else
                        webBrowser1.Document.InvokeScript("theLocation", new object[] {

     Convert.ToDouble(textBox_lon.Text), Convert.ToDouble(textBox_lat.Text) });
                }
                else MessageBox.Show("请输入正确的浮点数坐标.");
            }
            catch {

     }
        }

        // 把google/GPS坐标转换成百度地图坐标
        string change(double y, double x)
        {


            try
            {


                String path = "http://api.map.baidu.com/ag/coord/convert?from=0&to=4&x=" + x + "+&y=" + y + "&callback=BMap.Convertor.cbk_7594";
                string res = SendDataByGET(path);
                if (res.IndexOf("(") > 0 && res.IndexOf(")") > 0)
                {


                    int sint = res.IndexOf("(") + 1;
                    int eint = res.IndexOf(")");
                    int ls = res.Length;
                    String str = res.Substring(sint, eint - sint);
                    int errint = res.IndexOf("error") + 7;
                    int enderr = res.IndexOf("error") + 8;
                    String err = res.Substring(errint, 1);
                    if ("0".Equals(err))
                    {


                        int sx = str.IndexOf(",\"x\":\"") + 6;
                        int sy = str.IndexOf("\",\"y\":\"");
                        int endy = str.IndexOf("\"}");
                        int sl = str.Length;
                        string xp = str.Substring(sx, sy - sx);
                        string yp = str.Substring(sy + 7, endy - sy - 7);
                        byte[] outputb = Convert.FromBase64String(xp);
                        string XStr = Encoding.Default.GetString(outputb);
                        outputb = Convert.FromBase64String(yp);
                        string YStr = Encoding.Default.GetString(outputb);
                        return YStr + "," + XStr;
                    }
                }
            }
            catch {

     }
            return null;
        }

        // 通过GET方式发送数据
        public string SendDataByGET(string Url)
        {


            HttpWebRequest request = (HttpWebRequest)WebRequest.Create(Url);
            request.Method = "GET";
            request.ContentType = "text/html;charset=UTF-8";
            HttpWebResponse response = (HttpWebResponse)request.GetResponse();
            Stream myResponseStream = response.GetResponseStream();
            StreamReader myStreamReader = new StreamReader(myResponseStream, Encoding.GetEncoding("utf-8"));
            string retString = myStreamReader.ReadToEnd();
            myStreamReader.Close();
            myResponseStream.Close();
            return retString;
        }

        // 测量距离
        private void btnOpenDistance_Click(object sender, EventArgs e)
        {


            webBrowser1.Document.InvokeScript("openGetDistance");
        }
    }
}
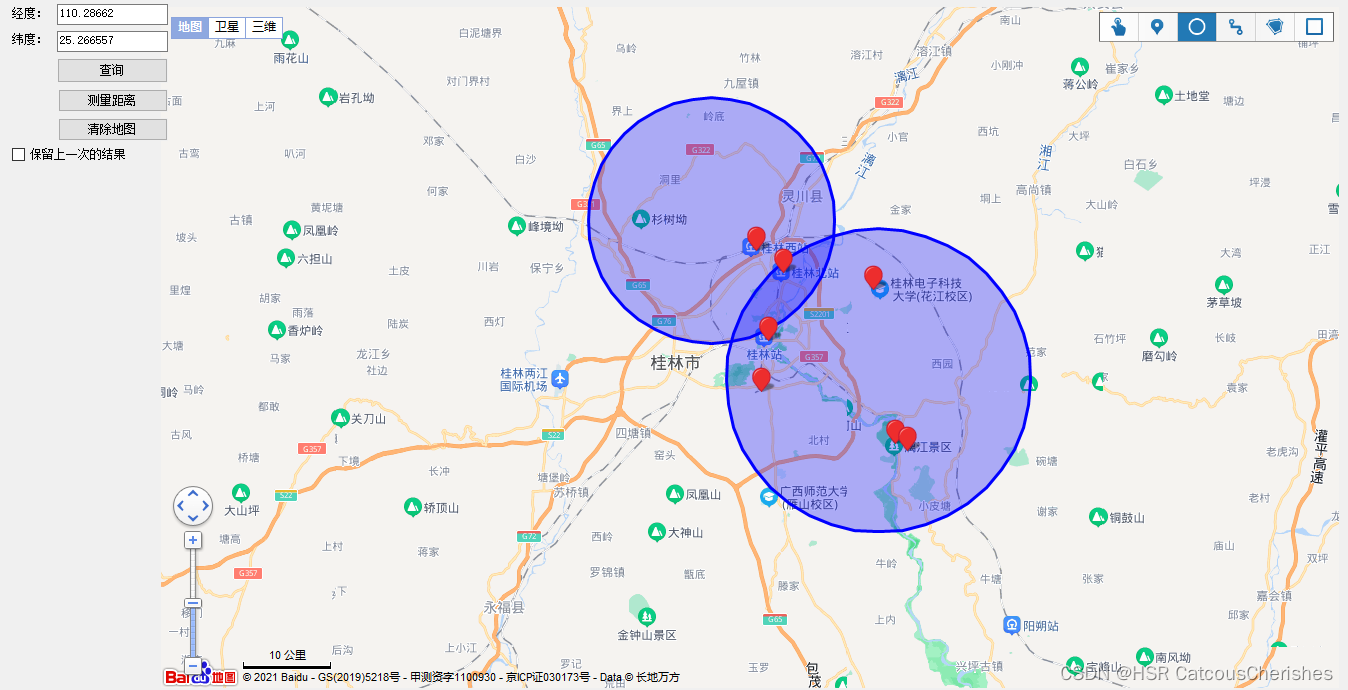
在窗体页面中显示得百度地图得功能如下图:
-
坐标显示功能

-
坐标查询显示与清除地图信息功能
 3.测量距离并显示功能
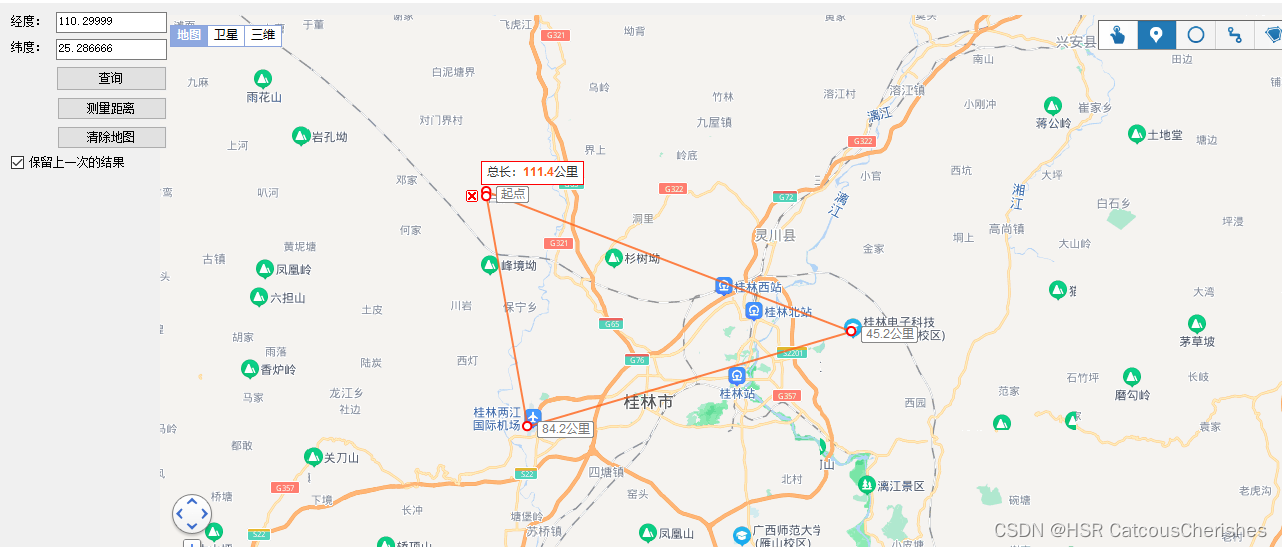
这些功能的实现都是基于对baiDuMap.html地图文件进行操作,即可实现这些函数功能。
三. 总结
以上得两个小demo都是在简单得操作百度地图API,在前端简单展示嵌入的地图,与在C#窗体结构设计中,实现的坐标显示,地理距离框定,距离测量等,都只是对baidumap.html 的操作应用。
但是对我们要实现的在手机APP端实时获取到的经纬度信息,存储到数据库;并需要C#去操作数据库,将获取到的正在处理应急任务的各小组的经纬度信息,实时显示在PCweb 端,最好是可以画出行动轨迹。目前对项目的cshtml 文件不是很清楚,项目结构也缺乏理解,主要是对C# web项目编码不熟悉。需要多请教师姐!