app开发过程中,利用原生+h5模式来开发是比较常见的
下面案例演示的是:原生调起一个H5页面,然后H5点击跳转到原生
WebViewActivity页面 调用H5 ,点击H5链接 跳转到原生MainActivity页面
注意 别忘了 <!-- 添加网络权限 -->
<uses-permission android:name="android.permission.INTERNET" />
清单文件,增加的配置
- data的数据就是H5 A标签 href=“#”填写的链接地址: android://h5/open
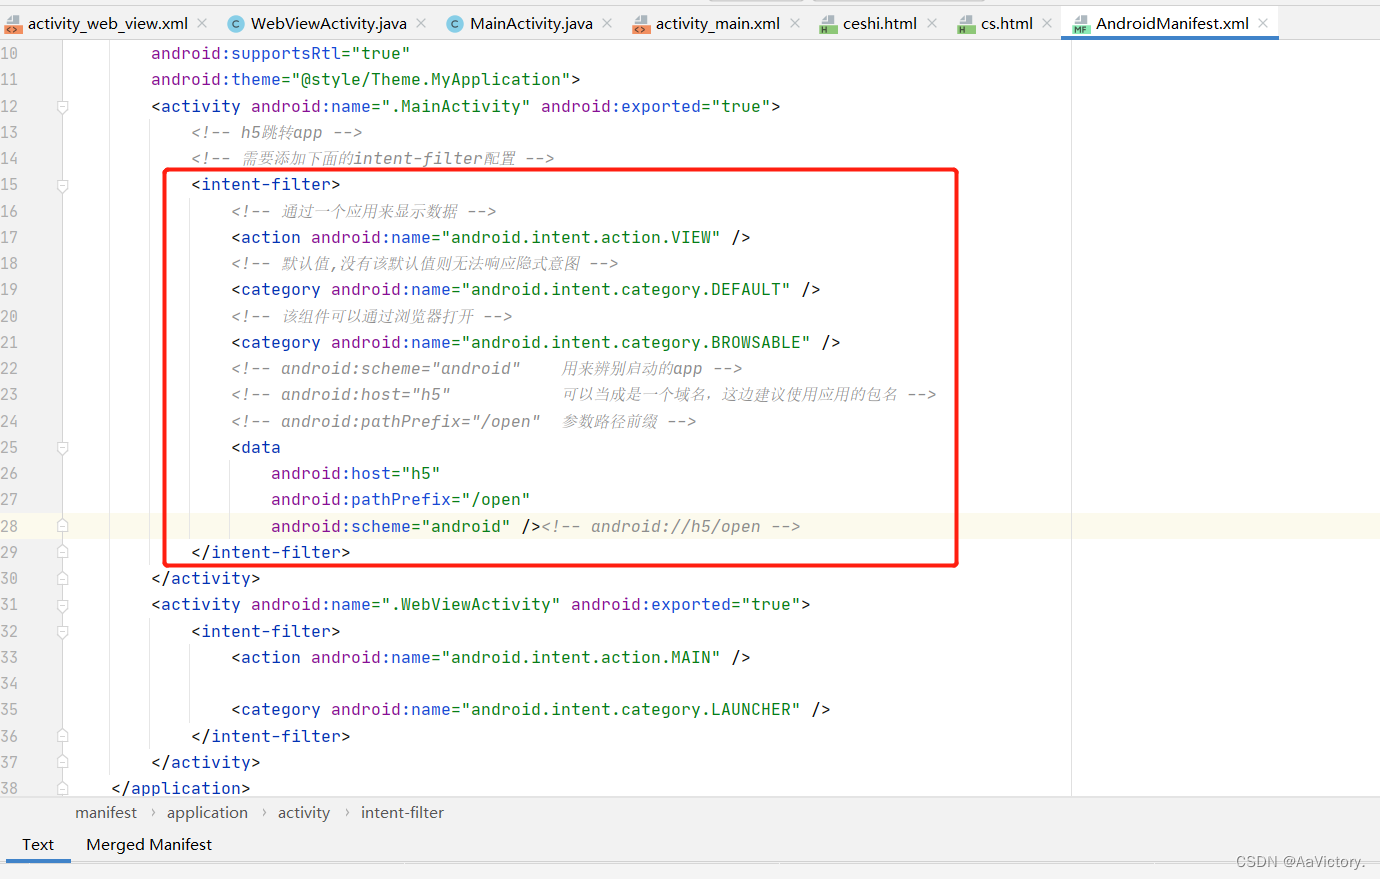
在你需要跳转的页面,清单文件中加入如下配置:
<activity android:name=".MainActivity" android:exported="true">
            <!-- h5跳转app -->
            <!-- 需要添加下面的intent-filter配置 -->
            <intent-filter>
                <!-- 通过一个应用来显示数据 -->
                <action android:name="android.intent.action.VIEW" />
                <!-- 默认值,没有该默认值则无法响应隐式意图 -->
                <category android:name="android.intent.category.DEFAULT" />
                <!-- 该组件可以通过浏览器打开 -->
                <category android:name="android.intent.category.BROWSABLE" />
                <!-- android:scheme="android"    用来辨别启动的app -->
                <!-- android:host="h5"           可以当成是一个域名,这边建议使用应用的包名 -->
                <!-- android:pathPrefix="/open"  参数路径前缀 -->
                <data
                    android:host="h5"
                    android:pathPrefix="/open"
                    android:scheme="android" /><!-- android://h5/open -->
            </intent-filter>
        </activity>
整体结构布局如下 :

贴一下html里面的代码吧
- ceshi.html
<!DOCTYPE html>
<html>
	<head>
		<meta charset="UTF-8">
		<title>测试</title>
	</head>
	<body>
		<a href="android://h5/open?type=5&id=2" style="font-size: 55px;">点击事件1</a>
		<br />
		<br />
		<a href="file:///android_asset/cs.html" style="font-size: 55px;">点击事件2</a>
		<br />
		<br />
	</body>
</html>
- cs.html
<!DOCTYPE html>
<html>
	<head>
		<meta charset="UTF-8">
		<title>测试</title>
	</head>
	<body>
		<br />
		<a href="file:///android_asset/ceshi.html" style="font-size: 55px;" >点击事件2</a>
		<br />
	</body>
</html>
具体实现如下:
- activity_web_view.xml
<?xml version="1.0" encoding="utf-8"?>
<RelativeLayout xmlns:android="http://schemas.android.com/apk/res/android"
    xmlns:app="http://schemas.android.com/apk/res-auto"
    xmlns:tools="http://schemas.android.com/tools"
    android:layout_width="match_parent"
    android:layout_height="match_parent"
    tools:context=".WebViewActivity">
    <WebView
        android:id="@+id/webView"
        android:layout_width="match_parent"
        android:layout_height="match_parent"
        />
</RelativeLayout>
- WebViewActivity页面的处理
调用的是本地H5(html)路径
package com.example.myapplication;

import androidx.appcompat.app.AppCompatActivity;

import android.annotation.SuppressLint;
import android.content.Intent;
import android.graphics.Bitmap;
import android.net.Uri;
import android.os.Bundle;
import android.text.TextUtils;
import android.util.Log;
import android.webkit.WebSettings;
import android.webkit.WebView;
import android.webkit.WebViewClient;

public class WebViewActivity extends AppCompatActivity {


    private WebView webView;
    @Override
    protected void onCreate(Bundle savedInstanceState) {


        super.onCreate(savedInstanceState);
        setContentView(R.layout.activity_web_view);
        initwebView();//初始化webview
    }

    @SuppressLint("JavascriptInterface")
    private void initwebView() {


        webView = (WebView) findViewById(R.id.webView);
        WebSettings webSettings = webView.getSettings();
        webSettings.setDomStorageEnabled(true);
        //设置WebView属性,能够执行Javascript脚本
        webSettings.setJavaScriptEnabled(true);
        //设置可以访问文件
        webSettings.setAllowFileAccess(true);
        //设置Web视图
        webView.setWebViewClient(new WebViewClient(){


            @Override
            public boolean shouldOverrideUrlLoading(WebView view, String url) {


                //返回值是true的时候控制去WebView打开,为false调用系统浏览器或第三方浏览器
                WebView.HitTestResult hit = view.getHitTestResult();
                //hit.getExtra()为null或者hit.getType() == 0都表示即将加载的URL会发生重定向,需要做拦截处理
                if (TextUtils.isEmpty(hit.getExtra()) || hit.getType() == 0) {


                    //通过判断开头协议就可解决大部分重定向问题了,有另外的需求可以在此判断下操作
                    Log.e("重定向", "重定向: " + hit.getType() + " && EXTRA()" + hit.getExtra() + "------");
                    Log.e("重定向", "GetURL: " + view.getUrl() + "\n" + "getOriginalUrl()" + view.getOriginalUrl());
                    Log.d("重定向", "URL: " + url);
                }
                if (url.startsWith("http://") || url.startsWith("https://")) {

     //加载的url是http/https协议地址
                    view.loadUrl(url);
                    return false; //返回false表示此url默认由系统处理,url未加载完成,会继续往下走

                } else {

     //加载的url是自定义协议地址
                    try {


                        Intent intent = new Intent(Intent.ACTION_VIEW, Uri.parse(url));
                        if (intent.resolveActivity(WebViewActivity.this.getPackageManager())!=null){


                            startActivity(intent);
                        }

                    } catch (Exception e) {


                        e.printStackTrace();
                    }
                    return true;
                }
            }
            //开始加载网络
            @Override
            public void onPageStarted(WebView view, String url, Bitmap favicon) {


                super.onPageStarted(view, url, favicon);
                Log.e("加载中",url);
            }
            //网页加载完成回调
            @SuppressLint("NewApi")
            @Override
            public void onPageFinished(WebView view, String url) {


                super.onPageFinished(view, url);
                Log.e("加载完成",url);
            }
        });
        // 调用本地H5页面的方法
        webView.loadUrl("file:///android_asset/ceshi.html");
    }
}
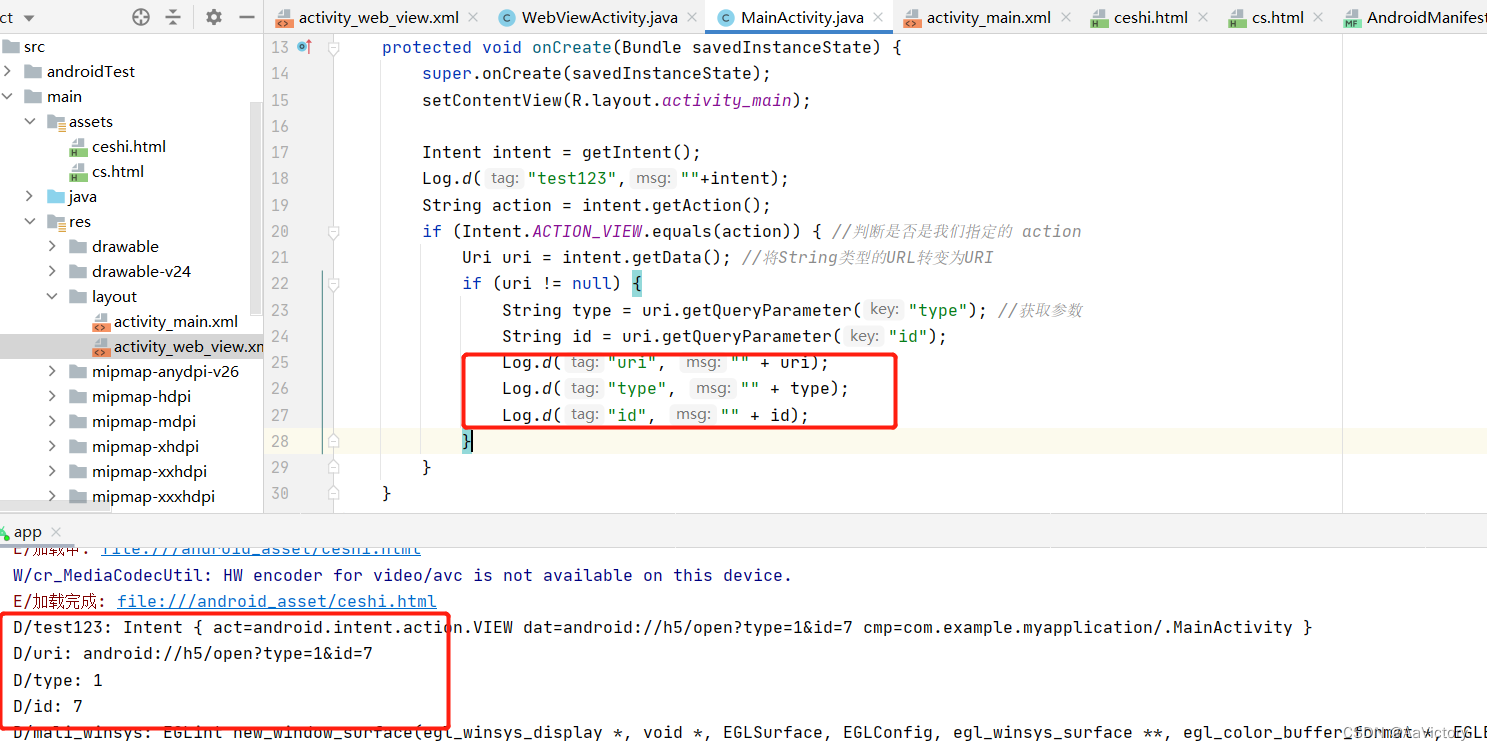
以上是运行跳转成功,下面是拿到跳转的参数
- MainActivity
public class MainActivity extends AppCompatActivity {


    @Override
    protected void onCreate(Bundle savedInstanceState) {


        super.onCreate(savedInstanceState);
        setContentView(R.layout.activity_main);
        Intent intent = getIntent();
        Log.d("test123",""+intent);
        String action = intent.getAction();
        if (Intent.ACTION_VIEW.equals(action)) {

     //判断是否是我们指定的 action
            Uri uri = intent.getData(); //将String类型的URL转变为URI
            if (uri != null) {


                String type = uri.getQueryParameter("type"); //获取参数
                String id = uri.getQueryParameter("id");
                Log.d("uri", "" + uri);
                Log.d("type", "" + type);
                Log.d("id", "" + id);
            }
        }
    }
}
- 跳转第二个页面后,获取的参数打印如下: