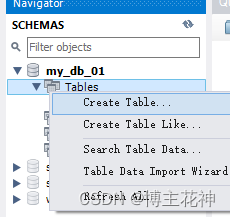
步骤1,打开MySQL Workbench,打开自己的数据库进入
创建用户信息表
新建 ev_users表
- id要加AI,设置成自增

安装并配置mysql模块
安装mysql模块
npm i mysql2
新建db文件夹下index.js,导入并配置mysql模块
// 1.导入mysql2模块
const mysql = require('mysql2')
// 2,建立与MySQL数据库的连接
const db = mysql.createPool({


    host: "127.0.0.1", //数据库的IP地址
    user: "root", //登录数据库的账号
    password: "lusheng123", //登录数据库的密码
    database: "my_db_01", //指定要操作哪个数据库
})
//3.检测mysql模块是否正常工作 SELECT 1 无作用,只是测试
db.query('SELECT 1',(err, results) => {


    //err为报错信息
    if (err) return console.log(err)
    //res是成功的消息
    console.log(results)
})
module.exports = db
安装bcryptjs对密码进行加密处理
- 安装 npm i [email protected]
- 优点:加密之后的密码,无法被逆向破解
- 同一明文密码多次加密,得到到加密效果结果各不相同,保证了安全性
- 目的,在数据库查看的时候,查看的是加密的密码
新建/router_handler/user.js中,导入并使用bcrypt.js
// 导入密码加密模块
const bcypt = require("bcryptjs")
// 加密用户密码,调用bcypt.hashSync(明文密码,随机盐的长度)方法
userinfo.password=bcypt.hashSync(userinfo.password,10)
router_handlerr/user.js用户模块里,书写注册的处理函数
- 注意,sql语句要写对,
// 导入数据库操作模块
const db = require("../db/index")
// 导入密码加密模块
const bcypt = require("bcryptjs")
// 注册新用户
exports.reguser = (req, res) => {


    // 获取客户端提交到服务器的信息,进行校验
    const userinfo = req.body
    if (!userinfo.username || !userinfo.password) return res.send({

    status: 0, message: "用户名和密码不合法"})
    //定义SQL语句,查询用户名是否被占用
    const sqlStr = "select * from ev_users where username=?"
    db.query(sqlStr, userinfo.username, (err, result) => {


        if (err) return res.send({

    status: 0,message: err.message })
        // 判断用户名是否被占用
        if (result.length > 0) return res.send({

    status: 0, message: "用户名被占用,请更换用户名" })
        // 加密用户密码,调用bcypt.hashSync(明文密码,随机盐的长度)方法
        userinfo.password=bcypt.hashSync(userinfo.password,10)
        // 插入新用户
        const sql="insert into ev_users set ?"
        db.query(sql,{

    username:userinfo.username,password:userinfo.password},(err,results)=>{


            // 判断是否成功
            if(err)return res.send({

    status: 0,message: err.message })
            // 判断影响行数是否为1
            if(results.affectedRows!==1)return res.send({

    status:1,message:"注册用户失败"})
            return res.send({


                status: 1,
                message: "注册成功"
            })
        })
    })
}
优化res.send()代码
- 在app.js文件里面
- 注意:封装在路由之前
//响应数据的中间件,上游挂载,下游共享
app.use((req, res, next) => {


    // status=0是失败,status=1是成功,默认为0
    res.cc = (err, status = 0) => {


        res.send({


            status,
            // 判断err是错误对象还是字符串
            message: err instanceof Error ? err.message : err
        })
    }
    next()
})
优化表单数据验证
- 前端验证为辅,后端验证为主
- 后端是验证数据合法性验证的最后一个关口
- 为提高效率,使用第三方库
安装npm i joi包,依赖
- 定义每条数据的验证规则
安装npm i @escook/express-joi包,
- 实现自动对表单数据进行验证的功能
创建schema文件夹,新建user.js
- 存放定义的规则
// 导入joi,定义表单规则
const joi=require("joi")
// 导入express-joi中间件,表单验证模块
const expressJoi=require("@escook/express-joi")

const userSchema ={


    // 校验req.body的数据
    body:{


        // 字符串,还必须字符和数字的组合,最小三位,最大12位,必传
        username:joi.string().alphanum().min(3).max(12).required(),
        // pattern指定正则表达式
        password:joi.string().pattern(/"[\s][6,15]$/),
        //当前规则和paddword规则保持一致
        repassword:joi.ref('password')
    },
    // 校验req.query的数据
    query:{


    },
    // 校验req.params的数据
    params:{


    }
}
// 暴露注册的表单验证规则
exports.userSchema=userSchema
- 在router/user.js中,导入验证表单数据的中间件
//存放每个路由的对应关系
// 导入express
const express = require('express')

// 创建路由对象
const router = express.Router()

// 导入用户处理函数模块
const userhandler=require('../router_handler/user')

// 1.导入验证表单数据的中间件
const expressJoi=require("@escook/express-joi")
// 2.导入需要验证的验证规则对象
const {

    userSchema}=require('../schema/user')

// 3.采用局部中间件方式校·验,校验通过,会把请求转给后面的路由处理函数,校验不通过,终止后续代码的执行,并抛出一个全局的Error错误,进入全局错误中间件中进行处理
// 注册新用户
router.post('/reguser',expressJoi(userSchema),userhandler.reguser)

// 登录
router.post('/login', userhandler.login)

// 将路由对象共享出去
module.exports = router
- 在app.js中,捕获表单验证的全局错误
- 注意:写在路由之后!
//全局错误中间件,捕获表单验证失败的报错
app.use((err, req, res, next) => {


    if (err instanceof joi.ValidationError) return res.cc(err)
    res.cc(err)
    next()
})
优化后的注册处理函数
// 导入数据库操作模块
const db = require("../db/index")
// 导入密码加密模块
const bcypt = require("bcryptjs")
// 注册新用户处理函数
exports.reguser = (req, res) => {


    // 获取客户端提交到服务器的信息,进行校验
    const userinfo = req.body
    if (!userinfo.username || !userinfo.password) return res.cc("用户名和密码不合法")
    //定义SQL语句,查询用户名是否被占用
    const sqlStr = "select * from ev_users where username=?"
    db.query(sqlStr, userinfo.username, (err, result) => {


        if (result.length > 0) return  res.cc("用户名被占用,请更换用户名")
        // 加密用户密码,调用bcypt.hashSync(明文密码,随机盐的长度)方法
        userinfo.password=bcypt.hashSync(userinfo.password,10)
        // 插入新用户
        const sql="insert into ev_users set ?"
        db.query(sql,{

    username:userinfo.username,password:userinfo.password},(err,results)=>{


            // 判断是否成功
            if(err)return res.cc(err)
            // 判断影响行数是否为1
            if(results.affectedRows!==1)return res.cc("注册用户失败")
            return res.cc("注册成功",1)
        })
    })
}
开发登录接口
生成JWT的token字符串
- 安装 npm i [email protected]
- 定义配置文件的秘钥和token有效期
//新建config.js
module.exports={


    //定义加密解密token的秘钥,随便写
    jwtSecretKey:'mimakey',
    // this.token有效期
    expiresIn:'10h'
}
- 处理函数中也就是,router_header/user.js文件下引用导入
// 导入JWTtoken模块
const JWT = require("jsonwebtoken")
const config = require("../config")
- 生成Jwt的token字符串的登录处理函数
// 导入数据库操作模块
const db = require("../db/index")
// 导入密码加密模块
const bcypt = require("bcryptjs")
// 导入JWTtoken模块
const JWT = require("jsonwebtoken")
const config = require("../config")
// 登录
exports.login = (req, res) => {


    const userinfo = req.body
    const sql ='select * from ev_users where username=?'
    db.query(sql,userinfo.username,(err,results)=>{


        if(err) return res.cc(err);
        // 执行成功,但查询到的数据不等于1
        if(results.length!==1){


            return res.cc('登录失败')
        }
        // 验证密码是否和数据库的相同
        const reppassword= bcypt.compareSync(userinfo.password,results[0].password)
        if(!reppassword){


            return res.cc('登录失败,密码不一致')
        }
        // 登录成功,生成JWT的token字符串
        // 通过es6语法,剔除密码和头像
        const user ={

    ...results[0],password:"",user_pic:""}
        // 对用户信息进行加密,生成token字符串,参数一是加密对象,参数2是加密秘钥,参数三是token有效期
        const tokenstr =JWT.sign(user,config.jwtSecretKey,{

    expiresIn:config.expiresIn})
        // 响应给客户端,token的bearer后面有空格,别丢
         res.send({


            status:1,
            message:'登录成功',
            token:'Bearer '+tokenstr
        })
    })
}
配置解析JWT的token字符串的中间件
- 作用:用来解析客户端传过来的token
- 安装中间件
npm i express-jwt@5.3.3
- 一定要在app.js中注册路由之前,配置解析token的中间件
// 导入配置文件
const config = require('./config')
// 导入解析token的中间件
const expressJWT = require('express-jwt')
// 使用.unless可以指定哪些接口不需要toke身份验证,演示以api开头的
app.use(expressJWT({


    secret: config.jwtSecretKey
}).unless({


    path: [/^\/api\//]
}))
- 全局错误中间件,捕获解析失败的错误
app.use((err, req, res, next) => {


    // 捕获token解析失败的错误
    if (err.name === 'UnauthorizedError') return res.cc('身份验证失败')
    res.cc(err)
    next()
})