最近在学习android为了毕业,网上下载了一些项目视频,跟着老师学着,写博客的目的算法做个笔记吧,希望对自己有帮助吧。
一、首页面 闪屏页面开发
实现首页面的动画效果,实现旋转、缩放、渐变的动画效果;同时去头,实现全屏显示。
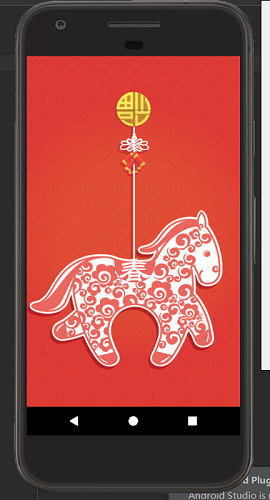
a、全屏显示
在AndroidManifest.xml中MainActivity中添加属性。
android:theme="@android:style/Theme.Black.NoTitleBar.Fullscreen"
b、显示图片,由于Horse图片显示在背景图片之上,所以这里是有相对布局。
<RelativeLayout xmlns:android="http://schemas.android.com/apk/res/android"
    android:layout_width="match_parent"
    android:layout_height="match_parent"
    android:background="@drawable/splash_bg_newyear"
    android:id="@+id/rl_root"
    >
    <ImageView
        android:id="@+id/iv_horse"
        android:layout_width="wrap_content"
        android:layout_height="wrap_content"
        android:src="@drawable/splash_horse_newyear"
        android:layout_centerHorizontal="true"
        android:layout_centerVertical="true"
        />
</RelativeLayout>
c、实现动画效果(旋转、渐变、缩放)
        /**旋转动画*/
        RotateAnimation rotateAnimation = new RotateAnimation(0,360,
                Animation.RELATIVE_TO_SELF,0.5f,
                Animation.RELATIVE_TO_SELF,0.5f);
        rotateAnimation.setDuration(1000);/**旋转时间*/
        rotateAnimation.setFillAfter(true);/**保持动画结束状态*/
        /**渐变动画*/
        AlphaAnimation animAlpha = new AlphaAnimation(0, 1);
        animAlpha.setDuration(2000);/**动画时间*/
        animAlpha.setFillAfter(true);/**保持动画结束状态*/
        /**设置动画集合*/
        AnimationSet animationSet = new AnimationSet(true);
        animationSet.addAnimation(rotateAnimation);
        animationSet.addAnimation(animAlpha);
        /** 缩放动画*/
        ScaleAnimation animScale = new ScaleAnimation(0, 1, 0, 1,
                Animation.RELATIVE_TO_SELF, 0.5f, Animation.RELATIVE_TO_SELF,
                0.5f);
        animScale.setDuration(1000);
        animScale.setFillAfter(true);/** 保持动画结束状态*/
        /**启动动画*/
        rl_root.startAnimation(animationSet);
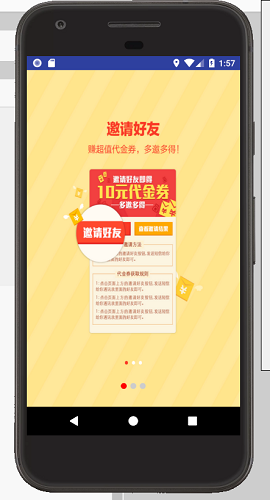
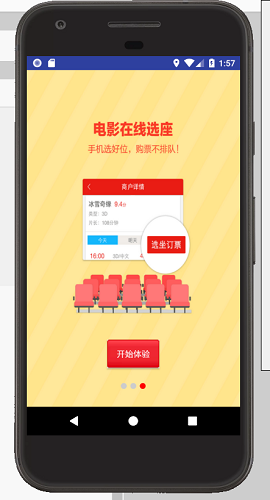
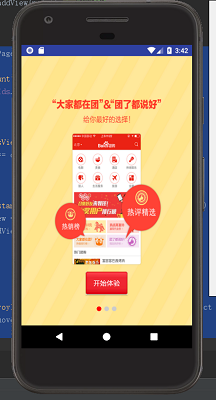
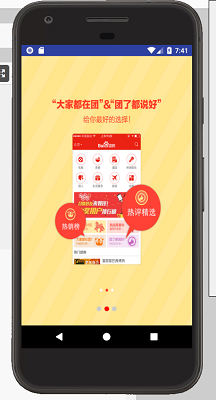
二:若用户是首次登陆app,则进入新手引导界面,否则进入主页面;新手引导界面由三张图片组成,可以进行左右拖拽,同时下面的红色图标会随着界面的更改而改变,最后一个页面上有一个开始体验按钮按钮,点击之后按钮背景色变成白色、字体颜色变成黑色,松开之后进入主页面。
a、实现动画结束之后,判断用户是否是第一次进入,若是进入引导界面,否则进入主页面。这里我们为动画设置监听器,当动画结束时进行判断;使用SharedPreferences进行数据的保存,实现共享数据。
首先,建立一个SharedPreferences的工具类,为我们存储信息。
public class SpUtils {
    public static boolean getBoolean(Context context,String key,boolean defaultValue){
        SharedPreferences sp = context.getSharedPreferences("config",Context.MODE_PRIVATE);
        return sp.getBoolean(key,defaultValue);
    }
    public static void setBoolean(Context context,String key,boolean value){
        SharedPreferences sp = context.getSharedPreferences("config",Context.MODE_PRIVATE);
        sp.edit().putBoolean(key,value).commit();
    }
    public static String getBoolean(Context context,String key,String defaultValue){
        SharedPreferences sp = context.getSharedPreferences("config",Context.MODE_PRIVATE);
        return sp.getString(key,defaultValue);
    }
    public static void setString(Context context,String key,String value){
        SharedPreferences sp = context.getSharedPreferences("config",Context.MODE_PRIVATE);
        sp.edit().putString(key,value).commit();
    }
    public static int getInt(Context context,String key,int defaultValue){
        SharedPreferences sp = context.getSharedPreferences("config",Context.MODE_PRIVATE);
        return sp.getInt(key,defaultValue);
    }
    public static void setInt(Context context,String key,int value){
        SharedPreferences sp = context.getSharedPreferences("config",Context.MODE_PRIVATE);
        sp.edit().putInt(key,value).commit();
    }
}
b、为动画集合设置监听器,同时实现监听器的onAnimationEnd方法,在此处从SpUtils中取key=is_first_enter变量的value值,判断用户是否是第一次登陆,若是则进入新手引导界面,否则进入主界面。
 animationSet.setAnimationListener(new Animation.AnimationListener() {
            Intent intent ;
            @Override
            public void onAnimationStart(Animation animation) {}
            @Override
            public void onAnimationEnd(Animation animation) {
                /**动画结束 跳转页面*/
                /**d第一次进入 就跳新手引导*/
                /**否则就跳主页面*/
                boolean isFirstEnter = SpUtils.getBoolean(getApplicationContext(),"is_first_key",true);
                if(isFirstEnter){
                    intent = new Intent(getApplicationContext(),GuideActivity.class);
                }else{
                    intent = new Intent(getApplicationContext(),HomeActivity.class);
                }
                startActivity(intent);
            }
            @Override
            public void onAnimationRepeat(Animation animation) {}
        });
c、实现新手引导界面,多个组件在背景图片之上,所以这里使用相对布局,界面有图片集合、按钮、灰色圆点、红色圆点组成,红色圆点会跟着图片变化,同时会覆盖当前页的灰色圆点。
页面布局UI的xml文件为:
<?xml version="1.0" encoding="utf-8"?>
<RelativeLayout xmlns:android="http://schemas.android.com/apk/res/android"
    android:layout_width="match_parent"
    android:layout_height="match_parent">
    <android.support.v4.view.ViewPager
        android:id="@+id/vp_guide"
        android:layout_width="match_parent"
        android:layout_height="match_parent"/>
    <Button
        android:id="@+id/btn_start"
        android:text="开始体验"
        android:layout_width="wrap_content"
        android:layout_height="wrap_content"
        android:layout_alignParentBottom="true"
        android:layout_centerHorizontal="true"
        android:layout_marginBottom="60dp"
        android:background="@color/btn_guide_selector"
        android:padding="5dp"
        android:textColor="@color/txt_guide_selector"
        />
    <RelativeLayout
        android:layout_width="wrap_content"
        android:layout_height="wrap_content"
        android:layout_alignParentBottom="true"
        android:layout_centerHorizontal="true"
        android:layout_marginBottom="30dp">
        <LinearLayout
            android:id="@+id/ll_content"
            android:layout_width="wrap_content"
            android:layout_height="wrap_content"
            android:orientation="horizontal"
            ></LinearLayout>
        <ImageView
            android:id="@+id/iv_red_point"
            android:layout_width="wrap_content"
            android:layout_height="wrap_content"
            android:src="@drawable/shape_point_redgray"
            />
    </RelativeLayout>
</RelativeLayout>
    /**初始化Image对象*/
    private void initImageViewList() {
        mImageViewArrayList = new ArrayList<>();
        for(int i = 0;i<imageIds.length;i++){
            ImageView imageView = new ImageView(this);
            imageView.setBackgroundResource(imageIds[i]);
            mImageViewArrayList.add(imageView);

            /**初始化圆点*/
            ImageView point = new ImageView(this);
            point.setImageResource(R.drawable.shape_point_gray);
            /**初始化布局参数  宽高包裹内容 父布局是谁 就是谁包裹的布局参数*/
            LinearLayout.LayoutParams params = new LinearLayout.LayoutParams(
                    LinearLayout.LayoutParams.WRAP_CONTENT,
                    LinearLayout.LayoutParams.WRAP_CONTENT);
            if(i>0){
                /**从第二个点开始设置左边距*/
                params.leftMargin =18;
            }
            point.setLayoutParams(params);/**设置布局参数*/
            llContainer.addView(point);/**给容器添加圆点*/
        }
    }
private class MyViewPageAdapter extends PagerAdapter{
        @Override
        public int getCount() {
            return imageIds.length;
        }

        @Override
        public boolean isViewFromObject(View view, Object object) {
            return view == object;
        }
        /**初始化条目*/
        @Override
        public Object instantiateItem(ViewGroup container, int position) {
            ImageView view = mImageViewArrayList.get(position);
            container.addView(view);
            return view;
        }

        /**销毁布局*/
        @Override
        public void destroyItem(ViewGroup container, int position, Object object) {
            container.removeView((View) object);
        }
    }
为图片容器添加监听器:
    mViewPager.setOnPageChangeListener(new ViewPager.OnPageChangeListener() {
            @Override
            public void onPageScrolled(int position, float positionOffset, int positionOffsetPixels) {
                /**会在页面滑动过程中回调*/
                Log.i(TAG,"当前位置"+position+";移动偏移百分比:"+positionOffset+",,,"+positionOffsetPixels);
                /**计算两个灰点之间的距离 更新红点的位置 随着拖动而改变*/
                /**计算红点的距离*/
                int leftMargin = (int)(positionOffset* mPointDis + position+mPointDis);
                /**修改位置*/
                RelativeLayout.LayoutParams params = (RelativeLayout.LayoutParams)mIVRedPoint.getLayoutParams();
                params.leftMargin = leftMargin; /**修改左边距*/
                /**重新设置布局*/
                mIVRedPoint.setLayoutParams(params);
            }
            @Override
            public void onPageSelected(int position) {
                /**当页面被选中之后,当页面处于最后一页的时候,将Button设置为可见*/
                if(position == mImageViewArrayList.size() -1){
                    mBtnStart.setVisibility(View.VISIBLE);
                }else{
                    mBtnStart.setVisibility(View.INVISIBLE); /**当页面处于非最后页 按钮消失*/
                }
            }
            @Override
            public void onPageScrollStateChanged(int state) {
            }
        });
其中计算两个圆点之间的方法是:
    /**使用视图树 监听layout方法结束的事件 位置确定好之后再获得圆点间距
         * 移动的距离 = 第二个小圆点左边距 - 第一个小圆点左边距
         * */
        mIVRedPoint.getViewTreeObserver().addOnGlobalLayoutListener(
                new ViewTreeObserver.OnGlobalLayoutListener() {
            @Override
            public void onGlobalLayout() {
                /**移除监听 避免重复回调*/
                mIVRedPoint.getViewTreeObserver().
                        removeOnGlobalLayoutListener(this);
                mPointDis = llContainer.getChildAt(1).getLeft()
                        -llContainer.getChildAt(0).getLeft();
                Log.i(TAG,mPointDis+"");
            }
        });
    mBtnStart.setOnClickListener(new View.OnClickListener() {
            @Override
            public void onClick(View v) {
                /**更新sp 已经不是第一次进入了*/
                SpUtils.setBoolean(getApplicationContext(),"is_first_enter",false);
                /**跳转到主页面*/
                startActivity(new Intent(getApplicationContext(),HomeActivity.class));
                finish();
            }
        });
在UI布局页面,为Button按钮设置自定义的背景色和字体色。
<selector xmlns:android="http://schemas.android.com/apk/res/android">
    <item android:state_pressed="true"
        android:color="#000"></item>
    <item  android:color="#fff"></item>
</selector>
<shape xmlns:android="http://schemas.android.com/apk/res/android"
    android:shape="oval">
    <solid android:color="#cccccc"></solid>
    <size android:width="10dp"
        android:height="10dp"></size>
</shape>
至此,智慧北京app第一天结束,下面是第一天的源代码,随着深入学习,后面的代码也会上传。
智慧北京第一天源码