目录
spread_inside:两边控件紧贴父布局,其余控件均分剩余空间编辑
ImageFilterButton & ImageFilterView
基本位置约束
在有start,end,right,left的字段中推荐使用shart,end因为有的国家文字是从左边开始的,也有从右边开始的,使用start,和end可以很好的兼容这种情况而不需要修改
基本方向约束
app:layout_constraintTop_toTopOf="" 我的顶部和谁的顶部对齐

app:layout_constraintBottom_toBottomOf="" 我的底部和谁的底部对齐

app:layout_constraintLeft_toLeftOf="" 我的左边和谁的左边对齐

app:layout_constraintRight_toRightOf="" 我的右边和谁的右边对齐

app:layout_constraintStart_toStartOf="" 我的开始位置和谁的开始位置对齐

app:layout_constraintEnd_toEndOf="" 我的结束位置和谁的结束位置对齐

app:layout_constraintTop_toBottomOf="" 我的顶部位置在谁的底部位置

app:layout_constraintStart_toEndOf="" 我的开始位置在谁的结束为止

........
基线对齐
layout_constraintBaseline_toBaselineOf="" 目标控件的id使用基线对齐,把两个大小不同的TextView的文字的基线对齐
角度约束
app:layout_constraintCircle="" 目标控件id

app:layout_constraintCircleAngle="" 对于目标的角度(0-360)

app:layout_constraintCircleRadius="" 到目标中心的距离
0度是在最上面的,然后顺时针旋转
百分比偏移
app:layout_constraintHorizontal_bias=""   水平偏移 取值范围是0-1的小数
app:layout_constraintVertical_bias=""     垂直偏移 取值范围是0-1的小数
让控件在父布局的水平或者垂直方向偏移多少的百分比
<?xml version="1.0" encoding="utf-8"?>
<androidx.constraintlayout.widget.ConstraintLayout xmlns:android="http://schemas.android.com/apk/res/android"
    xmlns:app="http://schemas.android.com/apk/res-auto"
    xmlns:tools="http://schemas.android.com/tools"
    android:layout_width="match_parent"
    android:layout_height="match_parent"
    tools:context=".MainActivity">

    <Button
        android:id="@+id/button"
        android:layout_width="wrap_content"
        android:layout_height="wrap_content"
        android:text="Button"
        app:layout_constraintBottom_toBottomOf="parent"
        app:layout_constraintEnd_toEndOf="parent"
        app:layout_constraintStart_toStartOf="parent"
        app:layout_constraintTop_toTopOf="parent"
        tools:ignore="MissingConstraints" />

    <Button
        android:id="@+id/button2"
        android:layout_width="wrap_content"
        android:layout_height="wrap_content"
        android:text="abcdef"
        app:layout_constraintBottom_toTopOf="@id/button"
        app:layout_constraintEnd_toEndOf="parent"
        app:layout_constraintStart_toStartOf="@id/button"
        app:layout_constraintTop_toTopOf="parent"
        app:layout_constraintHorizontal_bias="0.1"
        app:layout_constraintVertical_bias="0.1"
        tools:ignore="MissingConstraints" />

</androidx.constraintlayout.widget.ConstraintLayout>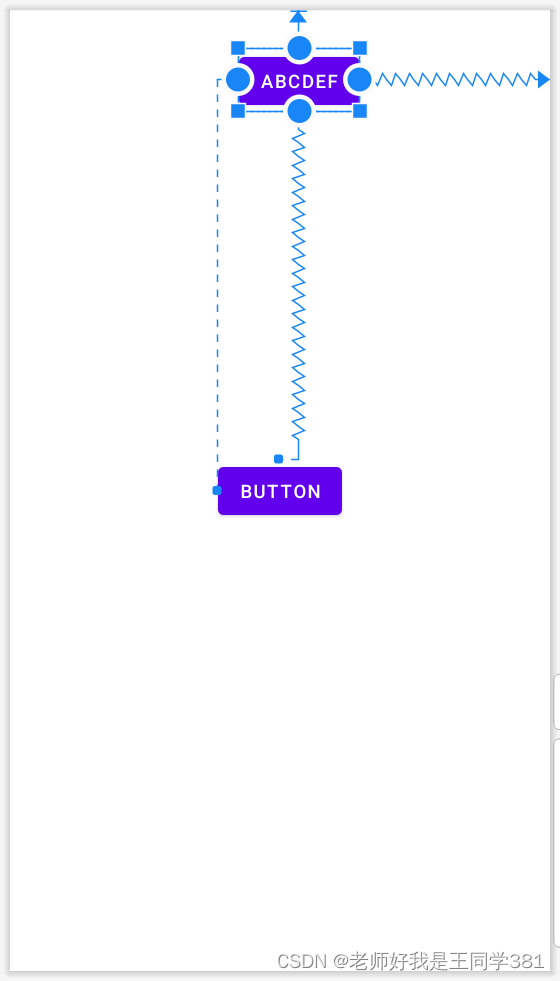
控件的内边距和外边距
外边距
android:layout_margin="0dp"
android:layout_marginStart="0dp"
android:layout_marginLeft="0dp"
android:layout_marginTop="0dp"
android:layout_marginEnd="0dp"
android:layout_marginRight="0dp"
android:layout_marginBottom="0dp"
内边距
android:padding="0dp"
android:paddingStart="0dp"
android:paddingLeft="0dp"
android:paddingTop="0dp"
android:paddingEnd="0dp"
android:paddingRight="0dp"
android:paddingBottom="0dp"
尺寸控制
尺寸限制
android:minWidth=""   设置view的最小宽度
android:minHeight=""  设置view的最小高度
android:maxWidth=""   设置view的最大宽度
android:maxHeight=""  设置view的最大高度
0dp
0dp的作用会根据设置的类型而产生不同的作用,进行设置类型的属性是layout_constraintWidth_default和layout_constraintHeight_default,取值可为spread、percent、wrap。
app:layout_constraintWidth_default="spread|percent|wrap"
app:layout_constraintHeight_default="spread|percent|wrap"
spread(默认):占用所有的符合要求的控件
percent:按照父布局的百分比进行设置
<?xml version="1.0" encoding="utf-8"?>
<androidx.constraintlayout.widget.ConstraintLayout xmlns:android="http://schemas.android.com/apk/res/android"
    xmlns:app="http://schemas.android.com/apk/res-auto"
    xmlns:tools="http://schemas.android.com/tools"
    android:layout_width="match_parent"
    android:layout_height="match_parent"
    tools:context=".MainActivity">

    <Button
        android:id="@+id/button"
        android:layout_width="0dp"
        android:layout_height="0dp"
        android:text="Button"
        app:layout_constraintBottom_toBottomOf="parent"
        app:layout_constraintEnd_toEndOf="parent"
        app:layout_constraintStart_toStartOf="parent"
        app:layout_constraintTop_toTopOf="parent"
        app:layout_constraintWidth_default="percent"
        app:layout_constraintWidth_percent="0.1"
        app:layout_constraintHeight_percent="0.5"
        tools:ignore="MissingConstraints" />

</androidx.constraintlayout.widget.ConstraintLayout>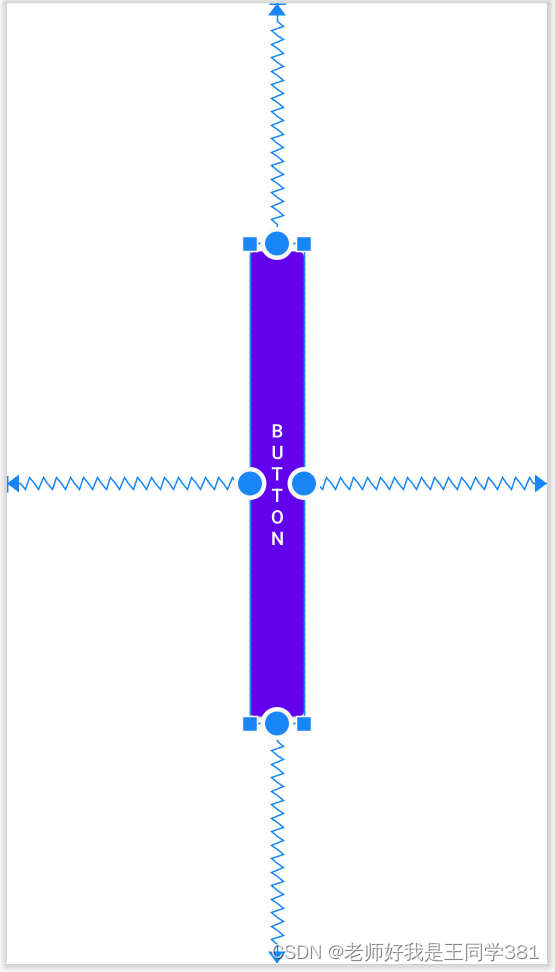
wrap:匹配内容的大小,但是不超过约束的限制
0dp还有一些其他的独特属性用于设置尺寸的大小限制
app:layout_constraintWidth_min=""   0dp下,宽度的最小值
app:layout_constraintHeight_min=""  0dp下,高度的最小值
app:layout_constraintWidth_max=""   0dp下,宽度的最大值
app:layout_constraintHeight_max=""  0dp下,高度的最大值
比例宽高
ConstraintLayout中可以对宽高设置比例,前提是至少有一个约束维度设置为0dp,这样比例才会生效,该属性可使用两种设置:
1. 浮点值,表示宽度和高度之间的比率
2. 宽度:高度,表示宽度和高度之间形式的比率
app:layout_constraintDimensionRatio="" 宽高比例Chains(链)
layout_constraintHorizontal_chainStyle = ""
layout_constraintVertical_chainStyle = ""
spread:均分剩余空间

spread_inside:两边控件紧贴父布局,其余控件均分剩余空间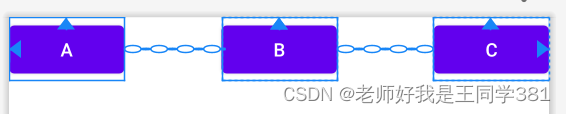
packed:所有控件紧贴据中

<?xml version="1.0" encoding="utf-8"?>
<androidx.constraintlayout.widget.ConstraintLayout xmlns:android="http://schemas.android.com/apk/res/android"
    xmlns:app="http://schemas.android.com/apk/res-auto"
    xmlns:tools="http://schemas.android.com/tools"
    android:layout_width="match_parent"
    android:layout_height="match_parent"
    tools:context=".MainActivity">

    <Button
        android:id="@+id/A"
        android:layout_width="wrap_content"
        android:layout_height="wrap_content"
        android:text="a"
        app:layout_constraintEnd_toStartOf="@id/B"
        app:layout_constraintHorizontal_chainStyle="spread|spread_inside|packed"
        app:layout_constraintStart_toStartOf="parent"
        app:layout_constraintTop_toTopOf="parent"
         />

    <Button
        android:id="@+id/B"
        android:layout_width="wrap_content"
        android:layout_height="wrap_content"
        android:text="b"
        app:layout_constraintEnd_toStartOf="@+id/C"
        app:layout_constraintStart_toEndOf="@+id/A"
        app:layout_constraintTop_toTopOf="parent"
         />

    <Button
        android:id="@+id/C"
        android:layout_width="wrap_content"
        android:layout_height="wrap_content"
        android:text="c"
        app:layout_constraintEnd_toEndOf="parent"
        app:layout_constraintTop_toTopOf="parent"
        app:layout_constraintStart_toEndOf="@id/B"
        />

</androidx.constraintlayout.widget.ConstraintLayout>
权重
layout_constraintHorizontal_weight = ""
layout_constraintVertical_weight = ""
Chains(链)还支持权重的分配(注意布局的宽度不能使用warp_content)

<?xml version="1.0" encoding="utf-8"?>
<androidx.constraintlayout.widget.ConstraintLayout xmlns:android="http://schemas.android.com/apk/res/android"
xmlns:app="http://schemas.android.com/apk/res-auto"
xmlns:tools="http://schemas.android.com/tools"
android:layout_width="match_parent"
android:layout_height="match_parent"
tools:context=".MainActivity">
<Button
android:id="@+id/A"
android:layout_width="0dp"
android:layout_height="wrap_content"
android:text="a"
app:layout_constraintEnd_toStartOf="@id/B"
app:layout_constraintHorizontal_chainStyle="spread"
app:layout_constraintHorizontal_weight="2"
app:layout_constraintStart_toStartOf="parent"
app:layout_constraintTop_toTopOf="parent"
/>
<Button
android:id="@+id/B"
android:layout_width="0dp"
android:layout_height="wrap_content"
android:text="b"
app:layout_constraintHorizontal_weight="1"
app:layout_constraintEnd_toStartOf="@+id/C"
app:layout_constraintStart_toEndOf="@+id/A"
app:layout_constraintTop_toTopOf="parent"
/>
<Button
android:id="@+id/C"
android:layout_width="0dp"
android:layout_height="wrap_content"
android:text="c"
app:layout_constraintHorizontal_weight="1"
app:layout_constraintEnd_toEndOf="parent"
app:layout_constraintTop_toTopOf="parent"
app:layout_constraintStart_toEndOf="@id/B"
/>
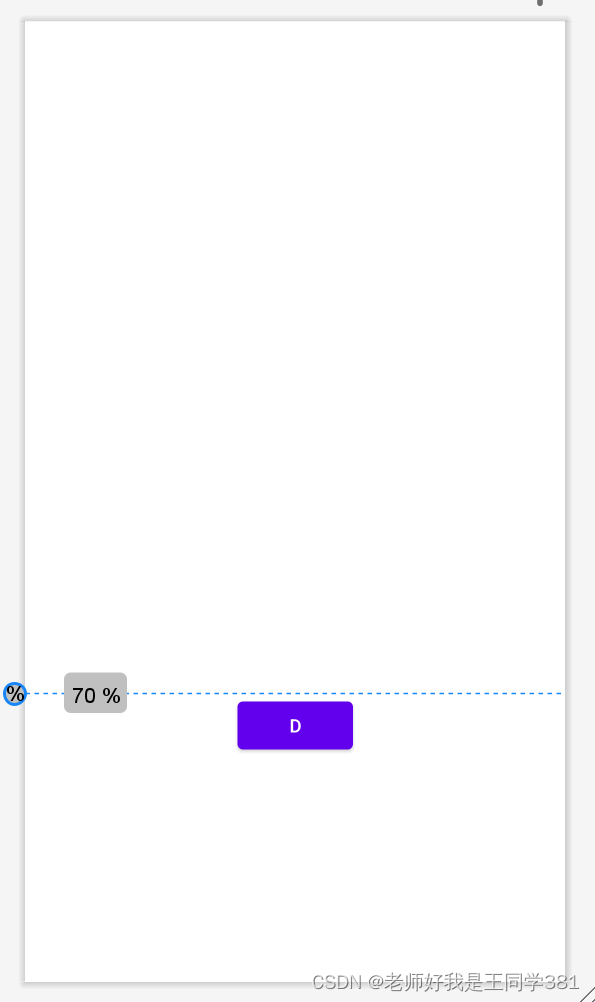
</androidx.constraintlayout.widget.ConstraintLayout>Guideline(参考线)
android:orientation="horizontal|vertical"  辅助线的对齐方式
app:layout_constraintGuide_percent="0-1"   距离父级宽度或高度的百分比(小数形式)
app:layout_constraintGuide_begin=""        距离父级起始位置的距离(左侧或顶部)
app:layout_constraintGuide_end=""          距离父级结束位置的距离(右侧或底部)
<?xml version="1.0" encoding="utf-8"?>
<androidx.constraintlayout.widget.ConstraintLayout xmlns:android="http://schemas.android.com/apk/res/android"
    xmlns:app="http://schemas.android.com/apk/res-auto"
    xmlns:tools="http://schemas.android.com/tools"
    android:layout_width="match_parent"
    android:layout_height="match_parent"
    tools:context=".MainActivity">

    <androidx.constraintlayout.widget.Guideline
        android:layout_width="wrap_content"
        android:layout_height="wrap_content"
        android:id="@+id/guideline"
        android:orientation="horizontal"
        app:layout_constraintGuide_percent="0.7"/>

    <Button
        android:layout_width="wrap_content"
        android:layout_height="wrap_content"
        android:id="@+id/d"
        android:text="d"
        app:layout_constraintStart_toStartOf="parent"
        app:layout_constraintEnd_toEndOf="parent"
        app:layout_constraintTop_toTopOf="@id/guideline"

</androidx.constraintlayout.widget.ConstraintLayout>
Barrier(屏障)
屏障可以理解为一个墙,"墙"里面的东西都受到它的保护,都不能超过这个墙
<!--  用于控制Barrier相对于给定的View的位置  -->
app:barrierDirection="top|bottom|left|right|start|end"

<!--  取值是要依赖的控件的id,Barrier将会使用ids中最大的一个的宽/高作为自己的位置  -->
app:constraint_referenced_ids="id,id"
<?xml version="1.0" encoding="utf-8"?>
<androidx.constraintlayout.widget.ConstraintLayout
xmlns:android="http://schemas.android.com/apk/res/android"
xmlns:app="http://schemas.android.com/apk/res-auto"
android:layout_width="match_parent"
android:layout_height="match_parent">
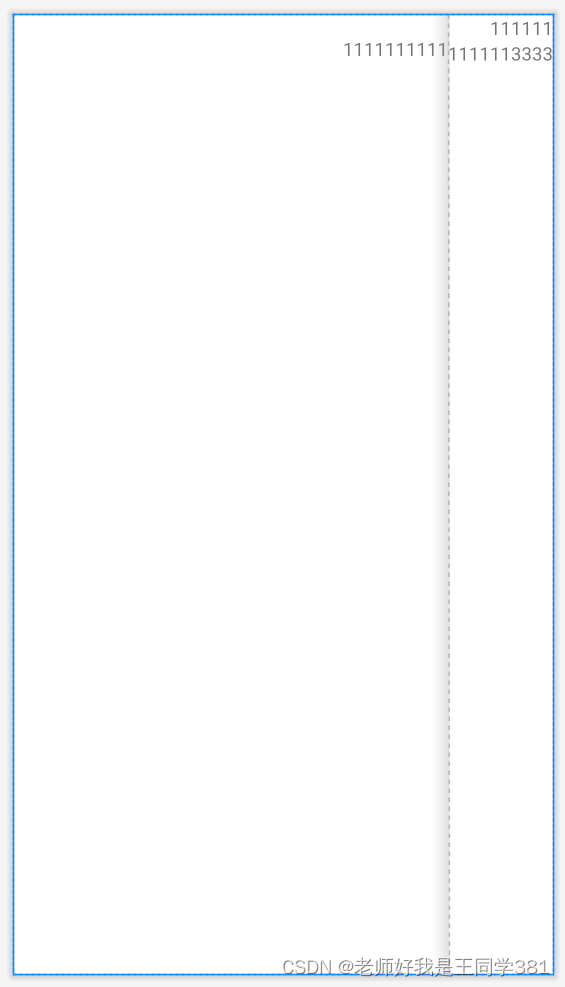
<TextView
android:id="@+id/textView1"
android:layout_width="wrap_content"
android:layout_height="wrap_content"
android:layout_marginStart="16dp"
android:layout_marginTop="16dp"
android:text="1111111111"
app:layout_constraintEnd_toStartOf="@id/barrier7"
app:layout_constraintTop_toTopOf="parent" />
<androidx.constraintlayout.widget.Barrier
android:id="@+id/barrier7"
android:layout_width="wrap_content"
android:layout_height="wrap_content"
app:barrierDirection="start"
app:constraint_referenced_ids="textView3,textView2" />
<TextView
android:id="@+id/textView3"
android:layout_width="0dp"
android:layout_height="wrap_content"
android:layout_marginStart="8dp"
android:text="111111"
app:layout_constraintEnd_toEndOf="parent"
app:layout_constraintTop_toTopOf="parent" />
<TextView
android:id="@+id/textView2"
android:layout_width="0dp"
android:layout_height="wrap_content"
android:layout_marginStart="8dp"
android:text="1111113333"
app:layout_constraintEnd_toEndOf="parent"
app:layout_constraintTop_toBottomOf="@id/textView3"
/>
</androidx.constraintlayout.widget.ConstraintLayout>
Group(组)
工作当中常常会有很多个控件同时隐藏或者显示的场景,传统做法要么是进行嵌套,对父布局进行隐藏或显示,要么就是一个一个设置,这显然都不是很好的办法,ConstraintLayout中的Group就是来解决这个问题的。Group的作用就是可以对一组控件同时隐藏或显示,没有其他的作用,它的属性如下:
app:constraint_referenced_ids="id,id" 加入组的控件idA、B、C三个view,受Group控制,当Group的visibility为visible时,它们都是正常显示的,设置为gone时,它们都会隐藏
<androidx.constraintlayout.widget.Group
        android:layout_width="wrap_content"
        android:layout_height="wrap_content"
        android:visibility="visible|gone"
        app:constraint_referenced_ids="A,B,C" />
Placeholder(占位符)
Placeholder的作用就是占位,它可以在布局中占好位置,通过app:content=""属性,或者动态调用setContent()设置内容,来让某个控件移动到此占位符中
<androidx.constraintlayout.widget.Placeholder
        android:layout_width="wrap_content"
        android:layout_height="wrap_content"
        app:layout_constraintEnd_toEndOf="parent"
        app:layout_constraintTop_toTopOf="parent" />
Layer(层布局)
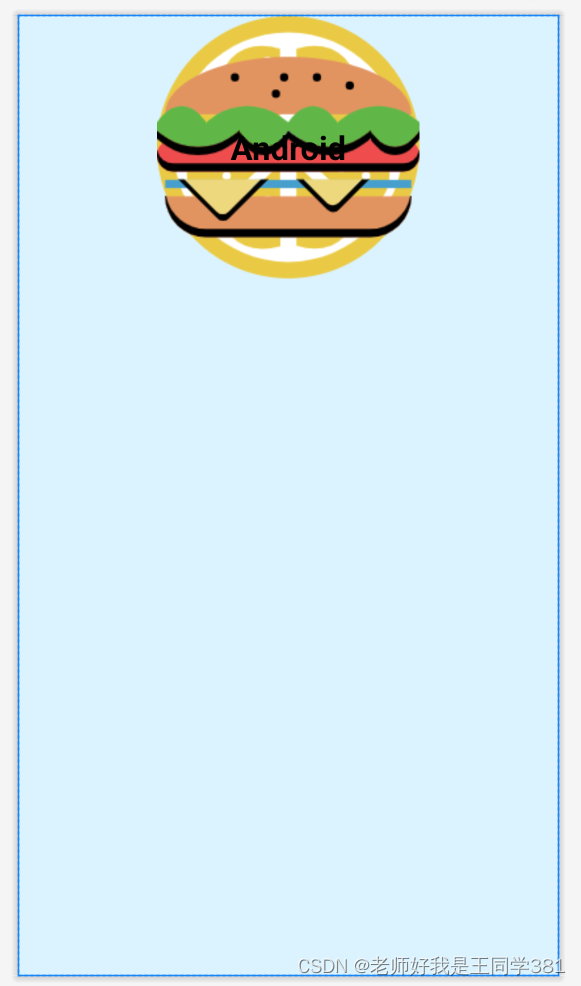
Layer继承自ConstraintHelper,是一个约束助手,常用来增加背景,或者共同动画,图层 (Layer) 在布局期间会调整大小,其大小会根据其引用的所有视图进行调整,代码的先后顺序也会决定着它的位置,如果代码在所有引用view的最后面,那么它就会在所有view的最上面,反之则是最下面,在最上面的时候如果添加背景,就会把引用的view覆盖掉,下面展示下添加背景的例子,做动画的例子这里不再展示了
<?xml version="1.0" encoding="utf-8"?>
<androidx.constraintlayout.widget.ConstraintLayout xmlns:android="http://schemas.android.com/apk/res/android"
    xmlns:app="http://schemas.android.com/apk/res-auto"
    xmlns:tools="http://schemas.android.com/tools"
    android:layout_width="match_parent"
    android:layout_height="match_parent"
    android:background="#DAF3FE"
    tools:context=".MainActivity"
    tools:ignore="HardcodedText">

    <ImageView
        android:id="@+id/AndroidImg2"
        android:layout_width="wrap_content"
        android:layout_height="wrap_content"
        android:src="@drawable/lemon"
        app:layout_constraintEnd_toEndOf="parent"
        app:layout_constraintStart_toStartOf="parent"
        app:layout_constraintTop_toTopOf="parent" />

    <ImageView
        android:id="@+id/AndroidImg3"
        android:layout_width="wrap_content"
        android:layout_height="wrap_content"
        android:src="@drawable/burger"
        app:layout_constraintEnd_toEndOf="parent"
        app:layout_constraintStart_toStartOf="parent"
        app:layout_constraintTop_toTopOf="parent" />

    <TextView
        android:id="@+id/NameTv1"
        android:layout_width="100dp"
        android:layout_height="40dp"
        android:gravity="center"
        android:text="Android"
        android:textColor="@color/black"
        android:textSize="25sp"
        android:textStyle="bold"
        app:layout_constraintEnd_toEndOf="@id/AndroidImg2"
        app:layout_constraintStart_toStartOf="@id/AndroidImg2"
        app:layout_constraintTop_toTopOf="@+id/AndroidImg2"
        app:layout_constraintBottom_toBottomOf="@+id/AndroidImg2"/>

</androidx.constraintlayout.widget.ConstraintLayout>
ImageFilterButton & ImageFilterView
ImageFilterButton和ImageFilterView是两个控件,他们之间的关系就和ImageButton与ImageView是一样的,所以这里就只拿ImageFilterView来做讲解。从名字上来看,它们的定位是和过滤有关系的,它们的大致作用有两部分,一是可以用来做圆角图片,二是可以叠加图片资源进行混合过滤,下面一一展示:
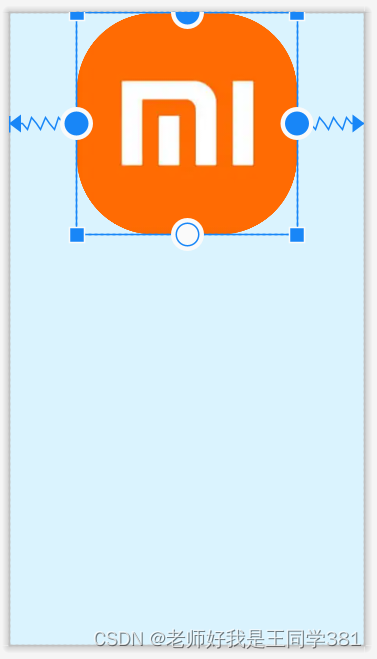
圆角图片:
app:roundPercent="0-1" 设置圆角
<?xml version="1.0" encoding="utf-8"?>
<androidx.constraintlayout.widget.ConstraintLayout xmlns:android="http://schemas.android.com/apk/res/android"
xmlns:app="http://schemas.android.com/apk/res-auto"
xmlns:tools="http://schemas.android.com/tools"
android:layout_width="match_parent"
android:layout_height="match_parent"
android:background="#DAF3FE"
tools:context=".MainActivity"
tools:ignore="HardcodedText">
<androidx.constraintlayout.utils.widget.ImageFilterView
android:id="@+id/AndroidImg2"
android:layout_width="wrap_content"
android:layout_height="wrap_content"
android:src="@drawable/xiaomi"
app:roundPercent="0.7"
app:layout_constraintEnd_toEndOf="parent"
app:layout_constraintStart_toStartOf="parent"
app:layout_constraintTop_toTopOf="parent" />
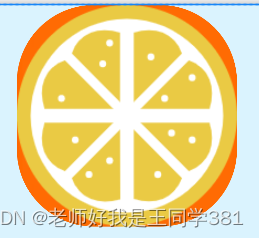
</androidx.constraintlayout.widget.ConstraintLayout>图片过滤:
ImageFilterButton和ImageFilterView不但可以使用src来设置图片资源,还可以使用altSrc来设置第二个图片资源,altSrc提供的资源将会和src提供的资源通过crossfade属性形成交叉淡化效果,默认情况下,crossfade=0,altSrc所引用的资源不可见,取值在0-1。下面看例子
android:src="@drawable/xiaomi"
app:altSrc="@drawable/lemon"
app:crossfade="1"
crossfade=1:
crossfade=0.5:
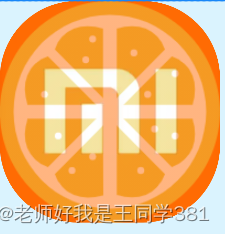
crossfade=0:

<?xml version="1.0" encoding="utf-8"?>
<androidx.constraintlayout.widget.ConstraintLayout xmlns:android="http://schemas.android.com/apk/res/android"
    xmlns:app="http://schemas.android.com/apk/res-auto"
    xmlns:tools="http://schemas.android.com/tools"
    android:layout_width="match_parent"
    android:layout_height="match_parent"
    android:background="#DAF3FE"
    tools:context=".MainActivity"
    tools:ignore="HardcodedText">

    <androidx.constraintlayout.utils.widget.ImageFilterView
        android:id="@+id/AndroidImg2"
        android:layout_width="wrap_content"
        android:layout_height="wrap_content"
        android:src="@drawable/xiaomi"
        app:altSrc="@drawable/lemon"
        app:crossfade="1"
        app:roundPercent="0.7"
        app:layout_constraintEnd_toEndOf="parent"
        app:layout_constraintStart_toStartOf="parent"
        app:layout_constraintTop_toTopOf="parent" />

</androidx.constraintlayout.widget.ConstraintLayout>
小结:
到此约束布局的使用就已经学习完毕了