由于目前SteamVR的射线SteamVR_LaserPointer没有操作UGUI的功能,所以这里就不再对SteamVR_LaserPointer进行过多介绍,功能的实现借助插件【InputUtility】来实现,这个插件AssetStore可以免费获取。
插件的导入,有时会因为未编译SteamVR_Input而导致插件的按键无法使用,这里需要注意的是,导入steamVR选择openVR时,要选择较新的UnityVR,之后导入插件便会自动弹出Wizard窗口,AcceptAll即可。
1.操作UGUI
正确导入SteamVR2.0+和Input Utility后,可以在Input Utility的示例场景中,查看UGUI的操作案例
HTC.UnityPlugin - ViveInputUtility - Examples - 1.UGUI
将SteamVR里的Player与插件结合使用
结合Player的传送和插件的射线功能,Player传送功能的使用方法可以参考前面文章。
为Player添加操作射线的UI
1.将Player做成新预设,这里命名为PlayerUI,然后将新预设的Player UnpackPrefab
2.找到HTC.UnityPlugin - ViveInputUtility - Prefabs中的预设VivePointers,将其拖拽到PlayerUI中
SteamVRObject子物体下。保持位置和旋转为0

3.新建一个Canvas,选择word模式,摆放到面前,添加一个Button按钮,
为Canvas添加脚本CanvasRaycastTarget

运行,即可使用射线指向按钮,点击Trigger触发按钮,其他UGUI同理
兼容操作UI的射线与传送的射线
由于,player的传送与VivePointer的射线分属不同插件,我们需要在需要的时候,手动开启相关功能。否则会出现如下射线重叠的情况

传送指示的UI是在按住Pad时显示,松开时隐藏,那么我们只需要将操作UI的射线反向操作一下即可
这里我创建了一个脚本挂在预设PlayerUI的VivepPointer上,来方便获取

using System.Collections;
using System.Collections.Generic;
using UnityEngine;

public class GetVivePointerUtility : MonoBehaviour
{
    public static GetVivePointerUtility instance;

    private void Awake() {
        instance = this;
    }
}
然后创建脚本PlayerUtility挂在PlayerUI上

PlayerUtility.cs
using System.Collections;
using System.Collections.Generic;
using UnityEngine;
using Valve.VR;

public class PlayerUtility : MonoBehaviour
{
    public SteamVR_Action_Boolean teleportAction = SteamVR_Input.GetAction<SteamVR_Action_Boolean>("Teleport");
    private GameObject _vivePointer;//操作UI,射线物体
    private GameObject vivePointer {
        get {
            if (_vivePointer == null) {
                _vivePointer = GetVivePointerUtility.instance.gameObject;
            }
            return _vivePointer;
        }
    }

    private void Update() {
        if (teleportAction.GetStateDown(SteamVR_Input_Sources.Any)) {
            vivePointer.SetActive(false);
        }

        if (teleportAction.GetStateUp(SteamVR_Input_Sources.Any)) {
            vivePointer.SetActive(true);
        }
    }
}
至此即可完成一个带有传送及操作UGUI的基础环境
注:若需要将操作UI的射线,不一直显示,可以使用Menu键,点按,开启或关闭
2.借助VivePointer实现点击物体
VivePointer的射线可以在物体上监听射线Enter,Exit,Click等事件,还可以为Click绑定不同的按键,并且借助
eventData.pointerCurrentRaycast.worldPosition可以获取到,射线点击到的点(世界坐标V3或者平面坐标V2)
1.直接获取手柄某按键点击(类似旧版SteamVR的按键获取方式)
用这种方式可以方便获取按键,并快捷绑定事件,缺点就是失去了部分SteamVR 2.0 input system的跨硬件优势,如果没有跨硬件需求,这种模式还是比较好用的。
using System.Collections;
using System.Collections.Generic;
using UnityEngine;
using HTC.UnityPlugin.Vive;

public class TestA001 : MonoBehaviour
{
    private void Update() {
        if (ViveInput.GetPressDownEx(HandRole.RightHand, ControllerButton.Trigger)) {
            Debug.Log("Right Trigger");
        }
        if (ViveInput.GetPressDownEx(HandRole.LeftHand, ControllerButton.Trigger)) {
            Debug.Log("left Trigger");
        }
    }
}
2.射线与物体的交互
注意,命名空间的引用,这里使用了EventSystem的接口,所以场景中也需要有EventSystem(若使用了Player,则不需要手动添加EventSystem,因为player的InputModule上已经带有了EventSystem)
using System.Collections;
using System.Collections.Generic;
using UnityEngine;
using HTC.UnityPlugin.Vive;
using UnityEngine.EventSystems;
public class TestB001 : MonoBehaviour, IPointerClickHandler, IPointerEnterHandler, IPointerExitHandler {
public void OnPointerClick(PointerEventData eventData) {
if (eventData.IsViveButton(ControllerButton.Trigger)) {
//获取按键点击,并且获取点击到的Raycast point
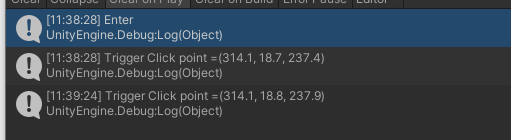
Debug.Log("Trigger Click point =" + eventData.pointerCurrentRaycast.worldPosition);
}
else if (eventData.button == PointerEventData.InputButton.Left) {
Debug.Log("Standard button triggered");
}
}
public void OnPointerEnter(PointerEventData eventData) {
Debug.Log("Enter");
}
public void OnPointerExit(PointerEventData eventData) {
Debug.Log("Exit");
}
}
将脚本,挂载到一个cube上即可