注:Oculus使用的是开源的hello_xr示例,但要使用自家的loader;在hello_xr上篇侧重分析了入口和图形的基本流程,此篇将侧重分析XR相关的流程
一,Setup and Build hello_xr
1,下载hello_xr官方示例、Oculus的sdk,获取loader
The OpenXR™ Software Development Kit (SDK) Sources Project contains the hello_xr
Oculus不支持标准的openxr的loader,需要下载ovr_openxr_mobile_sdk,取出对应的loader,/OpenXR/Libs/Android/ in SDK package;
修改hello_xr的cmake,将loader替换为Oculus提供的。
download the Oculus OpenXR Mobile SDK Downloads page.
2,修改配置文件,直接引用已下载的loader
replace this line:

option(BUILD_LOADER "Build loader" ON)
with these:
option(BUILD_LOADER "Build loader" OFF)
add_library(openxr_loader SHARED IMPORTED)
set_property(
TARGET
openxr_loader
PROPERTY
IMPORTED_LOCATION
C:/<path_to_Oculus_SDK_folder>/OpenXRMobileSDK/OpenXR/Libs/Android/${
ANDROID_ABI}/${
CMAKE_BUILD_TYPE}/libopenxr_loader.so
)
修改externalNativeBuild
externalNativeBuild {
cmake {
arguments '-DANDROID_STL=c++_shared',
'-DBUILD_API_LAYERS=OFF',
'-DBUILD_TESTS=ON',
'-DBUILD_LOADER=ON',
'-DBUILD_CONFORMANCE_TESTS=OFF',
'-DBUILD_ALL_EXTENSIONS=ON'
targets "openxr_loader", "hello_xr"
}
}
更新
externalNativeBuild {
ndk {
abiFilters 'arm64-v8a', 'armeabi-v7a'
}
cmake {
cppFlags ''
}
}
- Manifest增加Oculus项
src\tests\hello_xr\AndroidManifest.xml两处
<application>
<meta-data android:name="com.oculus.intent.category.VR" android:value="vr_only"/>
<meta-data android:name="com.oculus.supportedDevices" android:value="quest|quest2"/>
<intent-filter>
<action android:name="android.intent.action.MAIN" />
<category android:name="com.oculus.intent.category.VR" />
<category android:name="android.intent.category.LAUNCHER" />
</intent-filter>
二,重要概念
OpenXR 核心概念和openXR官方文档:
study the OpenXR 1.0 Specification at the Khronos Group site.
更多核心概念参考:spec1.0中Fundamentals部分
The site offers API reference documentation and a PDF reference guide that provides a detailed overview of the API.
Important: To get started with OpenXR core concepts, review Core Concepts and the rest of the topics under this doc set. These cover concepts and examples for:
在此面向应用开发,基于sample和框架的分析,review一些重要概念和流程
1 系统System
XR系统中定义了各种子系统,提供特定领域的功能,并有设备和硬件各子模块来实现,比如我们可以通过各个独立的设备获取不同的input输入、display frames显示等等;
——参考unity的XR plugin systems架构,即可理解unity的这一设计背景。
这些设备和模块在XR系统加载起来后,由运行时runtime来控制其激活和响应;
——参考unity新input action system,可理解这一软硬件解耦的框架。
2 对象概念和原子定义Handles and Atoms
Handles概念
代表运行时中的各object,有相应的创建销毁声明周期行为,应用可以调用对应的方法进行控制;这些对象在创建后,形成 父子管理 结构(也可以理解为 容器管理 结构),父级Handle往往管理子级的声明周期;
比如
要创建XrActionSet (handle),调用xrCreateActionSet 方法,传入XrInstance (handle)参数,那么XrInstance 就是 XrActionSet 的父级句柄,持有着ActionSet对象;
要销毁 XrSession, XrSpace and XrSwapchain各子级对象都会被一同销毁;
应用中几个重要的句柄类型如下:
| Handle type |
Description |
| XrInstance |
Enables apps to use the OpenXR runtime. These handles are the only ones without a parent. |
| XrSession |
Enables interaction with a specific XR device, allows for user input, rendering, managing events, and more. Generally, it is a graphics interaction with a particular XrSystem using a particular graphics binding. |
| XrAction |
Refers to individual actions when retrieving input data or sending haptic events. Apps receive input action states without directly receiving input from the hardware. |
| XrActionSet |
Refers to groups of actions that are valid in a certain context (for example, all actions to interact with a menu UI). Action sets can be enabled or disabled. |
| XrSwapchain |
Manages display of rendered images as a series of frame buffers. Images can be organized in multiple swapchains (queues of images to be displayed to the user). |
| XrSpace |
Represents spaces that the app can reason about through xrLocateSpace. |
OpenXR extensions通过创建新的handle对象,及其struct和functions来定义和扩展更多的api。
atoms 概念
定义为静态常量,在运行时中预定义了相关的数值,代表了对象无关的特征,比如XrPath and XrSystemID;
XrPath (atom)本质上是一个固定的数值,指向一个string,即语义化的设备路径如“/interaction_profiles/oculus/touch_controller”;XrSystemID制定了支持OpenXR的子系统的id;
3 传参封装structs和struct-chaining extension
openXR方法大量使用struct的结构传参,有更好的封装和扩展性,使得新的extension扩展可以增加新的参数而不影响原来的api;
另一个特性就是对extension扩展使用的struct成员构建了参数指针链,要求是扩展的这部分extension必须在创建instance时使能enable:
In order to use a structure type defined by an extension in a next chain, the proper extension must have been previously enabled during xrCreateInstance
Read-only的 struct pointer chain常常定义为
typedef struct XrBaseInStructure {
XrStructureType type;
const struct XrBaseInStructure* next;
} XrBaseInStructure;
例如:xrCreateInstance 调用时,传入的参数结构体:
typedef struct XrInstanceCreateInfo {
XrStructureType type; //for example XR_TYPE_INSTANCE_CREATE_INFO 用于对象创建
const void* next; //next is NULL or a pointer to the next struct in a struct-chain.
...
const char* const* enabledExtensionNames; //pointer to a string array with the names of extensions to enable
} XrInstanceCreateInfo;
XrInstanceCreateInfo createInfo{
XR_TYPE_INSTANCE_CREATE_INFO};
createInfo.next = m_platformPlugin->GetInstanceCreateExtension();
...
createInfo.enabledExtensionNames = extensions.data();
...
CHECK_XRCMD(xrCreateInstance(&createInfo, &m_instance));
4 复调函数Two-call
open XR的某些方法需要先接收buffer size的参数再返回具体数据,使用一个方法,通过二次调用来达成(一次传参,二次返回)。
常见风格:
XrResult xrFunction(uint32_t capacityInput, uint32_t* countOutput, float* elements);
第一次调用传入
a valid countOutput pointer
a nullptr as elements
0 as capacityInput
// the function sets the value pointed to by countOutput to the required size in number of elements
二次调用传入
a buffer at least as large as the value that countOutput points to
a pointer to the allocated buffer as elements
the length of the buffer as capacityInput
// the elements that have been written to the elements buffer.
Hello_xr示例:
uint32_t count;
CHECK_XRCMD(xrEnumerateEnvironmentBlendModes(m_instance, m_systemId, type, 0, &count, nullptr));
...
std::vector<XrEnvironmentBlendMode> blendModes(count);
CHECK_XRCMD(xrEnumerateEnvironmentBlendModes(m_instance, m_systemId, type, count, &count, blendModes.data()));
// count stores the number of supported blend modes
// 复调返回vector blendModes stores the supported environment blend modes.
三,Creating Instances and Sessions
下面进入核心API和基础流程,openxr的整体会话流程图上一篇有介绍过,结合helloxr的示例,在此抽象出应用的核心调用的执行关系:
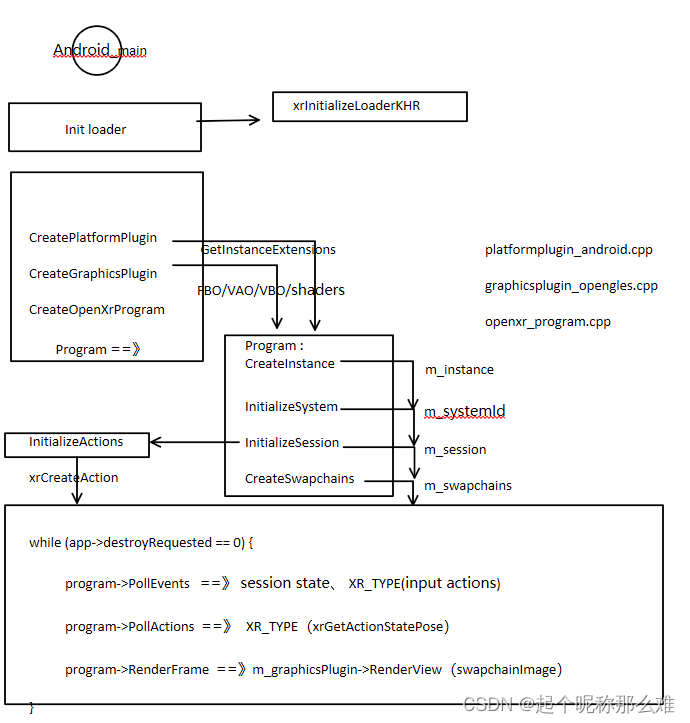
1,入口void android_main(struct android_app* app)方法
总体来说,主要进行三大块
loader init、CreateInstance和InitializeSession、跑while{事件和渲染}
因此首先进行loader、平台等实例和系统会话的处理;
使用loader extensions, 方法定义为xrInitializeLoaderKHR, xrGetInstanceProcAddress获取方法指针initializeLoader;
参数定义为XrLoaderInitInfoBaseHeaderKHR结构体(如上介绍的,XrStructureType风格,type为XR_TYPE_LOADER_INIT_INFO_ANDROID_KHR)
//Initializetheloaderforthisplatform
PFN_xrInitializeLoaderKHRinitializeLoader=nullptr;
if(XR_SUCCEEDED(
xrGetInstanceProcAddr(XR_NULL_HANDLE,"xrInitializeLoaderKHR",(PFN_xrVoidFunction*)(&initializeLoader)))){
XrLoaderInitInfoAndroidKHR loaderInitInfoAndroid;
memset(&loaderInitInfoAndroid,0,sizeof(loaderInitInfoAndroid));
loaderInitInfoAndroid.type=XR_TYPE_LOADER_INIT_INFO_ANDROID_KHR;
loaderInitInfoAndroid.next=NULL;
loaderInitInfoAndroid.applicationVM=app->activity->vm;
loaderInitInfoAndroid.applicationContext=app->activity->clazz;
initializeLoader((constXrLoaderInitInfoBaseHeaderKHR*)&loaderInitInfoAndroid);
}
2,平台与图形实例:
此处设备操作,即涉及到创建session:
- Create XrInstance.
- Use XrInstance to get XrSystemId.
- Create a session using XrSystemId.
在设备上跑openXR,首先需要设置Graphic api,确定platform信息,各种平台和图形api extension事先进行定义;Oculus上的flag定义:
Graphics API Header Control:
XR_USE_GRAPHICS_API_D3D11, XR_USE_GRAPHICS_API_D3D12,
XR_USE_GRAPHICS_API_OPENGL or XR_USE_GRAPHICS_API_VULKAN
Window System Header Control:
XR_USE_PLATFORM_WIN32
首先:
Hello_xr设计了IOpenXrProgram、IGraphicsPlugin和IPlatformPlugin抽象层,封装了platform-specific等实例及其创建方法和参数结构,让hello_xr可以支持多平台;
//Createplatform-specificimplementation.
std::shared_ptr<IPlatformPlugin>platformPlugin=CreatePlatformPlugin(options,data);
//CreategraphicsAPIimplementation.
std::shared_ptr<IGraphicsPlugin>graphicsPlugin=CreateGraphicsPlugin(options,platformPlugin);
//InitializetheOpenXRprogram.
std::shared_ptr<IOpenXrProgram>program=CreateOpenXrProgram(options,platformPlugin,graphicsPlugin);
然后AndroidPlatformPlugin等 的实现:
struct AndroidPlatformPlugin : public IPlatformPlugin {
AndroidPlatformPlugin(const std::shared_ptr<Options>& /*unused*/, const std::shared_ptr<PlatformData>& data) {
instanceCreateInfoAndroid = {XR_TYPE_INSTANCE_CREATE_INFO_ANDROID_KHR};
instanceCreateInfoAndroid.applicationVM = data->applicationVM;
instanceCreateInfoAndroid.applicationActivity = data->applicationActivity;
}
std::vector<std::string> GetInstanceExtensions() const override { return {XR_KHR_ANDROID_CREATE_INSTANCE_EXTENSION_NAME}; }
XrBaseInStructure* GetInstanceCreateExtension() const override { return (XrBaseInStructure*)&instanceCreateInfoAndroid; }
XrInstanceCreateInfoAndroidKHR instanceCreateInfoAndroid;// 初始化先设置vm、activity
};
在然后:
program->CreateInstance(); // 调用loader的xrCreateInstance(&createInfo, &m_instance)
program->InitializeSystem();// 调用graphicsPlugin:m_graphicsPlugin->InitializeDevice(m_instance, m_systemId);获取systemId
program->InitializeSession(); // 调用xrCreateSession(m_instance, &createInfo, &m_session),然后InitializeActions->xrAttachSessionActionSets(m_session, &attachInfo)
program->CreateSwapchains();// 调用xrCreateSwapchain(m_session, &swapchainCreateInfo, &swapchain.handle)
While(){
program->RenderFrame()//RenderFrame()->RenderLayer->
m_graphicsPlugin->RenderView
}
3,Create Instance
如上,接着进入CreateInstance
createInstanceinternal()前,还看到可以遍历openXR接口,此时也是自定义extensions接口的时机;
在此使能了graphic和platform plugin的extension;
先遍历了apilayer,再使用layerName遍历extensions,extensions是openxr的接口扩展机制可以定义新的方法,也可以修改现有方法。
两者在instance创建时使能,instance之后接口确定下来;
// Write out extension properties for a given layer.
const auto logExtensions = [](const char* layerName, int indent = 0) {
uint32_t instanceExtensionCount;
CHECK_XRCMD(xrEnumerateInstanceExtensionProperties(layerName, 0, &instanceExtensionCount, nullptr));
std::vector<XrExtensionProperties> extensions(instanceExtensionCount);
for (XrExtensionProperties& extension : extensions) {
extension.type = XR_TYPE_EXTENSION_PROPERTIES;
}
// 复调函数
CHECK_XRCMD(xrEnumerateInstanceExtensionProperties(layerName, (uint32_t)extensions.size(), &instanceExtensionCount, extensions.data()));
...
};
void CreateInstanceInternal() {
CHECK(m_instance == XR_NULL_HANDLE);
// Create union of extensions required by platform and graphics plugins.
std::vector<const char*> extensions;
// Transform platform and graphics extension std::strings to C strings.
const std::vector<std::string> platformExtensions = m_platformPlugin->GetInstanceExtensions();
std::transform(platformExtensions.begin(), platformExtensions.end(), std::back_inserter(extensions),
[](const std::string& ext) { return ext.c_str(); });
const std::vector<std::string> graphicsExtensions = m_graphicsPlugin->GetInstanceExtensions();
std::transform(graphicsExtensions.begin(), graphicsExtensions.end(), std::back_inserter(extensions),
[](const std::string& ext) { return ext.c_str(); });
XrInstanceCreateInfo createInfo{XR_TYPE_INSTANCE_CREATE_INFO};
createInfo.next = m_platformPlugin->GetInstanceCreateExtension();// 改为XR_TYPE_INSTANCE_CREATE_INFO_ANDROID_KHR
createInfo.enabledExtensionCount = (uint32_t)extensions.size();
createInfo.enabledExtensionNames = extensions.data();
strcpy(createInfo.applicationInfo.applicationName, "HelloXR");
createInfo.applicationInfo.apiVersion = XR_CURRENT_API_VERSION;
CHECK_XRCMD(xrCreateInstance(&createInfo, &m_instance));
}
將platform and graphics插件提供的方法合入extensions;
使用结构体参数XrInstanceCreateInfo ,創建instance
4,System Initialization
如上进入program->InitializeSystem();获取systemId。
XrSystemGetInfo systemInfo{XR_TYPE_SYSTEM_GET_INFO};
systemInfo.formFactor = m_formFactor;
CHECK_XRCMD(xrGetSystem(m_instance, &systemInfo, &m_systemId));
5,Session Creation
实例和会话的区别:apps使用一个openxr instance来与runtime通信,使用session来绑定一个具体的VR系统和graphicbinding扩展;
如上進入program->InitializeSession();获取session
XrSessionCreateInfo createInfo{XR_TYPE_SESSION_CREATE_INFO};
createInfo.next = m_graphicsPlugin->GetGraphicsBinding();
createInfo.systemId = m_systemId;
CHECK_XRCMD(xrCreateSession(m_instance, &createInfo, &m_session));
createInfo通过graphic插件提供,传入graphics binding header,可见session与图形系统、窗口上下文绑定;
Graphicsplugin_opengles.cpp
#ifdefXR_USE_PLATFORM_ANDROID
XrGraphicsBindingOpenGLESAndroidKHRm_graphicsBinding{ XR_TYPE_GRAPHICS_BINDING_OPENGL_ES_ANDROID_KHR};
#endif
constXrBaseInStructure*GetGraphicsBinding()constoverride{
returnreinterpret_cast<constXrBaseInStructure*>(&m_graphicsBinding);
}
上述graphicsBinding来自初始systemId和初始设备时:
Void InitializeDevice(XrInstance instance,XrSystemId systemId)override{
#ifdefined(XR_USE_PLATFORM_ANDROID)
m_graphicsBinding.display=window.display;
m_graphicsBinding.config=(EGLConfig)0;
m_graphicsBinding.context=window.context.context;
#endif
}
在program->InitializeSession()中得到session后,接着将完善获取 actions(后续交互)和appSpace(后续物体渲染坐标系):
- 绑定actions InitializeActions();
- 并创建全局app space:CHECK_XRCMD(xrCreateReferenceSpace(m_session, &referenceSpaceCreateInfo, &m_appSpace));
- 最后回到渲染迭代循环时,每次pollEvent,获取到session状态改变时,需要HandleSessionStateChangedEvent(){ready: xrBeginSession()}
6,Collecting System Information
一,SystemID的意义
运行时在xrCreateInstance获取实例之后跑起来,但是session会话还没有启动,按需設定条件FormFactor来调用xrGetSystem,从运行时获取一个XrSystemId (atom);
一个有效的XrSystemId 意味着系统已经激活和支持,系统条件指向了该系统配置信息;
支持的系统与FormFactor
OpenXR当前只支持枚举XR_FORM_FACTOR_HANDHELD_DISPLAY and XR_FORM_FACTOR_HEAD_MOUNTED_DISPLAY(一般用于枚举XR system);
文档注:如果有多个系统在一个runtime同时连接,一般不暴露给app做选择,openXR也没有api来list 可用系统,一般交给runtime来设置,Oculus是由用户在desktop app上选择。
2,系统相关信息:
获取XrSystemId ,需要处理一些相关信息
支持的环境混合模式,用于获取systemID。这是指系统支持的混合模式。其中包括的枚举值:不透明XR_ENVIRONMENT_BLEND_MODE_OPAQUE,相加混合XR_ENVIRONMENT_BLEND_MODE_ADDITIVE,合成层与现实世界进行alpha 混合XR_ENVIRONMENT_BLEND_MODE_ALPHA_BLEND
文档注:XR_ENVIRONMENT_BLEND_MODE_OPAQUE on Quest, Quest 2, and Rift.
系统view数量等配置,获得systemID后遍历取得。
例如,单屏或立体,the number of views
XR_VIEW_CONFIGURATION_PRIMARY_MONO for single screen and XR_VIEW_CONFIGURATION_PRIMARY_STEREO for dual screen or one screen per eye),调用xrBeginSession需要传入选择的view config;
二,Form Factor和configurations
构造条件,使用XR_FORM_FACTOR_HEAD_MOUNTED_DISPLAY类型的formFactor的systeminfo,获取systemID
1,hello_xr的systemId获取示例:
XrFormFactor m_formFactor{XR_FORM_FACTOR_HEAD_MOUNTED_DISPLAY};
...
XrSystemId m_systemId{XR_NULL_SYSTEM_ID};
...
XrSystemGetInfo systemInfo{XR_TYPE_SYSTEM_GET_INFO};
systemInfo.formFactor = m_formFactor;
CHECK_XRCMD(xrGetSystem(m_instance, &systemInfo, &m_systemId));
后续将使用m_systemId and the instance来创建session和初始化graphic api
2,遍历view configurations
复调方法:
uint32_t viewConfigTypeCount;
CHECK_XRCMD(xrEnumerateViewConfigurations(m_instance, m_systemId, 0, &viewConfigTypeCount, nullptr));
std::vector<XrViewConfigurationType> viewConfigTypes(viewConfigTypeCount);
CHECK_XRCMD(xrEnumerateViewConfigurations(m_instance, m_systemId, viewConfigTypeCount, &viewConfigTypeCount,
viewConfigTypes.data()));
CHECK((uint32_t)viewConfigTypes.size() == viewConfigTypeCount);
2)viewConfigProperties
for (XrViewConfigurationType viewConfigType : viewConfigTypes) {
...
XrViewConfigurationProperties viewConfigProperties{XR_TYPE_VIEW_CONFIGURATION_PROPERTIES};
CHECK_XRCMD(xrGetViewConfigurationProperties(m_instance, m_systemId, viewConfigType, &viewConfigProperties));
XrViewConfigurationView
uint32_t viewCount;
CHECK_XRCMD(xrEnumerateViewConfigurationViews(m_instance, m_systemId, viewConfigType, 0, &viewCount, nullptr));
if (viewCount > 0) {
std::vector<XrViewConfigurationView> views(viewCount, {XR_TYPE_VIEW_CONFIGURATION_VIEW});
CHECK_XRCMD(xrEnumerateViewConfigurationViews(m_instance, m_systemId, viewConfigType, viewCount, &viewCount, views.data()));
4)XrEnvironmentBlendMode
uint32_t count;
CHECK_XRCMD(xrEnumerateEnvironmentBlendModes(m_instance, m_systemId, type, 0, &count, nullptr));
...
std::vector<XrEnvironmentBlendMode> blendModes(count);
CHECK_XRCMD(xrEnumerateEnvironmentBlendModes(m_instance, m_systemId, type, count, &count, blendModes.data()));
获取blend modes和XrViewConfigurationType
7,Input API
按照openxr标准的input,组织成action set,绑定到session
xrAttachSessionActionSets
General Flow
To sum up, managing input occurs through this flow:
// For each ActionSet:
 xrCreateActionSet(...)
// For each Action
 xrCreateAction(...)
// For each ActionSpace
 xrCreateActionSpace(...)
// For each supported and tested device:
 xrSuggestInteractionProfileBindings(...)
xrAttachSessionActionSets(...)
while (frameLoop) {

     // Only once per frame:
     xrSyncActions(...)
    // As many times as needed, can be multiple times for the same action
     xrGetActionStateTYPE(...)
     xrLocateSpace(...)
 }
8,Creating and Using Swapchains
Enabling graphics pipelining relies on swapchains, which are queues of images to be displayed to the user.
一,Enumerating Swapchain Formats
说明一下swapchain的formats
也即OpenGL internal formats, GL_RGB10_A2 (10 bits for Red, 10 bits for Green, 10 bits for Blue, 2 bits for Alpha) for OpenGL-based graphics,
or, for Vulkan, formats such as VK_FORMAT_B8G8R8A8_SRGB (8 bits for Red, 8 bits for Green, 8 bits for Blue, 8 bits for Alpha).
// Select a swapchain format.
uint32_t swapchainFormatCount;
CHECK_XRCMD(xrEnumerateSwapchainFormats(m_session, 0, &swapchainFormatCount, nullptr));
std::vector<int64_t> swapchainFormats(swapchainFormatCount);
CHECK_XRCMD(xrEnumerateSwapchainFormats(m_session, (uint32_t)swapchainFormats.size(), &swapchainFormatCount, swapchainFormats.data()));
swapchainFormats使用vector保存data,返回image的formats
二,Creating Swapchains
进入openxr_program->CreateSwapchains()
1,获取系統信息xrGetSystemProperties
XrSystemProperties systemProperties{
XR_TYPE_SYSTEM_PROPERTIES};
CHECK_XRCMD(xrGetSystemProperties(m_instance, m_systemId, &systemProperties));
2,将system view configurations配置遍历出来
uint32_t viewCount;
CHECK_XRCMD(xrEnumerateViewConfigurationViews(m_instance, m_systemId, m_viewConfigType, 0, &viewCount, nullptr));
m_configViews.resize(viewCount, {
XR_TYPE_VIEW_CONFIGURATION_VIEW});
CHECK_XRCMD(xrEnumerateViewConfigurationViews(m_instance, m_systemId, m_viewConfigType, viewCount, &viewCount m_configViews.data()));
3,create a swapchain per view
正式调用XR创建swapchain,以swapchain.handle为key保存到m_swapchains
// Create a swapchain for each view.
for (uint32_t i = 0; i < viewCount; i++) {
const XrViewConfigurationView& vp = m_configViews[i];
...
}
using an XrSwapchainCreateInfo struct for info such as width, height, face count (that is number of faces, meaning either 6 textures for a swapchain per view for cubemaps, or 1)
for (uint32_t i = 0; i < viewCount; i++) {
// Create the swapchain.
XrSwapchainCreateInfo swapchainCreateInfo{
XR_TYPE_SWAPCHAIN_CREATE_INFO};
swapchainCreateInfo.arraySize = 1;
swapchainCreateInfo.format = m_colorSwapchainFormat; //xrEnumerateSwapchainFormats枚举值
swapchainCreateInfo.width = vp.recommendedImageRectWidth;
swapchainCreateInfo.height = vp.recommendedImageRectHeight;
swapchainCreateInfo.mipCount = 1;
swapchainCreateInfo.faceCount = 1;
swapchainCreateInfo.sampleCount = m_graphicsPlugin->GetSupportedSwapchainSampleCount(vp);
swapchainCreateInfo.usageFlags = XR_SWAPCHAIN_USAGE_SAMPLED_BIT | XR_SWAPCHAIN_USAGE_COLOR_ATTACHMENT_BIT;
Swapchain swapchain;
swapchain.width = swapchainCreateInfo.width;
swapchain.height = swapchainCreateInfo.height;
CHECK_XRCMD(xrCreateSwapchain(m_session, &swapchainCreateInfo, &swapchain.handle));
m_swapchains.push_back(swapchain); // For each view there is a separate swapchain
4,每个swapchain再拿SwapchainImages
为swapchain创建images(实际后续xrAcquire只调出使用一个index的image), 一个swapchain多个image。
使用图形系统m_graphicsPlugin开辟OpenGL类型的swapchainImages 结构体数组(类似取纹理单元最大数量),调用xrEnumerateSwapchainImages 填充数组(指针vector,一般用.data()取出整个指针,这里取第0个元素作为数组指针传递),最后使用XREnum接口遍历image出来保存;
uint32_t imageCount;
CHECK_XRCMD(xrEnumerateSwapchainImages(swapchain.handle, 0, &imageCount, nullptr));
//It allocates the buffer, initializes the buffer, and returns an array of pointers to each swapchain image struct.
std::vector<XrSwapchainImageBaseHeader*> swapchainImages =
m_graphicsPlugin->AllocateSwapchainImageStructs(imageCount, swapchainCreateInfo);
CHECK_XRCMD(xrEnumerateSwapchainImages(swapchain.handle, imageCount, &imageCount, swapchainImages[0]));//images array指针
m_swapchainImages.insert(std::make_pair(swapchain.handle, std::move(swapchainImages)));
到此,结束openxr_program->CreateSwapchains();
四,迭代循环Render View to Parts of Swapchain Images
进入迭代循环:
openxr_program->RenderFrame()->RenderLayer()->
物体准备:
for (XrSpace visualizedSpace : m_visualizedSpaces) { //每个物体使用一个space准备数据->cubes
最终进入
swapchain和projectionLayerViews准备:
// Render view to the appropriate part of the swapchain image.
for (uint32_t i = 0; i < viewCountOutput; i++) {
1,xrAcquireSwapchainImage
使用acquireInfo,获取初始化时xrEnum枚举出来的image的可用index
XrSwapchainImageAcquireInfo acquireInfo{ XR_TYPE_SWAPCHAIN_IMAGE_ACQUIRE_INFO};
uint32_t swapchainImageIndex;
CHECK_XRCMD(xrAcquireSwapchainImage(viewSwapchain.handle, &acquireInfo, &swapchainImageIndex));
2,waitInfo
等待上一帧完成,使用waitInfo(类似的有renderFrame一开始的xrWaitFrame);
设置超时,Apps must wait on the compositor to finish reading from any image
XrSwapchainImageWaitInfo waitInfo{
XR_TYPE_SWAPCHAIN_IMAGE_WAIT_INFO};
waitInfo.timeout = XR_INFINITE_DURATION;
CHECK_XRCMD(xrWaitSwapchainImage(viewSwapchain.handle, &waitInfo));
3,projectionLayerViews
XrCompositionLayerProjection作为layer,装载LayerViews;
XrCompositionLayerProjectionView作为单眼view,装载location等projection element信息
projectionLayerViews[i] = {
XR_TYPE_COMPOSITION_LAYER_PROJECTION_VIEW};
projectionLayerViews[i].pose = m_views[i].pose;
projectionLayerViews[i].fov = m_views[i].fov;
projectionLayerViews[i].subImage.swapchain = viewSwapchain.handle;
projectionLayerViews[i].subImage.imageRect.offset = {
0, 0};
projectionLayerViews[i].subImage.imageRect.extent = {
viewSwapchain.width, viewSwapchain.height};
4,转入图形插件:
传入物体数据和image作为纹理
const XrSwapchainImageBaseHeader* const swapchainImage = m_swapchainImages[viewSwapchain.handle][swapchainImageIndex];
m_graphicsPlugin->RenderView(projectionLayerViews[i], swapchainImage, m_colorSwapchainFormat, cubes);
graphicplugin中,
设置帧缓存,绑定swapchainImage附件,glDrawElements;
5,releases
the swapchain image through xrReleaseSwapchainImage
XrSwapchainImageReleaseInfo releaseInfo{
XR_TYPE_SWAPCHAIN_IMAGE_RELEASE_INFO};
CHECK_XRCMD(xrReleaseSwapchainImage(viewSwapchain.handle, &releaseInfo));
6,返回最后的layers汇总提交frame:
Calling xrEndFrame attempts to submit the frame by submitting all composition layers.
openxr_program->RenderFrame() -> CHECK_XRCMD(xrEndFrame(m_session, &frameEndInfo));
五,同步提交机制
openxr使用swapchains及其image,应用无法控制显示顺序,无法控制帧数,
只能设置些帧处理时间,提交机制包括调用 xrWaitFrame, xrBeginFrame, and xrEndFrame functions
同步等待提交:xrWaitFrame
must call xrWaitFrame before rendering the frame,this is a blocking call, meaning that a subsequent xrWaitFrame call will block until the previous frame is marked as ready-to-render by calling xrBeginFrame;
设置帧开始状态:xrBeginFrame
call xrBeginFrame before the start of frame rendering and all rendering work must follow because xrBeginFrame marks the start of the rendering process for that frame.
真正的提交:xrEndFrame
Calling xrEndFrame attempts to submit the frame by submitting all composition layers.
// The wait-begin-end Cycle:
XrFrameWaitInfo frameWaitInfo{XR_TYPE_FRAME_WAIT_INFO};
 XrFrameState frameState{XR_TYPE_FRAME_STATE};
 CHECK_XRCMD(xrWaitFrame(m_session, &frameWaitInfo, &frameState));
XrFrameBeginInfo frameBeginInfo{XR_TYPE_FRAME_BEGIN_INFO};
 CHECK_XRCMD(xrBeginFrame(m_session, &frameBeginInfo));
std::vector<XrCompositionLayerBaseHeader*> layers;
 ...
XrFrameEndInfo frameEndInfo{XR_TYPE_FRAME_END_INFO};
 frameEndInfo.displayTime = frameState.predictedDisplayTime;
 frameEndInfo.environmentBlendMode = m_environmentBlendMode;
 frameEndInfo.layerCount = (uint32_t)layers.size();
 frameEndInfo.layers = layers.data();
 CHECK_XRCMD(xrEndFrame(m_session, &frameEndInfo));
中间图形插件进行帧绘制,颜色附件来自image,image在swapchain,projectionLayerViews[i].subImage.swapchain最后的views都交给layer.views
六,Rendering Layers
如上,apps draw frames by submitting layers,合成器连接layers和GPU来绘制frame。
1,使用xrLocateViews 找layer位置
xrLocateViews function,XrViewLocateInfo struct:
return the viewer pose and projection parameters for rendering each view to use in a projection layer.
获取layer级别的m_views.data(pose/fov等),给到projectionLayerViews
XrViewLocateInfo viewLocateInfo{XR_TYPE_VIEW_LOCATE_INFO};
viewLocateInfo.viewConfigurationType = m_viewConfigType;
viewLocateInfo.displayTime = predictedDisplayTime;
viewLocateInfo.space = m_appSpace;
res = xrLocateViews(m_session, &viewLocateInfo, &viewState, viewCapacityInput, &viewCountOutput, m_views.data());
CHECK_XRRESULT(res, "xrLocateViews");
2,使用xrLocateSpace找cubes位置
Hello_xr预定义了cubes的space
// For each locatable space that we want to visualize, render a 25cm cube.
std::vector<Cube> cubes;
for (XrSpace visualizedSpace : m_visualizedSpaces) {
XrSpaceLocation spaceLocation{
XR_TYPE_SPACE_LOCATION};
res = xrLocateSpace(visualizedSpace, m_appSpace, predictedDisplayTime, &spaceLocation);
CHECK_XRRESULT(res, "xrLocateSpace");
if (XR_UNQUALIFIED_SUCCESS(res)) {
if ((spaceLocation.locationFlags & XR_SPACE_LOCATION_POSITION_VALID_BIT) != 0 &&
(spaceLocation.locationFlags & XR_SPACE_LOCATION_ORIENTATION_VALID_BIT) != 0) {
cubes.push_back(Cube{
spaceLocation.pose, {
0.25f, 0.25f, 0.25f}});
}
} else {
Log::Write(Log::Level::Verbose, Fmt("Unable to locate a visualized reference space in app space: %d", res));
}
}