一:邻点及邻域
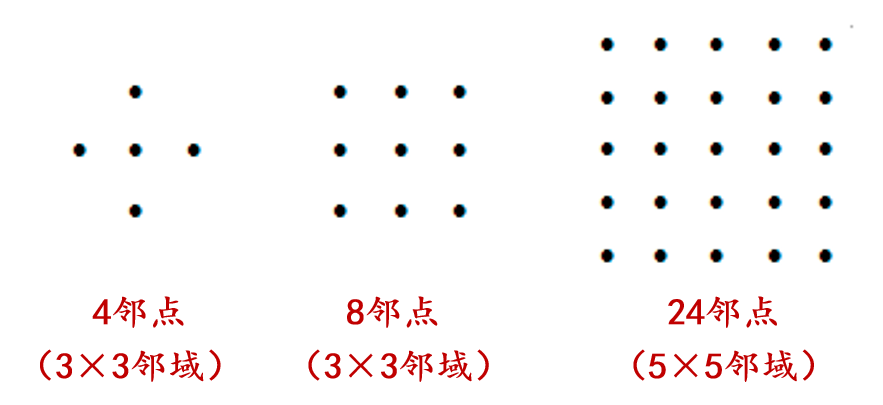
点运算:是对图像中每个像素点进行运算,其他点的值不会影响到该像素点,如图像的几何变换、灰度级变换等。简单说,相邻像素构成邻域,邻域中的像素点称为邻点,邻域的位置由中心像素决定,再用邻域的边长决定邻域的大小。以下是常用的三种邻点和邻域
二:模板运算
模板运算:在数字图像处理中,模板操作是指一种图像处理操作,包括在图像上移动一个小矩阵或过滤器,称为模板或核,以提取或增强特定的特征。模板,通常也称滤波器(filters)、核(kernels)、掩膜(templates)或窗口(windows),用一个小的二维阵列来表示(如 3×3)。通常把对应的模板上的值称为加权系数。因此,模板运算实现的是一种邻域运算,即某个像素点的记过不仅和本像素(中心像素)的灰度值有关及其邻点,或者其他邻域内的像素点的值也有关
在模板运算过程中,模板在图像上移动,在每个位置,模板内的像素值乘以模板矩阵中的相应数值,然后将结果相加。这将产生一个新的模板中心像素值,然后用来替换输出图像中的原始像素值
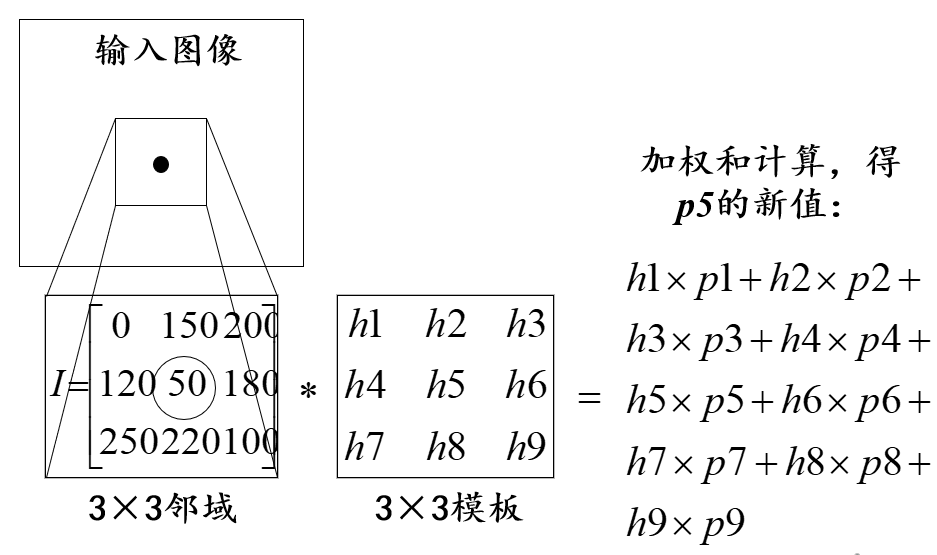
我们常说的卷积运算,具体来说在图像上不断移动模板的位置,使模板的中心像素遍历地对准图像的每一个像素,该像素所在邻域内的每一个像素分别与模板中的每一个加权系数(也就是模板的值)对位相乘,乘积之和即为该像素对应的滤波结果(也称为模板运算的结果)
三:综合案例
利用本章所学知识实现下图合成效果
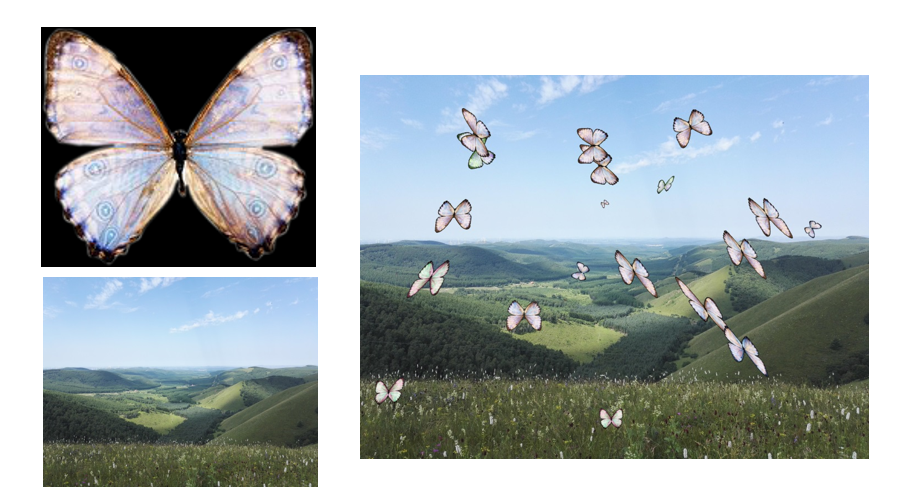
MATLAB实现
clear,clc,close all;
Image=imread('butterfly.bmp');
Back=imread('IMG3_13.jpg');
subplot(131),imshow(Image),title('蝴蝶');
subplot(132),imshow(Back),title('背景');
[h w c]=size(Back);
population=20;
num=3;
for k=1:population
    type=randi(6,1,num);
    NewImage=Image;
    for n=1:num
        switch type(n)
            case 1     %缩放
                scale=rand();
                NewImage=imresize(NewImage,scale,'bilinear');
            case 2    %旋转
                angle=round(rand()*100);
                NewImage=imrotate(NewImage,angle,'bilinear');
            case 3   %错切
                shear=rand()/2;
                tform1=maketform('affine',[1 0 0;shear 1 0; 0 0 1]);
                tform2=maketform('affine',[1 shear 0;0 1 0; 0 0 1]);
                NewImage=imtransform(NewImage,tform1);
                NewImage=imtransform(NewImage,tform2);
            case 4   %mirroring H
                NewImage=flipdim(NewImage,2);
            case 5   %mirroring  V
                NewImage=flipdim(NewImage,1);
            case 6   %mirroring C
                NewImage=flipdim(NewImage,2);
                NewImage=flipdim(NewImage,1);
        end
    end
    [newh neww newc]=size(NewImage);
    positionx=randi(w-2*neww,1,1);
    positiony=randi(h-2*newh,1,1);
    temp=Back(positiony:positiony+newh-1,positionx:positionx+neww-1,:);
    colorchange=randi(3,1,2);
    if colorchange(1)~=colorchange(2)
        color=NewImage(:,:,colorchange(1));
        NewImage(:,:,colorchange(1))=NewImage(:,:,colorchange(2));
        NewImage(:,:,colorchange(2))=color;
    end
    c=NewImage(:,:,1)&NewImage(:,:,2)&NewImage(:,:,3);
    pos=find(c(:)==0);
    NewImage(pos)=temp(pos);
    NewImage(pos+newh*neww)=temp(pos+newh*neww);
    NewImage(pos+2*newh*neww)=temp(pos+2*newh*neww);
    temp=NewImage;
    Back(positiony:positiony+newh-1,positionx:positionx+neww-1,:)=temp;
end
subplot(133),imshow(Back),title('合成图');
imwrite(Back,'hecheng.jpg');
Python实现
import cv2
import matplotlib.pyplot as plt
import numpy as np

# Load input images
image = cv2.imread('butterfly.bmp')
background = cv2.imread('IMG3_13.jpg')

# Display input images using matplotlib
plt.subplot(131)
plt.imshow(cv2.cvtColor(image, cv2.COLOR_BGR2RGB))
plt.title('蝴蝶')
plt.subplot(132)
plt.imshow(cv2.cvtColor(background, cv2.COLOR_BGR2RGB))
plt.title('背景')

# Set parameters
population = 20
num = 3
h, w, c = background.shape

for k in range(population):
    # Generate random transformation types
    types = np.random.randint(1, 7, size=num)
    new_image = image.copy()

    # Apply random transformations
    for n in range(num):
        if types[n] == 1:  # Scaling
            scale = np.random.rand()
            new_image = cv2.resize(new_image, None, fx=scale, fy=scale, interpolation=cv2.INTER_LINEAR)
        elif types[n] == 2:  # Rotation
            angle = np.round(np.random.rand() * 100)
            new_image = cv2.rotate(new_image, cv2.ROTATE_90_CLOCKWISE)
        elif types[n] == 3:  # Shearing
            shear = np.random.rand() / 2
            M = np.float32([[1, shear, 0], [0, 1, 0], [0, 0, 1]])
            new_image = cv2.warpPerspective(new_image, M, (w, h))
        elif types[n] == 4:  # Mirroring horizontally
            new_image = cv2.flip(new_image, 1)
        elif types[n] == 5:  # Mirroring vertically
            new_image = cv2.flip(new_image, 0)
        elif types[n] == 6:  # Mirroring both horizontally and vertically
            new_image = cv2.flip(new_image, -1)

    # Get new image size and position
    new_h, new_w, new_c = new_image.shape
    pos_x = np.random.randint(w - 2 * new_w)
    pos_y = np.random.randint(h - 2 * new_h)

    # Apply color changes
    color_change = np.random.randint(3, size=2)
    if color_change[0] != color_change[1]:
        color = new_image[:, :, color_change[0]].copy()
        new_image[:, :, color_change[0]] = new_image[:, :, color_change[1]]
        new_image[:, :, color_change[1]] = color

    # Replace background pixels with new image pixels
    mask = np.logical_and.reduce(new_image != 0, axis=2)
    pos = np.where(mask == False)
    temp = background[pos_y:pos_y + new_h, pos_x:pos_x + new_w].copy()
    temp[pos] = new_image[pos]
    temp[pos + new_h * new_w] = new_image[pos + new_h * new_w]
    temp[pos + 2 * new_h * new_w] = new_image[pos + 2 * new_h * new_w]
    background[pos_y:pos_y + new_h, pos_x:pos_x + new_w] = temp

# Display composite image using matplotlib
plt.subplot(133)
plt.imshow(cv2.cvtColor(background, cv2.COLOR_BGR2RGB))
plt.title('合成图')
plt.show()