记录:385
场景:在Spring Boot微服务中,读取application.yml或者bootstrap.yml等yml文件配置,转换为Map<String, Object>方式存储,使用(key,value)键值对方式,开箱即用。
1.基础说明
1.1转换原因
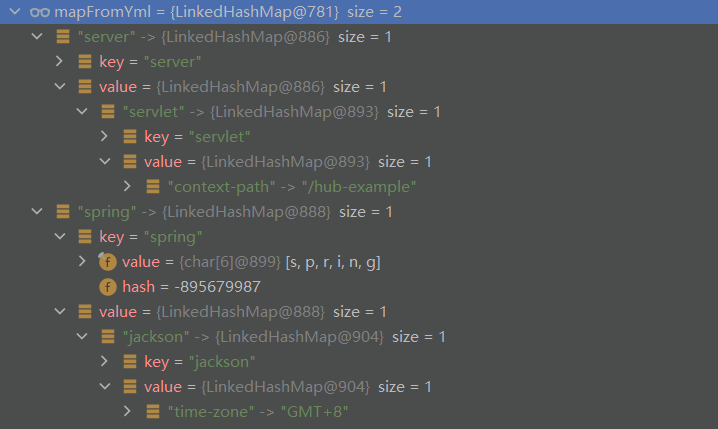
使用snakeyaml框架的org.yaml.snakeyaml.Yaml,从微服务的../src/main/resources资源加载yml文件,会存储在Map<String, Object> mapFromYml中。
(1)yml文件配置示例
server:
  servlet:
    context-path: /hub-example
spring:
  jackson:
    time-zone: GMT+8
(2)Yaml加载Map存储方式
Yaml加载Map存储方式:按照yml文件格式,一个冒号前面字符串就是一个Map的key,一个冒号后面部分是一个Map,直到冒号后面是具体值时,才是一个具体Object。因此,Yaml加载的结果Map<String, Object>在里面嵌套了很多层Map,最后一层Map的value才是具体值。具体格式,可以参考如下图。
使用不足:Yaml加载的Map,(key,value)键值对无法直接使用,使用时需要多次遍历才能找到最后值。因此,需转换。
(3)把Yaml加载的Map转换为可以直接使用的Map
yml配置示例:
server:
  servlet:
    context-path: /hub-example
spring:
  jackson:
    time-zone: GMT+8
转换后存储方式:
spring.jackson.time-zone=GMT+8
server.servlet.context-path=/hub-example
转换后取值方式:
Object value = Map.get(“spring.jackson.time-zone”)
1.2核心依赖
(1)功能
使用snakeyaml框架加载yml文件。
(2)依赖包
jar包:snakeyaml-1.33.jar
pom.xml依赖:
<dependency>
  <groupId>org.yaml</groupId>
  <artifactId>snakeyaml</artifactId>
  <version>1.33</version>
</dependency>
2.示例一:根据yml文件名读取yml配置和转换为Map<String, Object>
2.1实现方法
//1.从yml文件中加载
public static Map<String, Object> loadFromYmlFile(String ymlFileName) {
  InputStream input = null;
  Map<String, Object> mapFromYml = null;
  if (StringUtils.isBlank(ymlFileName)) {
      return null;
  }
  try {
      ClassPathResource resource = new ClassPathResource(ymlFileName);
      input = resource.getInputStream();
      Yaml yaml = new Yaml();
      mapFromYml = yaml.loadAs(input, Map.class);
  } catch (Exception e) {
      e.printStackTrace();
  } finally {
      if (input != null) {
          try {
              input.close();
          } catch (Exception e) {
              e.printStackTrace();
          }
      }
  }
  return mapFromYml;
}
//2.第一层转换
public static Map<String, Object> convertYml(Map<String, Object> mapFromYml) {
  Map<String, Object> map = mapFromYml;
  Map<String, Object> mapAfterConvert = new HashMap<>();
  map.forEach((key1, value1) -> {
      if (value1 instanceof Map) {
          mapAfterConvert.putAll(forEachYml(mapAfterConvert, key1, (Map) value1));
      } else {
          mapAfterConvert.put(key1, value1.toString());
      }
  });
  mapAfterConvert.forEach((key,value)->{
      System.out.println(key+"="+value);
  });
  return mapAfterConvert;
}
// 3.第二层转换(递归转换)
public static Map<String, Object> forEachYml(Map<String, Object> mapAfterConvert, String key1, Map<String, Object> map) {
  map.forEach((key2, value2) -> {
      String strNew;
      if (StringUtils.isNotEmpty(key1)) {
          strNew = key1 + "." + key2;
      } else {
          strNew = key2;
      }
      if (value2 instanceof Map) {
          mapAfterConvert.putAll(forEachYml(mapAfterConvert, strNew, (Map) value2));
      } else {
          mapAfterConvert.put(strNew, value2);
      }
  });
  return mapAfterConvert;
}
// 4.转换为(key,value),直接使用版本
public static Map<String, Object> getYmlAllConfig(String ymlFileName) {
    return convertYml(loadFromYmlFile(ymlFileName));
}
2.2测试方法
public static void main(String[] args) {
  Map<String, Object> application = getYmlAllConfig("application.yml");
}
3.示例二:读取yml文件使用单例方式存储转换结果Map<String, Object>
3.1实现方法
public final class YmlFileUtil02 {
  private static YmlFileUtil02 ymlFileUtil = null;
  private String ymlFileName = "application.yml";
  // org.yaml.snakeyaml.Yaml从yml文件加载的Map(需逐层遍历才能定位到具体值)
  private Map<String, Object> mapFromYml = new HashMap<>();
  // 转换后的Map,直接使用getValue(key)获取值
  private Map<String, Object> mapAfterConvert = new HashMap<>();
  //从yml文件中加载与转换
  private YmlFileUtil02(String ymlFileName) {
    InputStream input = null;
    if (StringUtils.isNotBlank(ymlFileName)) {
        this.ymlFileName = ymlFileName;
    }
    try {
        ClassPathResource resource = new ClassPathResource(this.ymlFileName);
        input = resource.getInputStream();
        Yaml yaml = new Yaml();
        this.mapFromYml = yaml.loadAs(input, Map.class);
        convertYml();
    } catch (Exception e) {
        e.printStackTrace();
    } finally {
        if (input != null) {
            try {
                input.close();
            } catch (Exception e) {
                e.printStackTrace();
            }
        }
    }
  }
  // 第一层转换
  private void convertYml() {
    Map<String, Object> map = this.mapFromYml;
    map.forEach((key1, value1) -> {
        if (value1 instanceof Map) {
            this.mapAfterConvert.putAll(forEachYml(key1, (Map) value1));
        } else {
            this.mapAfterConvert.put(key1, value1.toString());
        }
    });
  }
  // 第二层转换(递归转换)
  private Map<String, Object> forEachYml(String key1, Map<String, Object> map) {
    map.forEach((key2, value2) -> {
        String strNew;
        if (StringUtils.isNotEmpty(key1)) {
            strNew = key1 + "." + key2;
        } else {
            strNew = key2;
        }
        if (value2 instanceof Map) {
            this.mapAfterConvert.putAll(this.forEachYml(strNew, (Map) value2));
        } else {
            this.mapAfterConvert.put(strNew, value2);
        }
    });
    return this.mapAfterConvert;
  }
  // 转换为(key,value),直接使用
  public Object getValue(String key) {
    return this.mapAfterConvert.get(key);
  }
      // 根据文件名创建单例对象
  public static YmlFileUtil02 getInstance(String ymlFileName) {
    if (ymlFileUtil == null) {
        Class<YmlFileUtil02> obj = YmlFileUtil02.class;
        synchronized (obj) {
            if (ymlFileUtil == null) {
                ymlFileUtil = new YmlFileUtil02(ymlFileName);
            }
        }
    }
    return ymlFileUtil;
  }
}
3.2测试方法
public static void main(String[] args) {
  YmlFileUtil02 ymlInstance = YmlFileUtil02.getInstance("application.yml");
  System.out.println("server.port=" + ymlInstance.getValue("server.port"));
  System.out.println("spring.jackson.time-zone=" + ymlInstance.getValue("spring.jackson.time-zone"));
}
4.测试yml文件
4.1文件名
application.yml
4.2文件内容
server:
servlet:
context-path: /hub-example
port: 18080
spring:
jackson:
time-zone: GMT+8
application:
name: hub-example-custom
cloud:
nacos:
server-addr: 127.0.0.1:8848
username: nacos
password: nacos
namespace: d4f554cb-941e-40bc-85ce-f7a16c0dd4ba
config:
server-addr: 127.0.0.1:8848
username: nacos
password: nacos
namespace: d4f554cb-941e-40bc-85ce-f7a16c0dd4ce
group: DEFAULT_GROUP
file-extension: yaml
shared-configs:
- dataId: hub01.yml
refresh: true
group: DEFAULT_GROUP
- dataId: hub02.yml
refresh: true
group: DEFAULT_GROUP
- dataId: hub03.yml
refresh: true
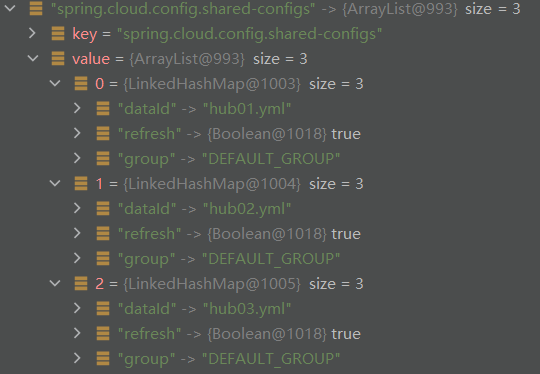
group: DEFAULT_GROUP4.3注意事项
在yml文件中,以-短横线开头的配置,对应成Java对象是List类型。因此这类的(key,value)是这样的:
key=spring.cloud.config.shared-configs
value=ArrayList
以上,感谢。
2023年3月13日