1. 脚本中获取物体对象
第一种方式:使用Find函数(不推荐)
这种方法不太方便,且编辑器中可能会对模型的名称进行更改,容易出错。
    void Start()
    {


        GameObject node = GameObject.Find("正方体");//查找获取编辑器中名称为“正方体”的模型
    }
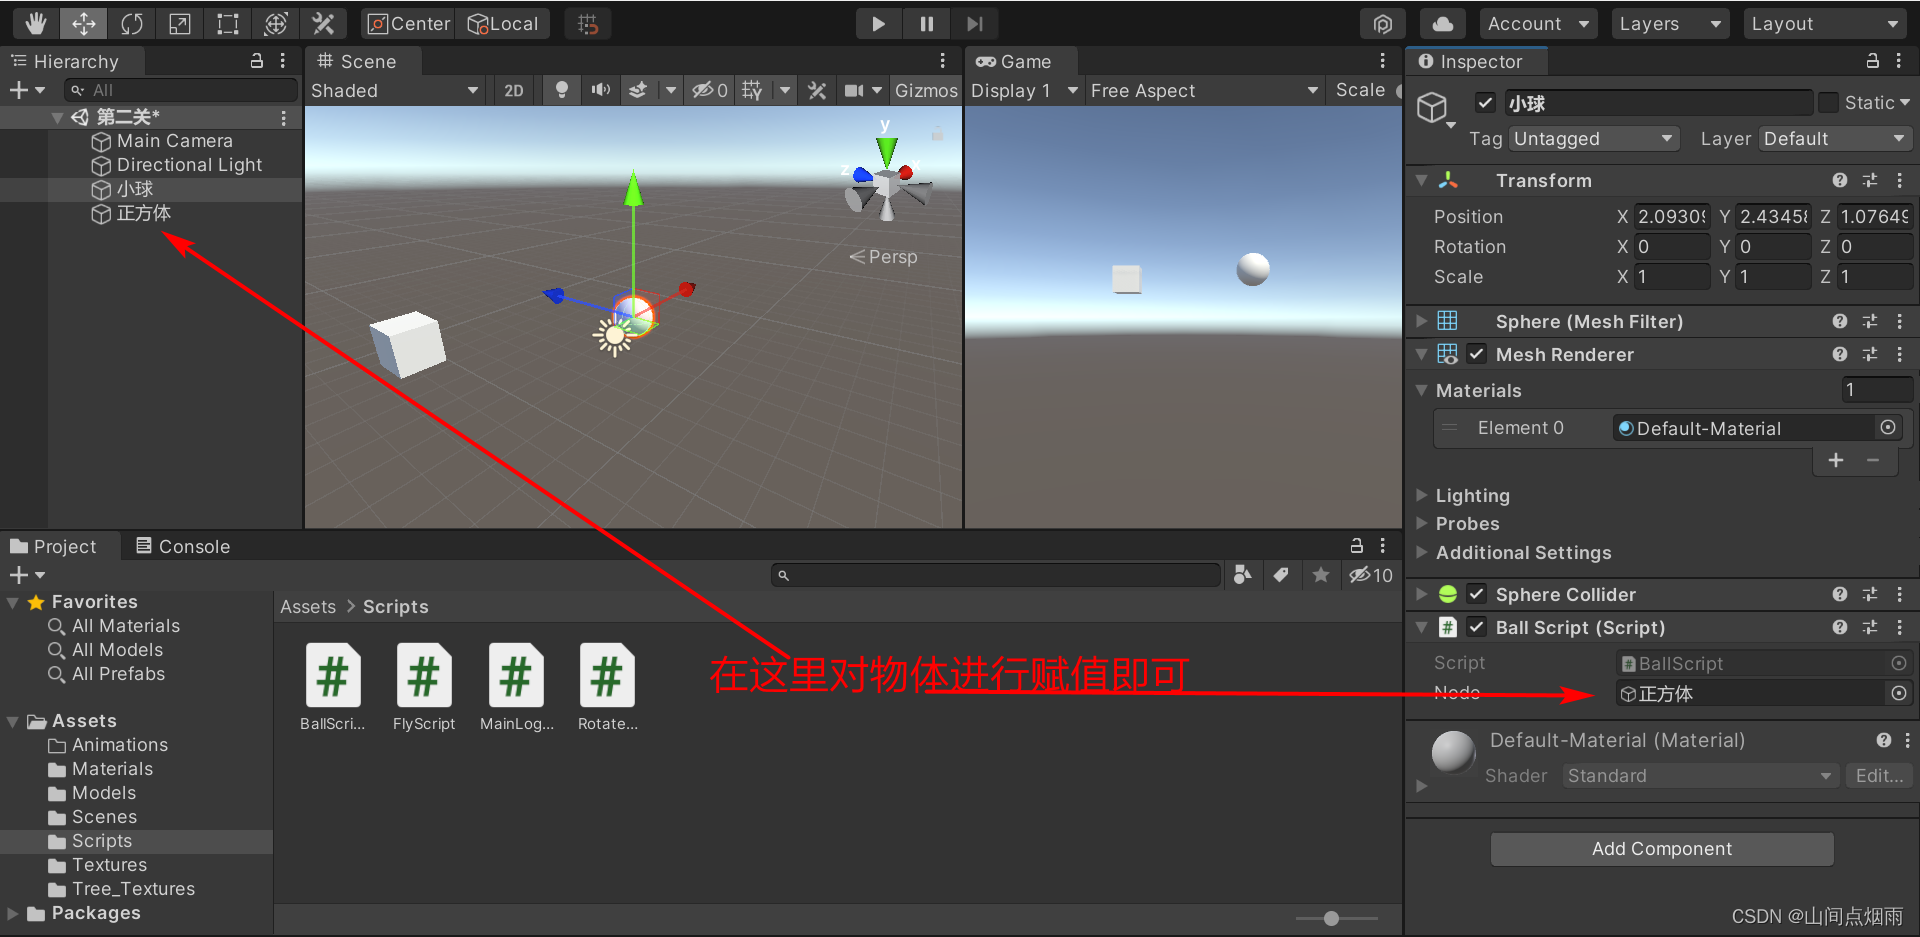
第二种方式:使用属性赋值的方式(推荐使用)
这种方法和组件的引用时类似的,在脚本文件中设置一个属性,然后在编辑器中对这个属性进行赋值,这样的好处是不管模型名称或位置怎么改动,编辑器会自动适应这种变化,不易出错。
using System.Collections;
using System.Collections.Generic;
using UnityEngine;

public class BallScript : MonoBehaviour
{


    public GameObject node; //在此处设置一个属性

    // Start is called before the first frame update
    void Start()
    {


        //赋值后就可以对物体传输过来的物体进行一些想要的操作
    }

    // Update is called once per frame
    void Update()
    {


    }
}
然后再在编辑器中对脚本中设置的属性进行赋值即可
2. 父级/子级物体的获取
在unity中,父级子级是由Transform这个类来维护的
获取父级:
Transform parent = this.transfrom.parent;
获取父级节点:
GameObject parentNode = this.transform.parent.gameobject;
获取子级:
//第一种:遍历查找
foreach(Transform child in transform)
{


    Debug.Log("* 子物体:" + child.name);
}
//第二种:索引查找
Transform child2 = this.transform.GetChild(0);
Debug.Log("* 子物体:" + child2.name);
//第三种:名称查找
Transform child3 = this.transform.Find("正方体");
Debug.Log("* 子物体:" + child3.name);
3. 物体的操作
3.1 设置父级节点
this.transform.SetParent(node);//node为某一个节点模型
this.transform .SetParent(null);//null表示设置为一级节点
3.2 隐藏 / 显示物体
Transform child = this.transform.Find("/aa");//前面的 / 表示在根节点开始查找
if (child.gameObject.activeSelf)//如果当前物体显示(activeself用于判断当前物体是否是激活状态)
 {


     child.gameObject.SetActive(false);//隐藏物体
 }
 else
 {


     child.gameObject.SetActive(true);//显示物体
 }
4. 资源的使用
在脚本中,也可以引用一个资源
比如:
AudioClip 音频文件
Texture 纹理贴图
Material 材质
…
举例:脚本控制音频文件 audioclip
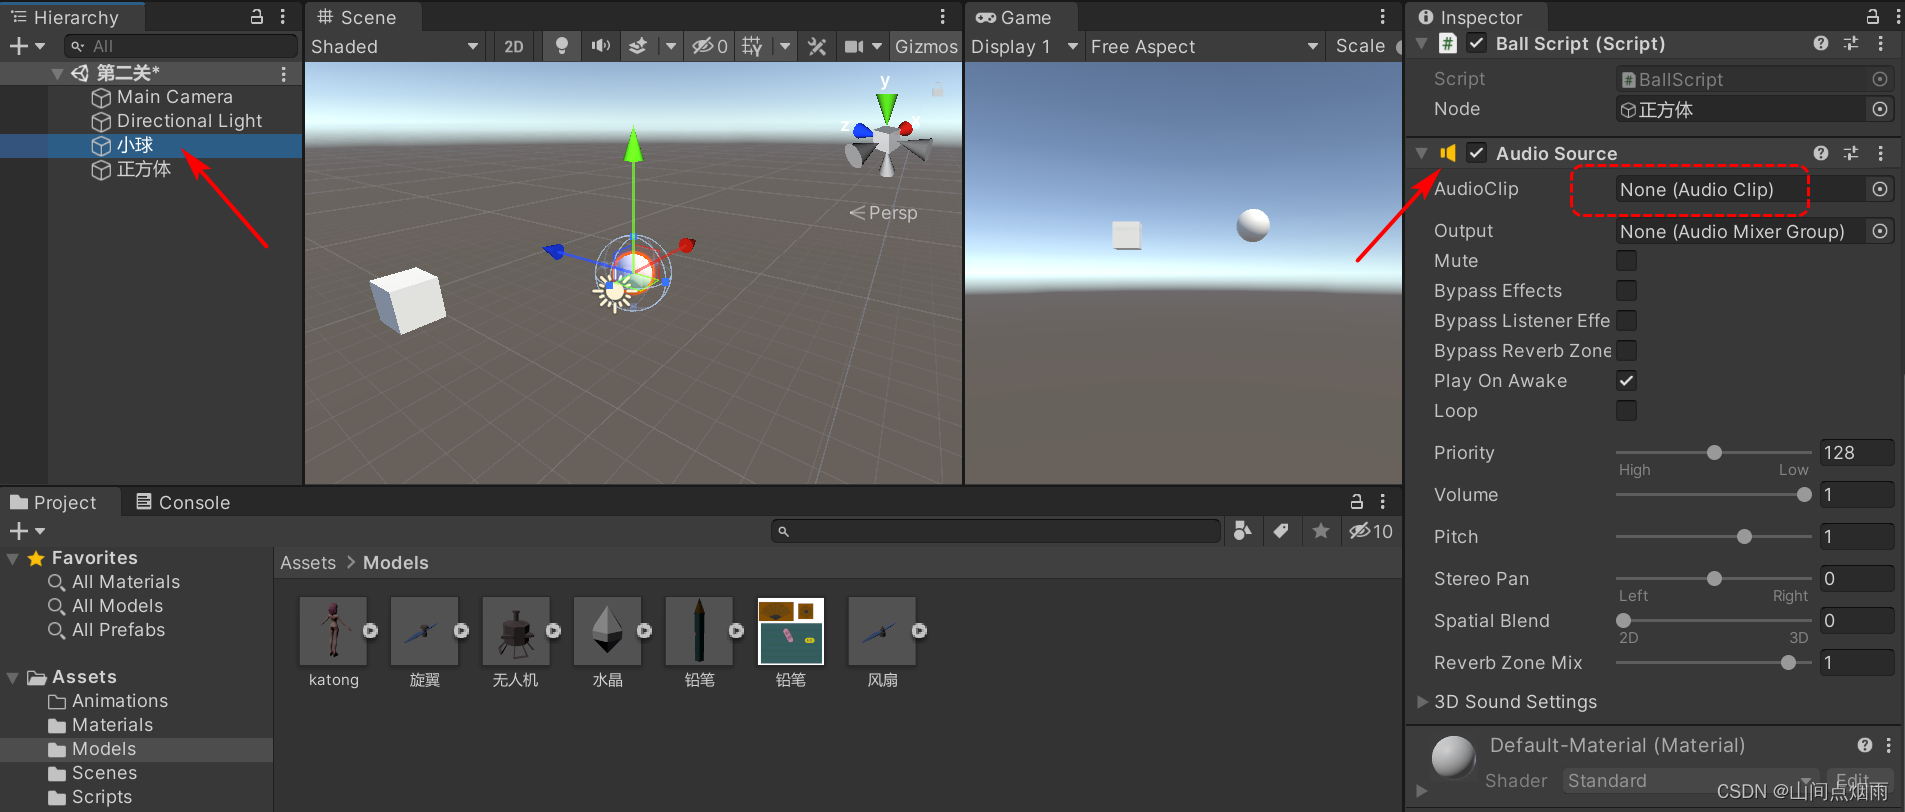
首先在界面编辑器当中给某一个物体挂载一个AudioSource组件,此时不用在界面中设定其AudioClip属性,这个在其挂载的脚本中进行设置,如图:(一般情况下,在界面编辑器中添加一个组件后,可以直接将资源文件拖放到对应属性内,不过现在要在脚本中进行设置)
然后在这个小球模型上挂载一个脚本,代码如下:
using System.Collections;
using System.Collections.Generic;
using UnityEngine;

public class BallScript : MonoBehaviour
{


    public AudioClip audioclipSucess; //定义一个属性,用于接收界面编辑器设置的'成功提示音'

    public AudioClip audioclipFail;//定义一个属性,用于接收界面编辑器设置的'失败提示音'

    private AudioSource audio;

    // Start is called before the first frame update
    void Start()
    {


        audio = this.GetComponent<AudioSource>();//获取当前模型下的audiosource组件
    }

    // Update is called once per frame
    void Update()
    {


        if(Input.GetKeyDown(KeyCode.A))
        {


            audio.PlayOneShot(audioclipSucess);//播放一次
        }
        if(Input.GetKeyDown(KeyCode.D))
        {


            audio.PlayOneShot(audioclipFail);//播放一次
        }
    }
}
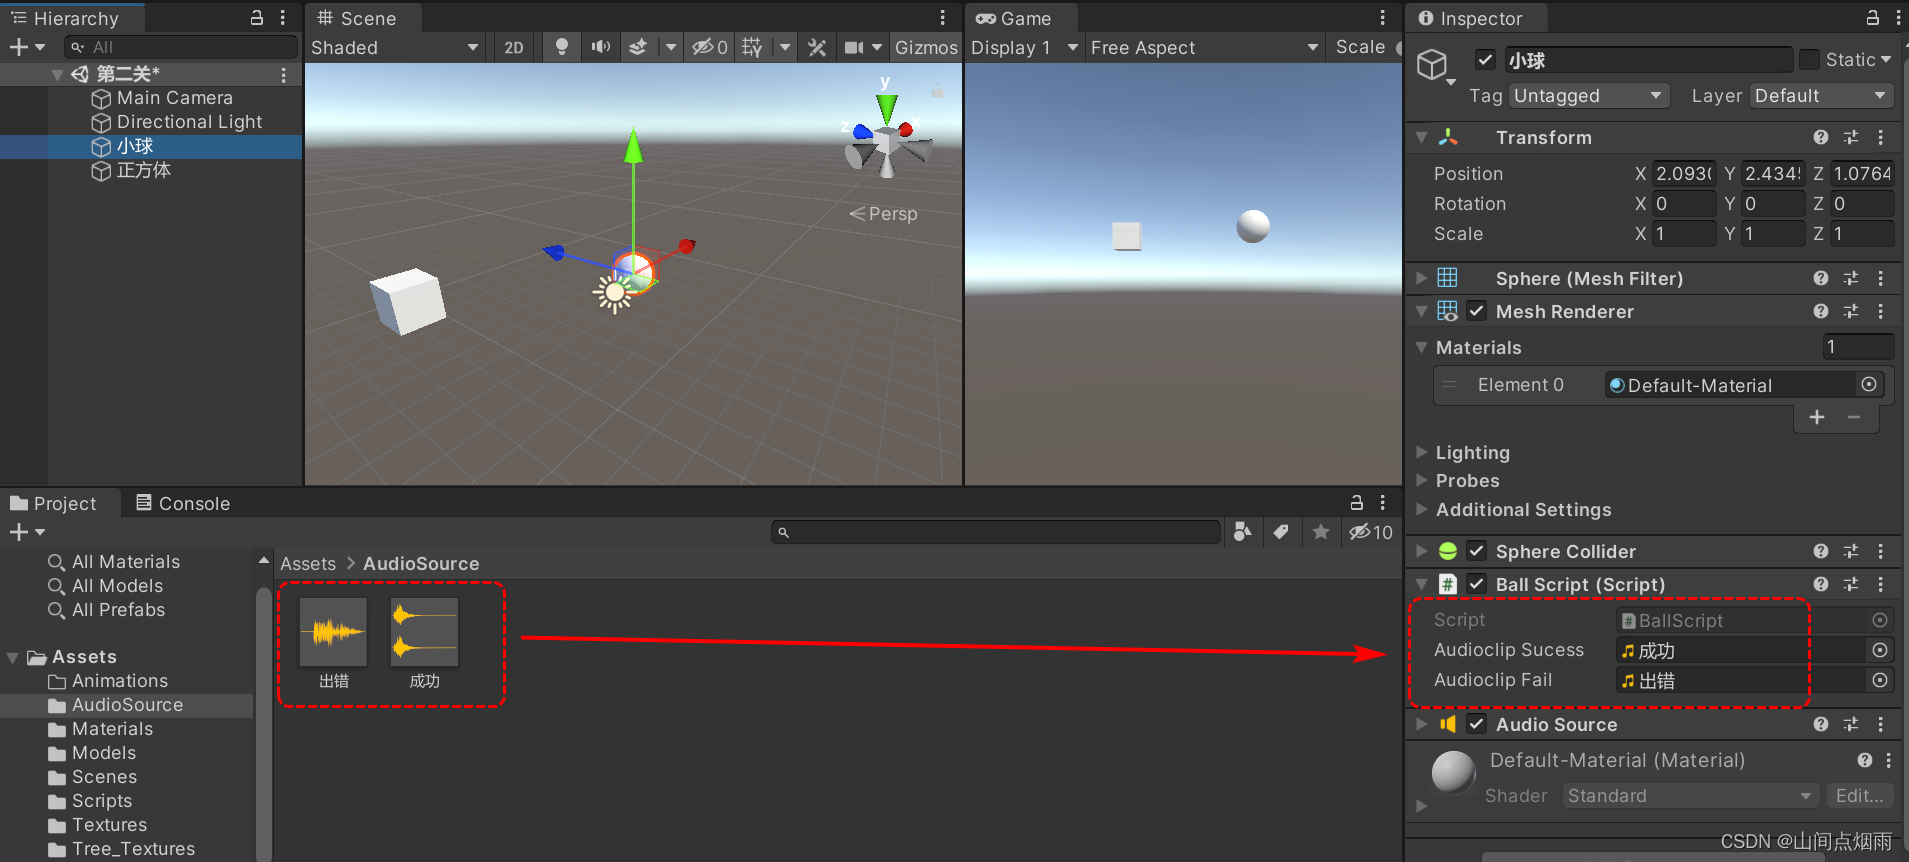
挂载代码后,还需在界面编辑器中将上面的两个属性进行指定,如下图所示,指定后运行程序即可。
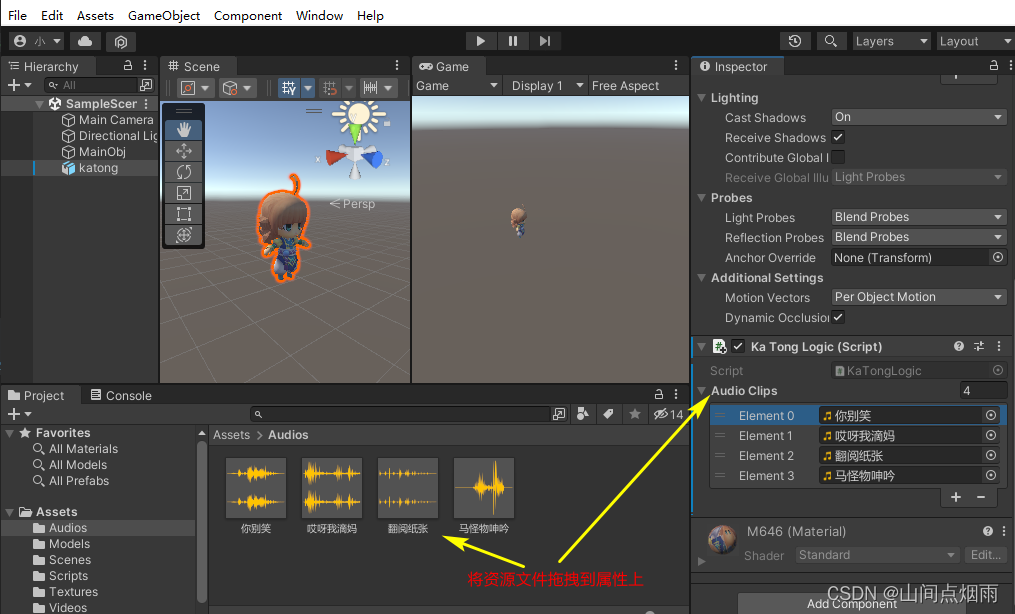
5. 资源数组
在定义属性时,如果需要一个变量存储多个内容,可以考虑使用数组来实现,在脚本中设置一个数组变量:
using System.Collections;
using System.Collections.Generic;
using UnityEngine;

public class KaTongLogic : MonoBehaviour
{


    public AudioClip[] audioClips;//添加一个数组类型的变量

    // Start is called before the first frame update
    void Start()
    {


    }

    // Update is called once per frame
    void Update()
    {


        if(Input.GetMouseButtonDown(0))
        {


        	NextAudio();
        }
    }
	private void NextAudio()
	{


		//随机播放
		int index = Random.Range(0,audioClips.Length);
		AudioClip audio = this.audioClips[index];
		AudioSource audioSource = this.GetComponent<AudioSource>();
		audioSource.clip = audio;	//给组件属性赋值
		audioSource.Play();	//开始播放
	}
}
在界面中对数组属性进行赋值时,可以多次赋值:
6. 定时调用
定时调用Invoke,即常说的定时器,继承自MonoBehavior,常用函数如下:
Invoke(func,delay):只调用一次
InvokeRepeating(func,delay,interval):第一次调用延迟delay时间,后面每次循环调用的间隔时间按照interval执行
IsInvoking(func):判断是否正在调度中
CancelInvoke(func):取消调用、从调度队列中移除
using System.Collections;
using System.Collections.Generic;
using UnityEngine;

public class KaTongLogic : MonoBehaviour
{


    public AudioClip[] audioClips;

    // Start is called before the first frame update
    void Start()
    {


        Debug.Log("* Start。。。。" + Time.time);

        //注意函数名要以字符串的形式给出
        this.Invoke("DoSomething",1);// 1 秒后调用这个函数

        this.InvokeRepeating("DoSomething",2,4);第一次是2秒后调用这个函数,后面就是按照间隔4秒循环调用
    }

    // Update is called once per frame
    void Update()
    {


    }

    public void DoSometing()
    {


        Debug.Log("* DoSomethis。。。。" + Time.time);
    }
}
7. unity线程问题??
在unity中是没有多线程的,不用考虑并发、多线程啥的。。。
可以使用线程ID进行验证
using System.Threading;
Thread.CurrentThread.ManagedThreadId;
分别在start()函数、update()函数和定时函数中打印出线程ID,发现ID号是一样的
using System.Collections;
using System.Collections.Generic;
using UnityEngine;

using System.Threading;

public class KaTongLogic : MonoBehaviour
{


    public AudioClip[] audioClips;

    // Start is called before the first frame update
    void Start()
    {


        Debug.Log("* Start。。。。" + Time.time);

        Debug.Log("* Start...." + Thread.CurrentThread.ManagedThreadId);//输出当前函数所在线程ID

        //注意函数名要以字符串的形式给出
        this.Invoke("DoSomething",1);// 1 秒后调用这个函数

        this.InvokeRepeating("DoSomething",2,4);//第一次是2秒后调用这个函数,后面就是按照间隔4秒循环调用
    }

    // Update is called once per frame
    void Update()
    {


        Debug.Log("* Update...." + Thread.CurrentThread.ManagedThreadId);//输出当前函数所在线程ID
    }

	//延迟调用函数
    public void DoSometing()
    {


        Debug.Log("* DoSometing...." + Thread.CurrentThread.ManagedThreadId);//输出当前函数所在线程ID
        Debug.Log("* DoSomethis。。。。" + Time.time);
    }
}
8. 案例:利用定时器实现速度的渐变
实现模型的缓慢加速旋转和缓慢停止旋转
代码:
using System.Collections;
using System.Collections.Generic;
using UnityEngine;
using System.Threading;


public class KaTongLogic : MonoBehaviour
{


    public float maxSpeed = 1000;

    float m_speed = 0;//当前速度
    bool m_speedUp = false;//是否加速
    // Start is called before the first frame update
    void Start()
    {


        this.InvokeRepeating("AdjustSpeed", 0.1f,0.1f);//循环调用
    }

    // Update is called once per frame
    void Update()
    {


        //点一下加速,再点减速,交替执行
        if(Input.GetMouseButtonDown(0))
        {


            m_speedUp = !m_speedUp;
        }
        if (m_speed > 0)
        {


            this.transform.Rotate(0, 0, m_speed * Time.deltaTime, Space.Self);
        }

    }

    public void AdjustSpeed()
    {


        if (m_speedUp)
        {


            //阈值判断
            if(m_speed < maxSpeed)
            {


                m_speed += 20;
            }
        }
        else
        {


            m_speed -= 20;
            //阈值判断
            if(m_speed < 0)
            {


                m_speed = 0;
            }
        }
    }
}
实际效果:
unity定时器实现速度渐变
10. unity中的向量
向量:有方向有长度,在unity当中使用较多的是Vector3三维向量。
using System.Collections;
using System.Collections.Generic;
using UnityEngine;
using System.Threading;

public class KaTongLogic : MonoBehaviour
{


    // Start is called before the first frame update
    void Start()
    {


        //两个API
        Vector3 v1 = new Vector3 (6, 8, 0);

        float len = v1.magnitude; //求向量的长度
        Debug.Log("v1的长度:" + len);

        Vector3 v2 = v1.normalized;//向量的标准化
        Debug.Log("v1的标准化:" + v2);

        //几个常量
        Vector3 vZero = Vector3.zero;//即(0,0,0)
        Vector3 vUp = Vector3.up;//即(0,1,0)
        Vector3 vRight = Vector3.right;//即(1,0,0)
        Vector3 vForward = Vector3.forward;//即(0,0,1)

        Vector3 a = new Vector3(3, 4, 0);
        Vector3 b = new Vector3(5, 6, 0);

        //向量加法
        Vector3 c = a + b;

        //向量减法
        Vector3 d = a - b;

        //向量乘法
        Vector3 e = a * 2;//标量乘法
        float f = Vector3.Dot(a,b);//点积
        Vector3 g = Vector3.Cross(a, b);//差积

        //向量赋值
        Vector3 h = a;//注意不能赋值为null
    }

    // Update is called once per frame
    void Update()
    {


    }
}
10.1 向量测距
可用于计算两个物体之间的距离,确切的说是计算两个物体轴心点之间的距离,测距之前应先检查一下两个物体之间的轴心点是否在一个平面上,不然可能存在误差。
using System.Collections;
using System.Collections.Generic;
using UnityEngine;

public class KaTongLogic : MonoBehaviour
{


    public GameObject target;
    // Start is called before the first frame update
    void Start()
    {


        Vector3 p1 = this.transform.position;//当前物体的坐标(相对于原点)
        Vector3 p2 = target.transform.position;//目标物体的坐标(相对于原点)

        Vector3 direction = p2 - p1;//计算两者间的方向向量
        float distance = direction.magnitude;//计算距离

        //使用API进行计算
        float distance2 = Vector3.Distance(p2, p1);

        Debug.Log("* 两者之间的距离:" + distance );
        Debug.Log("* 两者之间的距离:" + distance2);
    }

    // Update is called once per frame
    void Update()
    {


    }
}
辅助记忆:

10.2 向量的应用
比如在脚本中设定物体的移动速度,可以单独设置一个float类型的值,然后使用translate()函数指定物体在哪个方向移动,但这样并不通用,无法做到任意的更改移动方向,可以使用向量的方式来指定。
示例:
using System.Collections;
using System.Collections.Generic;
using UnityEngine;


public class KaTongLogic : MonoBehaviour
{


    public Vector3 speed; //定义一个三维向量来控制物体移动(包括方向和速度)

    // Start is called before the first frame update
    void Start()
    {


    }

    // Update is called once per frame
    void Update()
    {


        Vector3 delta = speed * Time.deltaTime;

        this.transform.Translate(delta, Space.Self);
    }
}
这样就可以在界面编辑器中任意指定物体移动的方向和速度了,在下图中的x,y,z输入框内输入数值,可任意指定:
