什么是spring boot
Spring Boot是由Pivotal团队提供的全新框架,其设计目的是用来简化新Spring应用的初始搭建以及开发过程。该框架使用了特定的方式来进行配置,从而使开发人员不再需要定义样板化的配置。spring boot其实就是优化了一些配置,它默认配置了很多框架的使用方式,就像maven整合了所有的jar包,spring boot整合了所有的框架。
使用spring boot的好处
对于spring web项目,如果我们要搭建一个spring web项目,1:配置web.xml文件,用来加载spring。2:配置数据库连接,配置事务。3:配置日志文件。4:配置加载文件的读取,读取配置文件。5:。。。。最后,配置完成之后部署tomcat 调试。这些文件配置下来,工作相当的繁琐。
当前比较流行的微服务框架,比如一个下单流程,可能支付是一个项目,会计结算是一个项目,积分生成是一个项目。。。如果使用spring boot就要把每个流程都折腾一遍。但如果使用了spring boot,只需要简单的几个步骤就可以轻松搭建web项目。
第一个spring boot项目
spring boot项目demo网上有很多教程和案例,但是第一个项目都是简单的打出一个hello word,这样实现起来也没有太大的意义,只是让你理解一下spring boot,带你稍微的入一下门。。。。废话不多说了,今天的总结是spring-boot+jpa+thymeleaf实现curd的操作。
一:构建spring boot项目。(不用去用eclipse去创建,这是不智能的方法,推荐大家使用以下方式,这只是个人意见哈)
1、访问http://start.spring.io/
2、选择构建工具Maven Project、Spring Boot版本2.0.1以及一些工程基本信息,点击“Switch to the full version.”java版本选择1.8,可参考下图所示
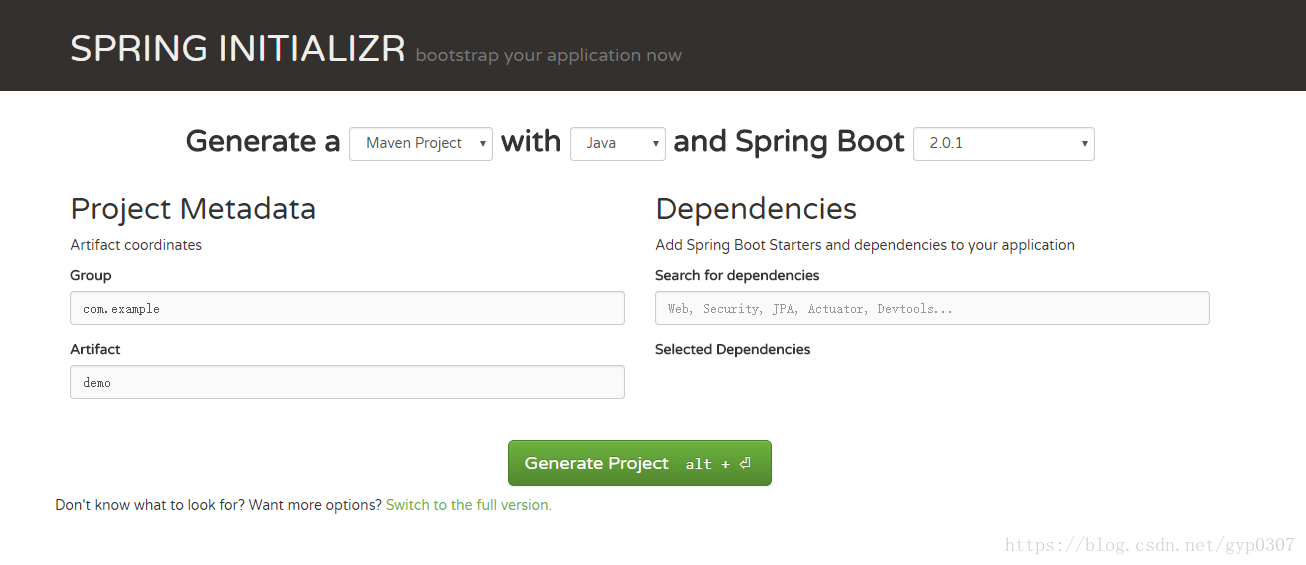
4、解压后,使用eclipse,Import -> Existing Maven Projects -> Next ->选择解压后的文件夹-> Finsh
二:项目结构
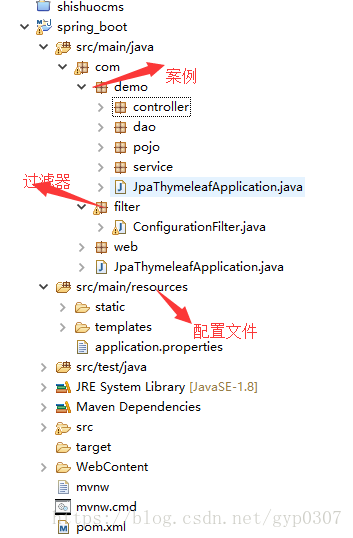
下面话不多说,我直接上代码,有需要注意的我会标识出来
a:>>>>pom.xml文件配置:
<?xml version="1.0" encoding="UTF-8"?>
<project xmlns="http://maven.apache.org/POM/4.0.0" xmlns:xsi="http://www.w3.org/2001/XMLSchema-instance"
	xsi:schemaLocation="http://maven.apache.org/POM/4.0.0 http://maven.apache.org/xsd/maven-4.0.0.xsd">
	<modelVersion>4.0.0</modelVersion>

	<groupId>com.web</groupId>
	<artifactId>spring_boot</artifactId>
	<version>0.0.1-SNAPSHOT</version>
	<packaging>jar</packaging>

	<name>spring_boot</name>
	<description>自己练习的一个spring_boot项目</description>

	<parent>
		<groupId>org.springframework.boot</groupId>
		<artifactId>spring-boot-starter-parent</artifactId>
		<version>2.0.1.RELEASE</version>
		<relativePath/> <!-- lookup parent from repository -->
	</parent>

	<properties>
		<project.build.sourceEncoding>UTF-8</project.build.sourceEncoding>
		<project.reporting.outputEncoding>UTF-8</project.reporting.outputEncoding>
		<java.version>1.8</java.version>
	</properties>

	<dependencies>
		<dependency>
			<groupId>org.springframework.boot</groupId>
			<artifactId>spring-boot-starter</artifactId>
		</dependency>

		<dependency>
			<groupId>org.springframework.boot</groupId>
			<artifactId>spring-boot-starter-test</artifactId>
			<scope>test</scope>
		</dependency>
		<dependency>
	        <groupId>org.springframework.boot</groupId>
	        <artifactId>spring-boot-starter-web</artifactId>
 		</dependency>
 		<dependency>
        	<groupId>org.springframework.boot</groupId>
        	<artifactId>spring-boot-starter-data-jpa</artifactId>
    	</dependency>
     	<dependency>
        	<groupId>mysql</groupId>
        	<artifactId>mysql-connector-java</artifactId>
    	</dependency>
    	<dependency>
            <groupId>org.springframework.boot</groupId>
            <artifactId>spring-boot-starter-thymeleaf</artifactId>
        </dependency>
        <dependency>
            <groupId>org.springframework.boot</groupId>
            <artifactId>spring-boot-devtools</artifactId>
            <optional>true</optional>
        </dependency>
	</dependencies>

	<build>
		<plugins>
			<plugin>
				<groupId>org.springframework.boot</groupId>
				<artifactId>spring-boot-maven-plugin</artifactId>
			</plugin>
		</plugins>
	</build>


</project>
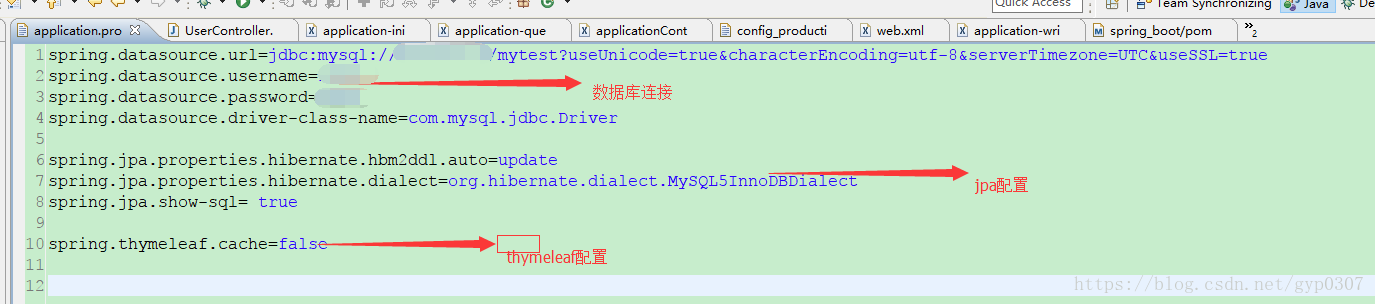
b:>>>application.properties相关配置(这个是仅实现项目功能而配置的,具体的详细说明请自行百度)
c:>>>JpaThymeleafApplication
@SpringBootApplication(scanBasePackages = "com.*")
public class JpaThymeleafApplication extends SpringBootServletInitializer {
	@Override
	protected SpringApplicationBuilder configure(SpringApplicationBuilder application) {
		return application.sources(JpaThymeleafApplication.class);
	}

	public static void main(String[] args) throws Exception {
		SpringApplication.run(JpaThymeleafApplication.class, args);
	}
}
d:>>>controller
@Controller
public class UserController {

	@Resource
	UserService userService;

	@RequestMapping("/")
	public String index() {
		System.out.println("*****************************************");
		return "redirect:/list";
	}

	@RequestMapping("/list")
	public String list(Model model) {
		List<User> users = userService.getUserList();
		model.addAttribute("users", users);
		return "user/list";
	}

	@RequestMapping("/toAdd")
	public String toAdd() {
		return "user/userAdd";
	}

	@RequestMapping("/add")
	public String add(User user) {
		userService.save(user);
		return "redirect:/list";
	}

	@RequestMapping("/toEdit")
	public String toEdit(Model model, Long id) {
		User user = userService.findUserById(id);
		model.addAttribute("user", user);
		return "user/userEdit";
	}

	@RequestMapping("/edit")
	public String edit(User user) {
		userService.edit(user);
		return "redirect:/list";
	}

	@RequestMapping("/delete")
	public String delete(Long id) {
		userService.delete(id);
		return "redirect:/list";
	}

}
d:>>>service()
public interface UserService {

	public List<User> getUserList();

	public User findUserById(long id);

	public void save(User user);

	public void edit(User user);

	public void delete(long id);

}
service实现层
@Service
public class UserServiceImpl implements UserService {

	@Autowired
	private UserRepository userRepository;

	@Override
	public List<User> getUserList() {
		return userRepository.findAll();
	}

	@Override
	public User findUserById(long id) {
		return userRepository.findById(id);
	}

	@Override
	public void save(User user) {
		userRepository.save(user);
	}

	@Override
	public void edit(User user) {
		userRepository.save(user);
	}

	@Override
	public void delete(long id) {
		userRepository.deleteById(id);
	}

}
e:>>>dao层设置
public interface UserRepository extends JpaRepository<User, Long> {

	User findById(long id);

}
dao只要继承JpaRepository类就可以,几乎可以不用写方法,还有一个特别有尿性的功能非常赞,就是可以根据方法名来自动的生产SQL,比如
findByUserName
会自动生产一个以
userName
为参数的查询方法,比如
findAlll
自动会查询表里面的所有数据,比如自动分页等等
f:>>>pojo层
@Entity
public class User {
	@Id
	@GeneratedValue
	private long id;
	@Column(nullable = false, unique = true)
	private String userName;
	@Column(nullable = false)
	private String password;
	@Column(nullable = false)
	private int age;
        省略set/get方法...
}
<!DOCTYPE html>
<html lang="en" xmlns:th="http://www.thymeleaf.org">
<head>
    <meta charset="UTF-8"/>
    <title>userList</title>
    <link rel="stylesheet" th:href="@{/css/bootstrap.css}"></link>
</head>
<body class="container">
<br/>
<h1>用户列表</h1>
<br/><br/>
<div class="with:80%">
    <table class="table table-hover">
        <thead>
        <tr>
            <th>#</th>
            <th>User Name</th>
            <th>Password</th>
            <th>Age</th>
            <th>Edit</th>
            <th>Delete</th>
        </tr>
        </thead>
        <tbody>
        <tr  th:each="user : ${users}">
            <th scope="row" th:text="${user.id}">1</th>
            <td th:text="${user.userName}">neo</td>
            <td th:text="${user.password}">Otto</td>
            <td th:text="${user.age}">6</td>
            <td><a th:href="@{/toEdit(id=${user.id})}">edit</a></td>
            <td><a th:href="@{/delete(id=${user.id})}">delete</a></td>
        </tr>
        </tbody>
    </table>
</div>
<div class="form-group">
    <div class="col-sm-2 control-label">
        <a href="/toAdd" th:href="@{/toAdd}" class="btn btn-info">add</a>
    </div>
</div>

</body>
</html>
三:页面文件
这里我们先了解一下Thymeleaf:Thymeleaf是一款用于渲染XML/XHTML/HTML5内容的模板引擎。类似JSP,Velocity,FreeMaker等,它也可以轻易的与Spring MVC等Web框架进行集成作为Web应用的模板引擎。与其它模板引擎相比,Thymeleaf最大的特点是能够直接在浏览器中打开并正确显示模板页面,而不需要启动整个Web应用。它的功能特性如下:
- Spring MVC中@Controller中的方法可以直接返回模板名称,接下来Thymeleaf模板引擎会自动进行渲染
- 模板中的表达式支持Spring表达式语言(Spring EL)
- 表单支持,并兼容Spring MVC的数据绑定与验证机制
- 国际化支持
spring boot默认加载文件的路径是
/META-INF/resources/
/resources/
/static/
/public/
html文件默认都在templates文件下,具体原先请查看jar包源码。
为方便开发我们直接采取默认即可,也可以自行进行修改
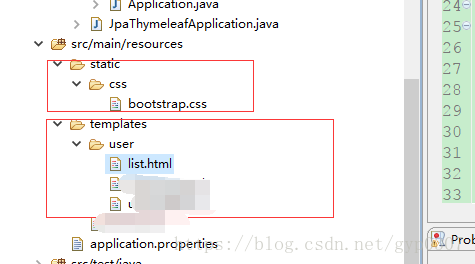
static >> css >> bootstrap.css
省略
templates >> user >> list.html
<!DOCTYPE html>
<html lang="en" xmlns:th="http://www.thymeleaf.org">
<head>
    <meta charset="UTF-8"/>
    <title>userList</title>
    <link rel="stylesheet" th:href="@{/css/bootstrap.css}"></link>
</head>
<body class="container">
<br/>
<h1>用户列表</h1>
<br/><br/>
<div class="with:80%">
    <table class="table table-hover">
        <thead>
        <tr>
            <th>#</th>
            <th>User Name</th>
            <th>Password</th>
            <th>Age</th>
            <th>Edit</th>
            <th>Delete</th>
        </tr>
        </thead>
        <tbody>
        <tr  th:each="user : ${users}">
            <th scope="row" th:text="${user.id}">1</th>
            <td th:text="${user.userName}">neo</td>
            <td th:text="${user.password}">Otto</td>
            <td th:text="${user.age}">6</td>
            <td><a th:href="@{/toEdit(id=${user.id})}">edit</a></td>
            <td><a th:href="@{/delete(id=${user.id})}">delete</a></td>
        </tr>
        </tbody>
    </table>
</div>
<div class="form-group">
    <div class="col-sm-2 control-label">
        <a href="/toAdd" th:href="@{/toAdd}" class="btn btn-info">add</a>
    </div>
</div>

</body>
</html>
本文只是记录了一些步骤,方便以后自己的记忆,具体的实现原理并没有进行说明。这边文章是方便自己记忆回顾的。