图片数据:
链接:https://pan.baidu.com/s/1-5T0c3ev-l2jvz9ZfjybrQ
提取码:qzgo
文章目录
前言
本文分别应用区域生长算法和Grabcut算法对图像进行分割。形成了两种方法。
原图(beijing.jpg):

Grabcut算法分割效果:

区域生长算法分割效果:

一、Grabcut算法
1. Grabcut算法的原理
Grabcut是采用graph cut图分割和最大流技术的一种交互式图像分割技术,它需要用户输入一个bounding box作为分割目标位置,实现对目标与背景的分离/分割, Grabcut主要包含了k均值聚类、高斯混合模型建模(GMM)、max flow/min cut部分的知识。
2. GrabCut算法的实现步骤
(1) 在图片中定义(一个或者多个)包含物体的矩形(为了便于实现我在本题中使用鼠标绘制边框图形)。
(2) 矩形外的区域被自动认为是背景。
(3) 对于用户定义的矩形区域,可用背景中的数据来区分它里面的前景和背景区域。
(4) 用高斯混合模型(GMM)来对背景和前景建模,并将未定义的像素标记为可能的前景或者背景。
(5) 图像中的每一个像素都被看做通过虚拟边与周围像素相连接,而每条边都有一个属于前景或者背景的概率,这是基于它与周边像素颜色上的相似性。
(6) 每一个像素(即算法中的节点)会与一个前景或背景节点连接。
(7) 在节点完成连接后(可能与背景或前景连接),若节点之间的边属于不同终端(即一个节点属于前景,另一个节点属于背景),则会切断他们之间的边,这就能将图像各部分分割出来。
3. 代码实现及操作方法
操作方法:
运行下方代码之后,先按住鼠标左键(会留下红线)沿着华表图案画一半,然后用鼠标右键(会留下蓝线)对比弹出的窗口(窗口名为result)中的实时效果,进行补充(哪里有非黑色区域就沿着对应的边界画上蓝线)。
操作情景形如下图:

最终效果:

#应用Grabcut算法分割图像
import cv2
import numpy as np
import time

drawing = False
mode = False

class GrabCut:
    def __init__(self, t_img):
        self.img = t_img
        self.img_raw = img.copy()
        self.img_width = img.shape[0]
        self.img_height = img.shape[1]
        self.scale_size = 640 * self.img_width // self.img_height
        if self.img_width > 640:
            self.img = cv2.resize(self.img, (640, self.scale_size), interpolation=cv2.INTER_AREA)
        self.img_show = self.img.copy()
        self.img_gc = self.img.copy()
        self.img_gc = cv2.GaussianBlur(self.img_gc, (3, 3), 0)
        self.lb_up = False
        self.rb_up = False
        self.lb_down = False
        self.rb_down = False
        self.mask = np.full(self.img.shape[:2], 2, dtype=np.uint8)
        self.firt_choose = True


# 鼠标的回调函数
def mouse_event2(event, x, y, flags, param):
    global drawing, last_point, start_point
    # 左键按下:开始画图
    if event == cv2.EVENT_LBUTTONDOWN:
        drawing = True
        last_point = (x, y)
        start_point = last_point
        param.lb_down = True
        print('mouse lb down')
    elif event == cv2.EVENT_RBUTTONDOWN:
        drawing = True
        last_point = (x, y)
        start_point = last_point
        param.rb_down = True
        print('mouse rb down')
# 按住鼠标移动进行绘制
    elif event == cv2.EVENT_MOUSEMOVE:
        if drawing:
            if param.lb_down:
                cv2.line(param.img_show, last_point, (x,y), (0, 0, 255), 2, -1)
                cv2.rectangle(param.mask, last_point, (x, y), 1, -1, 4)
            else:
                cv2.line(param.img_show, last_point, (x, y), (255, 0, 0), 2, -1)
                cv2.rectangle(param.mask, last_point, (x, y), 0, -1, 4)
            last_point = (x, y)
# 左键释放:结束画图
    elif event == cv2.EVENT_LBUTTONUP:
        drawing = False
        param.lb_up = True
        param.lb_down = False
        cv2.line(param.img_show, last_point, (x,y), (0, 0, 255), 2, -1)
        if param.firt_choose:
            param.firt_choose = False
        cv2.rectangle(param.mask, last_point, (x,y), 1, -1, 4)
        print('mouse lb up')
    elif event == cv2.EVENT_RBUTTONUP:
        drawing = False
        param.rb_up = True
        param.rb_down = False
        cv2.line(param.img_show, last_point, (x,y), (255, 0, 0), 2, -1)
        if param.firt_choose:
            param.firt_choose = False
            param.mask = np.full(param.img.shape[:2], 3, dtype=np.uint8)
        cv2.rectangle(param.mask, last_point, (x,y), 0, -1, 4)
        print('mouse rb up')


img_src = 'beijing.jpg'
if __name__ == '__main__':
    img = cv2.imread(img_src)
    if img is None:
        print('error: 图像为空')
    g_img = GrabCut(img)

    cv2.namedWindow('image')
# 定义鼠标的回调函数
    cv2.setMouseCallback('image', mouse_event2, g_img)
    while (True):
        cv2.imshow('image', g_img.img_show)
        if g_img.lb_up or g_img.rb_up:
            g_img.lb_up = False
            g_img.rb_up = False
            start = time.process_time()
            bgdModel = np.zeros((1, 65), np.float64)
            fgdModel = np.zeros((1, 65), np.float64)

            rect = (1, 1, g_img.img.shape[1], g_img.img.shape[0])
            print(g_img.mask)
            mask = g_img.mask
            g_img.img_gc = g_img.img.copy()
            cv2.grabCut(g_img.img_gc, mask, rect, bgdModel, fgdModel, 5, cv2.GC_INIT_WITH_MASK)
            elapsed = (time.process_time() - start)
            mask2 = np.where((mask == 2) | (mask == 0), 0, 1).astype('uint8')  # 0和2做背景
            g_img.img_gc = g_img.img_gc * mask2[:, :, np.newaxis]  # 使用蒙板来获取前景区域
            cv2.imshow('result', g_img.img_gc)

            print("Time used:", elapsed)

        if cv2.waitKey(20) == 27:
            break
#按ESC键退出image二、区域生长算法
1. 区域生长算法的原理
区域生长是图像分割技术的一种。区域生长的基本思想是将具有相似性的像素集合起来构成区域,区域生长是从某个或者某些像素点出发,最后得到整个区域,进而实现目标的提取。
2. 区域生长算法的实现步骤
(1) 首先对每个需要分割的区域找出一个种子像素作为生长的起点.
(2) 将种子像素周围邻域中与种子有相同或相似性质的像素(根据事先确定的生长或相似准则来确定)合并到种子像素所在的区域中。而新的像素继续作为种子向四周生长,直到再没有满足条件的像素可以包括进来,一个区域就生长而成了。
在本次实验中我使用人工选择的方式选取种子;灰度图的判定准则用灰度差值小于某个阈值来表示。
3. 代码实现
import numpy as np
import matplotlib.pyplot as plt
from skimage import data,io,color
from scipy import ndimage
from skimage import filters
from scipy import signal
class Point(object):
def __init__(self,x,y):
self.x = x
self.y = y
def getX(self):
return self.x
def getY(self):
return self.y
def getGrayDiff(img,currentPoint,tmpPoint):
return abs(int(img[currentPoint.x,currentPoint.y]) - int(img[tmpPoint.x,tmpPoint.y]))
def selectConnects(p):
if p != 0:#八连通
connects = [Point(-1, -1), Point(0, -1), Point(1, -1), Point(1, 0), Point(1, 1), \
Point(0, 1), Point(-1, 1), Point(-1, 0)]
else:#四联通
connects = [ Point(0, -1), Point(1, 0),Point(0, 1), Point(-1, 0)]
return connects
def regionGrow(img,seeds,thresh,p = 1):
height, weight = img.shape
seedMark = np.zeros(img.shape)
seedList = []
for seed in seeds:
seedList.append(seed)
label = 1
connects = selectConnects(p)
while(len(seedList)>0):
currentPoint = seedList.pop(0)#栈
seedMark[currentPoint.x,currentPoint.y] = label
for i in range(len(connects)):
tmpX = currentPoint.x + connects[i].x
tmpY = currentPoint.y + connects[i].y
if tmpX < 0 or tmpY < 0 or tmpX >= height or tmpY >= weight:
continue
grayDiff = getGrayDiff(img,currentPoint,Point(tmpX,tmpY))
if grayDiff < thresh and seedMark[tmpX,tmpY] == 0:
seedMark[tmpX,tmpY] = label
seedList.append(Point(tmpX,tmpY))
return seedMark
img = (color.rgb2grey(io.imread(r'beijing.jpg'))*255).astype(np.int32)
#用中值滤波进行去噪
new_img=ndimage.median_filter(img,3)
#选取种子点
seeds = [Point(10,10),Point(82,150),Point(100,200),Point(20,300)]
binaryImg = regionGrow(new_img,seeds,4)
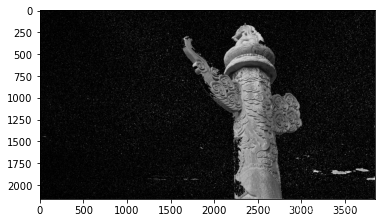
plt.imshow((1-binaryImg)*new_img,plt.cm.gray)
plt.show()效果图:
总结
总的来说,Grabcut算法还是比区域生长算法的效果要强很多,不但图案是彩色的,而且可以人工划定割取范围,并且图像分割的效果更好,但是Grabcut算法的分割需要一定的操作手法,区域生长算法直接运行代码即可。