最近几年, Web程序有种趋势, 那就是业务逻辑越来越多的移到了客户端一侧, 开创出了一种称为富互联网应用(RIA)的架构。在RIA中, 服务器的主要功能是为客户提供数据存取服务。 在这种模式中, 服务器变成了Web服务或应用编程接口(API)
RIA可采用多种协议与Web服务通信, 最近几年REST崭露头角。
Flask是开发REST架构Web服务的理想框架, 本章我们了解如何使用Flask实现符合REST架构的API。
一.创建API蓝本
1)API蓝本的结构
REST API相关的路由是一个自成一体的程序子集, 所以为了更好的组织代码, 我们最好把这些路由放到独立的蓝本中。
|-flasky
|-app
|-api_1_0
|-__init__.py
|-users.py
|-posts.py
|-comments.py
|-authentication.py
|-errors.py
|-decorators.py
2)app/api_1_0/__init__.py
#创建蓝本并关联所有路由
from flask import Blueprint

api = Blueprint('api', __name__)

from . import users, posts, comments, errors
3)app/__init__.py
#把蓝本注册到程序实例上

def create_app(config_name):

    #...

    from .api_1_0 import api as api_1_0_blueprint

    app.register_blueprint(api_1_0_blueprint, url_prefix='/api/v1.0')
二. 错误处理
为所有客户端生成适当响应的一种方法是, 在错误处理程序中根据客户端请求的格式改写响应, 这种技术成为内容协商。
Web服务返回json格式的响应。
1)app/main/errors.py
#根据请求首部字段accept的值确定返回响应的格式

@main.app_errorhandler(404)

def page_not_found(e):

    if request.accept_mimetypes.accept_json and\

        not request.accept_mimetypes.accept_html:

            response = jsonify({'error': 'not found'})

            response.status_code = 404

            return response

    return render_template('404.html'), 404
2)app/api_1_0/errors.py
#Web服务的视图函数可以调用这些辅助函数生成错误相应

def forbidden(message):

    response = jsonify({'error': 'forbidden', 'message': message})

    response.status_code = 403

    return response


def unauthorized(message):

    response = jsonify({'error': 'unauthorized', 'message': message})

    response.status_code = 401

    return response
三. 使用flask-httpauth认证用户
1)app/api_1_0/authentication.py
from flask_httpauth import HTTPBasicAuth
auth = HTTPBasicAuth()
@auth.verify_password
def verify_password(email, password):
#支持匿名用户
if email == '':
g.current_user = AnonymousUser()
return True
user = User.query.filtet_by(email=eamil).first()
if not user:
return False
g.current_user = user
return user.verify_password(password)
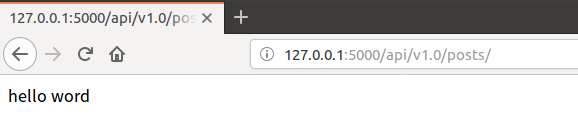
@api.route('/posts/')
@auth.login_required
def get_posts():
return "hello word!"
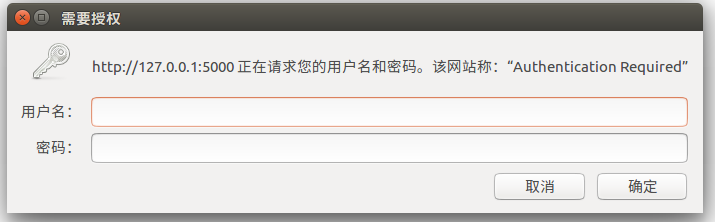
上面的代码即可实现HTTP认证, 当你访问127.0.0.1:5000/api/v1.0/posts 链接时, 由于会弹出一个会话框让你填写用户名和密码, 填写之后会调用verify_password进行验证, 如果通过验证返回True(注意匿名用户也会返回True), 才能执行视图函数里面的代码, 注意g.current_user保存了访问的用户, 可以在视图函数中使用该用户。
2)app/api_1_0/authentication.py
这个蓝本中的所有路由都要使用相同的方式进行保护, 所以我们可以在before_request处理程序中使用一次login_required修饰器, 应用到整个蓝本。
from .errors.py import forbidden


@api.before_request

@auth.login_required

def before_request():

    if not g.current_user.is_anonymouse and\

         not g.current_user.confirm:

             return forbidden('Unconfirmed account')
@api.route('/posts/')

def get_posts():

    return "hello word!
这样的话, 我们访问任意api蓝本的路由, 都会先访问before_request修饰的函数, 该函数又被login_required修饰, 所以效果就是, 访问任意api蓝本的路由, 都会出发verify_password验证, 通过验证后, 可以执行before_request函数里的带代码, 此时如果通过验证的用户不是匿名用户并且没有通过认证, 返回forbidden json响应。
3)演示
1. 我们在浏览器地址栏输入地址:

首先我们会访问before_request函数, 因为该函数被修饰器auth.login_required修饰, 所以浏览器弹出提示框要求验证用户, 如果支持匿名用户的话verify_password默认通过验证, 不会弹出该提示框, 只有把verify_password函数头两句代码去掉才会弹出该提示框:
填入有效的用户名密码后,verify_password验证通过返回True, 可以执行before_request函数, 因为不是匿名用户且该用户confirm属性为True, 通过二次验证, 执行posts视图函数, 返回helloworld: