目录
3.plugin 自定义插件 install,app.use()
4 .teleport 把组件某些元素直接挂到其他dom元素上
1. provide,inject 依赖注入
当父组件要向后代组件传递参数的时候,要一层一层定义 props 传递,比较繁琐
<script>
    const app = Vue.createApp({
      data() {
        return {
          count: 1
        }
      },
      template:`
        <div>
          <child :count="count"/>
        </div>
      `
    })

    app.component('child',{
      props:['count'],
      template:`
        <div>
          子组件{

   { count }}
          <child-child :count="count"/>
        </div>
      `
    })

    app.component('child-child',{
      props:['count'],
      template: '<div>子-子组件{

   { count }}</div>'
    })
    const vm = app.mount('#root')
  </script>
- provide / inject
- 父组件使用 provide 传递参数
- 子组件使用 inject 接收即可
- 但是父组件改变参数的时候,子组件值不会跟着变化,因为 provide 是一次性传递,不是双向绑定,后续学习有解决办法
<script>
    const app = Vue.createApp({
      data() {
        return {
          count: 1
        }
      },
      provide() {
        return {
          count: this.count
        }
      },
      template:`
        <div>
          父组件 {

   { count }}
          <child />
          <button @click="count++">+1</button> // 后代组件的 count 不会跟着改变
        </div>
      `
    })

    app.component('child',{
      inject: ['count'],
      template:`
        <div>
          子组件{

   { count }}
          <child-child />
        </div>
      `
    })

    app.component('child-child',{
      inject: ['count'],
      template: '<div>子-子组件{

   { count }}</div>'
    })
    const vm = app.mount('#root')
  </script>
2.directive 自定义指令
<!DOCTYPE html>
<html lang="en">
<head>
  <meta charset="UTF-8">
  <meta http-equiv="X-UA-Compatible" content="IE=edge">
  <meta name="viewport" content="width=device-width, initial-scale=1.0">
  <title>Document</title>
  <script src="https://unpkg.com/vue@3"></script>
  <style>
    .header{
      position: absolute
    }
  </style>
</head>
<body>
  <div id="root"></div>
</body>
<script>
  // 局部自定义指令
  const directives = {
    focus: {
      mounted(el) {
        el.focus()
      }
    }
  }

  const app = Vue.createApp({
    data() {
      return {
        distence: 100
      }
    },
    directives: directives, // 局部自定义指令
    template: `
      <div>
        <div class="header" v-pos:right="distence">
          <input v-focus/>
        </div>
      </div>
    `
  });
  // 全局指令
  /* app.directive('pos', {
    mounted(el, binding) {
      el.style[binding.arg] = binding.value + 'px'
    },
    updated(el, binding) {
      el.style[binding.arg] = binding.value + 'px'
    },
  }) */
  // 以上写法可简化为:
  app.directive('pos', (el, binding) => {
    el.style[binding.arg] = binding.value + 'px'
  })

  const vm = app.mount('#root');
</script>
</html>
3.plugin 自定义插件 install,app.use()
- 把通用的性能封装起来
- app.config.globalProperties 扩展全局属性(vue 3)
可封装provide,directive,mixin等
<!DOCTYPE html>
<html lang="en">
<head>
  <meta charset="UTF-8">
  <meta name="viewport" content="width=device-width, initial-scale=1.0">
  <title>lesson 32</title>
  <script src="https://unpkg.com/vue@next"></script>
</head>
<body>
  <div id="root"></div>
</body>
<script>
  // plugin 插件, 也是把通用性的功能封装起来
  const myPlugin = {
    install(app, options) {
      app.provide('name', 'Dell Lee');
      app.directive('focus', {
        mounted(el) {
          el.focus();
        }
      })
      app.mixin({
        mounted(){
          console.log('mixin')
        }
      })
      app.config.globalProperties.$sayHello = 'hello world';
    }
  }

  const app = Vue.createApp({
    template: `
      <my-title />
    `
  });

  app.component('my-title', {
    inject: ['name'],
    mounted() {
      console.log(this.$sayHello);
    },
    template: `<div>{

   {name}}<input v-focus /></div>`
  })

  app.use(myPlugin, { name: 'dell'});

  const vm = app.mount('#root');
</script>
</html>
数据校验插件开发实例
<!DOCTYPE html>
<html lang="en">
<head>
  <meta charset="UTF-8">
  <meta name="viewport" content="width=device-width, initial-scale=1.0">
  <title>lesson 33</title>
  <script src="https://unpkg.com/vue@next"></script>
</head>
<body>
  <div id="root"></div>
</body>
<script>
  // 对数据做校验的插件
  const app = Vue.createApp({
    data() {
      return { name: 'dell', age: 23}
    },
    rules: {
      age: {
        validate: age => age > 25,
        message: 'too young, to simple'
      },
      name: {
        validate: name => name.length >= 4,
        message: 'name too short'
      }
    },
    template: `
      <div>name:{

   {name}}, age:{

   {age}}</div>
    `
  });

  const validatorPlugin = (app, options) => {  //或是: install(app, options) {}
    app.mixin({
      created() {
        for(let key in this.$options.rules) {
          const item = this.$options.rules[key];
          this.$watch(key, (value) => {
            const result = item.validate(value);
            if(!result) console.log(item.message);
          })
        }
      }
    })
  }

  app.use(validatorPlugin);
  const vm = app.mount('#root');
</script>
</html>
4 .teleport 把组件某些元素直接挂到其他dom元素上
<!DOCTYPE html>
<html lang="en">
<head>
  <meta charset="UTF-8">
  <meta http-equiv="X-UA-Compatible" content="IE=edge">
  <meta name="viewport" content="width=device-width, initial-scale=1.0">
  <title>Document</title>
  <script src="https://unpkg.com/vue@3"></script>
  <style>
    .area{
      position: absolute;
      top: 50%;
      left: 50%;
      transform: translate(-50%, -50%);
      width: 200px;
      height: 300px;
      background-color: green;
    }
    .mask{
      position: absolute;
      left: 0;
      top: 0;
      right: 0;
      bottom: 0;
      background-color: #000;
      opacity: 0.5;
    }
  </style>
</head>
<body>
  <div id="root"></div>
</body>
<script>
  const app = Vue.createApp({
    data() {
      return {
        show: false
      }
    },
    template: `
      <div>
        <div class="area">
          <button @click="show = !show">点击</button>
          <teleport to="body">
            <div v-show="show" class="mask"></div>
          </teleport>
        </div>
      </div>
    `,
    created() {
      console.log('app created')
    },
    mounted() {
    },
    methods: {
      handleClick() {
        console.log('app click')
      }
    }
  });

  const vm = app.mount('#root')
</script>
</html>
5.Non-Props 特性
- 如果父组件传递的参数,子组件没有通过 props 接收,那么,参数会绑定在子组件的 dom 节点上
- 不继承父组件传递的参数 inheritAttrs :false
什么情况下使用 Non-Props 特性?
传递 style 样式或是 class 等属性
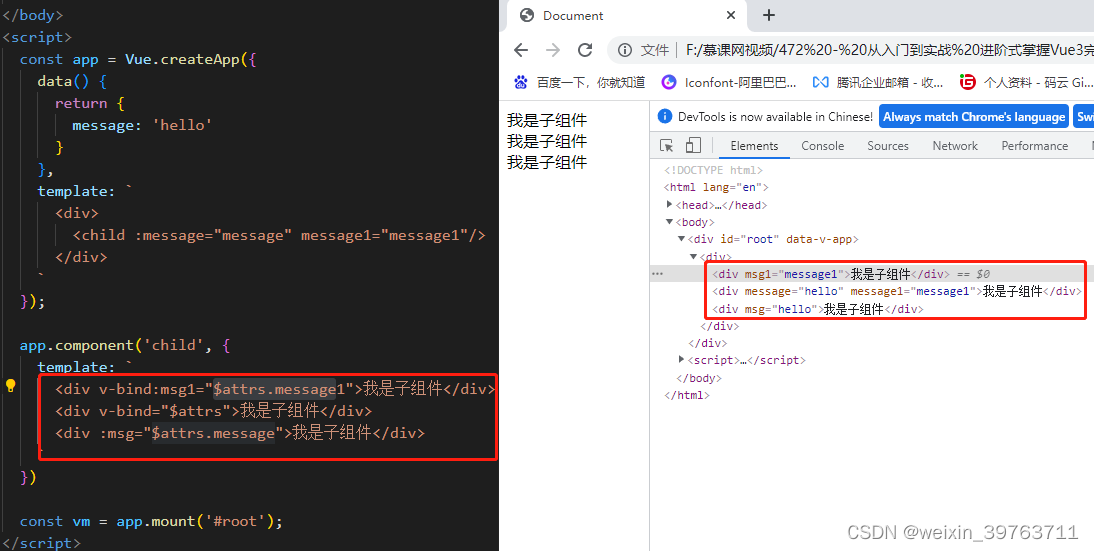
当子组件有多个根节点,Non-Props 失效,使用 $attrs 将所有父组件传递的属性放到当前组件上
拿到某一个属性 $attrs.属性值
也可以在其他生命周期函数或js方法里使用 this.$attrs

不继承父组件传递的参数 inheritAttrs :false

- 什么情况下使用 Non-Props 特性?
传递 style 样式或是 class 等属性

当子组件有多个根节点,Non-Props 失效,使用 $attrs 将所有父组件传递的属性放到当前组件上

拿到某一个属性 $attrs.属性值
也可以在其他生命周期函数或js方法里使用 this.$attrs
