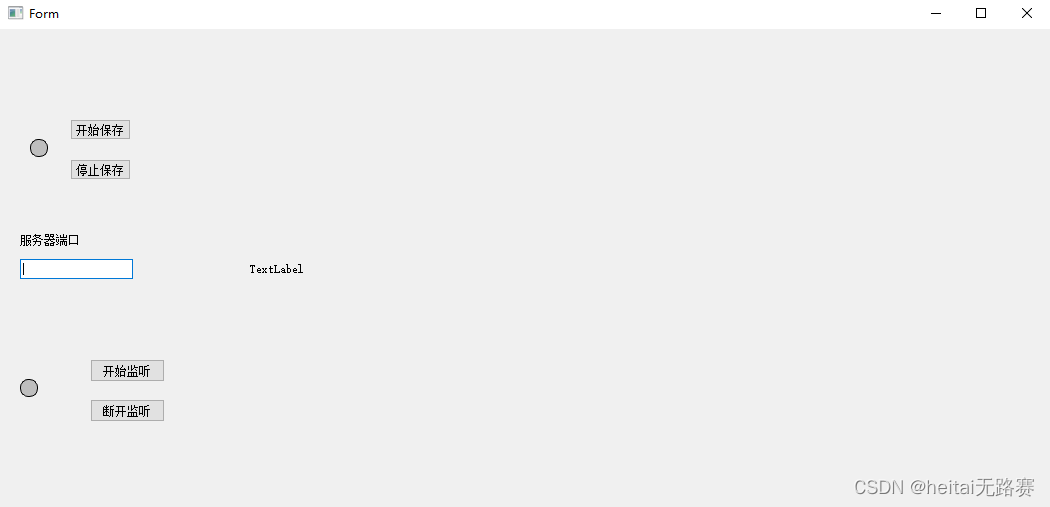
近期因为一个项目,尝试用了Pyqt做了一个UDP视频视频接收端,视频帧大小是800x480,发送方是一块FPGA板子,由于UDP包限制大小,所以每个包只发送一行数据,首行数据长度和尾行的数据长度与中间行的数据长度不同,用此来判断是否是完整的一帧数据。
期间踩了许多坑,首先就是不知道Qlabel可以显示的图像格式。刚开始是把收到的一帧图像RGB565转成RGB888,之后又转RGB三维数组的格式,然后保存到本地,然后再用Pyqt的函数读出来再显示到终端。这样处理之后的速度非常慢,只有两三帧每秒。
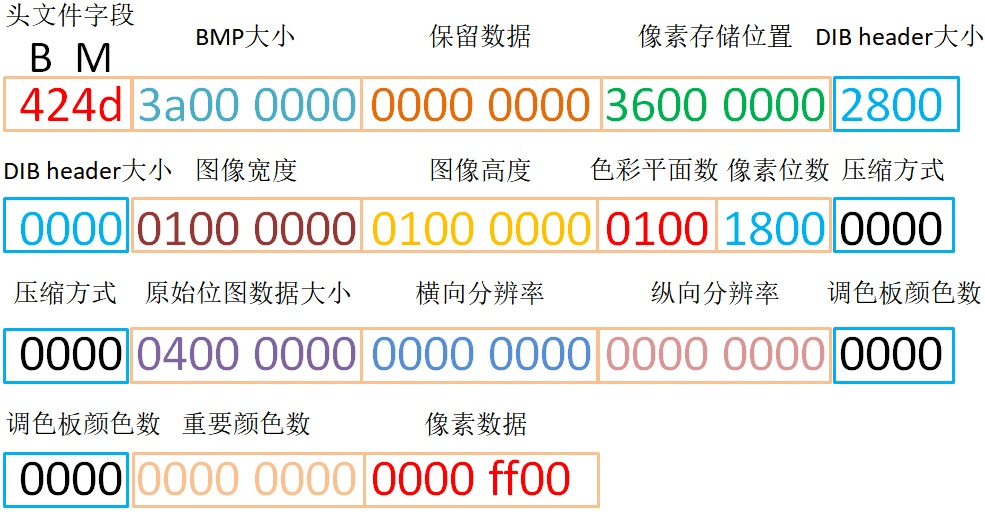
之后查了资料之后才发现,RGB的数据格式可以封装成BMP,然后再由Pyqt的内置函数读出为QPixmap类型可以直接显示到Qlabel上。BMP文件头解析,具体的可以百度搜索
然后对BMP的文件头信息进行处理添加上去
    def add_565bytes_header(self):
        self.calc_565data_size()        # 计算RGB的数据大小,返回self.dataSize和self.fileSize
        reserved = 0
        offset = 54                     # 位图数据在文件中的偏移值,等于 “文件信息+位图信息+调色板信息”。
        file_tag = 19778                # 转为16进制,文件标识,BMP 文件值固定为 0x4D42,存储为小端模式,转换成 ASCII 就是 “BM”。
        bitmap_info_size = 40           # 位图信息的大小,固定为 40
        planes = 1                      # 位图的位面数,固定为 1
        image_depth = 16                # 位图的图像深度
        compression = 0                 # 位图压缩方式
        x_pels_permeter = 0             # 指定位图目标设备的水平打印分辨率,表示水平方向每米的像素点数量,可以是 0
        y_pels_permeter = 0             # 指定位图目标设备的垂直打印分辨率,表示垂直方向每米的像素点数量,可以是 0
        color_used = 0                  # 位图实际使用调色板的颜色数量,图像深度少于或等于 8 bits 时,值有效。值为 0 表示使用了整个调色板的颜色
        color_important = 0             # 重要的颜色数量,值通常等于 color_used,值为 0 时表示所有颜色都重要
        # 添加文件头
        file_info_head = file_tag.to_bytes(2, byteorder="little")
        file_info_head = file_info_head + self.fileSize.to_bytes(4, byteorder="little")
        file_info_head = file_info_head + reserved.to_bytes(4, byteorder="little")
        file_info_head = file_info_head + offset.to_bytes(4, byteorder="little")
        # 添加位图信息
        bitmap_info_head = bitmap_info_size.to_bytes(4, byteorder="little")
        bitmap_info_head = bitmap_info_head + self.w.to_bytes(4, byteorder="little")
        bitmap_info_head = bitmap_info_head + self.h.to_bytes(4, byteorder="little")
        bitmap_info_head = bitmap_info_head + planes.to_bytes(2, byteorder="little")
        bitmap_info_head = bitmap_info_head + image_depth.to_bytes(2, byteorder="little")
        bitmap_info_head = bitmap_info_head + compression.to_bytes(4, byteorder="little")
        bitmap_info_head = bitmap_info_head + self.dataSize.to_bytes(4, byteorder="little")
        bitmap_info_head = bitmap_info_head + x_pels_permeter.to_bytes(4, byteorder="little")
        bitmap_info_head = bitmap_info_head + y_pels_permeter.to_bytes(4, byteorder="little")
        bitmap_info_head = bitmap_info_head + color_used.to_bytes(4, byteorder="little")
        bitmap_info_head = bitmap_info_head + color_important.to_bytes(4, byteorder="little")

        bmp_bytes = file_info_head + bitmap_info_head + self.pic_data
        # print(len(bmp_bytes))
        return bmp_bytes
然后显示出来发现图像的颜色有色差,然后查资料发现是BMP的格式显示问题。我使用的是RGB565格式,这个位图压缩方式需要修改为3。
compression = 0 # 位图压缩方式0 - 不压缩 (使用BI_RGB表示)
1 - RLE 8-使用8位RLE压缩方式(用BI_RLE8表示)
2 - RLE 4-使用4位RLE压缩方式(用BI_RLE4表示)
3 - Bitfields-位域存放方式(用BI_BITFIELDS表示)
RGB16bit除了565还有555格式,所以需要增加调色板信息,要注意这里增加了调色板信息后,文件头字节数增加,字节的偏移量发生变化,以下是修改后的文件头信息。
    def add_565bytes_header(self):
        self.calc_565data_size()        # 计算RGB的数据大小,返回self.dataSize和self.fileSize
        reserved = 0
        offset = 66                     # 位图数据在文件中的偏移值,等于 “文件信息14+位图信息50+调色板信息12”。
        file_tag = 19778                # 转为16进制,文件标识,BMP 文件值固定为 0x4D42,存储为小端模式,转换成 ASCII 就是 “BM”。
        bitmap_info_size = 40           # 位图信息的大小,固定为 40
        planes = 1                      # 位图的位面数,固定为 1
        image_depth = 16                # 位图的图像深度
        compression = 3                 # 位图压缩方式
        x_pels_permeter = 0             # 指定位图目标设备的水平打印分辨率,表示水平方向每米的像素点数量,可以是 0
        y_pels_permeter = 0             # 指定位图目标设备的垂直打印分辨率,表示垂直方向每米的像素点数量,可以是 0
        color_used = 0                  # 位图实际使用调色板的颜色数量,图像深度少于或等于 8 bits 时,值有效。值为 0 表示使用了整个调色板的颜色
        color_important = 0             # 重要的颜色数量,值通常等于 color_used,值为 0 时表示所有颜色都重要

        # 调色板相关掩码位
        R = 63488
        G = 2016
        B = 31

        # 添加文件头
        file_info_head = file_tag.to_bytes(2, byteorder="little")
        file_info_head = file_info_head + self.fileSize.to_bytes(4, byteorder="little")
        file_info_head = file_info_head + reserved.to_bytes(4, byteorder="little")
        file_info_head = file_info_head + offset.to_bytes(4, byteorder="little")
        # 添加位图信息
        bitmap_info_head = bitmap_info_size.to_bytes(4, byteorder="little")
        bitmap_info_head = bitmap_info_head + self.w.to_bytes(4, byteorder="little")
        bitmap_info_head = bitmap_info_head + self.h.to_bytes(4, byteorder="little")
        bitmap_info_head = bitmap_info_head + planes.to_bytes(2, byteorder="little")
        bitmap_info_head = bitmap_info_head + image_depth.to_bytes(2, byteorder="little")
        bitmap_info_head = bitmap_info_head + compression.to_bytes(4, byteorder="little")
        bitmap_info_head = bitmap_info_head + self.dataSize.to_bytes(4, byteorder="little")
        bitmap_info_head = bitmap_info_head + x_pels_permeter.to_bytes(4, byteorder="little")
        bitmap_info_head = bitmap_info_head + y_pels_permeter.to_bytes(4, byteorder="little")
        bitmap_info_head = bitmap_info_head + color_used.to_bytes(4, byteorder="little")
        bitmap_info_head = bitmap_info_head + color_important.to_bytes(4, byteorder="little")
        # 添加调色板信息
        bitmap_info_head = bitmap_info_head + R.to_bytes(4, byteorder="little")
        # print(str(R.to_bytes(4, byteorder="little").hex()))
        bitmap_info_head = bitmap_info_head + G.to_bytes(4, byteorder="little")
        bitmap_info_head = bitmap_info_head + B.to_bytes(4, byteorder="little")


        bmp_bytes = file_info_head + bitmap_info_head + self.pic_data
        return bmp_bytes
红色占位 RGB565 要填:0x0000F800
绿色占位RGB565 要填:0x000007E0
蓝色占位RGB565 要填:0x0000001F
也就是RGB565占位的掩码。
总共12个字节,所以偏移量改为54+12 = 66。
至此问题解决。该项目地址UDP_video_terminal: 使用Pyqt实现UDP接收800x480的RGB565视频,每一个包为一行数据,组帧后进行格式转换显示出来。