目录
一、前言
三维模型由于其需要将模型的每个面与边进行渲染,往往会出现打开模型十分缓慢的问题。那么这问题该如何解决呢,最简单粗暴的方法当然是对模型载入不断的进行优化,但是优化往往是最困难的。从另一方面想,让用户精准的打开自己需要的模型,是不是也能一定程度的缓解该问题呢?所以实现三维模型的缩略图是很有必要的。
二、简介
本文实现模型缩略图主要的框架为Vue3,使用threejs来管理模型。总的分为三步:1.准备threejs场景容器;2.构建threjs场景,载入模型;3.canvas转base64编码,将其载入img容器中。
三、简单实现
0、准备
首先,既然要导入模型,就需要准备一个想要添加到场景中的模型。在此推荐一个模型下载网站SketChfab,Threejs源码中引用模型大多出自于此。
然后,需要给生成的canvas准备一个容器:
<template>
<div id="thumbnail"></div>
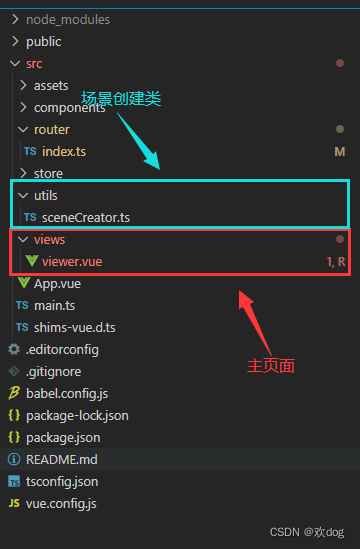
</template>创建一个ts文件,整合模型场景能用到的操作,在此将其命名为sceneCreator:
1、创建场景
基本的场景创建不再赘述,不理解的可以参考Vue3中简单使用Three.js。
//引入threejs
import * as THREE from 'three'
//引入加载器
import { GLTFLoader } from 'three/examples/jsm/loaders/GLTFLoader.js'
class SceneCreator {
public scene: THREE.Scene = new THREE.Scene()
private camera: THREE.PerspectiveCamera
private renderer: THREE.Renderer
private controls: OrbitControls
constructor (fatherElement: HTMLElement) {
this.scene.background = new THREE.Color(0xaaaaaa)
// 添加光源
this.initLight()
// 创建一个透视相机
const width = window.innerWidth; const height = window.innerHeight
this.camera = new THREE.PerspectiveCamera(45, width / height, 1, 5000)
// 设置相机位置
this.camera.position.set(100, 400, 600)
// 设置相机方向
this.camera.lookAt(0, 0, 0)
// 创建辅助坐标轴
const axesHelper = new THREE.AxesHelper(100)
this.scene.add(axesHelper)
// 创建一个WebGL渲染器
this.renderer = new THREE.WebGLRenderer()
this.renderer.setSize(width, height)
this.renderer.render(this.scene, this.camera)
fatherElement.appendChild(this.renderer.domElement)
}
render () {
this.renderer.render(this.scene, this.camera)
}
/**
*灯光初始化
*/
initLight () {
const ambient = new THREE.AmbientLight(0x505050)
this.scene.add(ambient)
const pointLight1 = new THREE.PointLight(0xffffff, 0.4)
const pointLight2 = new THREE.PointLight(0xffffff, 0.4)
pointLight1.position.set(200, 300, 400)
this.scene.add(pointLight1)
pointLight2.position.set(-200, -300, -400)
this.scene.add(pointLight2)
const hemiLight = new THREE.HemisphereLight(0xffffff, 0xffffff, 0.6)
hemiLight.color.setHSL(0.6, 1, 0.6)
hemiLight.groundColor.setHSL(0.095, 1, 0.75)
hemiLight.position.set(0, 200, 0)
this.scene.add(hemiLight)
const hemiLightHelper = new THREE.HemisphereLightHelper(hemiLight, 10)
this.scene.add(hemiLightHelper)
const dirLight = new THREE.DirectionalLight(0xffffff, 1)
dirLight.color.setHSL(0.1, 1, 0.95)
dirLight.position.set(-100, 175, 100)
dirLight.position.multiplyScalar(30)
this.scene.add(dirLight)
}
}
//暴露
export { SceneCreator }2.模型导入
在此,使用threejs中的GLTFLoader来加载下载好的glb,由于制作缩略图并不需要对模型进行什么特殊操作,所以只需要将加载好的模型添加进场景即可。
createCar () {
const loader = new GLTFLoader()
const glbHref = new URL('../assets/glb/car/ferrari_458.glb', import.meta.url).href
loader.load(glbHref, (gltf) => {
const carModel = gltf.scene.children[0]
this.scene.add(carModel)
})
}3.生成Base64
<script lang='ts' setup>
import { onMounted, Ref, ref } from 'vue'
import { SceneCreator } from '../utils/sceneCreator'
let myScene: SceneCreator
const img:Ref<string> = ref('')
const createThumbnails = async () => {
const el = document.getElementById('thumbnail')
if (el) {
// 创建场景
myScene = new SceneCreator(el)
// 场景自适应,防止模型变形
myScene.resize()
// 载入模型,由于loader是异步的所以我们需要等它加载好后再生成base64,否则生成的图片是没有模型的
await myScene.createCar()
myScene.render()
// 生成base64
const canvas = el.children[0] as HTMLCanvasElement
img.value = canvas.toDataURL('img/png')
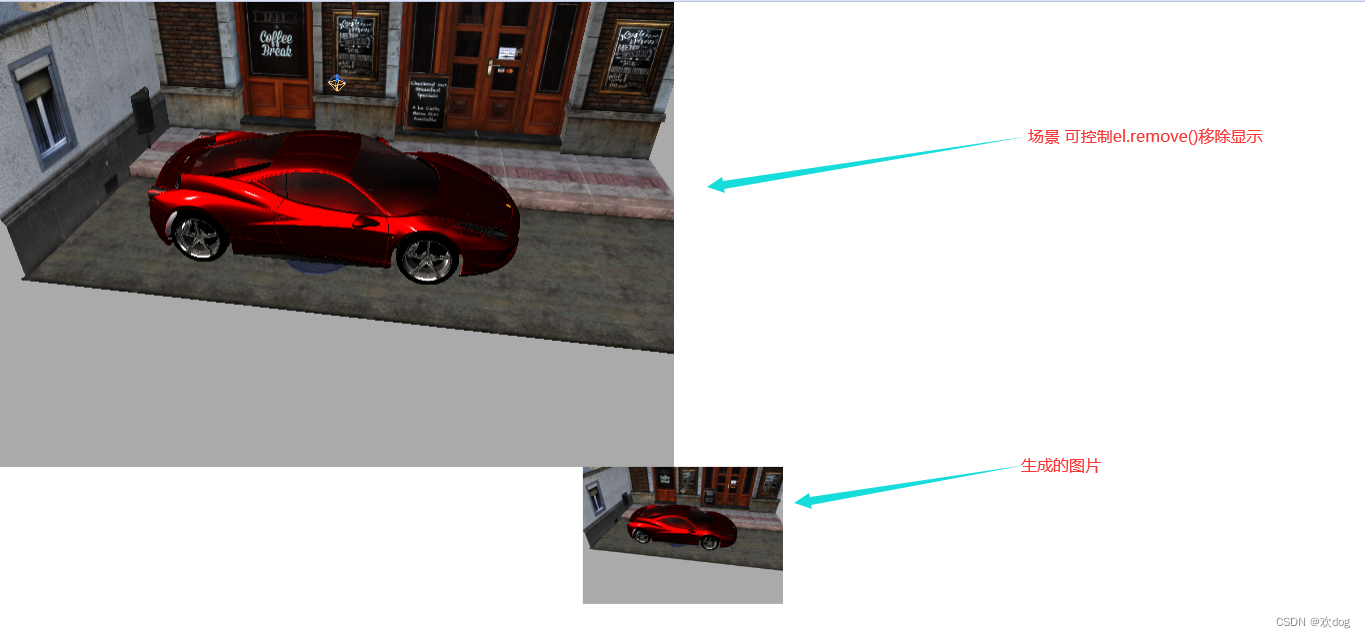
// 不需要展示canvas就移除它
// el.remove()
}
}
onMounted(() => {
createThumbnails()
})
</script>4.绑定图片
创建img标签,将第3步中生成的base64绑定到img标签的scr中即可。
<template>
  <div id="thumbnail"></div>
  <img :src="img" alt="">
</template>
四、结果展示