本次实验基于上次的.net aspx的手机实现短信验证。
本次实验大致过程是:
1.用户在页面输入手机号码进行注册
2.如果手机号已经存在了就会提示已经注册过了
3. 用户点击"发送验证码"按钮,把手机号码发送给服务端,服务端产生6位数的随机码
4.第三方发送6位数的随机码至用户手机
5. 用户在页面输入接收到的短信验证码
6. 把随机码等发送给服务端,与服务端保存的随机码比较,如果一致,就通过,让注册
这里做实验,就搭建一个简单的界面,如下:
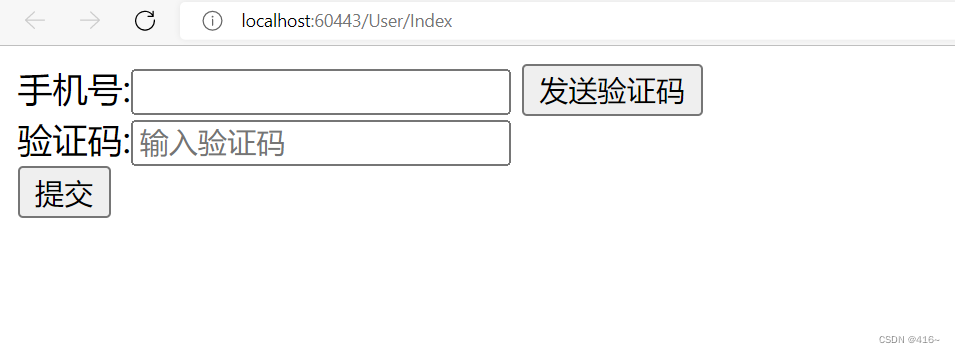
我们需要考虑的方面包括:
● 手机号码:判断手机号码的合法性,与数据库中已有的手机号码比较,判断是否有重复,等等(这里就不做手机号码合法性的判断了,很简单写个正则表达就好,也可以用其他方法)
● "获取短信验证码"按钮:点击后,禁用它,再来一个比如60秒的倒计时,倒计时结束恢复使用
● "提交"按钮:在提交之前需要判断表单是否验证通过,以及验证码是否通过
要实现发送验证码,前期就要做好准备,这里的用的是通讯云服务给的接口
做好前期准备,我们需要申请公众号和腾讯云服务的操作,在这里就不演示了,请进入我之前写的文章里把基本的都搭建好 在进行下一步(一定要把公众号和腾讯云都弄好) http://t.csdn.cn/KapyY
现在可以开始实验:
首先先创建好一个MVC项目,创建一个自己的控制器,找到文件夹Controllers--->右键--->添加控制器 取名UserController(可以自己取名)
然后找到Model文件夹连接数据库 也就是EF,右键-->新建项-->ADO.NET实体数据模型
把你的数据库连接好,这里是模拟用户登录 所以自己选择自己的表用就好
进入UserController控制器界面

添加Index视图,进入视图页
直接上代码吧 做了注释
<head>
    <meta name="viewport" content="width=device-width" />
    <script src="~/Scripts/jquery-3.4.1.min.js"></script>
    <title>Index</title>
</head>
<body>
    @using (Html.BeginForm())
    {
        <div>
            手机号:@Html.TextBox("username")
            <input type="button" value="发送验证码" id="btn"  onclick="Checkname()" />
            <br />
            验证码:<input type="text" name="Yzm" value="" placeholder="输入验证码" />
            <span id="msg"> </span>
            <span>@ViewBag.tx</span>
            <br />
            <input type="submit" name="sub" value="提交" />
        </div>
    }
    <script type="text/javascript">
        function Checkname() {
            jQuery.ajax({
                url: "/User/Validate",
                type: "GET",
                data: { "username": $("#username").val() },/*数据源,username获取控制器的值和前台文本的id值*/
                success: function (data) {
                    if (data == "false") {
                        $("#msg").html("<font color='red'>手机号已存在!</font>");
                    }
                    else {      /*否则就代表手机号在数据库中不存在,就可以发送验证码并且实现按钮60秒倒计时*/
                        $("#msg").html("<font></font>");
                        var count = 60; //计时开始
                        var t; //时间间隔种子
                            //关于按钮
                            var $getCodeBtn = $('#btn');
                            t = setInterval(function () {
                                $getCodeBtn.val(count + "秒之后重新获取");
                                $getCodeBtn.prop('disabled', true);
                                count--;
                                if (count == 0) {
                                    clearInterval(t);
                                    $getCodeBtn.prop('disabled', false);
                                    $getCodeBtn.val("点击获取验证码");
                                    count = 3;
                                }
                            }, 1000);
                    }
                },
                error: function (xhr, error, ex) {
                    $("#msg").html("<font color='red'>系统出现异常,请联系客服!</font>");
                }
            });
        }
    </script>

</body>
写好后进入控制器,记得导入 TencentCloud到项目中(TencentCloud这个包在腾讯云里,需要自己去找并且下载好)

然后找到TencentCloud里面的Send.cs文件打开:
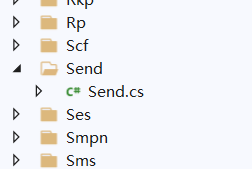
打开后按照注释填写自己的相关内容即可
 /// <summary>
        /// 发送短信
        /// </summary>
        /// <param name="PhoneNumber">发送手机</param>
        /// <param name="code">验证码</param>
        /// <param name="Time">有效时间</param>
        public static void SendDL(string[] PhoneNumber, string code, int Time)
        {
            try
            {
                Credential cred = new Credential
                {
                    SecretId = "", //在腾讯云官网中的“云产品”中找到“访问秘钥”,点击打开,就看得到相关ID和Key,复制填写即可
                    SecretKey = ""
                };
                ClientProfile clientProfile = new ClientProfile();
                HttpProfile httpProfile = new HttpProfile();
                httpProfile.Endpoint = ("sms.tencentcloudapi.com");
                clientProfile.HttpProfile = httpProfile;
                SmsClient client = new SmsClient(cred, "", clientProfile);
                SendSmsRequest req = new SendSmsRequest();
                req.PhoneNumberSet = PhoneNumber;
                req.TemplateID = "";//创建正文模板ID
                req.SmsSdkAppid = "";//在腾讯云官网中的短信里面找到应用管理里面的应用列表复制里面的SDKAPPid
                req.Sign = "";//您的签名管理的签名内容的名字
                req.TemplateParamSet = new String[] { code, Time.ToString() };
                SendSmsResponse resp = client.SendSmsSync(req);


            }
            catch (Exception e)
            {
                Console.WriteLine(e.ToString());
            }

            return;
        }
找到model右键添加一个类,取名为PhoneTool
把这段代码复制过去
public class PhoneTool
    {
        public static string CreateRandomCode(int codeCount)
        {
            StringBuilder randomCode = new StringBuilder();
            Random rand = new Random();
            for (int i = 0; i < codeCount; i++)
            {
                randomCode.Append(rand.Next(10));
            }
            return randomCode.ToString();
        }
    }
以上完成后,整体代码如下:
using System;
using System.Collections.Generic;
using System.Linq;
using System.Web;
using Ajax_01.Models;
using System.Web.Mvc;
using System.Collections;
using TencentCloud.Common;
using TencentCloud.Common.Profile;
using TencentCloud.Cr.V20180321.Models;
using TencentCloud.Sms.V20190711;
using TencentCloud.Sms.V20190711.Models;
using System.Text;

namespace Ajax_01.Controllers
{
    public class UserController : Controller
    {
        // GET: User
        public ActionResult Index()
        {
            return View();
        }
        public static string codes;//接受随机数的变量
        public ActionResult Validate(string username)
        {

            using (sqlEntities db = new sqlEntities())//数据库上下文对象
            {
                if (db.student.Where(u => u.Username == username).Count() > 0)//如果查询到用户手机号
                {
                    return Content("false");//直接返回false,不做任何处理
                }
                else
                {
                    int codeCount = 6;
                    string str = username;
                    codes = PhoneTool.CreateRandomCode(codeCount);
                    SendDL(new string[] { "+86" + str }, codes, 10);
                    return Content("true");
                }
            }
        }
        [HttpPost]
        public ActionResult Index(student stu)
        {
            using(sqlEntities db=new sqlEntities())
            {
                string sm = Request["Yzm"];
                if (sm != codes)
                {
                    ViewBag.tx = "验证码错误!";
                    return View();
                }
                else
                {
                    db.student.Add(stu);//保存信息到数据库内
                    db.SaveChanges();
                    ViewBag.tx = "成功!";
                    return View();
                }
            }
        }
        /// <summary>
        /// 这个是腾讯云的自带接口方法,里面的值填你自己的就好
        /// </summary>
        /// <param name="PhoneNumber"></param>
        /// <param name="code"></param>
        /// <param name="Time"></param>
        public static void SendDL(string[] PhoneNumber, string code, int Time)
        {
            try
            {
                Credential cred = new Credential
                {
                    SecretId = "", //在腾讯云官网中的“云产品”中找到“访问秘钥”,点击打开,就看得到相关ID和Key,复制填写即可
                    SecretKey = ""
                };
                ClientProfile clientProfile = new ClientProfile();
                HttpProfile httpProfile = new HttpProfile();
                httpProfile.Endpoint = ("sms.tencentcloudapi.com");
                clientProfile.HttpProfile = httpProfile;
                SmsClient client = new SmsClient(cred, "", clientProfile);
                SendSmsRequest req = new SendSmsRequest();
                req.PhoneNumberSet = PhoneNumber;
                req.TemplateID = "";//创建正文模板ID
                req.SmsSdkAppid = "";//在腾讯云官网中的“云产品”中找到“访问秘钥”,点击打开,就会有一个APPID,复制填写即可
                req.Sign = "";//您的公众号名字
                req.TemplateParamSet = new String[] { code, Time.ToString() };
                SendSmsResponse resp = client.SendSmsSync(req);
            }
            catch (Exception e)
            {
                Console.WriteLine(e.ToString());
            }

            return;
        }
 }
}
如有问题,可联系我~