注意点是:node版本必须是大于7.6.0 ,最好使用最新版node。
初始创建项目步骤如下:空文件夹,进行命名 ,cmd进入后步骤如下
1.vue init -y :初始依赖项
2.插件下载

3.package.json是需要下载的插件库
1.项目需要用到的库插件
图片如下:
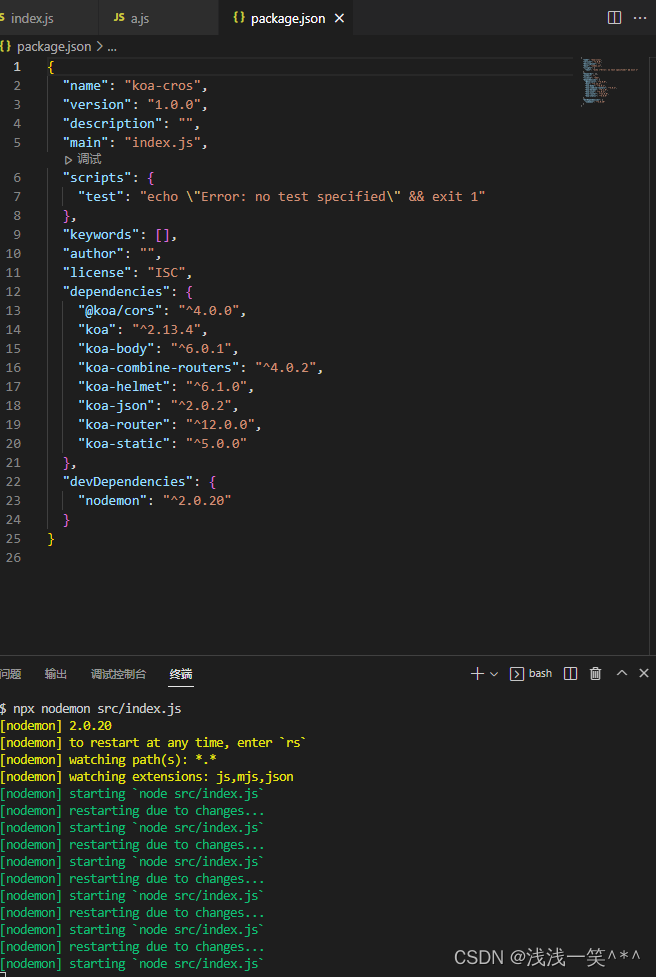
package.json
{
  "name": "koa-cros",
  "version": "1.0.0",
  "description": "",
  "main": "index.js",
  "scripts": {
    "test": "echo \"Error: no test specified\" && exit 1"
  },
  "keywords": [],
  "author": "",
  "license": "ISC",
  "dependencies": {
    "@koa/cors": "^4.0.0",
    "koa": "^2.13.4",
    "koa-body": "^6.0.1",
    "koa-combine-routers": "^4.0.2",
    "koa-helmet": "^6.1.0",
    "koa-json": "^2.0.2",
    "koa-router": "^12.0.0",
    "koa-static": "^5.0.0"
  },
  "devDependencies": {
    "nodemon": "^2.0.20"
  }
}
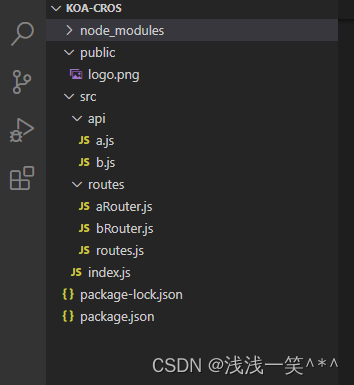
项目结构:
注意是:(*)
使用方法启动node服务,了解客户端的请求加载数据的过程。
代码:
src/api/a.js
// 正常项目中书写方式
// function a(ctx){
//   ctx.body={}
// }
// module.exports={
//   a
// }

//...代码省略写法
//初始message:'hello from a'
//修改后messsage:'hello from a!!!'
//修改后的数据页面已更新 --启动localhost:3000/a
module.exports=function(ctx){
  ctx.body={//开发过程中的热加载  修改代码后重新启动
   "message":"hello from a!!!"
  }
 }
src/api/b.js
module.exports=function(ctx){
 ctx.body={
  "message":"hello from b"
 }
}
src/routes/aRouter.js
const Router= require ('koa-router')
//引用a模块
const a=require('../api/a')

const router=new Router()

router.get('/a',a)

module.exports=router
src/routes/bRouter.js
const Router= require ('koa-router')
//引用a模块
const b=require('../api/b')

const router=new Router()

router.get('/b',b)

module.exports=router
src/routes/routes.js
//合并操作 可以对页面上所有的router进行组合
const combineRoutes = require('koa-combine-routers')
//路由
const aroutes=require('./aRouter')
const broutes=require('./bRouter')

module.exports=combineRoutes(//路由拼装
  aroutes,
  broutes
)
src/index.js 主文件
// koa 主文件 index.js 引用
const koa=require('koa')
//引入图片 需要使用到path路径模块
const path=require('path')
const app =new koa()

const helmet =require('koa-helmet')//安全头部信息加入项目
const statics=require('koa-static')//中简介 传递路径是一个绝对路径

//routes
const router=require('./routes/routes')
app.use(helmet())
//当前工作目录 、
app.use(statics(path.join(__dirname,'../public')))//放入图片
app.use(router())
//端口
app.listen(3000)

//开发koa路由的时候,
//需要按照功能模块进行区分方便路由的定义以及文件夹的区分,
//用到了路由压缩koa-rputers
//静态资源koa-static  需要注意的是中简介的使用需要用到path模块 并且传递到中简介的是一个绝对路径


//2.部分 koa配置开发热加载 es6语法支持webpack配置
//nodemon 简单的监视一个脚本的变化 在js发生变化的时候会重启服务
//使用步骤npm install -g nodemon
//npm install --save-dev nodemon
//开发过程中的依赖包 npm install -D nodemon


//使用方法启动node服务,了解客户端的请求加载数据的过程。
方法一:
启动:node src/index.js
浏览器:localhost:3000/a或者localhost:3000/b
localhost:3000/logo.png
方法二:
npx nodemon src/index.js
总结:方便进阶学习,记录一下。