1 formik 简介
1.1 FormIk介绍
FormIk是React 官方推荐我们使用的用于增强表单功能的第三方组件库。使用了formik 我们就可以更加专注于我们的业务逻辑,而不用分心去处理表单基础上的一些细节。
它帮助我们增强表单的护理能力,简化表单处理流程。
1.2 FormIk 下载
npm install formik2 FormIk增强表单
2.1 Formik 基本使用
使用formik 进行表单数据绑定以及表单提交处理
import { memo, useState } from 'react'
import { useFormik } from 'formik'

function App () {
  const formik = useFormik({
    initialValues: {
      username: '',
      password: ''
    },
    onSubmit: values => {
      // 这里formik 已经默认帮我们阻止了默认执行
      console.log(values)
    }
  })
  return (
    <div>
      <form onSubmit={formik.handleSubmit}>
        <label htmlFor='username'>用户名</label>
        <input
          type='text'
          name='username'
          value={formik.values.username}
          onChange={formik.handleChange}
        />
        <label htmlFor='password'>密码</label>
        <input
          type='password'
          name='password'
          value={formik.values.password}
          onChange={formik.handleChange}
        />
        <button type='submit'>提交</button>
      </form>
    </div>
  )
}

export default memo(App)
2.2 formik 表单验证
2.2.1 初始验证方式
在useFomik时配置validate属性,是一个函数,它接收表单的值,在函数内部可以对表单的值进行验证,该函数最终返回一个对象,对表单中的字段的验证错误结果进行描述。
2.2.3 完善验证错误信息时的用户体验
在提示错误信息时,通过 formik.touched.xxx 可以检查表单元素是否被改动过。在此之前,需要给input 的表达元素中添加 onBlur 事件处理函数 onBlur={formik.handleBlur},也就是当鼠标离开焦点时再开始验证。
import { memo } from 'react'
import { useFormik } from 'formik'
function App () {
const formik = useFormik({
// validateOnChange: false,
// validateOnBlur: true,
initialValues: {
username: '',
password: ''
},
onSubmit: values => {
console.log(values)
},
validate: values => {
const errors = {}
if (!values.username || values.username.trim() === '') {
errors.username = '用户名不能为空'
} else if (values.username.length > 15) {
errors.username = '用户名长度不能大于15位'
}
if (values.password.length < 6) {
errors.password = '密码长度不能小于6位'
}
console.log('validate....', errors)
return errors
}
})
return (
<div>
<form onSubmit={formik.handleSubmit}>
<div>
<label htmlFor='username'>用户名</label>
<input
id='username'
type='text'
name='username'
value={formik.values.username}
onChange={formik.handleChange}
onBlur={formik.handleBlur}
/>
<p>
{formik.touched.username && formik.errors.username
? formik.errors.username
: null}
</p>
</div>
<div>
<label htmlFor='password'>密 码</label>
<input
id='password'
type='password'
name='password'
value={formik.values.password}
onChange={formik.handleChange}
onBlur={formik.handleBlur}
/>
<p>
{formik.touched.username && formik.errors.password
? formik.errors.password
: null}
</p>
</div>
<button type='submit'>提交</button>
</form>
</div>
)
}
export default memo(App)2.2.2 使用yup 验证表单
2.2.2.1 下载yup
npm install yup
2.2.2.2 如何使用yup
定义验证规则
使用yup 配合Formik实现验证需要配置 validationSchema 选项, 配置为Yup.object({})所生产的一个对象,这时候我们就可以把validate函数拿掉,检验的代码就变得简洁多了,成为了编写描述对象的形式。而其他的没有变化。
import { memo } from 'react'
import { useFormik } from 'formik'
import * as Yup from 'yup'
function App () {
const formik = useFormik({
// validateOnChange: false,
// validateOnBlur: true,
initialValues: {
username: '',
password: ''
},
onSubmit: values => {
console.log(values)
},
/* validate: values => {
const errors = {}
if (!values.username || values.username.trim() === '') {
errors.username = '用户名不能为空'
} else if (values.username.length > 15) {
errors.username = '用户名长度不能大于15位'
}
if (values.password.length < 6) {
errors.password = '密码长度不能小于6位'
}
console.log('validate....', errors)
return errors
} */
// 使用yup 实现验证需要配置 validationSchema, 配置位Yup.object({})所生产的一个对象
validationSchema: Yup.object({
username: Yup.string()
.max(15, '用户名长度不能大于15位')
.required('请填写用户名'),
password: Yup.string()
.min(6, '密码长度不能小于6位')
.required('请填写密码')
})
})
return (
<div>
<form onSubmit={formik.handleSubmit}>
<div>
<label htmlFor='username'>用户名</label>
<input
id='username'
type='text'
name='username'
value={formik.values.username}
onChange={formik.handleChange}
onBlur={formik.handleBlur}
/>
<p>
{formik.touched.username && formik.errors.username
? formik.errors.username
: null}
</p>
</div>
<div>
<label htmlFor='password'>密 码</label>
<input
id='password'
type='password'
name='password'
value={formik.values.password}
onChange={formik.handleChange}
onBlur={formik.handleBlur}
/>
<p>
{formik.touched.username && formik.errors.password
? formik.errors.password
: null}
</p>
</div>
<button type='submit'>提交</button>
</form>
</div>
)
}
export default memo(App)2.3 使用getFieldProps方法简化表单代码
getFieldProps 方法会帮助我们返回对应表单项input 中的value,onChange 以及onBlur 等属性,放在一个对象中,获取回来后通过{...getFieldProps('xxx')}的形式添加到input 标签中即可,可大大简化我们写form表单的页面代码。
<input
    id='username'
    type='text'
    name='username'
    {...formik.getFieldProps('username')}
    />
完整代码:
import { memo } from 'react'
import { useFormik } from 'formik'
import * as Yup from 'yup'
function App () {
const formik = useFormik({
// validateOnChange: false,
// validateOnBlur: true,
initialValues: {
username: '',
password: ''
},
onSubmit: values => {
console.log(values)
},
/* validate: values => {
const errors = {}
if (!values.username || values.username.trim() === '') {
errors.username = '用户名不能为空'
} else if (values.username.length > 15) {
errors.username = '用户名长度不能大于15位'
}
if (values.password.length < 6) {
errors.password = '密码长度不能小于6位'
}
console.log('validate....', errors)
return errors
} */
// 使用yup 实现验证需要配置 validationSchema, 配置位Yup.object({})所生产的一个对象
validationSchema: Yup.object({
username: Yup.string()
.max(15, '用户名长度不能大于15位')
.required('请填写用户名'),
password: Yup.string()
.min(6, '密码长度不能小于6位')
.required('请填写密码')
})
})
return (
<div>
<form onSubmit={formik.handleSubmit}>
<div>
<label htmlFor='username'>用户名</label>
<input
id='username'
type='text'
name='username'
{...formik.getFieldProps('username')}
/>
<p>
{formik.touched.username && formik.errors.username
? formik.errors.username
: null}
</p>
</div>
<div>
<label htmlFor='password'>密 码</label>
<input
id='password'
type='password'
name='password'
{...formik.getFieldProps('password')}
/>
<p>
{formik.touched.username && formik.errors.password
? formik.errors.password
: null}
</p>
</div>
<button type='submit'>提交</button>
</form>
</div>
)
}
export default memo(App)2.4 使用Formik 的组件形式构建表单
好处是可以让我们的表单代码看起来更加简单,它提供了 Formik、Form、Field、ErrorMessage 组件。
import { memo } from 'react'
import * as Yup from 'yup'
import { Formik, Form, Field, ErrorMessage } from 'formik'
function App () {
const initialValues = { username: '', password: '' }
const handleSubmit = values => {
console.log(values)
}
const validationSchema = Yup.object({
username: Yup.string()
.max(15, '用户名长度不能大于15位')
.required('请填写用户名'),
password: Yup.string()
.min(6, '密码长度不能小于6位')
.required('请填写密码')
})
return (
<Formik
initialValues={initialValues}
onSubmit={handleSubmit}
validationSchema={validationSchema}
>
<Form>
<div>
<label htmlFor='username'>用户名</label>
<Field id='username' name='username' />
<ErrorMessage name='username' />
</div>
<div>
<label htmlFor='password'>密 码</label>
<Field id='password' name='password' />
<ErrorMessage name='password' />
</div>
<input type='submit' />
</Form>
</Formik>
)
}
export default memo(App)2.5 使用 Formik 的组件构建其他表单项
默认情况下,Field 组件渲染的是文本框,如要生成其他表单元素,可以使用如下语法:
import { memo } from 'react'
import * as Yup from 'yup'
import { Formik, Form, Field, ErrorMessage } from 'formik'
function App () {
const initialValues = {
username: '张三',
password: '',
content: '文章整挺好啊',
subject: 'Java'
}
const handleSubmit = values => {
console.log(values)
}
const validationSchema = Yup.object({
username: Yup.string()
.max(15, '用户名长度不能大于15位')
.required('请填写用户名'),
password: Yup.string()
.min(6, '密码长度不能小于6位')
.required('请填写密码')
})
return (
<Formik
initialValues={initialValues}
onSubmit={handleSubmit}
validationSchema={validationSchema}
>
<Form>
<div>
<label htmlFor='username'>用户名</label>
<Field id='username' name='username' />
<ErrorMessage name='username' />
</div>
<div>
<label htmlFor='password'>密 码</label>
<Field id='password' type='password' name='password' />
<ErrorMessage name='password' />
</div>
<div>
<h2>使用Formik的 Field组件 编写其他表单元素</h2>
<div>
<label htmlFor='content'>文章内容</label>
<Field id='content' name='content' as='textarea'></Field>
</div>
<div>
<label htmlFor='content'>文章内容</label>
<Field id='subject' name='subject' as='select'>
<option value='前端'>前端</option>
<option value='Java'>Java</option>
<option value='Python'>Python</option>
</Field>
</div>
</div>
<input type='submit' />
</Form>
</Formik>
)
}
export default memo(App)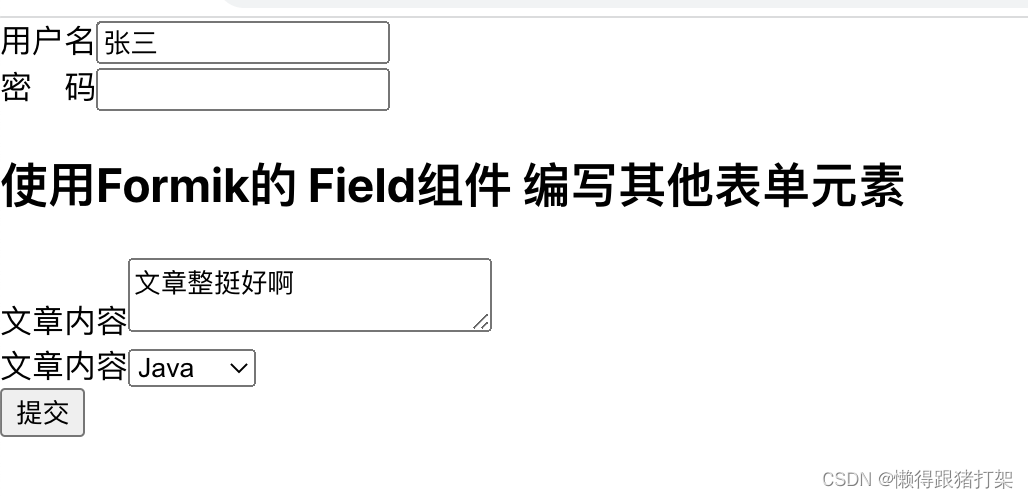
2.6 使用 useField 构建自定义表单控件
例如单选框,复选框等Formik 是没有给我们提供的,所以需要我们自己去构建这些表单控件。需要用到 useField 方法。自定义表单空间实际上就是组件。
import { memo } from 'react'
import * as Yup from 'yup'
import { Formik, Form, Field, ErrorMessage, useField } from 'formik'
/**
* 自定义密码表单控件演示案例
* @param {*} param0
* @returns
*/
function PasswordInputField ({ label, ...props }) {
const [field, meta] = useField(props)
console.log(field, meta)
return (
<div>
<label htmlFor={props.id}>{label}</label>
<input {...field} {...props} />
{meta.touched && meta.error ? <span>{meta.error}</span> : null}
</div>
)
}
function App () {
const initialValues = {
username: '张三',
password: '',
password2: 'mymima',
content: '文章整挺好啊',
subject: 'Java'
}
const handleSubmit = values => {
console.log(values)
}
const validationSchema = Yup.object({
username: Yup.string()
.max(15, '用户名长度不能大于15位')
.required('请填写用户名'),
password: Yup.string()
.min(6, '密码长度不能小于6位')
.required('请填写密码'),
password2: Yup.string()
.min(6, '密码2长度不能小于6位')
.required('请填写密码2')
})
return (
<Formik
initialValues={initialValues}
onSubmit={handleSubmit}
validationSchema={validationSchema}
>
<Form>
<div>
<label htmlFor='username'>用户名</label>
<Field id='username' name='username' />
<ErrorMessage name='username' />
</div>
<div>
<label htmlFor='password'>密 码</label>
<Field id='password' type='password' name='password' />
<ErrorMessage name='password' />
</div>
<PasswordInputField
id='password2'
type='password'
name='password2'
label='密 码'
placeholder='请输入密码'
/>
<div>
<h2>使用Formik的 Field组件 编写其他表单元素</h2>
<div>
<label htmlFor='content'>文章内容</label>
<Field id='content' name='content' as='textarea'></Field>
</div>
<div>
<label htmlFor='content'>文章内容</label>
<Field id='subject' name='subject' as='select'>
<option value='前端'>前端</option>
<option value='Java'>Java</option>
<option value='Python'>Python</option>
</Field>
</div>
</div>
<input type='submit' />
</Form>
</Formik>
)
}
export default memo(App)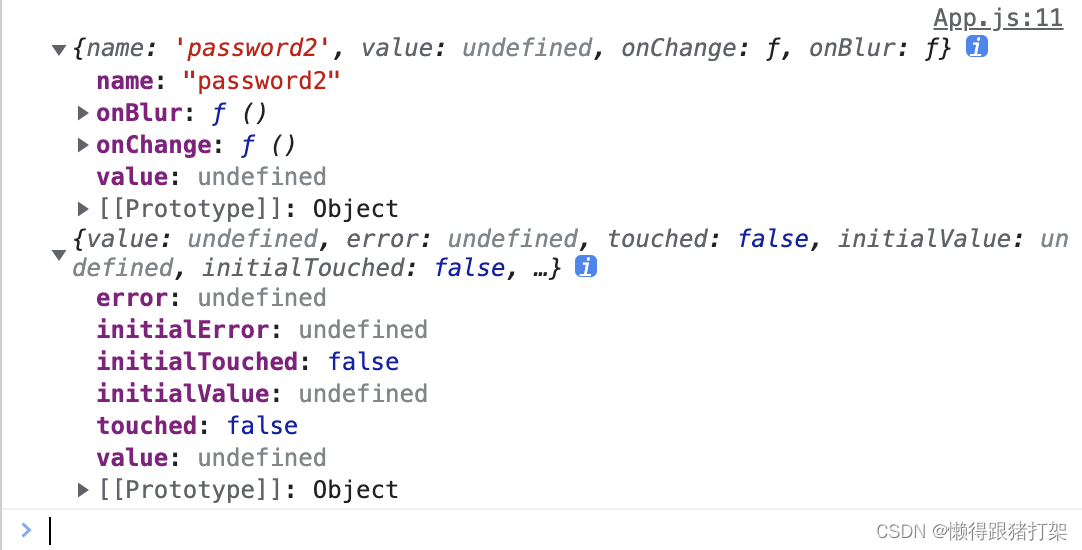
2.7 使用 useField 构建自定义表单控件复选框 案例
编写一个复选框控件,让用户可以在一组选项列表中,选择多项内容。
import { memo } from 'react'
import * as Yup from 'yup'
import { Formik, Form, Field, ErrorMessage, useField } from 'formik'
function CheckBox ({ label, ...props }) {
// useField 返回数组 [FieldInputProps<any>, FieldMetaProps<any>, FieldHelperProps<any>]
// 其中:FieldHelperProps 是提供给我们对field 的值或改动状态进行修改的方法的
const [field, meta, helper] = useField(props)
const { value } = meta
const { setValue } = helper
const handleChange = () => {
// 利用 Set 集合快速去重拷贝数据
const set = new Set(value)
if (set.has(props.value)) {
set.delete(props.value)
} else {
set.add(props.value)
}
// 对数据进行增删后调用 setValue 更新状态值
setValue([...set])
}
return (
<div>
<input
checked={value.includes(props.value)}
type='checkbox'
{...props}
onChange={handleChange}
/>
<label htmlFor={props.id}>{label || props.value}</label>
</div>
)
}
function MultipleSelectField ({ label, options = [], ...props }) {
const [field, meta] = useField(props)
return (
<div>
{label ? <label htmlFor={props.id}>{label}</label> : null}
<select multiple {...field} {...props}>
<option disabled>请选择</option>
{options.map(option => {
return (
<option key={option.name || option} value={option.value || option}>
{option.name || option.value || option}
</option>
)
})}
</select>
{meta.touched && meta.error ? <span>{meta.error}</span> : null}
</div>
)
}
/**
* 自定义密码表单控件演示案例
* @param {*} param0
* @returns
*/
function PasswordInputField ({ label, ...props }) {
const [field, meta] = useField(props)
return (
<div>
{label ? <label htmlFor={props.id}>{label}</label> : null}
<input {...field} {...props} />
{meta.touched && meta.error ? <span>{meta.error}</span> : null}
</div>
)
}
function App () {
const initialValues = {
username: '张三',
password: '',
password2: 'mymima',
content: '文章整挺好啊',
subject: 'Java',
hobbies: ['吃饭', '睡觉'],
careers: ['前端开发']
}
const handleSubmit = values => {
console.log(values)
}
const validationSchema = Yup.object({
username: Yup.string()
.max(15, '用户名长度不能大于15位')
.required('请填写用户名'),
password: Yup.string()
.min(6, '密码长度不能小于6位')
.required('请填写密码'),
password2: Yup.string()
.min(6, '密码2长度不能小于6位')
.required('请填写密码2'),
hobbies: Yup.array()
.min(1, '必须发展一个爱好')
.max(2, '最多发展2个爱好')
})
return (
<Formik
initialValues={initialValues}
onSubmit={handleSubmit}
validationSchema={validationSchema}
>
<Form>
<div>
<label htmlFor='username'>用户名</label>
<Field id='username' name='username' />
<ErrorMessage name='username' />
</div>
<div>
<label htmlFor='password'>密 码</label>
<Field id='password' type='password' name='password' />
<ErrorMessage name='password' />
</div>
<p>自定义的表单控件</p>
<PasswordInputField
id='password2'
type='password'
name='password2'
label='密 码'
placeholder='请输入密码'
/>
<MultipleSelectField
id='hobbies'
type='select'
name='hobbies'
label='爱 好'
placeholder='请选择爱好'
options={['吃饭', '睡觉', '打豆豆']}
/>
<h3>职 业</h3>
<CheckBox id='前端开发xxx' value='前端开发' name='careers' />
<CheckBox id='Java开发xxx' value='Java开发' name='careers' />
<CheckBox id='全栈开发xxx' value='全栈开发' name='careers' />
<div>
<h2>使用Formik的 Field组件 编写其他表单元素</h2>
<div>
<label htmlFor='content'>文章内容</label>
<Field id='content' name='content' as='textarea'></Field>
</div>
<div>
<label htmlFor='content'>文章内容</label>
<Field id='subject' name='subject' as='select'>
<option value='前端'>前端</option>
<option value='Java'>Java</option>
<option value='Python'>Python</option>
</Field>
</div>
</div>
<input type='submit' />
</Form>
</Formik>
)
}
export default memo(App)