zabbix、ansible
- 一. zabbix 架构原理,及常用组件及用途分析。
- 二. 监控LNMP架构,并配置报警升级,0-5分钟不报警执行重启应用,5-30分钟通知运维,30-60分钟短信通过总监。
- 三. zabbix api批量添加多个主机,要求一些不走代理,一些支持走代理。
- 四. 基于角色完成部署LNMP架构,并支持一键发布,回滚应用。同时基于zabbix角色批量部署zabbix。
- 五. 总结zabbix自定义监控项,基于自定义监控项监控nginx。
- 六. 基于zabbix实现邮件或微信告警。
- 七. 总结zabbix自动发现监控
- 八 还有优化、高可用的话题
一. zabbix 架构原理,及常用组件及用途分析。
1.1 Zabbix 由如下主要的功能组件组成
- SERVER
Zabbix server 是 Zabbix 软件的核心组件
Zabbix Agent 向其报告可用性、系统完整性信息和统计信息。
Zabbix server也是存储所有配置信息、统计信息和操作信息的核心存储库。
Zabbix server也是Zabbix监控系统的告警中心。在监控的系统中出现任何异常,将发出通知给管理员。
基本的 Zabbix Server 的功能分解成为三个不同的组件。他们是:Zabbix server、Web前端和数据库。
Zabbix 的所有配置信息都存储在 Server和Web前端进行交互的数据库中。例如,当你通过Web前端(或者API)新增一个监控项时,它会被添加到数据库的监控项表里。然后,Zabbix server 以每分钟一次的频率查询监控项表中的有效项,接着将它存储在 Zabbix server 中的缓存里。这就是为什么 Zabbix前端所做的任何更改需要花费两分钟左右才能显示在最新的数据段的原因。 - 数据库
所有配置信息以及 Zabbix 采集到的数据都被持久存储在数据库中
可以支持MySQL,PostgreSQL,Oracle 等多种数据库 - WEB 界面
WEB 界面是 Zabbix server 的一部分,用于实现展示和配置的界面
通常(但不一定)和 Zabbix server 运行在同一台物理机器上
基于 Apache(Nginx)+PHP 实现,早期只支持LAMP架构,从Zabbix5.0开始支持LNMP - AGENT
Zabbix agents 部署在被监控目标上,用于主动监控本地资源和应用程序,并将收集的数据发送给Zabbix server。从Zabbix5.0开始支Zabbix Agent2 - PROXY
Zabbix Proxy 可以代替 Zabbix Server 采集性能和可用性数据
Zabbix Proxy 在 Zabbix 的部署是可选部分
Zabbix Proxy 的部署可以很好的分担单个Zabbix server的负载 - Java 网关
Zabbix 要监控 tomcat 服务器和其它JAVA程序,需要使用 Java gateway 做为代理,才能从JAVA程序中获取数据 - 内部配置的数据流程
Zabbix 内部的数据流对Zabbix的使用也很重要。首先,为了创建一个采集数据的监控项,就必须先创建主机。其次,在任务的另外一端,必须要有监控项才能创建触发器(trigger),必须要有触发器来创建动作(action)。因此,如果您想要收到类似“X个server上CPU负载过高”这样的告警,您必须首先为 Server X 创建一个主机条目,其次创建一个用于监控其 CPU的监控项,最后创建一个触发器,用来触发 CPU负载过高这个动作,并将其发送到您的邮箱里。虽然这些步骤看起
来很繁琐,但是使用模板的话,实际操作非常简单。也正是由于这种设计,使得 Zabbix 的配置变得更加灵活易用。
二. 监控LNMP架构,并配置报警升级,0-5分钟不报警执行重启应用,5-30分钟通知运维,30-60分钟短信通过总监。
2.1 分级告警
当出现报警后,一般会根据组织的重要级别,按时间逐级分层向上报警,如下面常见分层报警
初级运维/指定运维组–高级运维工程师/业务运维-—->架构师—>总监/CTO
2.1.1 实现故障自愈功能
配置远程命令的操作类似于发送消息,区别在于一个执行命令,一个发送消息
远程命令可以直接在ZabbixServer, ZabbixProxy和ZabbixAgent上执行。
但在Zabbix agent和Zabbix proxy上,远程命令默认是不开启的,它们可以通过以下方式启用:
在agent配置中添加AllowKey=system.run[*]、UnsafeUserParameters=1参数
在proxy配置中,将enableremotecomcommands参数设置为1;
#编译安装路径
[root@centos8 ~]#vim /apps/zabbix_agent/etc/zabbix_agentd.conf
#包安装路径
[root@centos8 ~]#vim /etc/zabbix/zabbix_agentd.conf
AllowKey=system.run[*] #zabbix5.0版本以上,代替EnableRemoteCommands,agent2默认没有此
命令手工加入
#EnableRemoteCommands=1 #开启远程执行命令,此指令在zabbix5.0版本以上淘汰
AllowRoot=1  #开启此项,直接使用root进行远程管理,而无须对zabbix用户授权sudo权限
UnsafeUserParameters=1  #允许远程执行命令的时候使用不安全的参数(特殊字符串,如: \ ' * ?
[] {

    } ~ $ ! & ; ( ) < > 等 )
[root@centos8 ~]#systemctl restart zabbix-agent.service
Zabbix Agent 对 Zabbix 用户授权管理权限
默认zabbix agent是使用zabbix用户启动的,有些特权命令zabbix用户是没有权限执行,会导致定义好
的自治愈策略因为权限拒绝为执行失败,所以需要事先对zabbix用户进行授权.
范例: 在 zabbix 用户进行 sudo 授权
[root@centos8 ~]#vim /etc/sudoers
zabbix ALL=(ALL)   NOPASSWD: ALL
#检查语法
[root@centos8 ~]#visudo -c
查看内置的模板及相关触发器

使用内置的版本关联需要监控的主机
使用内置模板 Template App Nginx by HTTP
创建动作
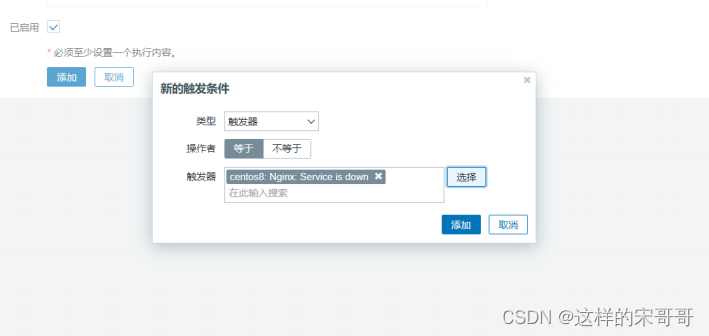
添加动作的条件,用于指定动作关联的条件,即只有特定的触发器发生才会执行动作
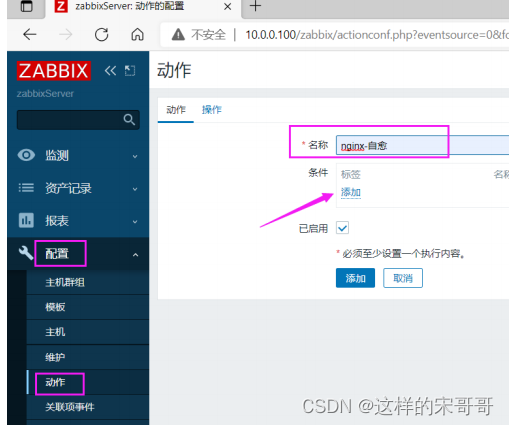
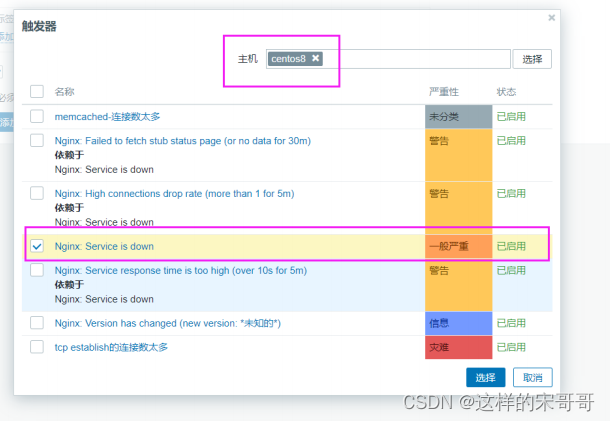
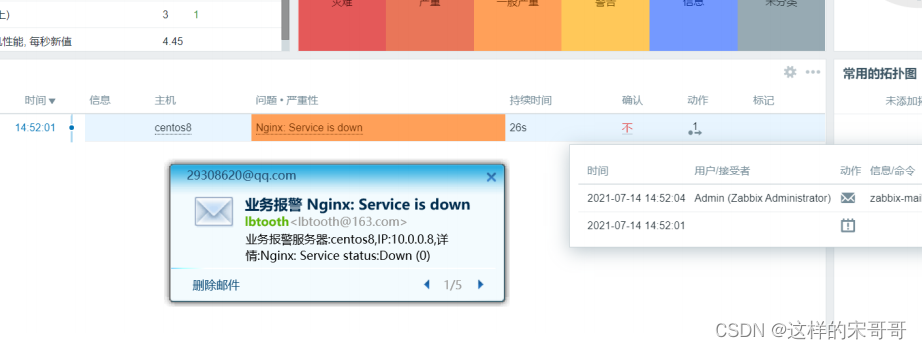
选中Nginx Service is down 的触发器
步骤为1和1表示只执行一次
步骤持续时间表示如果有多个步骤执行时的时间间隔,0表示使用默认步骤持续时间间隔
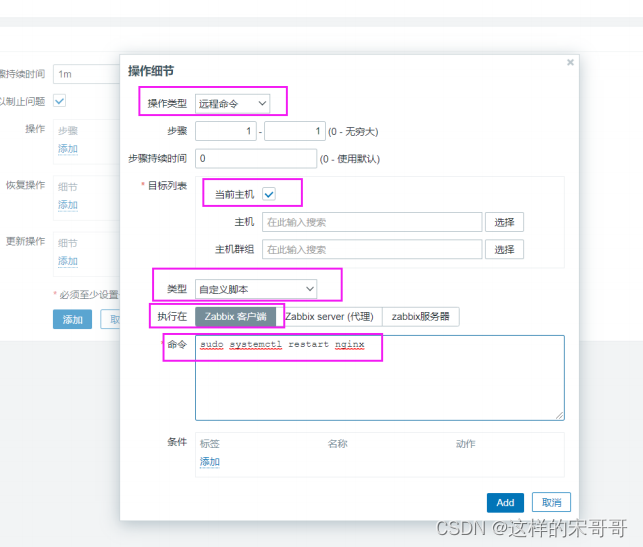
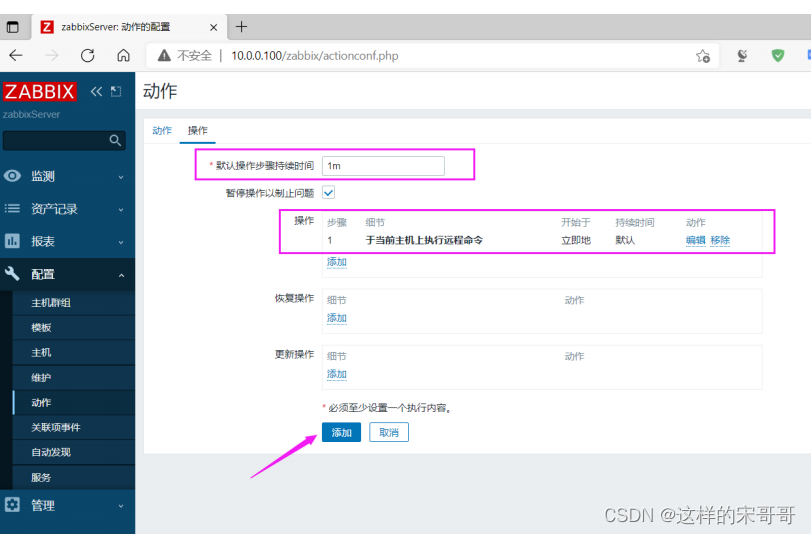
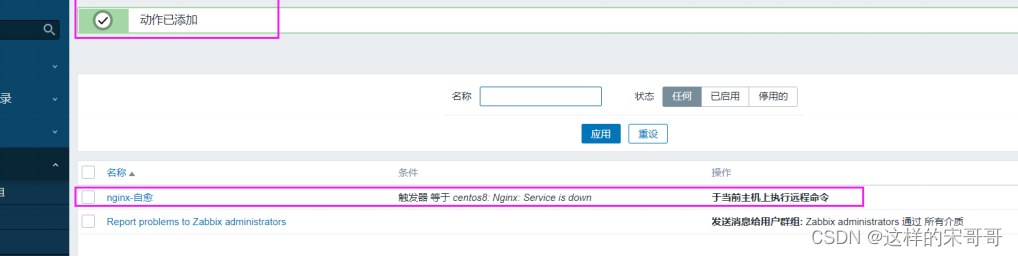
动作创建完成
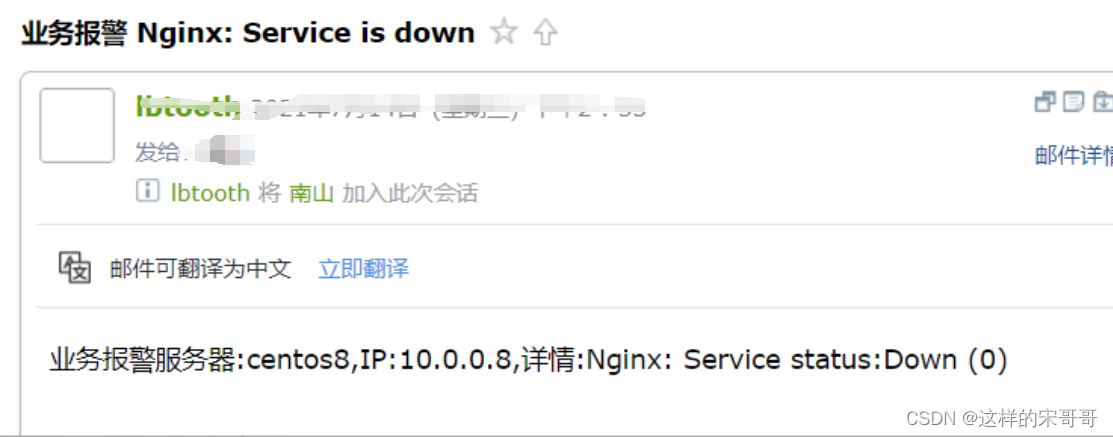
2.1.2 配置邮箱
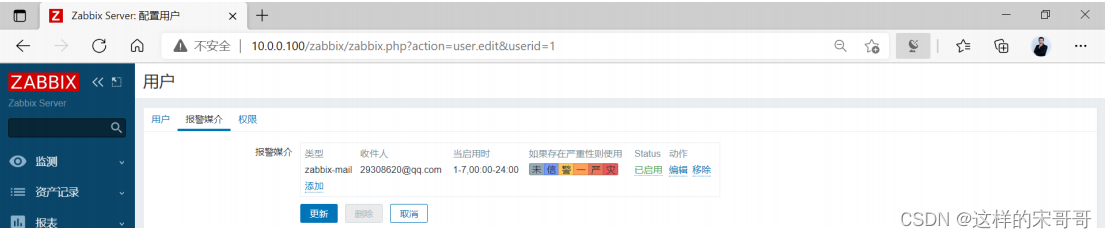
配置Admin用户的邮箱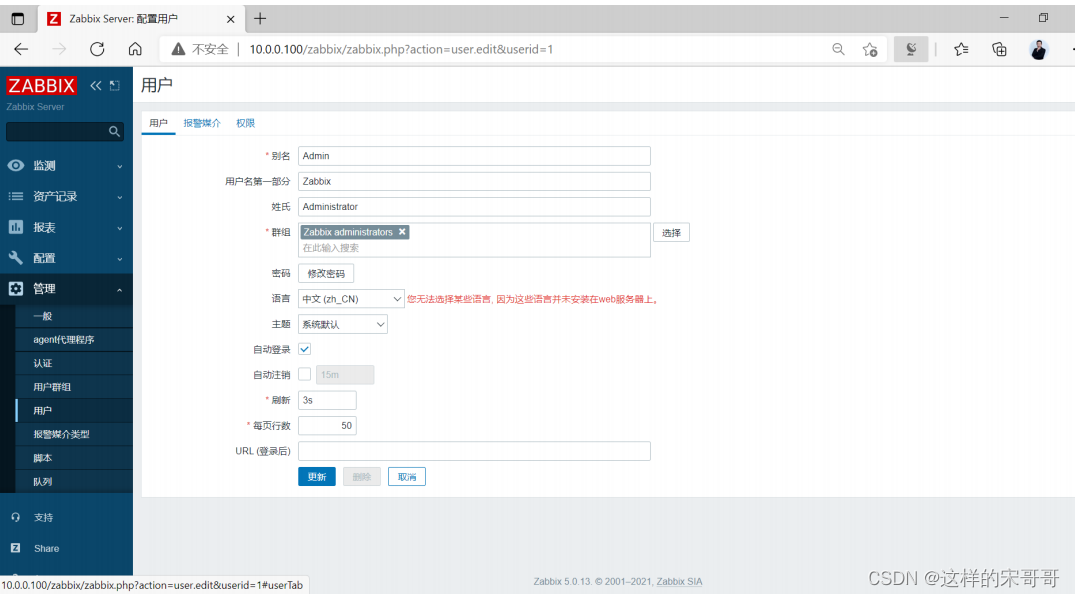
另一个用户wang使用不同的邮箱

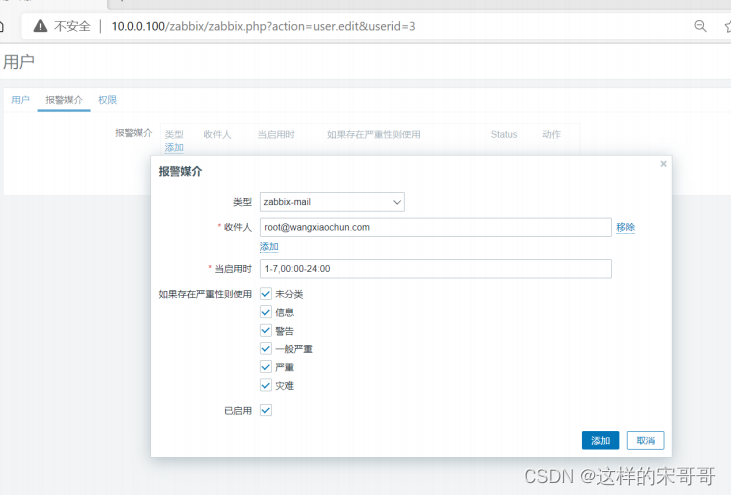
配置操作指定不同的步骤发邮件给不同的用户
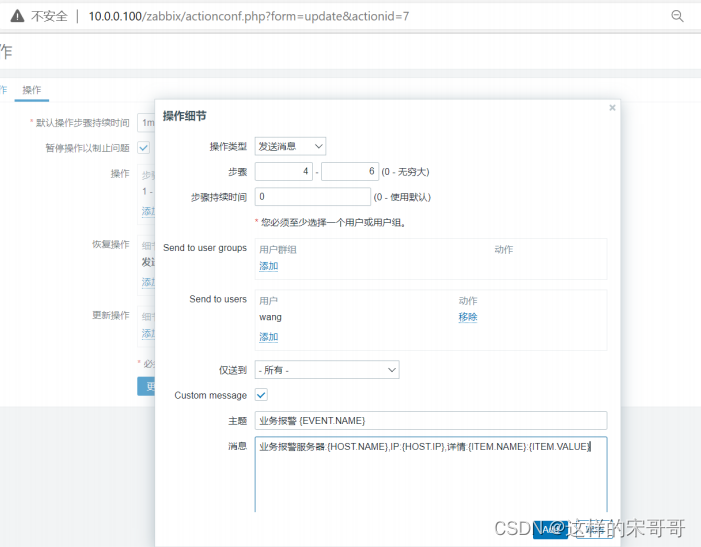
在原来操作基础上添加新的操作
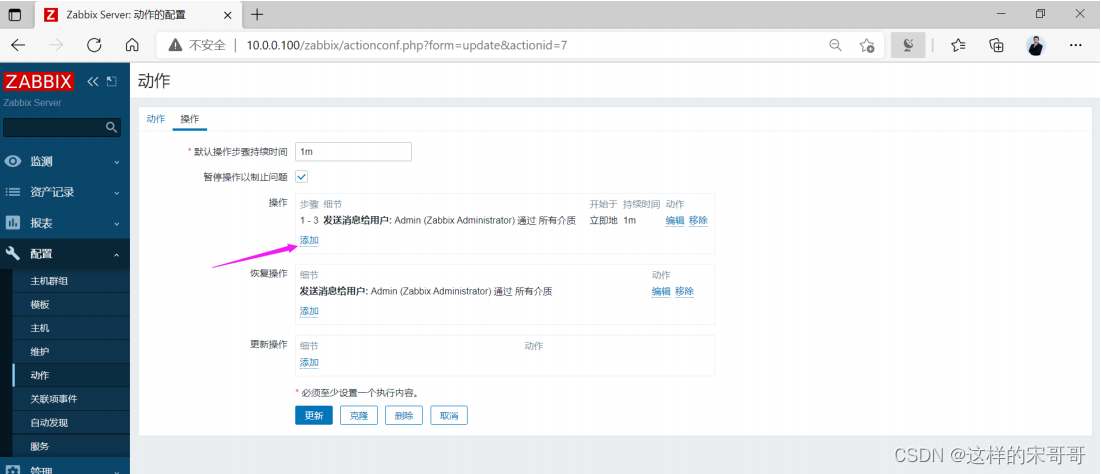
添加操作,发送消息给上级领导的邮箱
{

    ESC.HISTORY} 宏放在在自定义消息里
该宏将包含关于此升级之前执行的所有步骤的信息,例如:发送的通知和执行的命令。
自定义消息如下示例:
主题:Problem:{

    EVENT.NAME}
告警主机:{

    HOST.NAME1}
告警服务: {

    ITEM.NAME1}
告警Key1: {

    ITEM.KEY1}:{

    ITEM.VALUE1}
告警Key2: {

    ITEM.KEY2}:{

    ITEM.VALUE2}
严重级别: {

    TRIGGER.SEVERITY}
此前步骤:{

    ESC.HISTORY}

确认动作更新

这里举个例子把操作的顺序、步骤持续的时间更改一下就可以了
三. zabbix api批量添加多个主机,要求一些不走代理,一些支持走代理。
3.1 Zabbix API 介绍
API(Application Programming Interface,应用程序编程接口)是一些预先定义的函数,目的是提供
应用程序与开发人员基于某软件或硬件得以访问一组功能的能力,而又无需直接使用源代码,或理解内
部工作机制的细节。
Zabbix API允许你以编程方式检索和修改Zabbix的配置,并提供对历史数据的访问。它广泛用于:
- 创建新的应用程序以使用Zabbix
- 将Zabbix与第三方软件集成
- 自动执行常规任务
Zabbix API是基于Web的API,作为Web前端的一部分提供。它使用JSON-RPC 2.0协议,这意味着两件
事: - 该API包含一组独立的方法
- 客户端和API之间的请求和响应使用JSON格式进行编码
官方参考文档:
https://www.zabbix.com/documentation/5.0/zh/manual/api
https://www.zabbix.com/documentation/4.0/zh/manual/api
https://www.zabbix.com/documentation/5.0/zh/manual/api/reference
https://www.zabbix.com/documentation/4.0/zh/manual/api/reference
Zabbix 支持各种语言的开发库
https://zabbix.org/wiki/Docs/api/libraries
Zabbix 常用API
user.login #用户登录
host.get(create|delete|update) #主机操作
hostgroup.get(create|delete|update) #主机组操作
item.get(create|delete|update) #监控项目操作
history.get #历史数据查询
event.get #事件查询
trigger.get #触发器查询
获取 Token
在访问Zabbix内部的任何数据之前,需要登录并获得身份验证令牌。这可以使用user.login方法来完
成。
假设以Zabbix的Admin用户登录。那么JSON请求将是这样的:
[root@zabbix-server ~]#yum -y install python3
[root@zabbix-server ~]#cat zabbix-api-token.sh
#!/bin/bash
#
#********************************************************************
#Author:           wangxiaochun
#QQ:               29308620
#Date:             2020-09-08
#FileName:         zabbix-api-token.sh
#URL:               http://www.wangxiaochun.com
#Description:       The test script
#Copyright (C):     2020 All rights reserved
#********************************************************************
ZABBIX_SERVER=zabbix.wang.org
curl -s -XPOST -H "Content-Type: application/json-rpc" -d '

{
"jsonrpc": "2.0",
"method": "user.login",
"params": {
"user": "Admin",
"password": "zabbix"
},
"id": 1,
"auth": null
}' http://${ZABBIX_SERVER}/zabbix/api_jsonrpc.php
[root@zabbix-server ~]#./zabbix-api-token.sh | python3 -m json.tool
{


    "jsonrpc": "2.0",
    "result": "6e936114704269310d372a19c409e93d",  #此为获取的Token
    "id": 1
}
关于 json.tool 的说明:
在通常的测试场景中,直接输出JSON结果的结果很乱,没有换行,没有任何格式,看起来很复杂,如果想要格
式化输出,需要花费很多的时间对结果进行处理,使用python的json.tool可以直接将结果以json格式输 出,看起来美观易读
还可以利jq工具实现类似的效果
3.2 脚本实现
#!/bin/bash
#
#********************************************************************
#Author:           Mr.Song
#QQ:               1132197391
#Date:             2022-12-02
#Description:       The test script
#Copyright (C):     2022 All rights reserved
#********************************************************************
ZABBIX_SERVER=10.0.0.100
TOKEN=$(./zabbix-api-token.sh| awk -F'"' '{print $8}')
IPLIST=(10.0.0.1 10.0.0.2 10.0.0.3 10.0.0.5)

for ((i=0; i<${#IPLIST[@]}; i++ ));do

curl_content='
{
"jsonrpc": "2.0",
"method": "host.create",
"params": {
    "host": "'${IPLIST[$i]}'",
    "name": "'web-${IPLIST[$i]}'",
    "interfaces": [
       {
        "type": 1,
        "main": 1,
        "useip": 1,
        "ip": "'${IPLIST[$i]}'",
        "dns": "",
        "port": "10050"
       }
   ],
    "groups": [
       {
            "groupid": "2"
       }
   ],
     "templates": [
       {
            "templateid": "10001"
       }
   ]
 },
"id": 1,
"auth": "'$TOKEN'"
}'

curl_proxy_content='
{
"jsonrpc": "2.0",
"method": "host.create",
"params": {
    "host": "'${IPLIST[$i]}'",
    "name": "'web-proxy-api-${IPLIST[$i]}'",
    "proxy_hostid": "10276",
    "interfaces": [
       {
        "type": 1,
        "main": 1,
        "useip": 1,
        "ip": "'${IPLIST[$i]}'",
        "dns": "",
        "port": "10050"
       }
   ],
    "groups": [
       {
            "groupid": "2"
       }
   ],
    "templates": [
       {
            "templateid": "10001"
       }
   ]
 },
"id": 1,
"auth": "'$TOKEN'"
}'


  if [ $i -gt 2 ];then
        curl -s -XPOST -H \"Content-Type: application/json-rpc\" -d "$curl_proxy_content" http://${ZABBIX_SERVER}/zabbix/api_jsonrpc.php | python3 -m json.tool
  else

        curl -s -XPOST -H \"Content-Type: application/json-rpc\" -d "$curl_content" http://${ZABBIX_SERVER}/zabbix/api_jsonrpc.php | python3 -m json.tool
  fi

done
四. 基于角色完成部署LNMP架构,并支持一键发布,回滚应用。同时基于zabbix角色批量部署zabbix。
4.1 基于角色完成部署LNMP架构
4.1.1 目录结构
 ll
总用量 52
-rw-r--r--  1 root root 19973 10月 29 21:23 ansible.cfg
-rw-r--r--  1 root root  1234 10月 31 05:44 hosts_mysql
-rw-r--r--  1 root root  1217 11月 15 23:41 hosts_redis
-rw-r--r--  1 root root  1327 10月 29 21:28 hosts_shopxo
-rw-r--r--  1 root root  1305 10月 29 21:24 hosts_wordpress
-rw-r--r--  1 root root    63 10月 31 06:37 mysql_role.yml
-rw-r--r--  1 root root    58 11月 15 17:17 redis_role.yml
drwxr-xr-x 11 root root   137 10月 29 21:23 roles
-rw-r--r--  1 root root    64 10月 29 21:23 shopxo_role.yml
-rw-r--r--  1 root root     0 10月 29 21:23 tomcat_role.yml
-rw-r--r--  1 root root    67 10月 29 21:23 wordpress_role.yml
4.1.2 hosts信息
mysql
[dbservers]
10.1.10.113
10.1.10.114

[dbservers:vars]
uid=306
user=mysql
gid=306
group=mysql
basedir="/usr/local"
datadir="/data/mysql"
mysql_version="8.0.20"
mysql_file="mysql-{

    {mysql_version}}-linux-glibc2.12-x86_64.tar.xz"
mysql_root_password=123456
redis
[redis]
10.1.10.113
10.1.10.114


[redis:vars]
uid=6379
user=redis
gid=6379
group=redis
redis_version="6.0.15"
redis_file="redis-{

    {redis_version}}.tar.gz"
redis_data_dir="/data/redis"
redis_base_dir="/usr/local"
redis_password=123456
nginx
hosts_wordpress

[webservers]
10.1.10.113
10.1.10.114

[webservers:vars]
[webservers]
10.1.10.113
10.1.10.114

[webservers:vars]
uid=88
user=www
gid=88
group=www
version="1.20.2"
url="http://nginx.org/download/nginx-{

    { version }}.tar.gz"
install_dir="/apps/nginx"
root_path=/data/wordpress
fqdn=www.wang.org
app=wordpress-6.0-zh_CN


shopxo

[webservers]
10.1.10.113
10.1.10.114

[webservers:vars]
uid=88
user=www
gid=88
group=www
version="1.20.2"
url="http://nginx.org/download/nginx-{

    { version }}.tar.gz"
install_dir="/apps/nginx"
root_path=/data/shopxo
fqdn=eshop.wang.org
app_version=2.2.3
app=shopxo-v{

    {

     app_version }}
4.1.3 总入口yml文件信息
mysql
cat mysql_role.yml
- hosts: dbservers
  remote_user: root

  roles:
    - mysql
redis
cat redis_role.yml
- hosts: redis
  remote_user: root

  roles:
    - redis
nginx
cat wordpress_role.yml
- hosts: webservers
  remote_user: root

  roles:
    - wordpress

cat shopxo_role.yml
- hosts: webservers
  remote_user: root

  roles:
    - shopxo
4.1.4 task代码
以下代码都是可复用,tags替换配置文件、重启服务
mysql (开启远程)
其目录结构
 tree roles/mysql/
roles/mysql/
├── files
│   └── mysql-8.0.20-linux-glibc2.12-x86_64.tar.xz
├── handlers
│   └── main.yml
├── tasks
│   ├── main.yml
│   ├── main.yml_changed_when
│   └── main.yml_when
└── templates
    ├── my.cnf.j2
    └── mysql_auth_sql.j2

4 directories, 7 files
cat roles/mysql/tasks/main.yml
- name: create {

    {

     group }}
  group:
    name: "{

    { group }}"
    gid: "{

    { gid }}"
- name: create {

    {

     user }}
  user:
    name: "{

    { user }}"
    uid: "{

    { uid }}"
    group: "{

    { group }}"
    system: yes
    shell: /sbin/nologin
    create_home: yes
    home: "{

    { datadir }}"
- name: install packages
  yum:
    name: "{

    { item }}"
  loop:
    - ncurses-compat-libs
- name: copy tar to remote host and file mode
  unarchive:
    src: "{

    { mysql_file }}"
    dest: "{

    { basedir }}"
    group: "{

    { group }}"
    owner: "{

    { user }}"
    creates: "{

    { basedir }}/mysql-{

    { mysql_version }}-linux-glibc2.12-x86_64"
- name: create linkfile {

    {

     basedir }}/mysql
  file:
    src: "{

    { basedir }}/mysql-{

    { mysql_version }}-linux-glibc2.12-x86_64"
    dest: "{

    { basedir }}/mysql"
    state: link
- name: data dir
  shell:
    cmd: "{

    { basedir }}/mysql/bin/mysqld --initialize-insecure --user={

    { user }} --datadir={

    { datadir }}"
    creates: "{

    { datadir }}/mysql"
  tags: data
- name: config my.cnf
  template:
    src: my.cnf.j2
    dest: /etc/my.cnf
  notify:
    - restart mysqld
- name: config mysql_auth_sql
  template:
    src: mysql_auth_sql.j2
    dest: "{

    { basedir }}/mysql/mysql_auth_sql"
- name: service script
  copy:
    src: "{

    { basedir }}/mysql/support-files/mysql.server"
    dest: /etc/init.d/mysqld
    remote_src: yes
    mode: preserve
- name: PATH variable
  copy:
    content: 'PATH={

    { basedir }}/mysql/bin:$PATH'
    dest: /etc/profile.d/mysql.sh
- name: start mysql
  shell:
    cmd: chkconfig --add mysqld;/etc/init.d/mysqld start
  tags: service
- name: check whether mysql has remote access enabled
  shell:
    cmd: "{

    { basedir }}/mysql/bin/mysql -uroot  -e 'select user,host from mysql.user where user=\"root\" and host=\"localhost\";'"
  ignore_errors: yes
  register: check_mysql_remote
- name: debug var
  debug:
    var=check_mysql_remote
- name: mysql set remote
  shell:
    cmd: "{

    { basedir }}/mysql/bin/mysql < {

    { basedir }}/mysql/mysql_auth_sql"
  when: check_mysql_remote.rc ==0
redis
cat  roles/redis/tasks/main.yml
- name: yum install packages
  yum:
    name: "{

    { item }}"
  loop:
    - gcc
    - make
    - jemalloc-devel
    - systemd-devel

- name: create group {

    {

     group }}
  group:
    name: "{

    { group }}"
    gid: "{

    { gid }}"
- name: create user {

    {

     user }}
  user:
    name: "{

    { user }}"
    uid: "{

    { uid }}"
    group: "{

    { group }}"
    system: yes
    shell: /sbin/nologin
    create_home: yes
    home: "{

    { redis_data_dir }}"
- name: create redis rdb_data log  directory
  file:
    path: "{

    { redis_data_dir }}/{

    { item }}"
    state: directory
    group: "{

    { group }}"
    owner: "{

    { user }}"
    mode: '0755'
  loop:
    - "data"
    - "log"
- name:
  unarchive:
    src: "{

    { redis_file }}"
    dest: "{

    { redis_base_dir }}/src"
    creates: "{

    { redis_base_dir }}/src/redis-{

    { redis_version }}"
- name: install redis-{

    {

     redis_version }}
  shell:
    chdir: "{

    { redis_base_dir }}/src/redis-{

    { redis_version }}"
    cmd: "make -j 2 USE_SYSTEMD=yes PREFIX={

    { redis_base_dir }}/redis install"
    creates: "{

    { redis_base_dir }}/redis"
- name: Create an etc directory for storing redis.conf
  file:
    path: "{

    { redis_base_dir }}/redis/etc"
    state: directory
    mode: '0755'
- name: Copy the compiled redis.conf file to etc
  template:
    src: redis.conf.j2
    dest: "{

    { redis_base_dir }}/redis/etc/redis.conf"
  tags: redis_conf
  notify:
    - restart redis
- name: chown {

    {

     user }} {

    {

     redis_base_dir}}/redis
  shell:
    cmd: "chown -R {

    { redis_base_dir}}/redis;chmod 755 -R {

    { redis_data_dir }}"
- name: copy redis.service
  template:
    src: redis.service.j2
    dest: /lib/systemd/system/redis.service
  notify:
    - daemon-reload
- name: redis PATH variable
  copy:
    content: 'PATH={

    { redis_base_dir }}/redis/bin:$PATH'
    dest: /etc/profile.d/redis.sh
- name: Chanage net.core.somaxconn
  sysctl:
    name: net.core.somaxconn
    value: '1024'
    sysctl_set: yes
    state: present
- name: vm.overcommit_memory
  sysctl:
    name: vm.overcommit_memory
    value: '1'
    sysctl_set: yes
    state: present
- name: set transparent_hugepage
  shell:
    cmd: "echo never > /sys/kernel/mm/transparent_hugepage/enabled"
- name: start redis
  service:
    name: redis
    state: started
    enabled: yes
nginx
cat  roles/nginx/tasks/main.yml
- name: install packages
  yum:
    name: "{

    { item }}"
  loop:
    - gcc
    - make
    - pcre-devel
    - openssl-devel
    - zlib-devel
    - perl-ExtUtils-Embed

- name: get nginx source
  unarchive:
    src: "{

    { url }}"
    dest: "/usr/local/src"
    remote_src: yes

- name: compile and install
  shell:
    cmd: "./configure --prefix={

    { install_dir }} --user=nginx --group=nginx --with-http_ssl_module --with-http_v2_module --with-http_realip_module --with-http_stub_status_module --with-http_gzip_static_module --with-pcre --with-stream --with-stream_ssl_module --with-stream_realip_module &&  make && make install"
    chdir: "/usr/local/src/nginx-{

    { version }}"
    creates: "{

    {install_dir}}/sbin/nginx"

- name: create  {

    {

     group }}
  group:
    name: "{

    { group }}"
    gid: "{

    { gid}}"

- name: create {

    {

     user }}
  user:
    name: "{

    { user }}"
    uid: "{

    { uid }}"
    group: "{

    { group }}"
    system: yes

- name: copy config
  template:
    src: nginx.conf.j2
    dest: "{

    {install_dir}}/conf/nginx.conf"
  notify:
    - restart nginx

- name: config dir
  file:
    path: "{

    {install_dir}}/conf.d"
    state: directory

- name: config file mode
  file:
    path: "{

    {install_dir}}"
    owner: "{

    { user }}"
    group: "{

    { group }}"
    recurse: yes

- name: check nginx config
  shell:
    cmd: "{

    {install_dir}}/sbin/nginx -t"
  register: check_nginx_config
  changed_when:
    - check_nginx_config.stdout.find('successful')
    - false

- name: service file
  template:
    src: nginx.service.j2
    dest: /lib/systemd/system/nginx.service

- name: start nginx
  service:
    name: nginx
    state: started
    enabled: yes
php-fpm
cat roles/php-fpm/tasks/main.yml
- name: install packages
  yum:
    name: "{

    { item }}"
  loop:
    - php-fpm
    - php-mysqlnd
    - php-json
    - php-xml
    - php-gd
    - php-pecl-zip

- name: php path
  file:
    path: /var/lib/php/
    owner: "{

    { user }}"
    group: "{

    { group }}"
    recurse: yes

- name: config php.ini
  template:
    src: php.ini.j2
    dest: /etc/php.ini
  notify: restart php-fpm

- name: config www.conf
  template:
    src: w.conf.j2
    dest: /etc/php-fpm.d/www.conf
  notify: restart php-fpm

- name: config nginx
  template:
    src: php-fpm.conf.j2
    dest: "{

    { install_dir }}/conf.d/php-fpm.conf"
  notify: restart nginx


- name: start php-fpm
  service:
    name: php-fpm
    state: started
    enabled: yes
WordPress
 cat  roles/wordpress/tasks/main.yml
- name: mkdir wordpress directory
  file:
    path: /data/
    state: directory
    owner: "{

    { user }}"
    group: "{

    { group }}"
- name: down wordpress
  unarchive:
    src: "{

    {app}}.tar.gz"
    dest: /data/
    owner: "{

    { user }}"
    group: "{

    { group }}"
shopxo
- name: down {

    {

     app }}
  unarchive:
    src: "{

    {app}}.tar.gz"
    dest: /data/
    owner: "{

    { user }}"
    group: "{

    { group }}"


- name: link dir
  file:
    src: "/data/shopxo-{

    { app_version }}"
    path: "{

    { root_path }}"
    state: link
4.1.5 template文件内容
mysql
cat roles/mysql/templates/my.cnf.j2
[mysqld]
server-id=1
log-bin
datadir={

    {

     datadir }}
socket={

    {

     datadir }}/mysql.sock
log-error={

    {

     datadir }}/mysql.log
pid-file={

    {

     datadir }}/mysql.pid
max_connections=1500

[client]
socket={

    {

     datadir }}/mysql.sock`

cat roles/mysql/templates/mysql_auth_sql.j2
ALTER USER "root"@"localhost" IDENTIFIED BY "{

    { mysql_root_password }}";
use mysql;
update user set host = "%" where user = "root";
flush privileges;
redis
cat roles/redis/templates/redis.conf.j2
bind 0.0.0.0
requirepass  {

    {

     redis_password }}
masterauth   {

    {

     redis_password }}
protected-mode yes
port 6379
tcp-backlog 511
timeout 0
tcp-keepalive 300
daemonize yes
supervised no
pidfile {

    {

     redis_base_dir }}/bin/redis.pid
loglevel notice
logfile "{

    { redis_data_dir }}/log/redis.log"
databases 16
always-show-logo yes
save 900 1
save 300 10
save 60 10000
stop-writes-on-bgsave-error yes
rdbcompression yes
rdbchecksum yes
dbfilename dump.rdb
dir {

    {

     redis_data_dir }}/data
replica-serve-stale-data yes
replica-read-only yes
repl-diskless-sync no
repl-diskless-sync-delay 5
repl-disable-tcp-nodelay no
replica-priority 100
lazyfree-lazy-eviction no
lazyfree-lazy-expire no
lazyfree-lazy-server-del no
replica-lazy-flush no
appendonly yes
appendfilename "appendonly.aof"
appendfsync everysec
no-appendfsync-on-rewrite no
auto-aof-rewrite-percentage 100
auto-aof-rewrite-min-size 64mb
aof-load-truncated yes
aof-use-rdb-preamble yes
lua-time-limit 5000
slowlog-log-slower-than 10000
slowlog-max-len 128
latency-monitor-threshold 0
notify-keyspace-events ""
hash-max-ziplist-entries 512
hash-max-ziplist-value 64
list-max-ziplist-size -2
list-compress-depth 0
set-max-intset-entries 512
zset-max-ziplist-entries 128
zset-max-ziplist-value 64
hll-sparse-max-bytes 3000
stream-node-max-bytes 4096
stream-node-max-entries 100
activerehashing yes
client-output-buffer-limit normal 0 0 0
client-output-buffer-limit replica 256mb 64mb 60
client-output-buffer-limit pubsub 32mb 8mb 60
hz 10
dynamic-hz yes
aof-rewrite-incremental-fsync yes
rdb-save-incremental-fsync yes

cat roles/redis/templates/redis.service.j2
[Unit]
Description=Redis persistent key-value database
After=network.target
[Service]
ExecStart={

    {

    redis_base_dir}}/redis/bin/redis-server {

    {

    redis_base_dir}}/redis/etc/redis.conf --supervised systemd
ExecStop=/bin/kill -s QUIT $MAINPID
Type=forking
User=redis
Group=redis
RuntimeDirectory=redis
RuntimeDirectoryMode=0755
LimitNOFILE=1000000
[Install]
WantedBy=multi-user.target
nginx
cat roles/nginx/templates/nginx.conf.j2
user {

    {

     user }};
worker_processes  auto;

#error_log  logs/error.log;
#error_log  logs/error.log  notice;
#error_log  logs/error.log  info;

#pid        logs/nginx.pid;


events {


    worker_connections  1024;
}


http {


    include       mime.types;
    default_type  application/octet-stream;

    #log_format  main  '$remote_addr - $remote_user [$time_local] "$request" '
    #                  '$status $body_bytes_sent "$http_referer" '
    #                  '"$http_user_agent" "$http_x_forwarded_for"';

    #access_log  logs/access.log  main;
    keepalive_timeout  65;
    include {

    {

    install_dir}}/conf.d/*.conf;
}


cat roles/nginx/templates/nginx.service.j2
[Unit]
Description=The nginx HTTP and reverse proxy server
After=network.target remote-fs.target nss-lookup.target

[Service]
Type=forking
PIDFile={

    {

     install_dir }}/logs/nginx.pid
ExecStartPre=/usr/bin/rm -f {

    {

     install_dir }}/logs/nginx.pid
ExecStartPre={

    {

     install_dir }}/sbin/nginx -t
ExecStart={

    {

     install_dir }}/sbin/nginx
ExecReload=/bin/kill -s HUP $MAINPID
KillSignal=SIGQUIT
TimeoutStopSec=5
KillMode=mixed
PrivateTmp=true

[Install]
WantedBy=multi-user.target
php-fpm
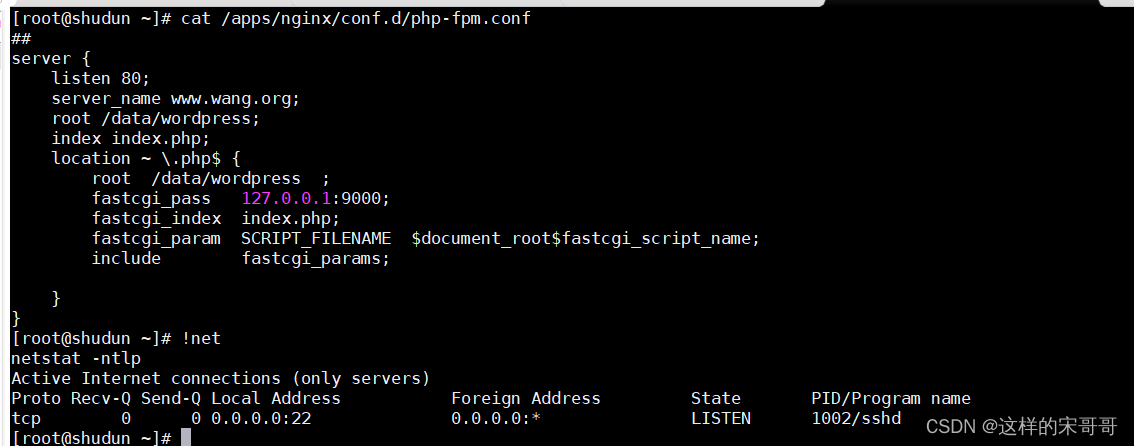
cat roles/php-fpm/templates/php-fpm.conf.j2
##
server {


    listen 80;
    server_name {

    {

     fqdn }};
    root {

    {

     root_path }};
    index index.php;
    location ~ \.php$ {


        root  {

    {

     root_path }}  ;
        fastcgi_pass   127.0.0.1:9000;
        fastcgi_index  index.php;
        fastcgi_param  SCRIPT_FILENAME  $document_root$fastcgi_script_name;
        include        fastcgi_params;

    }
}


grep -vE "^;|^$" roles/php-fpm/templates/php.ini.j2
[PHP]
engine = On
short_open_tag = Off
precision = 14
output_buffering = 4096
zlib.output_compression = Off
implicit_flush = Off
unserialize_callback_func =
serialize_precision = -1
disable_functions =
disable_classes =
zend.enable_gc = On
expose_php = On
max_execution_time = 360
max_input_time = 600
memory_limit = 128M
error_reporting = E_ALL & ~E_DEPRECATED & ~E_STRICT
display_errors = Off
display_startup_errors = Off
log_errors = On
log_errors_max_len = 1024
ignore_repeated_errors = Off
ignore_repeated_source = Off
report_memleaks = On
html_errors = On
variables_order = "GPCS"
request_order = "GP"
register_argc_argv = Off
auto_globals_jit = On
post_max_size = 80M
auto_prepend_file =
auto_append_file =
default_mimetype = "text/html"
default_charset = "UTF-8"
doc_root =
user_dir =
enable_dl = Off
file_uploads = On
upload_max_filesize = 80M
max_file_uploads = 20
allow_url_fopen = On
allow_url_include = Off
default_socket_timeout = 60
[CLI Server]
cli_server.color = On
[Date]
date.timezone = Asia/Shanghai
[filter]
[iconv]
[intl]
[sqlite3]
[Pcre]
pcre.jit=0
[Pdo]
[Pdo_mysql]
pdo_mysql.cache_size = 2000
pdo_mysql.default_socket=
[Phar]
[mail function]
sendmail_path = /usr/sbin/sendmail -t -i
mail.add_x_header = On
[ODBC]
odbc.allow_persistent = On
odbc.check_persistent = On
odbc.max_persistent = -1
odbc.max_links = -1
odbc.defaultlrl = 4096
odbc.defaultbinmode = 1
[Interbase]
ibase.allow_persistent = 1
ibase.max_persistent = -1
ibase.max_links = -1
ibase.timestampformat = "%Y-%m-%d %H:%M:%S"
ibase.dateformat = "%Y-%m-%d"
ibase.timeformat = "%H:%M:%S"
[MySQLi]
mysqli.max_persistent = -1
mysqli.allow_persistent = On
mysqli.max_links = -1
mysqli.cache_size = 2000
mysqli.default_port = 3306
mysqli.default_socket =
mysqli.default_host =
mysqli.default_user =
mysqli.default_pw =
mysqli.reconnect = Off
[mysqlnd]
mysqlnd.collect_statistics = On
mysqlnd.collect_memory_statistics = Off
[PostgreSQL]
pgsql.allow_persistent = On
pgsql.auto_reset_persistent = Off
pgsql.max_persistent = -1
pgsql.max_links = -1
pgsql.ignore_notice = 0
pgsql.log_notice = 0
[bcmath]
bcmath.scale = 0
[browscap]
[Session]
session.save_handler = files
session.use_strict_mode = 0
session.use_cookies = 1
session.use_only_cookies = 1
session.name = PHPSESSID
session.auto_start = 0
session.cookie_lifetime = 0
session.cookie_path = /
session.cookie_domain =
session.cookie_httponly =
session.serialize_handler = php
session.gc_probability = 1
session.gc_divisor = 1000
session.gc_maxlifetime = 1440
session.referer_check =
session.cache_limiter = nocache
session.cache_expire = 180
session.use_trans_sid = 0
session.sid_length = 26
session.trans_sid_tags = "a=href,area=href,frame=src,form="
session.sid_bits_per_character = 5
[Assertion]
zend.assertions = -1
[mbstring]
[gd]
[exif]
[Tidy]
tidy.clean_output = Off
[soap]
soap.wsdl_cache_enabled=1
soap.wsdl_cache_dir="/tmp"
soap.wsdl_cache_ttl=86400
soap.wsdl_cache_limit = 5
[sysvshm]
[ldap]
ldap.max_links = -1
[dba]
[curl]
[openssl]

grep -vE "^;|^$" roles/php-fpm/templates/www.conf.j2
[www]
user = {

    {

     user }}
group = {

    {

     group }}
listen = 127.0.0.1:9000
listen.acl_users = apache,nginx
listen.allowed_clients = 127.0.0.1
pm = dynamic
pm.max_children = 50
pm.start_servers = 5
pm.min_spare_servers = 5
pm.max_spare_servers = 35


slowlog = /var/log/php-fpm/www-slow.log


php_admin_value[error_log] = /var/log/php-fpm/www-error.log
php_admin_flag[log_errors] = on
php_value[session.save_handler] = files
php_value[session.save_path]    = /var/lib/php/session
php_value[soap.wsdl_cache_dir]  = /var/lib/php/wsdlcache
4.1.6 handlers文件内容
handlers文件内容基本一致就不展开编写了
cat roles/mysql/handlers/main.yml
- name: restart mysqld
  service:
    name: mysqld
    state: restarted
4.1.7 meta文件内容
WordPress shopxo 需要依赖mysql、redis、nginx、php-fpm
files目录下文件在hosts文件里的变量有说明就不展开说明了
cat roles/wordpress/meta/main.yml
dependencies:
  - role: mysql
    vars:
      uid: 306
      user: mysql
      gid: 306
      group: mysql
      basedir: "/usr/local"
      datadir: "/data/mysql"
      mysql_version: "8.0.20"
      mysql_file: "mysql-{

    {mysql_version}}-linux-glibc2.12-x86_64.tar.xz"
      mysql_root_password: 123456

  - role: redis
    vars:
      uid: 6379
      user: redis
      gid: 6379
      group: redis
      redis_version: "6.0.15"
      redis_file: "redis-{

    {redis_version}}.tar.gz"
      redis_data_dir: "/data/redis"
      redis_base_dir: "/usr/local"
      redis_password: 123456

  - role: nginx
    vars:
      user: www
      group: www
      uid: 88
      gid: 88

  - role: php-fpm
4.1.8 开始展示安装WordPress
这里我手动把2台被控端服务都停了,部署的文件也保留
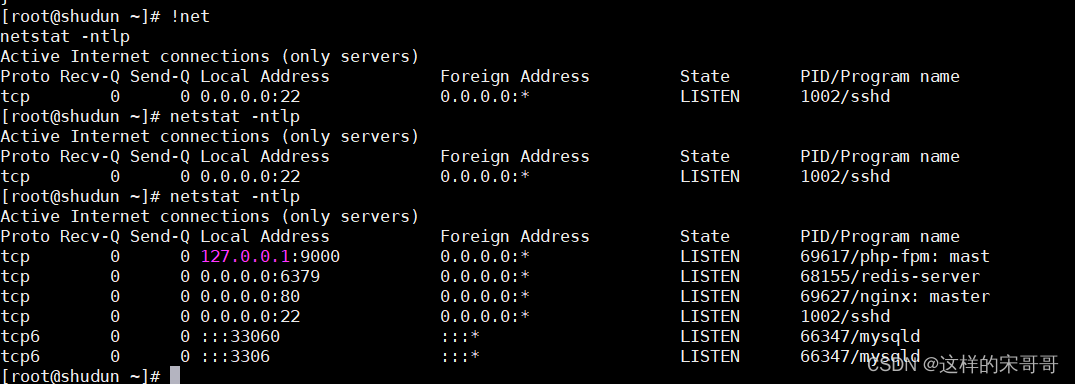
ansible-playbook -i hosts_wordpress wordpress_role.yml
PLAY [webservers] ******************************************************************************************************************************
TASK [Gathering Facts] *************************************************************************************************************************
ok: [10.1.10.113]
ok: [10.1.10.114]
TASK [mysql : create www] **********************************************************************************************************************
ok: [10.1.10.114]
ok: [10.1.10.113]
TASK [mysql : create www] **********************************************************************************************************************
changed: [10.1.10.113]
changed: [10.1.10.114]
TASK [mysql : install packages] ****************************************************************************************************************
ok: [10.1.10.113] => (item=ncurses-compat-libs)
ok: [10.1.10.114] => (item=ncurses-compat-libs)
TASK [mysql : copy tar to remote host and file mode] *******************************************************************************************
skipping: [10.1.10.113]
skipping: [10.1.10.114]
TASK [mysql : create linkfile /usr/local/mysql] ************************************************************************************************
ok: [10.1.10.113]
ok: [10.1.10.114]
TASK [mysql : data dir] ************************************************************************************************************************
ok: [10.1.10.114]
ok: [10.1.10.113]
TASK [mysql : config my.cnf] *******************************************************************************************************************
ok: [10.1.10.114]
ok: [10.1.10.113]
TASK [mysql : config mysql_auth_sql] ***********************************************************************************************************
ok: [10.1.10.113]
ok: [10.1.10.114]
TASK [mysql : service script] ******************************************************************************************************************
ok: [10.1.10.114]
ok: [10.1.10.113]
TASK [mysql : PATH variable] *******************************************************************************************************************
ok: [10.1.10.113]
ok: [10.1.10.114]
TASK [mysql : start mysql] *********************************************************************************************************************
changed: [10.1.10.114]
changed: [10.1.10.113]
TASK [mysql : check whether mysql has remote access enabled] ***********************************************************************************
fatal: [10.1.10.113]: FAILED! => {
"changed": true, "cmd": "/usr/local/mysql/bin/mysql -uroot -e 'select user,host from mysql.user where user=\"root\" and host=\"localhost\";'", "delta": "0:00:00.357809", "end": "2022-12-02 23:39:25.215392", "msg": "non-zero return code", "rc": 1, "start": "2022-12-02 23:39:24.857583", "stderr": "ERROR 1045 (28000): Access denied for user 'root'@'localhost' (using password: NO)", "stderr_lines": ["ERROR 1045 (28000): Access denied for user 'root'@'localhost' (using password: NO)"], "stdout": "", "stdout_lines": []}
...ignoring
fatal: [10.1.10.114]: FAILED! => {
"changed": true, "cmd": "/usr/local/mysql/bin/mysql -uroot -e 'select user,host from mysql.user where user=\"root\" and host=\"localhost\";'", "delta": "0:00:00.352758", "end": "2022-12-02 23:39:25.285422", "msg": "non-zero return code", "rc": 1, "start": "2022-12-02 23:39:24.932664", "stderr": "ERROR 1045 (28000): Access denied for user 'root'@'localhost' (using password: NO)", "stderr_lines": ["ERROR 1045 (28000): Access denied for user 'root'@'localhost' (using password: NO)"], "stdout": "", "stdout_lines": []}
...ignoring
TASK [mysql : debug var] ***********************************************************************************************************************
ok: [10.1.10.113] => {
"check_mysql_remote": {
"changed": true,
"cmd": "/usr/local/mysql/bin/mysql -uroot -e 'select user,host from mysql.user where user=\"root\" and host=\"localhost\";'",
"delta": "0:00:00.357809",
"end": "2022-12-02 23:39:25.215392",
"failed": true,
"msg": "non-zero return code",
"rc": 1,
"start": "2022-12-02 23:39:24.857583",
"stderr": "ERROR 1045 (28000): Access denied for user 'root'@'localhost' (using password: NO)",
"stderr_lines": [
"ERROR 1045 (28000): Access denied for user 'root'@'localhost' (using password: NO)"
],
"stdout": "",
"stdout_lines": []
}
}
ok: [10.1.10.114] => {
"check_mysql_remote": {
"changed": true,
"cmd": "/usr/local/mysql/bin/mysql -uroot -e 'select user,host from mysql.user where user=\"root\" and host=\"localhost\";'",
"delta": "0:00:00.352758",
"end": "2022-12-02 23:39:25.285422",
"failed": true,
"msg": "non-zero return code",
"rc": 1,
"start": "2022-12-02 23:39:24.932664",
"stderr": "ERROR 1045 (28000): Access denied for user 'root'@'localhost' (using password: NO)",
"stderr_lines": [
"ERROR 1045 (28000): Access denied for user 'root'@'localhost' (using password: NO)"
],
"stdout": "",
"stdout_lines": []
}
}
TASK [mysql : mysql set remote] ****************************************************************************************************************
skipping: [10.1.10.113]
skipping: [10.1.10.114]
TASK [redis : yum install packages] ************************************************************************************************************
ok: [10.1.10.113] => (item=gcc)
ok: [10.1.10.114] => (item=gcc)
ok: [10.1.10.113] => (item=make)
ok: [10.1.10.114] => (item=make)
ok: [10.1.10.114] => (item=jemalloc-devel)
ok: [10.1.10.113] => (item=jemalloc-devel)
ok: [10.1.10.113] => (item=systemd-devel)
ok: [10.1.10.114] => (item=systemd-devel)
TASK [redis : create group www] ****************************************************************************************************************
ok: [10.1.10.113]
ok: [10.1.10.114]
TASK [redis : create user www] *****************************************************************************************************************
changed: [10.1.10.114]
changed: [10.1.10.113]
TASK [redis : create redis rdb_data log directory] ********************************************************************************************
changed: [10.1.10.113] => (item=data)
changed: [10.1.10.114] => (item=data)
changed: [10.1.10.113] => (item=log)
changed: [10.1.10.114] => (item=log)
TASK [redis : unarchive] ***********************************************************************************************************************
skipping: [10.1.10.113]
skipping: [10.1.10.114]
TASK [redis : install redis-6.0.15] ************************************************************************************************************
ok: [10.1.10.114]
ok: [10.1.10.113]
TASK [redis : Create an etc directory for storing redis.conf] **********************************************************************************
ok: [10.1.10.113]
ok: [10.1.10.114]
TASK [redis : Copy the compiled redis.conf file to etc] ****************************************************************************************
ok: [10.1.10.113]
ok: [10.1.10.114]
TASK [redis : chown www /usr/local/redis] ******************************************************************************************************
changed: [10.1.10.113]
changed: [10.1.10.114]
TASK [redis : copy redis.service] **************************************************************************************************************
ok: [10.1.10.113]
ok: [10.1.10.114]
TASK [redis : redis PATH variable] *************************************************************************************************************
ok: [10.1.10.113]
ok: [10.1.10.114]
TASK [redis : Chanage net.core.somaxconn] ******************************************************************************************************
ok: [10.1.10.113]
ok: [10.1.10.114]
TASK [redis : vm.overcommit_memory] ************************************************************************************************************
ok: [10.1.10.114]
ok: [10.1.10.113]
TASK [redis : set transparent_hugepage] ********************************************************************************************************
changed: [10.1.10.113]
changed: [10.1.10.114]
TASK [redis : start redis] *********************************************************************************************************************
changed: [10.1.10.114]
changed: [10.1.10.113]
TASK [nginx : install packages] ****************************************************************************************************************
ok: [10.1.10.113] => (item=gcc)
ok: [10.1.10.114] => (item=gcc)
ok: [10.1.10.114] => (item=make)
ok: [10.1.10.113] => (item=make)
ok: [10.1.10.113] => (item=pcre-devel)
ok: [10.1.10.114] => (item=pcre-devel)
ok: [10.1.10.113] => (item=openssl-devel)
ok: [10.1.10.114] => (item=openssl-devel)
ok: [10.1.10.113] => (item=zlib-devel)
ok: [10.1.10.114] => (item=zlib-devel)
ok: [10.1.10.114] => (item=perl-ExtUtils-Embed)
ok: [10.1.10.113] => (item=perl-ExtUtils-Embed)
TASK [nginx : get nginx source] ****************************************************************************************************************
ok: [10.1.10.114]
ok: [10.1.10.113]
TASK [nginx : compile and install] *************************************************************************************************************
ok: [10.1.10.113]
ok: [10.1.10.114]
TASK [nginx : create www] *********************************************************************************************************************
ok: [10.1.10.113]
ok: [10.1.10.114]
TASK [nginx : create www] **********************************************************************************************************************
ok: [10.1.10.113]
ok: [10.1.10.114]
TASK [nginx : copy config] *********************************************************************************************************************
ok: [10.1.10.114]
ok: [10.1.10.113]
TASK [nginx : config dir] **********************************************************************************************************************
ok: [10.1.10.113]
ok: [10.1.10.114]
TASK [nginx : config file mode] ****************************************************************************************************************
ok: [10.1.10.114]
ok: [10.1.10.113]
TASK [nginx : check nginx config] **************************************************************************************************************
ok: [10.1.10.113]
ok: [10.1.10.114]
TASK [nginx : service file] ********************************************************************************************************************
ok: [10.1.10.113]
ok: [10.1.10.114]
TASK [nginx : start nginx] *********************************************************************************************************************
changed: [10.1.10.114]
changed: [10.1.10.113]
TASK [php-fpm : install packages] **************************************************************************************************************
ok: [10.1.10.113] => (item=php-fpm)
ok: [10.1.10.114] => (item=php-fpm)
ok: [10.1.10.114] => (item=php-mysqlnd)
ok: [10.1.10.113] => (item=php-mysqlnd)
ok: [10.1.10.113] => (item=php-json)
ok: [10.1.10.114] => (item=php-json)
ok: [10.1.10.113] => (item=php-xml)
ok: [10.1.10.114] => (item=php-xml)
ok: [10.1.10.113] => (item=php-gd)
ok: [10.1.10.114] => (item=php-gd)
ok: [10.1.10.113] => (item=php-pecl-zip)
ok: [10.1.10.114] => (item=php-pecl-zip)
TASK [php-fpm : php path] **********************************************************************************************************************
ok: [10.1.10.114]
ok: [10.1.10.113]
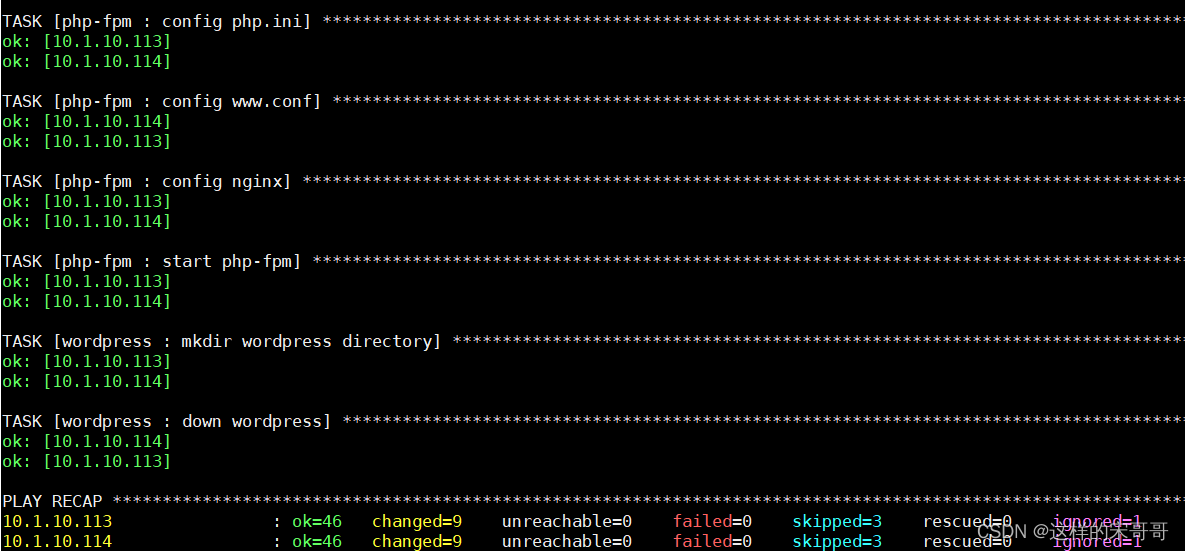
TASK [php-fpm : config php.ini] ****************************************************************************************************************
ok: [10.1.10.113]
ok: [10.1.10.114]
TASK [php-fpm : config www.conf] ***************************************************************************************************************
ok: [10.1.10.114]
ok: [10.1.10.113]
TASK [php-fpm : config nginx] ******************************************************************************************************************
ok: [10.1.10.113]
ok: [10.1.10.114]
TASK [php-fpm : start php-fpm] *****************************************************************************************************************
ok: [10.1.10.113]
ok: [10.1.10.114]
TASK [wordpress : mkdir wordpress directory] ***************************************************************************************************
ok: [10.1.10.113]
ok: [10.1.10.114]
TASK [wordpress : down wordpress] **************************************************************************************************************
ok: [10.1.10.114]
ok: [10.1.10.113]
PLAY RECAP *************************************************************************************************************************************
10.1.10.113 : ok=46 changed=9 unreachable=0 failed=0 skipped=3 rescued=0 ignored=1
10.1.10.114 : ok=46 changed=9 unreachable=0 failed=0 skipped=3 rescued=0 ignored=1
回滚的话是根据templates下配置文件手动进行替换然后调度handlers重启服务
4.2 基于zabbix角色批量部署zabbix(依赖于原先部署好的LNMP)
4.2.1 zabbix_server、zabbix_agent2增加角色
tree roles/zabbix_*
roles/zabbix_agent2
├── defaults
│   └── main.yml
├── files
│   └── zabbix_agent2.d
│       ├── mem.conf
│       ├── nginx_state.conf
│       ├── not_allow_ip.conf
│       ├── script
│       │   └── not_allow_ip_count.sh
│       ├── tcp.state.conf
│       └── user_login_count.conf
├── handlers
│   └── main.yml
├── meta
│   └── main.yml
├── README.md
├── tasks
│   └── main.yml
├── templates
│   └── zabbix_agent2.conf.j2
├── tests
│   ├── inventory
│   └── test.yml
└── vars
    └── main.yml
roles/zabbix_server
├── defaults
│   └── main.yml
├── files
├── handlers
│   └── main.yml
├── meta
│   └── main.yml
├── README.md
├── tasks
│   └── main.yml
├── templates
│   ├── zabbix.conf.j2
│   ├── zabbix_ngx.conf.j2
│   └── zabbix_server.conf.j2
├── tests
│   ├── inventory
│   └── test.yml
└── vars
    └── main.yml

18 directories, 26 files
 pwd
/data/ansible
# #ansible-galaxy init roles/zabbix_server/
# #ansible-galaxy init roles/zabbix_agent2/
4.2.2 host、role文件展示
cat zabbix_role.yml
- hosts: zabbix_server
  remote_user: root
  roles:
    - zabbix_server

- hosts: zabbix_agent2
  remote_user: root
  roles:
    - zabbix_agent2
[root@shudun ansible]# cat hosts_zabbix
[zabbix_server]
10.1.10.115

[zabbix_server:vars]
ansible_python_interpreter="/usr/bin/python3"
zabbix_server_domain="www.zabbixtest_v2.com"


[zabbix_agent2]
#10.1.10.65
#10.1.10.71
10.1.10.113
10.1.10.114
10.1.10.115

[zabbix_agent2:vars]
zabbix_server_ip="10.1.10.115"
zabbix_ver="5.0"
4.2.3 task代码展示
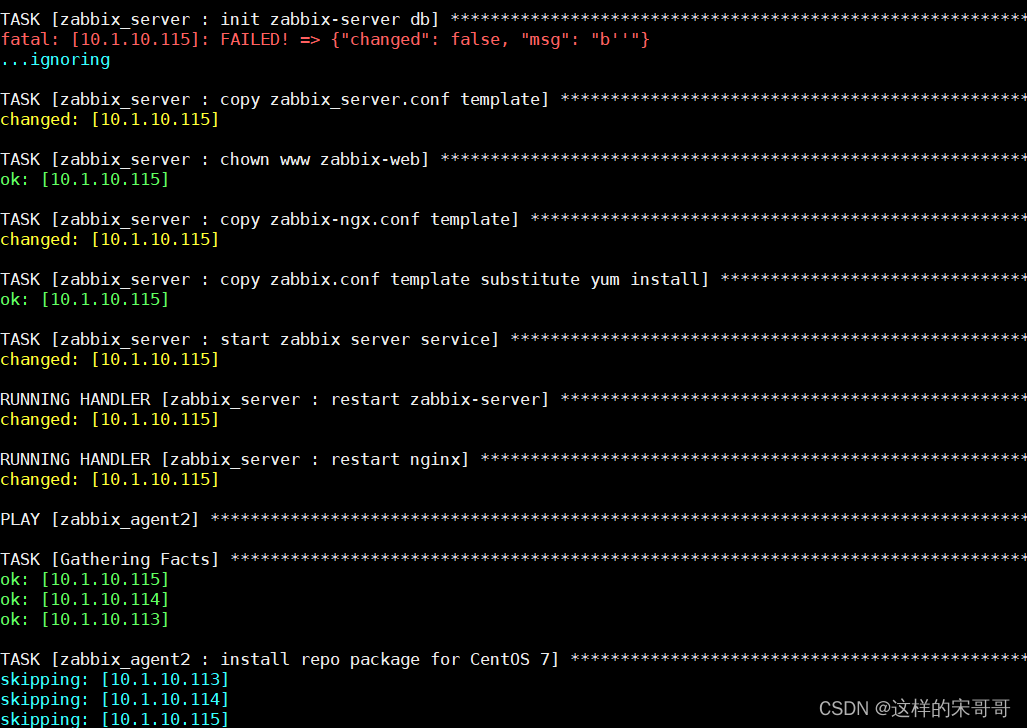
!注意:mysql_db使用了pymysql的模块需要在两端安装对应模块,而且运行过程中可能出现已经创建库了再执行报错情况,可以ignore_errors
zabbix-server
cat roles/zabbix_server/tasks/main.yml
- name: install zabbix-server
  dnf:
    name: " {

    { item }}"
  loop:
    - zabbix-server-mysql
    - zabbix-web-mysql
    - zabbix-get
- name: create zabbix-server database
  mysql_db:
    login_host: "localhost"
    login_user: "root"
    login_password: "{

    { mysql_root_password }}"
    login_port: "3306"
    name: "zabbix"
    encoding: "utf8"
    state: "present"
  tags: test_pymysql #适配mysql模块

- name: create zabbix-server user
  mysql_user:
    login_host: "localhost"
    login_user: "root"
    login_password: "{

    { mysql_root_password }}"
    name: zabbix             ##用户名
    host: "%"
    password: "{

    { mysql_root_password }}" #用户密码,这里设立变量不给明文更安全
    priv: 'zabbix.*:ALL'  #将zabbix数据库的权限给出
    state: present

- name: init zabbix-server db
  mysql_db:
    login_host: "localhost"
    login_user: "root"
    login_password: "{

    { mysql_root_password }}"
    name: zabbix
    state: import
    target: /usr/share/doc/zabbix-server-mysql/create.sql.gz
  ignore_errors: yes
  tags: import_db

- name: copy zabbix_server.conf template
  template:
    src: zabbix_server.conf.j2
    dest: /etc/zabbix/zabbix_server.conf
    mode: 0600
    owner: "{

    { user }}"
    group: "{

    { group }}"
  notify:
    - restart zabbix-server
  tags: restart_zabbix-server

- name: chown {

    {

     user }} zabbix-web
  file:
    path:  /etc/zabbix/web
    state: directory
    owner: "{

    { user }}"
    group: "{

    { group }}"
    recurse: yes


- name: copy zabbix-ngx.conf template
  template:
    src: zabbix_ngx.conf.j2
    dest: "{

    { install_dir }}/conf.d/zabbix_ngx.conf"
    owner: "{

    { user }}"
    group: "{

    { group }}"

  notify:
    - restart nginx

- name: copy zabbix.conf template substitute yum install
  template:
    src: zabbix.conf.j2
    dest: "/etc/php-fpm.d/zabbix.conf"

  notify:
    - restart php-fpm
- name: start zabbix server service
  service:
    name: zabbix-server
    state: restarted
    enabled: yes
依赖meta(!注意的是引用别的角色作为依赖的时候需要把相关vars写进去)
cat roles/zabbix_server/meta/main.yml
dependencies:
  - role: mysql
    vars:
      uid: 306
      user: mysql
      gid: 306
      group: mysql
      basedir: "/usr/local"
      datadir: "/data/mysql"
      mysql_version: "8.0.20"
      mysql_file: "mysql-{

    {mysql_version}}-linux-glibc2.12-x86_64.tar.xz"
      mysql_root_password: 123456

  - role: nginx
    vars:
      user: www
      group: www
      uid: 88
      gid: 88
      version: "1.20.2"
      url: "http://nginx.org/download/nginx-{

    { version }}.tar.gz"
      install_dir: "/apps/nginx"


  - role: php-fpm
    root_path: /data/wordpress
    fqdn: www.wang.org
    app: wordpress-6.0-zh_CN
zabbix-agent2
cat roles/zabbix_agent2/tasks/main.yml
- name: install repo package for CentOS 7
  yum:
    name: "https://repo.zabbix.com/zabbix/{

    { zabbix_ver }}/rhel/{

    { ansible_distribution_major_version }}/x86_64/zabbix-release-{

    { zabbix_ver }}-1.el{

    { ansible_distribution_major_version }}.noarch.rpm"
  when:
    - ansible_facts['distribution'] == "CentOS"
    - ansible_facts['distribution_major_version'] == "7"
- name: install repo package for CentOS 8
  dnf:
    name: "https://repo.zabbix.com/zabbix/{

    { zabbix_ver }}/rhel/{

    { ansible_distribution_major_version }}/x86_64/zabbix-release-{

    { zabbix_ver }}-1.el{

    { ansible_distribution_major_version }}.noarch.rpm"
    disable_gpg_check: yes
  #shell:
  #  cmd: "yum -y install https://repo.zabbix.com/zabbix/{

    { zabbix_ver }}/rhel/{

    { ansible_distribution_major_version }}/x86_64/zabbix-release-{

    { zabbix_ver }}-1.el{

    { ansible_distribution_major_version }}.noarch.rpm"
    #  register: check_zabbix_agent2_url
    #- name: debug zabbix_agent2_url
    #  debug:
    #    meg: "{

    { check_zabbix_agent2_url }}"
  when:
    - ansible_facts['distribution'] == "CentOS"
    - ansible_facts['distribution_major_version'] == "8"

- name: download repo package for Ubuntu 18.04
  get_url:
    url: "https://repo.zabbix.com/zabbix/{

    { zabbix_ver }}/ubuntu/pool/main/z/zabbix-release/zabbix-release_{

    { zabbix_ver }}-1+{

    { ansible_distribution_release }}_all.deb"
    dest: /opt/
  when:
    - ansible_facts['distribution'] == "Ubuntu"
    - ansible_facts['distribution_major_version'] == "18"

- name: install repo package for ubuntu 18.04
  shell: "dpkg -i /opt/zabbix-release_{

    { zabbix_ver }}-1+{

    { ansible_distribution_release }}_all.deb"
  when:
    - ansible_facts['distribution'] == "Ubuntu"
    - ansible_facts['distribution_major_version'] == "18"

- name: aliyun repo for CentOS
  replace:
    path: /etc/yum.repos.d/zabbix.repo
    regexp: 'repo.zabbix.com'
    replace: 'mirrors.aliyun.com/zabbix'
  when: ansible_facts['distribution'] == "CentOS"

- name: aliyun repo for Ubuntu 18.04
  replace:
    path: /etc/apt/sources.list.d/zabbix.list
    regexp: 'repo.zabbix.com'
    replace: 'mirrors.aliyun.com/zabbix'
  when:
    - ansible_facts['distribution'] == "Ubuntu"
    - ansible_facts['distribution_major_version'] == "18"

- name: install zabbix agent packages for CentOS 7
  yum:
    name: zabbix-agent2
  when:
    - ansible_facts['distribution'] == "CentOS"
    - ansible_facts['distribution_major_version'] == "7"
- name: install zabbix agent packages for CentOS 8
  dnf:
    name: zabbix-agent2
  when:
    - ansible_facts['distribution'] == "CentOS"
    - ansible_facts['distribution_major_version'] == "8"
- name: install zabbix agent packages for ubuntu 18.04
  apt:
    name: zabbix-agent2
    update_cache: yes
  when:
    - ansible_facts['distribution'] == "Ubuntu"
    - ansible_facts['distribution_major_version'] == "18"

- name: zabbix agent config file
  template:
    src: zabbix_agent2.conf.j2
    dest: /etc/zabbix/zabbix_agent2.conf
    mode: 0644

  notify:
    - restart zabbix-agent2

- name: copy zabbix-agten2.d dir
  copy:
    src: zabbix_agent2.d
    dest: /etc/zabbix
    preserver: yes
  notify:
    - restart zabbix-agent2
  tags: agent2.d

- name: start zabbix agent2 service
  service:
    name: zabbix-agent2
    state: restarted
    enabled: yes
4.2.4 最后template、handlers展示
zabbix-server template
cat roles/zabbix_server/templates/zabbix_ngx.conf.j2
server {


    listen 80;
    server_name {

    {

     zabbix_server_domain }};
    root /usr/share/zabbix;
    index index.php;
    location = /favicon.ico {


                log_not_found   off;
        }

        location / {


                try_files       $uri $uri/ =404;
        }

        location /assets {


                access_log      off;
                expires         10d;
        }

        location ~ /\.ht {


                deny            all;
        }

        location ~ /(api\/|conf[^\.]|include|locale|vendor) {


                deny            all;
                return          404;
        }
    location ~ [^/]\.php(/|$) {


                fastcgi_pass   127.0.0.1:9000;
                #fastcgi_pass    unix:/run/php-fpm/zabbix.sock;
                fastcgi_split_path_info ^(.+\.php)(/.+)$;
                fastcgi_index   index.php;

                fastcgi_param   DOCUMENT_ROOT   /usr/share/zabbix;
                fastcgi_param   SCRIPT_FILENAME /usr/share/zabbix$fastcgi_script_name;
                fastcgi_param   PATH_TRANSLATED /usr/share/zabbix$fastcgi_script_name;

                include fastcgi_params;
                fastcgi_param   QUERY_STRING    $query_string;
                fastcgi_param   REQUEST_METHOD  $request_method;
                fastcgi_param   CONTENT_TYPE    $content_type;
                fastcgi_param   CONTENT_LENGTH  $content_length;

                fastcgi_intercept_errors        on;
                fastcgi_ignore_client_abort     off;
                fastcgi_connect_timeout         60;
                fastcgi_send_timeout            180;
                fastcgi_read_timeout            180;
                fastcgi_buffer_size             128k;
                fastcgi_buffers                 4 256k;
                fastcgi_busy_buffers_size       256k;
                fastcgi_temp_file_write_size    256k;
        }

}

cat roles/zabbix_server/templates/zabbix_
zabbix_ngx.conf.j2     zabbix_server.conf.j2
[root@shudun ansible]# cat roles/zabbix_server/templates/zabbix_server.conf.j2
LogFile=/var/log/zabbix/zabbix_server.log
LogFileSize=0
PidFile=/var/run/zabbix/zabbix_server.pid
SocketDir=/var/run/zabbix
DBName=zabbix
DBUser=zabbix
DBHost={

    {

     ansible_default_ipv4.address }}
#DBSocket={

    { datadir }}/mysql.sock
SNMPTrapperFile=/var/log/snmptrap/snmptrap.log
Timeout=4
AlertScriptsPath=/usr/lib/zabbix/alertscripts
ExternalScripts=/usr/lib/zabbix/externalscripts
LogSlowQueries=3000
StatsAllowedIP=127.0.0.1
DBPassword={

    {

     mysql_root_password }}
zabbix-server handlers
cat roles/zabbix_server/handlers/main.yml
- name: restart zabbix-server
  service:
    name: zabbix-server
    state: restarted

- name: restart nginx
  service:
    name: nginx
    state: reloaded

- name: restart php-fpm
  service:
    name: php-fpm
    state: restarted
zabbix-agent2 template
cat roles/zabbix_agent2/templates/zabbix_agent2.conf.j2
##
PidFile=/var/run/zabbix/zabbix_agent2.pid
LogFile=/var/log/zabbix/zabbix_agent2.log
LogFileSize=0
Server={

    {

     zabbix_server_ip }}
ServerActive={

    {

     zabbix_server_ip }}
Hostname={

    {

     ansible_default_ipv4.address }}
Include=/etc/zabbix/zabbix_agent2.d/*.conf
ControlSocket=/tmp/agent.sock
zabbix-agent2 handlers
cat roles/zabbix_agent2/handlers/main.yml
- name: restart zabbix-agent2
  service:
    name: zabbix-agent2
    state: restarted
4.2.5 执行展示
4.2.6 测试
pwd
/etc/zabbix
[root@shudun zabbix]# cat zabbix_agent2.d/mem.conf
UserParameter=mem_use_percent,free | awk 'NR==2{print $3/$2*100}'
UserParameter=mem_unuse_percent,free | awk 'NR==2{print 100-($3/$2*100)}'
[root@shudun zabbix]# zabbix_get -s 10.1.10.113 -k mem_use_percent
9.77897
[root@shudun zabbix]# zabbix_get -s 10.1.10.114 -k mem_use_percent
9.10477
[root@shudun zabbix]# zabbix_get -s 10.1.10.115 -k mem_use_percent
11.1653
[root@shudun zabbix]# cat zabbix_agent2.d/tcp.state.conf
UserParameter=tcp_state[*], netstat -nat | grep -c $1
zabbix_get -s 10.1.10.115 -k tcp_state[ESTABLISHED]
56
我会将代码传到Gitee,有兴趣的小伙伴可以自行down下来
gitee地址
五. 总结zabbix自定义监控项,基于自定义监控项监控nginx。
系统内置的监控项如下
https://www.zabbix.com/documentation/5.0/zh/manual/config/items/itemtypes/zabbix_agent
内置的监控项无法满足要求,可以自定义监控项
5.1 自定义监控项配置
监控项键值的格式
https://www.zabbix.com/documentation/5.0/zh/manual/config/items/item/key

客户端可以自定义监控项,在Zabbix Agent 配置文件添加内容,格式如下
#cat /etc/zabbix/zabbix_agentd.conf
#cat /etc/zabbix/zabbix_agent2.conf
UserParameter=<key>,<shell command>
Include=/etc/zabbix/zabbix_agentd.d/*.conf
#或者创建独立的自定义文件
#cat /etc/zabbix/zabbix_agentd.d/*.conf
#cat /etc/zabbix/zabbix_agent2.d/*.conf
UserParameter=<key>,<shell command>
说明
- key 必须整个系统唯一。注意大小写是敏感的, Key名允许的字符如下
0-9a-zA-Z_-.
key使用 [*] 用于定义该key接受括号内的参数。参数需在配置监控项时给出;参数禁止使用下列字符:\
’ ” ` * ? [ ] { } ~ $ ! & ; ( ) <>
- Command:命令用于生成key对应的值。可以在命令中使用位置引用$1 … $9来引用监控项Key中的相应参数。Zabbix解析监控项Key的[]中包含的参数,并相应地替换$1,…,$9。$0会替换为完整的原始命令(在对$0,…,$9执行替换之前的命令)运行。不管位置参数($0,…,$9)是用双引号( “ )还是单引号( ’ )括起来,都会解析位置引用
测试监控项
在Zabbix Agent 上执行测试
zabbix_agent -t “在客户端定义的key名”
在Zabbix Server上可以使用zabbix_get工具获取自定义监控项
zabbix_get -s 客户端IP -p 10050 -k “在客户端定义的key名”
5.1.1 宏Macros
另外Zabbix 支持用户自定义宏,即支持变量定义
自定义宏格式为: {$macrosz_name}
官方文档
https://www.zabbix.com/documentation/5.0/zh/manual/appendix/macros
5.1.2 自定义监控项配置案例
范例:取根文件系统的空间利用率
[root@centos8 ~]#cat /etc/zabbix/zabbix_agentd.d/test.conf
[root@centos8 ~]#cat /etc/zabbix/zabbix_agent2.d/test.conf
UserParameter=root_filesystem_use,df|awk -F' +|%' '$7 == "/" {print $5 }'
#客户端测试
[root@centos8 ~]#zabbix_agent -t root_filesystem_use
[root@centos8 ~]#zabbix_agent2 -t root_filesystem_use
[root@centos8 ~]#systemctl restart zabbix-agent.service
#服务器端测试
[root@zabbix-server ~]#yum -y install zabbix-get
[root@zabbix-server ~]#apt -y install zabbix-get
[root@zabbix-server ~]#zabbix_get -s 10.0.0.38 -p 10050 -k
"root_filesystem_use"
范例:利用自定义监控项的参数功能监控MySQL的状态
[root@centos8 ~]#yum -y install mysql-server
[root@centos8 ~]#systemctl enable --now mysqld
[root@centos8 ~]#mysql
mysql> create user test@'localhost' identified by '123456';
[root@centos8 ~]#mysqladmin -utest -p123456 ping
mysqladmin: [Warning] Using a password on the command line interface can be
insecure.
mysqld is alive
[root@centos8 ~]#cat /etc/zabbix/zabbix_agentd.d/test.conf
UserParameter=mysql.ping[*],mysqladmin -u$1 -p$2 ping 2>/dev/null| grep -c alive
[root@centos8 ~]#systemctl restart zabbix-agent.service
[root@zabbix-server ~]#zabbix_get -s 10.0.0.38 -p 10050 -k
"mysql.ping[test,123456]"
1
[root@centos8 ~]#systemctl stop mysqld
[root@zabbix-server ~]#zabbix_get -s 10.0.0.38 -p 10050 -k
"mysql.ping[test,123456]"
0
范例监控 Memcached 服务
cat /apps/zabbix_agent/etc/zabbix_agentd.conf.d/memcached_state.sh
#!/bin/bash
memached_state(){


    port=$1
    echo -e 'stats\nquit'| nc 127.0.0.1 $port |awk -v item=$2  '$2==item{print
$3}'
}
memcached_state $1 $2

/apps/zabbix_agent/etc/zabbix_agentd.conf.d/memcached_state.sh
11211 version
1.5.9
[root@centos8 ~]#vim /apps/zabbix_agent/etc/zabbix_agentd.conf
### Option: UserParameter
#   User-defined parameter to monitor. There can be several user-defined
parameters.
#   Format: UserParameter=<key>,<shell command>
#   See 'zabbix_agentd' directory for examples.
#
# Mandatory: no
# Default:
# UserParameter=
UserParameter=tcp_state[*],/apps/zabbix_agent/etc/zabbix_agentd.conf.d/tcp_state
.sh "$1"
UserParameter=memcached_state[*],/apps/zabbix_agent/etc/zabbix_agentd.conf.d/mem
cached_state.sh "$1" "$2"
#如果是包安装,配置文件如下
[root@centos8 ~]#cat /etc/zabbix/zabbix_agentd.d/test.conf
UserParameter=memcached_state[*],/etc/zabbix/zabbix_agentd.d/memcached_state.sh
"$1" "$2"
[root@centos8 ~]#systemctl restart zabbix-agent.service
Zabbix Server 测试监控memcached服务的监控项数据
[root@zabbix-server ~]#zabbix_get -s 10.0.0.103 -p 10050 -
k"memcached_state[11211,version]"
1.5.9
[root@zabbix-server ~]#zabbix_get -s 10.0.0.103 -p 10050 -
k"memcached_state[11211,curr_connections]"
2
5.2 自定义监控项监控nginx
cat nginx_state.conf
UserParameter=ngx_state,ps aux  | grep -c [n]ginx
zabbix_get -s 10.1.20.150 -k ngx_state
5
web界面配置我就不逐个展示了用文字描述
自定义模板实现监控
创建应用集ngx_state
在自定义的模板中创建自定义监控项或者将已有的监控项复制到模板中
查看自定义的模板中已存在自定义的应用集和监控项
在被监控主机重新关联自定义的模板
选择指定的模板中创建触发器
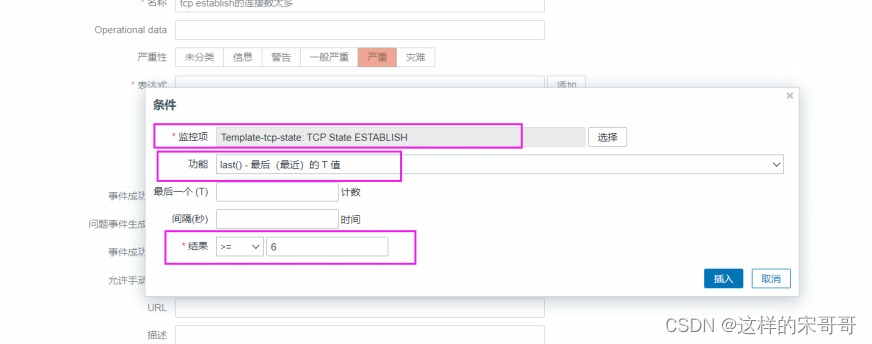
填好表达式得到的值等于0代表nginx宕机
可以在自定义的模板中加入自定义图形
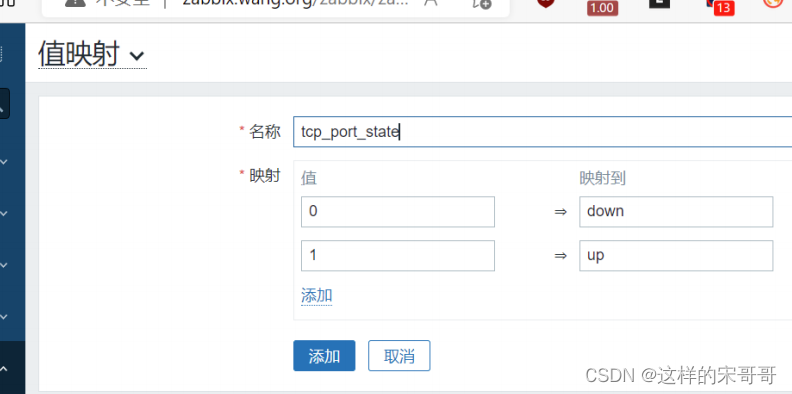
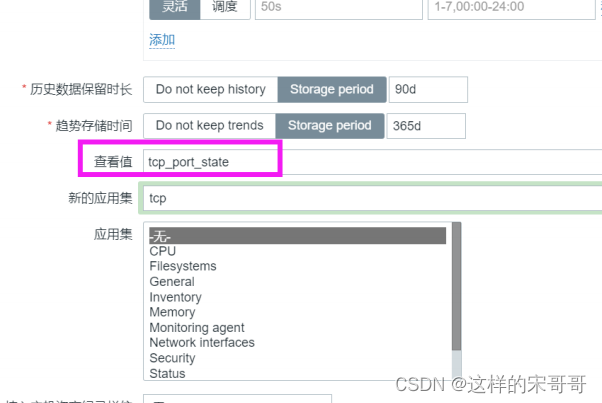
可以配置值映射,更加人性化显示
示例:
http 响应码
‘200’ → ‘OK’
‘403’ → ‘Forbidden’
‘404’ → ‘Not Found’


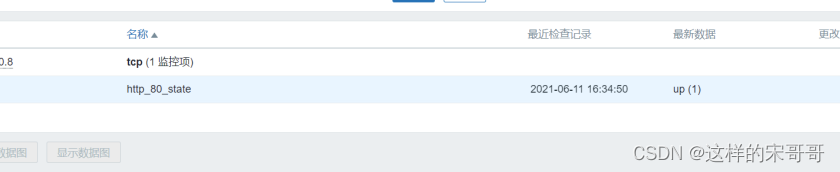
添加监控项时,在查看值处选中上面创建的值映射名称
查看结果

5.3 自己实现的监控项
服务器登录白名单
cat not_allow_ip_count.sh
#!/bin/bash
not_allow_list="tty1|10.1.20.150|10.1.20.149|10.3.10.86"
if [[ $(who| grep -Ev $not_allow_list) ]];then
        echo $(who| grep -Evc $not_allow_list);
else
        echo 0
fi

cat not_allow_ip.conf
UserParameter=not_allow_ip_count,sh /etc/zabbix/zabbix_agent2.d/not_allow_ip_count.sh

zabbix_get -s 10.1.20.150 -k not_allow_ip_count
0
大于1就告警


六. 基于zabbix实现邮件或微信告警。
生产环境中,通常当达到一定的指标,比如硬盘使用率为80%左右时,会触发触发器的条件,而触发器可
以再触发动作,实现事件通知告警或执行指定命令等.要实现事件通知告警,就需要一个中间介质来发送
告警消息给运维
Zabbix 有如下常见报警介质:
- 微信
- 短信
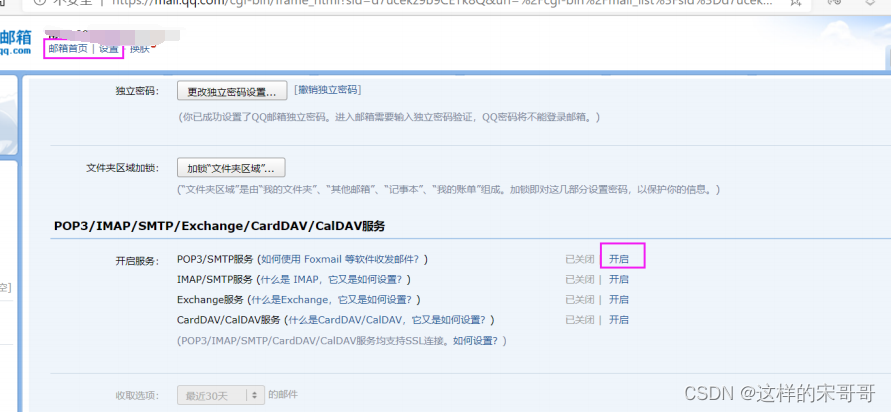
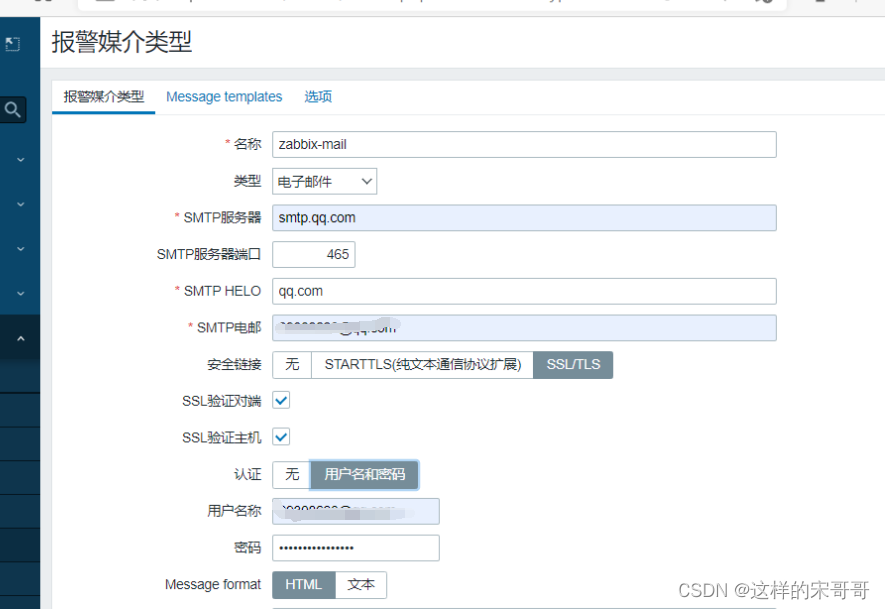
在邮箱上开启SMTP功能,利用此邮箱实现发送报警邮件
创建报警媒介类型实现发信人功能
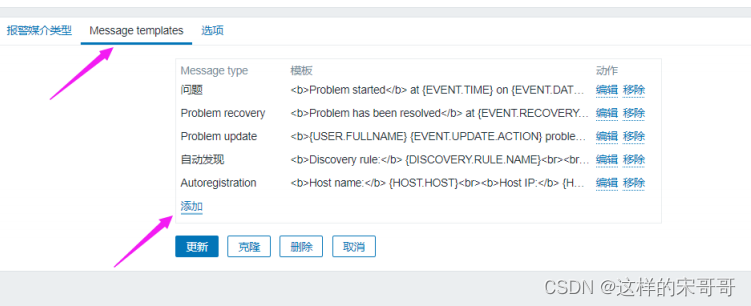
添加消息模板用于发送信息
#可以修改两个消息模板
# 问题
主题: 告警: {

    EVENT.NAME}
告警主机:{

    HOST.NAME1}
告警服务: {

    ITEM.NAME1}
告警Key1: {

    ITEM.KEY1}:{

    ITEM.VALUE1}
告警Key2: {

    ITEM.KEY2}:{

    ITEM.VALUE2}
严重级别: {

    TRIGGER.SEVERITY}
# 恢复 Problem Recovery
主题: 恢复: {

    EVENT.DURATION}: {

    EVENT.NAME}
恢复主机:{

    HOST.NAME1}
恢复服务: {

    ITEM.NAME1}
恢复Key1:{

    ITEM.KEY1}:{

    ITEM.VALUE1}
恢复Key2: {

    ITEM.KEY2}:{

    ITEM.VALUE2}
测试是否邮件正常,有时QQ邮箱不成功,可以尝试其它邮箱,如163邮箱
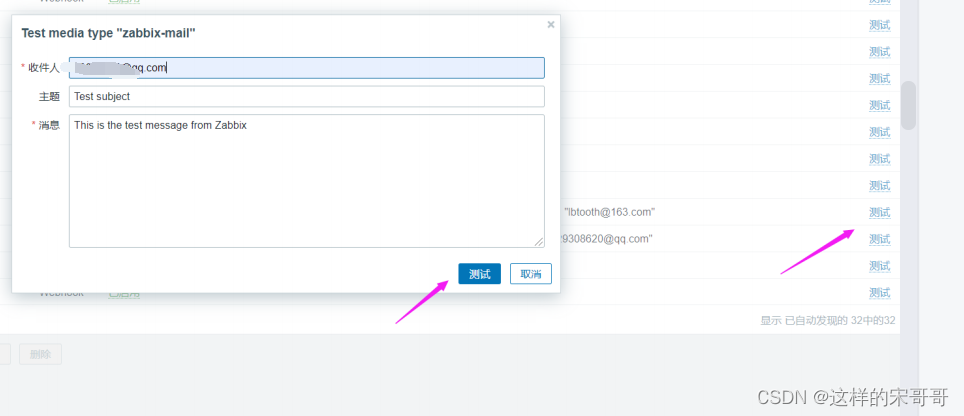
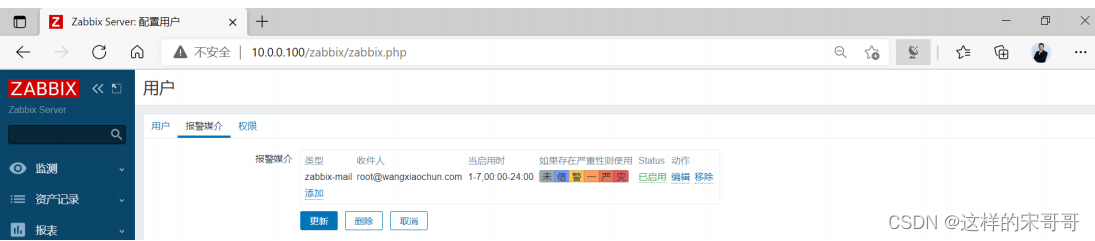
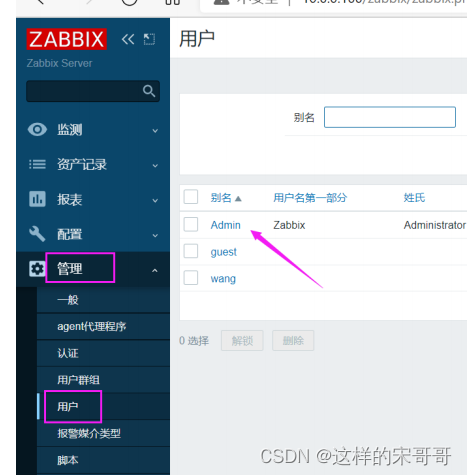
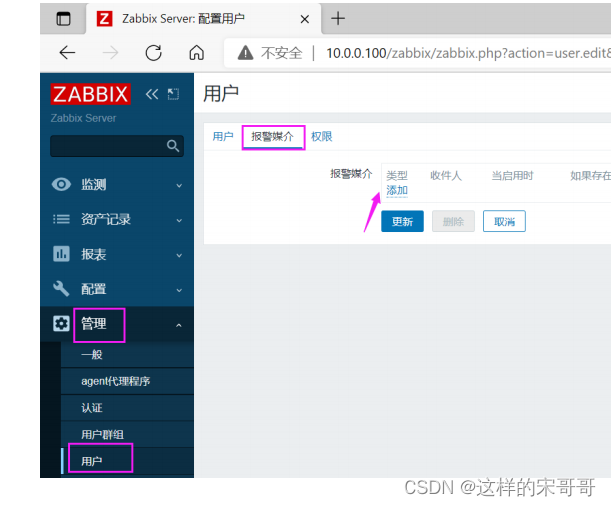
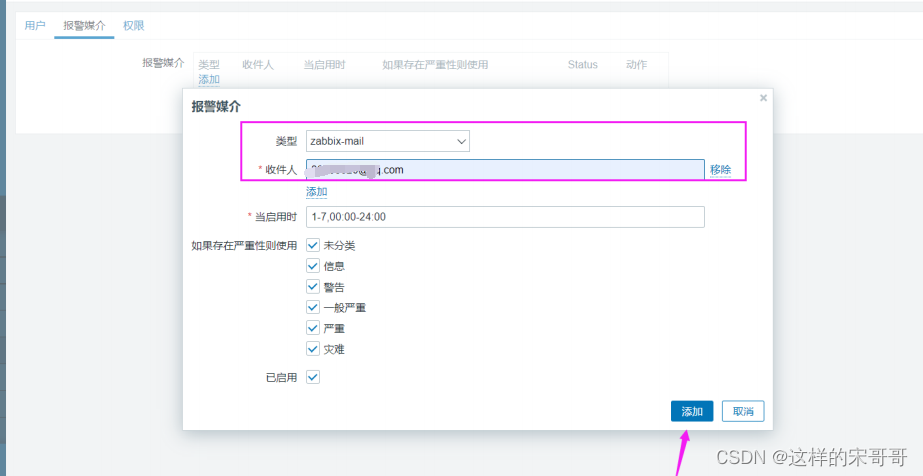
6.1 给指定用户添加报警媒介实现收件人功能
注意:下面图中一定要点击“更新”才能生效
6.2 创建和配置动作
动作可以实现当触发器被触发后可以执行哪些操作,一般可以是发送告警或执行命令
关于宏,即一些在Zabbix 中可以调用的变量
宏分为三种
- 系统内置的宏变量: {MACRO}
- 用户自定义的宏变量: {$MACRO}
- 低级别自动发现宏变量: {#MACRO}
指定动作即条件为事件的严重度为信息时就触发动作

官方宏参考:
https://www.zabbix.com/documentation/5.0/zh/manual/appendix/macros/supported_by_location
https://www.zabbix.com/documentation/4.0/zh/manual/appendix/macros/supported_by_location
6.2.1 范例: 操作和恢复操作的定制消息主题和和内容
#操作主题
故障:{TRIGGER.STATUS} 服务器:{HOSTNAME1} 事件:{TRIGGER.NAME}故障!
#消息内容
告警主机:{HOSTNAME1}
告警时间:{EVENT.DATE} {EVENT.TIME}
告警等级:{TRIGGER.SEVERITY}
告警信息:{TRIGGER.NAME}
告警项目:{TRIGGER.KEY1}
问题详情:{ITEM.NAME}:{ITEM.VALUE}
当前状态:{TRIGGER.STATUS}:{ITEM.VALUE1}
事件ID:{EVENT.ID}
#恢复操作主题
恢复:{TRIGGER.STATUS} 服务器:{HOSTNAME1} 事件:{TRIGGER.NAME}已恢复!
#恢复消息内容
告警主机:{HOSTNAME1}
告警时间:{EVENT.DATE} {EVENT.TIME}
故障持续时间:{EVENT.AGE}
恢复时间:{EVENT.RECOVERY.TIME}
告警等级:{TRIGGER.SEVERITY}
告警信息:{TRIGGER.NAME}
告警项目:{TRIGGER.KEY1}
问题详情:{ITEM.NAME}:{ITEM.VALUE}
当前状态:{TRIGGER.STATUS}:{ITEM.VALUE1}
事件ID:{EVENT.ID}
步骤设为0时,表示会不停的持续发送警报,一般建议1到3表示执行三次。
步骤持续时间表示如果有后续步骤执行时的间隔时长,默认为0表示使用默认时间1h后才会执行后续步骤,此值最低不能低于60s,最大不能超过604800s,可以设为1到5m(分钟)比较合适

配置故障恢复信息
恢复操作内容
默认标题:业务恢复
信息内容:业务恢复服务器:{HOST.NAME},IP:{HOSTNAME1},详情:{ITEM.NAME}:{ITEM.VALUE}

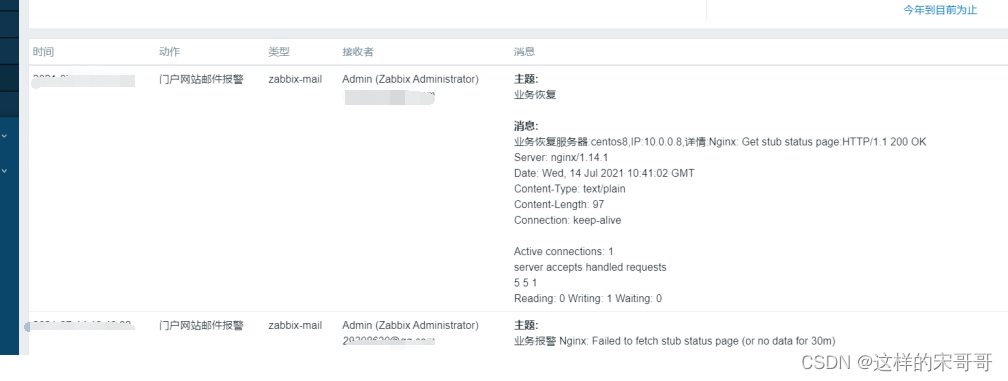
模拟故障验证邮件通知 systemctl stop nginx


在报表中可以看到动作日志如下面信息
七. 总结zabbix自动发现监控
7.1 Zabbix 网络发现介绍
之前都是手动一台一台主机的添加到 Zabbix 中进行监控,很是繁琐,可以利用自动发现功能,自动添加被监控的主机
当众多的服务器都已经安装了agent或者snmp后,利用自动发现功能,Zabbix server 可以自动扫描预先配置好的ip段,自动添加主机,自动关联模板,自动加到主机组里等等。
网络发现功能更快速的部署zabbix、简化zabbix管理、并且在经常变动的环境里面也不需要花太多的精力,毕竟网络发现也能随时发现变化。
当然网络发现也不是万能的,虽然网络发现能干很多事情,但是它无法发现网络拓扑的变化。
由于自动发现效率比较低,严重消耗Zabbix Server资源和网络带宽,大规模环境中较少使用
自动发现虽然能自动完成发现并添加主机,但仍然存在一些问题
- 发现时间长,效率较低
- 扫描过程中容易漏扫
- 当IP地址不固定难以实现
- 无法实现不同类型主机关联不同模板
官方帮助
https://www.zabbix.com/documentation/5.0/zh/manual/discovery/network_discovery
7.2 实现 Zabbix 网络发现
自动发现由两个步骤组成:
- 发现discovery: Zabbix周期性地扫描在"网络发现规则"中定义的IP段,发现满足规则的主机
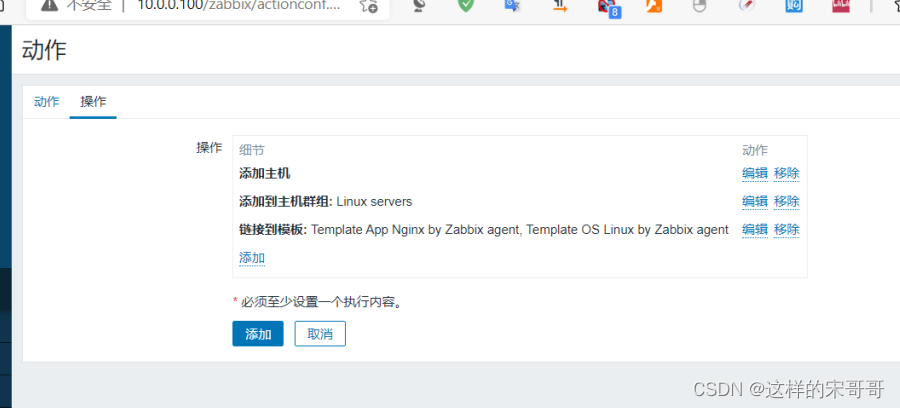
- 动作action: 对这些主机完成动作,包括添加主机、添加模板、发送通知等等。
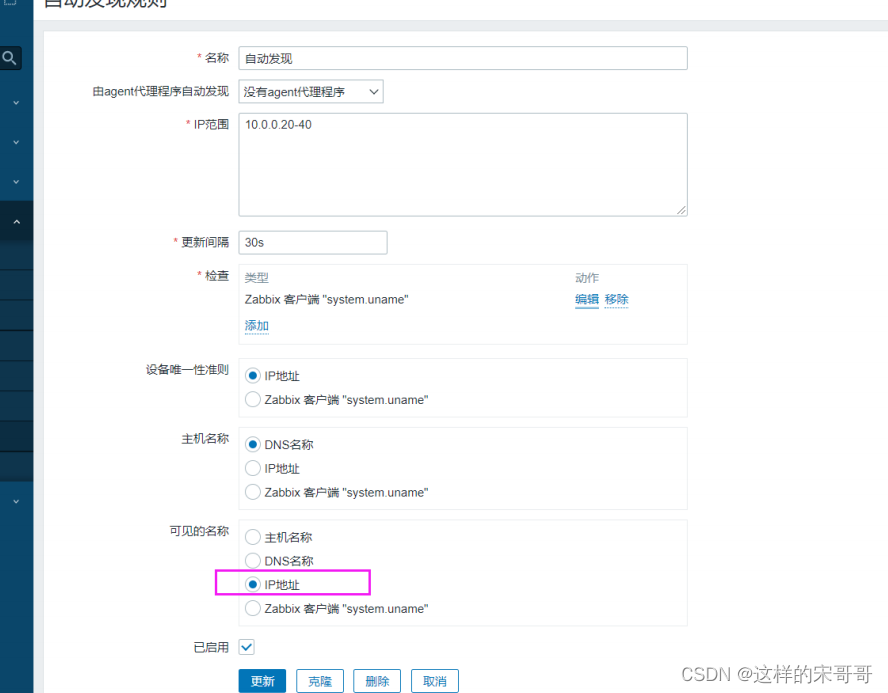
案例: 自动发现需求
发现有Zabbix agent运行的主机
每10分钟执行一次
如果主机正常运行时间超过2分钟,添加主机
将Linux主机添加到“Linux servers”组
链接模板Template OS Linux 到Linux主机
如果主机停机时间超过24小时,删除主机
7.2.1 创建自动发现指定需要监控的网段
配置-- 自动发现-- 创建发现规则
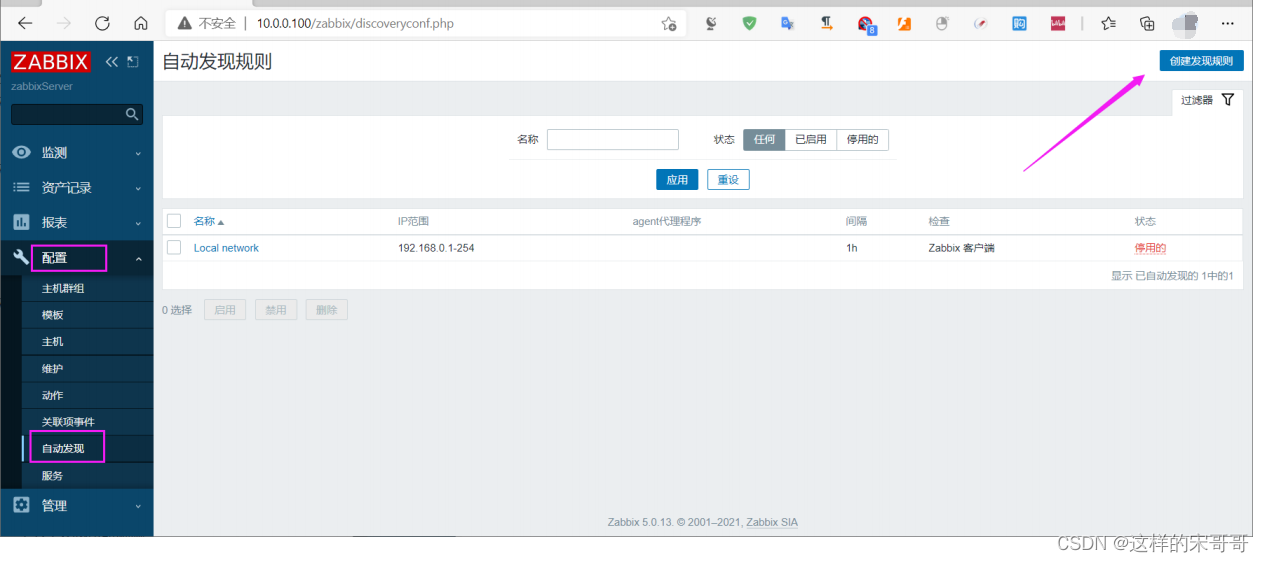
指定名称,IP范围和逢动发现检查等信息
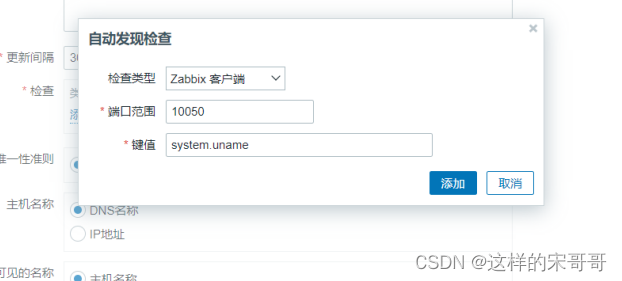
可见名称为IP地址

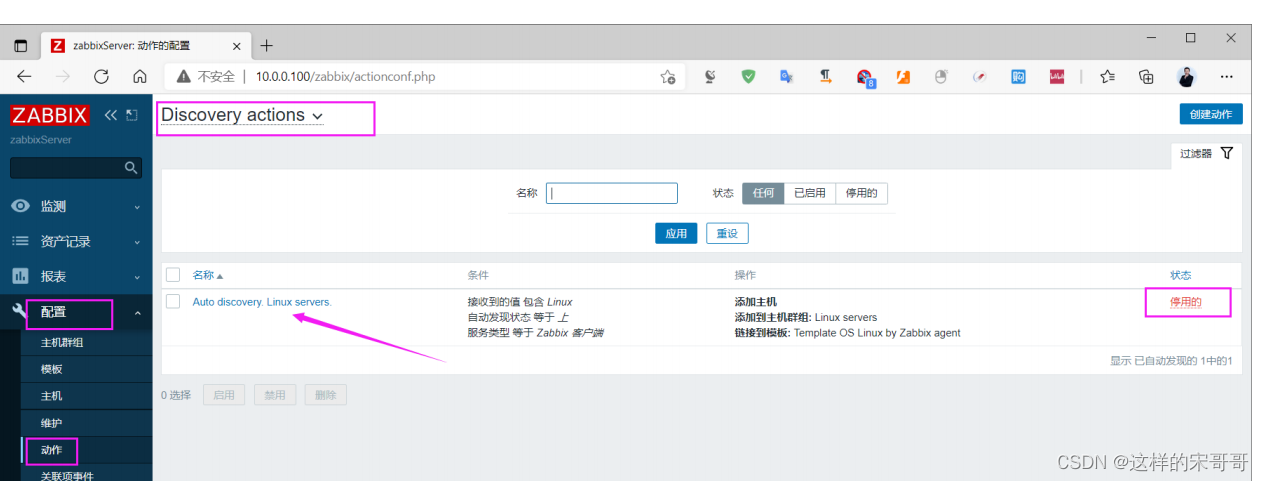
7.2.2 创建添加主机的自动发现动作
创建新的动作
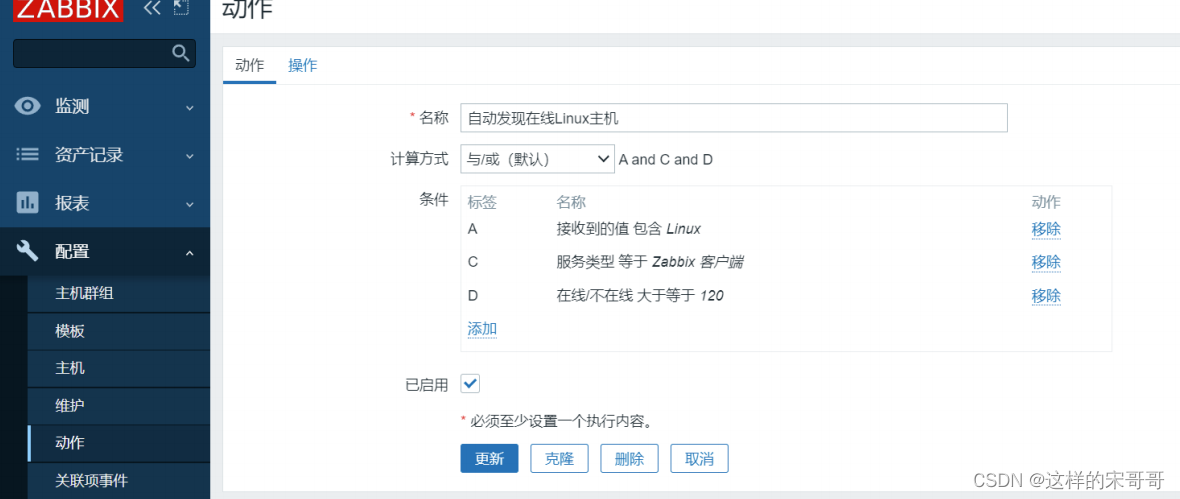
系统默认内置动作,也可以修改已有的被禁用自动发现动作
启用此动作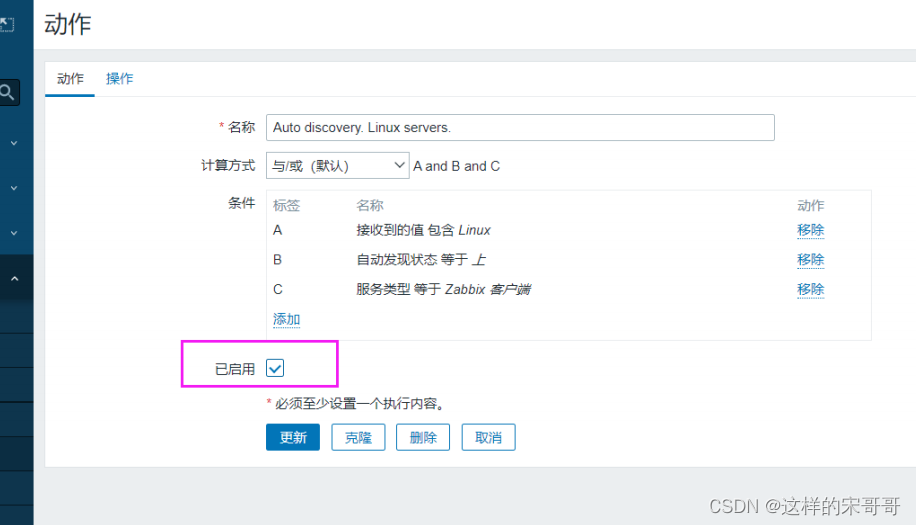
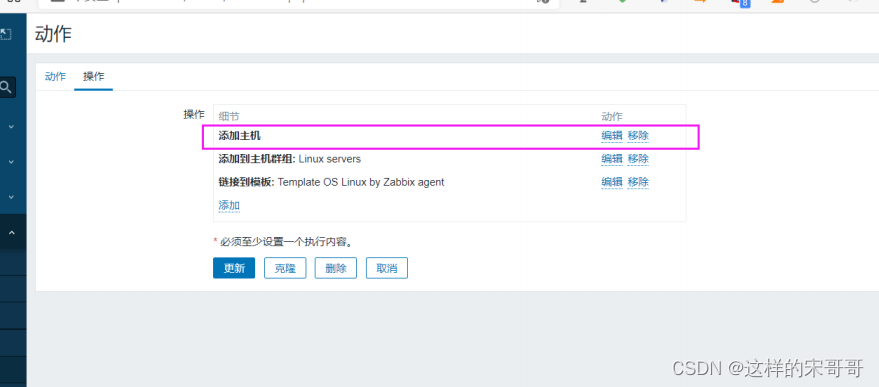
操作增加三个操作: 添加主机,添加群组,添加模板
也可以添加发送消息给Admin等操作
7.2.3 创建删除主机的自动发现动作


7.2.4 验证自动发现的结果
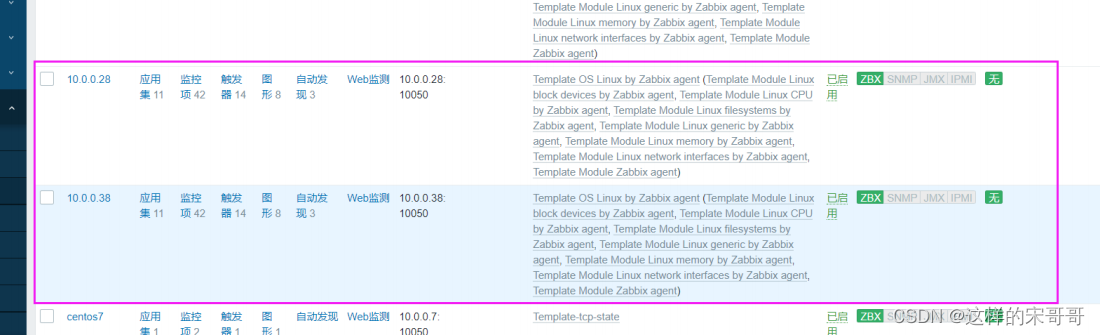
一段时间后,可以观察到下面结果,自动添加两台主机并关联相应的模板
将客户端关机后,过一天后,再观察是否自动删除此主机
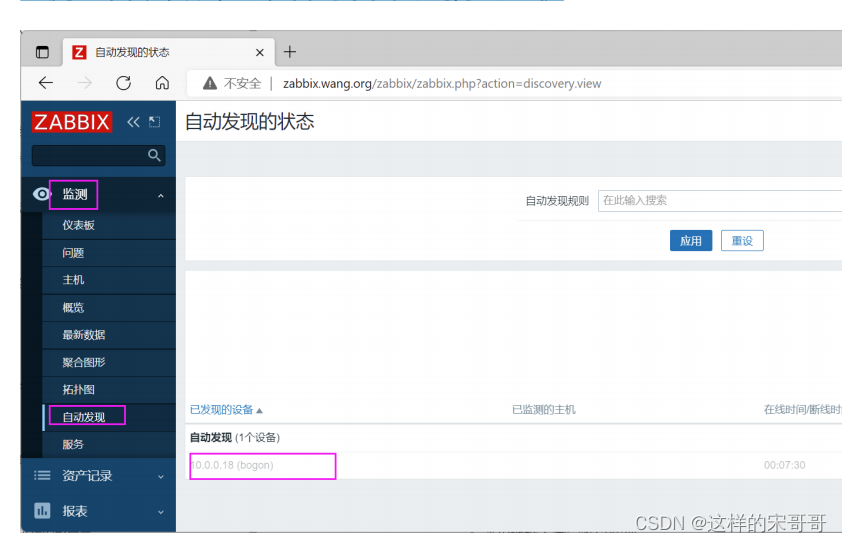
监测 – 自动发现, 可以看到下面的删除的主机
7.3 Zabbix 自动注册(推荐使用)
7.3.1 Zabbix 自动注册介绍
当客户端众多时,将每台主机手动添加到Zabbix,还手动添加关联模板,无疑是低效的.
但是利用网络发现实现,Zabbix Server 资源消耗又比较严重
利用Zabbix的自动注册功能,实现添加主机的自动化,可以大幅减少运维的工作量,减少Zabbix Server 的资源消耗
此方式和自动发现不同,是由Active agent主动发起请求zabbix server将这些agent加到主机里。
注意: Agent 必须使用主动模式才支持自动注册
自动注册由于比自动发现效率更好,Zabbix Server资源消耗更少,更适合大规模及云环境IP地址不固定的
场景使用
官方帮助
https://www.zabbix.com/documentation/5.0/zh/manual/discovery/auto_registration
在Zabbix agent 端的配置文件修改以下项目
Server=<Zabbix Server IP>
ServerActive=<Zabbix Server IP> #客户端主动模式是实现自动注册的前提条件
Hostname=<agent IP>
#HostnameItem=system.hostname
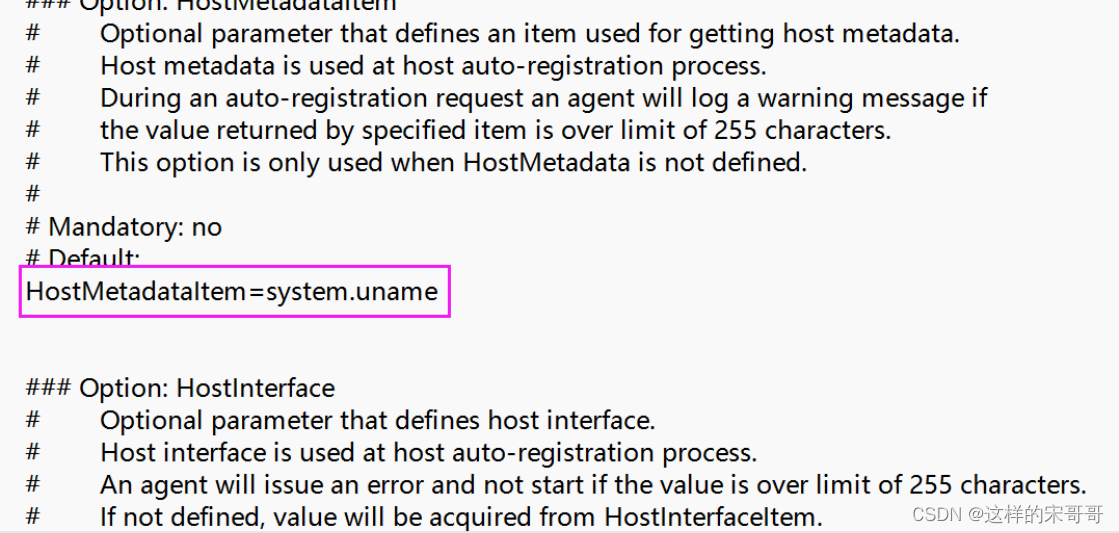
HostMetadata==<key> #非必须项,可以做为添加主机的验证标识和分类,或者实现加入主机
的验证功能
HostMetadataItem=<监控项Item> #非必须项,监控项的值可以做为添加主机的验证标识和分类
修改 Zabbix agent 的配置
范例:
[root@centos8 ~]#vim /etc/zabbix/zabbix_agentd.conf
Server=zabbix.wang.org
ServerActive=zabbix.wang.org
Hostname=web-10.0.0.18  #指定主机名,如果不指定,则服务器将使用agent的系统主机名
#HostnameItem=system.hostname   #指定主机名
HostMetadata=web
#HostMetadataItem=system.uname
[root@centos8 ~]#systemctl restart zabbix-agent.service
[root@zabbix-server ~]#zabbix_get -s 10.0.0.8 -k system.uname
Linux rocky8.magedu.org 4.18.0-348.el8.0.2.x86_64 #1 SMP Sun Nov 14 00:51:12 UTC
2021 x86_64
[root@zabbix-server ~]#zabbix_get -s 10.0.0.8 -k system.hostname
rocky8.magedu.org
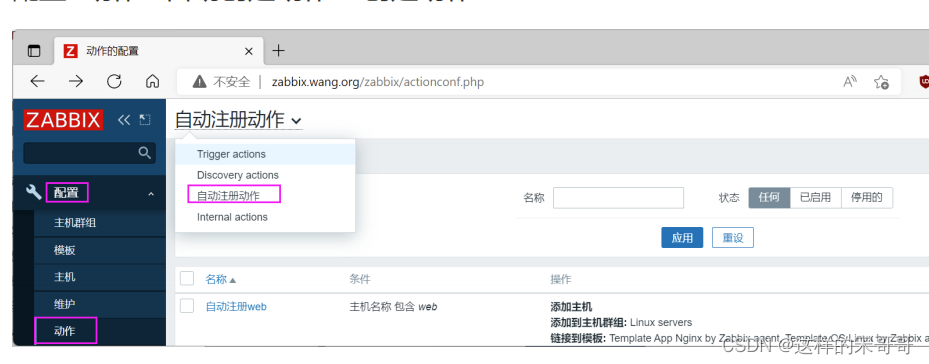
在 Zabbix Server 配置动作
在配置—动作—选择自动注册动作
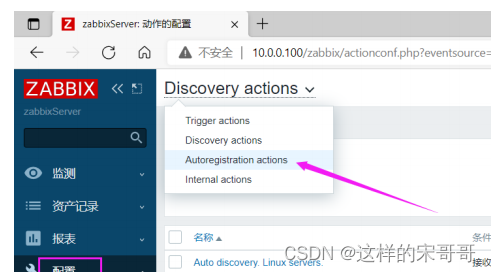
创建新动作

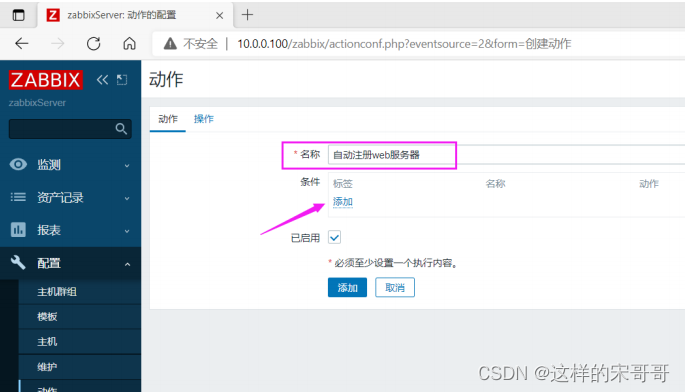
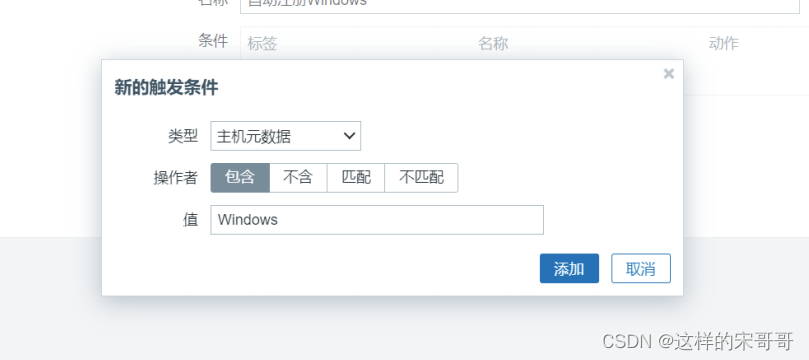
指定动作中条件的主机名的值
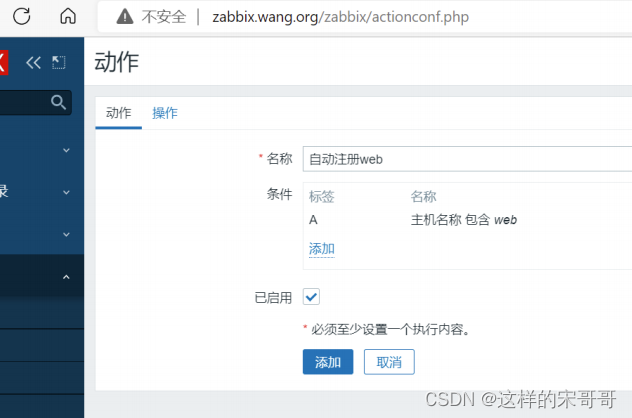
或者使用元数据添加
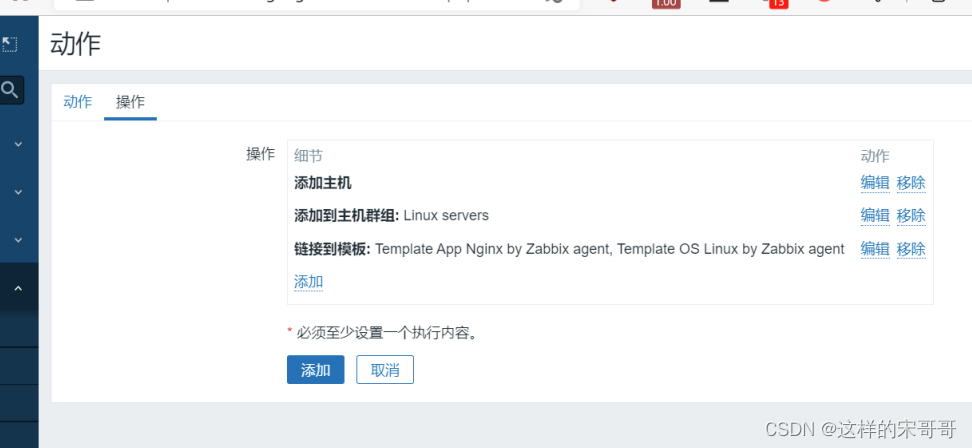
指定操作
指定操作,添加主机,添加主机到主机群组,关系相关模板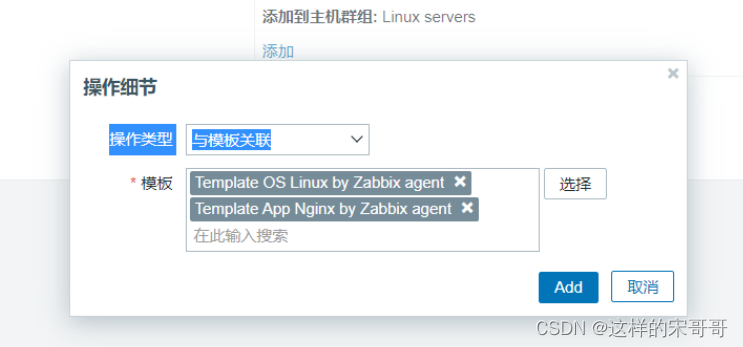
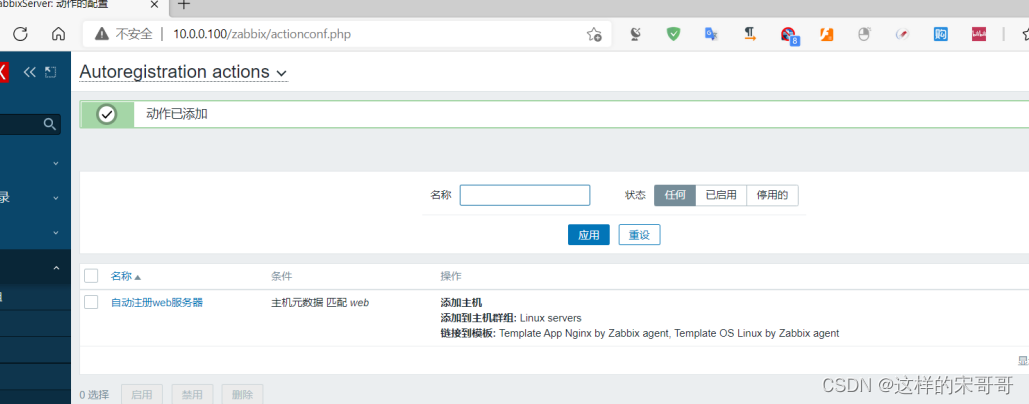
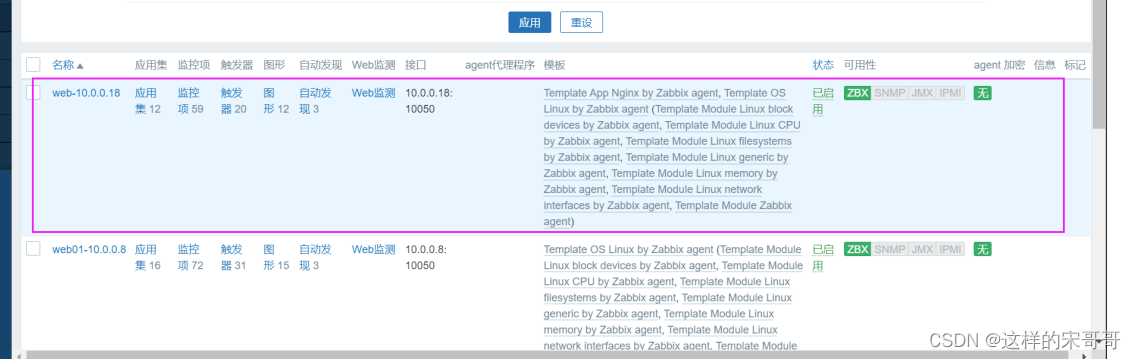
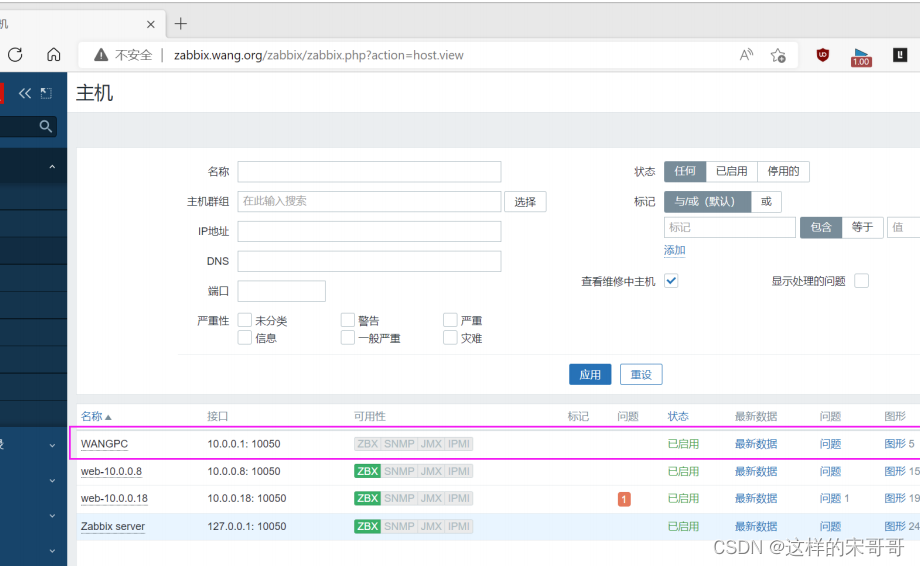
验证结果
稍过一会儿,再观察可以看到下面显示添加主机成功
7.3.2 案例: 将 Windows 主动自动注册
重启服务
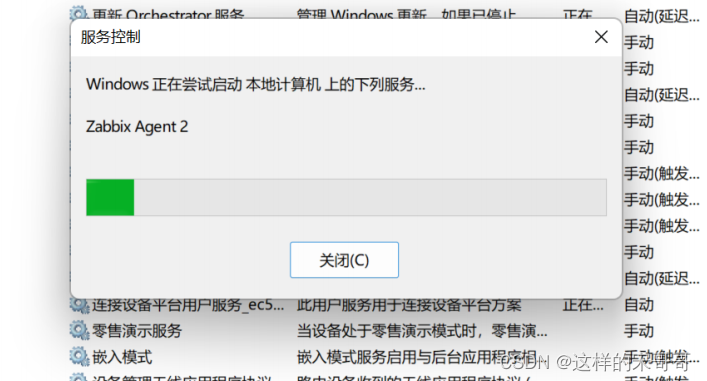

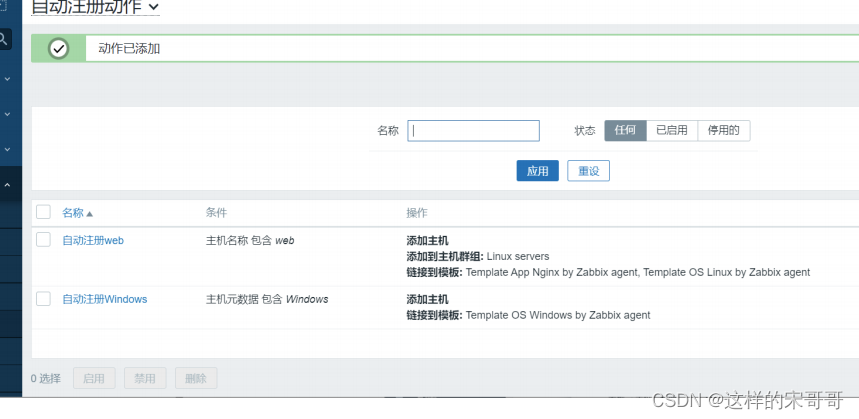
验证结果
另外还有基于 Ansible 实现批量的自动注册
八 还有优化、高可用的话题
zabbix 监控主机和监控项比较少的时候,无需过度优化!
优化方法
- 数据库: 写多读少,数据采集比较频繁,可以考虑 PostgreSQL
- 使用主动模式,减轻Zabbix Server压力
- 如果需要监控远程主机,使用 Zabbix Proxy
- 删除无用监控项,建议使用自定义的模板和监控项
- 适当增加监控项的取值间隔,减少历史数据保存周期,此工作由housekeeper进程定时清理
- 针对zabbix历史数据和趋势图的数据表,进行周期性分表保存
- 对 Zabbix Server 进程调优,发现性能瓶颈的进程,加大它的进程数量
- 对 Zabbix Server 缓存调优,发现哪种缓存的剩余内存少,就加大它的缓存值
8.1 优化
数据库空间估算
监控项的保留时长,历史数据默认90天,趋势数据1年

https://www.zabbix.com/documentation/6.0/zh/manual/installation/requirements
https://www.zabbix.com/documentation/5.0/zh/manual/installation/requirements
配置文件数据+ 历史数据+ 趋势数据+ 事件数据
范例: 假设 100台主机,每个主机约有100个监控项,每个监控项每间隔60s获取一次数值
历史数据:
days*(items/refresh rate)243600bytes
90(10000/60)24360090=116173440000 字节 约共116GB
趋势:
days(items/3600)243600bytes
365(10000/3600)24360090=5676480000 字节 约共5G
事件:
daysevents243600bytes
3651243600*170=5361120000 约5G
合计:126GB
AlertScriptsPath
默认值:/usr/local/share/zabbix/alertscripts
说明:告警脚本目录
AllowRoot
默认值:0 说明:是否允许使用root启动,0:不允许,1:允许,默认情况下她会使用zabbix用户来启动
zabbix进程,不推荐使用root
CacheSize
取值范围: 128K-8G
默认值:8M
说明:配置缓存,用于存储host,item,trigger数据,2.2.3版本之前最大支持2G,目前最大支持8G,
CacheUpdateFrequency
取值范围:1-3600
默认值:60
说明:多少秒更新一次配置缓存
DBHost
默认值:localhost
说明:数据库主机地址
DBName
默认值:无
必填:是
DBPassword:
默认值:无
说明:数据库密码
DBPort
取值范围:1024-65535
默认值:3306
说明:SQLite作为DB,这个选项请忽略,如果使用socket链接,也请忽略。
DBSchema
说明:Schema名称. 用于 IBM DB2 、 PostgreSQL.
DBSocket
默认值:/tmp/mysql.sock
说明:mysql sock文件路径
DebugLevel
取值范围:0-5
默认值:3
说明: 指定debug级别
0 - 基本信息
1 - critical信息
2 - error信息
3 - warnings信息
4 - 调试日志,日志内容很多,慎重使用
5 - 用于调试web和vmware监控
ExternalScripts
默认值: /usr/local/share/zabbix/externalscripts
说明: 外部脚本目录
Fping6Location
默认值:/usr/sbin/fping6
说明:fping6路径,如果zabbix非root启动,请给fping6 SUID
FpingLocation
默认值:/usr/sbin/fping
说明:和上面的一样
HistoryCacheSize
取值范围:128K-2G
默认值:8M
说明:
历史记录缓存大小,用于存储历史记录
HistoryTextCacheSize
取值范围:128K-2G
默认值:16M
说明:文本类型历史记录的缓存大小,存储character, text 、log历史记录.
HousekeepingFrequency
取值范围:0-24
默认值:1
说明:housekeep执行频率,默认每小时回去删除一些过期数据。如果server重启,那么30分钟之后才执行
一次,接下来,每隔一小时在执行一次。
Include
说明:include配置文件,可以使用正则表达式,例如:/usr/local/zabbix-
2.4.4/conf/ttlsa.com/*.conf
JavaGateway
说明:Zabbix Java gateway的主机名,需要启动Java pollers
JavaGatewayPort
取值范围:1024-32767
默认值:10052
Zabbix Java gateway监听端口
ListenIP
默认值:0.0.0.0
说明:监听地址,留空则会在所有的地址上监听,可以监听多个IP地址,ip之间使用逗号分隔,例如:
127.0.0.1,10.10.0.2
ListenPort
取值范围:1024-32767
默认值:10051
说明:监听端口
LoadModule
说明:加载模块,格式: LoadModule=,文件必须在指定的LoadModulePath目录下,如果需要加载多个模
块,那么写多个即可。
LoadModulePath
模块目录,参考上面
LogFile
日志文件,例如:/data/logs/zabbix/zabbix-server.log
LogFileSize
取值范围:0-1024
默认值:1
0表示禁用日志自动rotation,如果日志达到了限制,并且rotation失败,老日志文件将会被清空掉,重新
生成一个新日志。
LogSlowQueries
取值范围:0-3600000
默认值:0
多慢的数据库查询将会被记录,单位:毫秒,0表示不记录慢查询。只有在DebugLevel=3时,这个配置才有
效。
MaxHousekeeperDelete
取值范围: 0-1000000
默认值:5000
housekeeping一次删除的数据不能大于MaxHousekeeperDelete
PidFile
默认值:/tmp/zabbix_server.pid
PID文件
ProxyConfigFrequency
取值范围:1-604800
默认值:3600
proxy被动模式下,server多少秒同步配置文件至proxy。
ProxyDataFrequency
取值范围:1-3600
默认值:1
被动模式下,zabbix server间隔多少秒向proxy请求历史数据
SenderFrequency
取值范围:5-3600
默认值:30
间隔多少秒,再尝试发送为发送的报警
SNMPTrapperFile
默认值:/tmp/zabbix_traps.tmp
SNMP trap发送到server的数据临时存放文件。
SourceIP
出口IP地址
SSHKeyLocation
SSH公钥私钥路径
SSLCertLocation
SSL证书目录,用于web监控
SSLKeyLocation
SSL认证私钥路径、用于web监控
SSLCALocation
SSL认证,CA路径,如果为空,将会使用系统默认的CA
StartDBSyncers
取值范围:1-100
默认值:4
预先foke DB Syncers的数量,1.8.5以前最大值为64
StartDiscoverers
取值范围:0-250
默认值:1
pre-forked discoverers的数量,1.8.5版本以前最大可为255
StartPollers
# Mandatory: no
取值范围:0-1000
默认值:5
Number of pre-forked instances of pollers.
StartHTTPPollers
取值范围:0-1000
默认值:1
pre-forked HTTP pollers的数量,1.8.5以前最大255
StartIPMIPollers
取值范围:0-1000
默认值:0
pre-forked IPMI pollers的数量,1.8.5之前,最大为255
StartPollersUnreachable
取值范围:0-1000
默认值:1
pre-forked instances of pollers for unreachable hosts (including IPMI and Java)
Timeout
取值范围:1-30
默认值:3
agent,snmp,external check的超时时间,单位为秒
TmpDir
默认值:/tmp
TrapperTimeout
取值范围:1-300
默认值:300
处理trapper数据的超时时间
TrendCacheSize
取值范围:128K-2G
默认值:4M
历史数据缓存大小
UnavailableDelay
取值范围:1-3600
默认值:60
间隔多少秒再次检测主机是否可用
UnreachableDelay
取值范围:1-3600
默认值:15
间隔多少秒再次检测主机是否可达。
UnreachablePeriod
取值范围:1-3600
默认值:45
检测到主机不可用,多久将它置为不可达
User
默认值:zabbix
启动zabbix server的用户,在配置禁止root启动,并且当前shell用户是root得情况下有效。如果当前
用户是ttlsa,那么zabbix server的运行用户是ttlsa
ValueCacheSize
取值范围:0,128K-64G
默认值:8M
0表示禁用,history value缓存大小,当缓存超标了,将会每隔5分钟往server日志里面记录。养成看日
志的好习惯。
修改 Zabbix Server 配置
[root@zabbix-server ~]#vim /etc/zabbix/zabbix_server.conf
StartDiscoverers=100    # StartDiscoverers=1 默认值为1,加大此值
[root@zabbix-server ~]#systemctl restart zabbix-agent.service
缓存案例
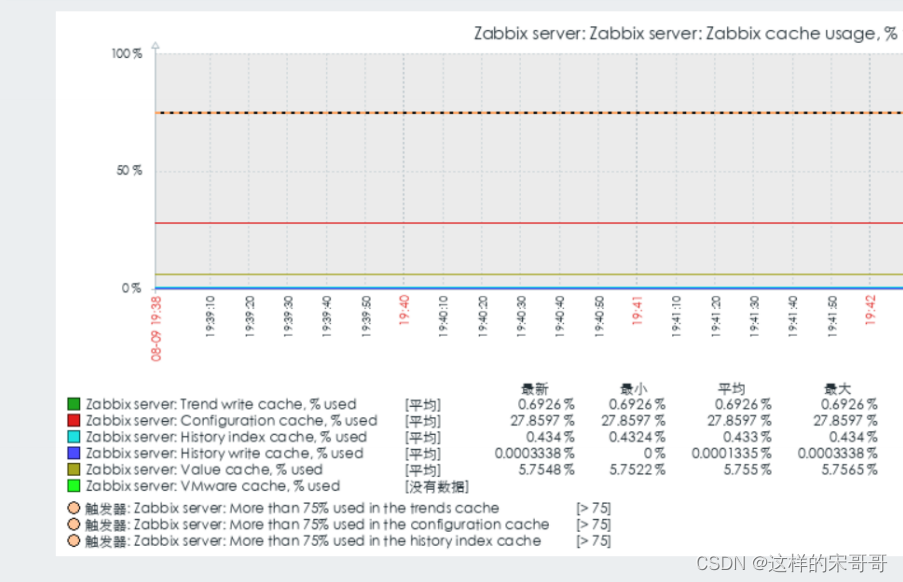
Zabbix Server 相关缓存的配置项
[root@zabbix-server ~]#grep -i cache /etc/zabbix/zabbix_server.conf
### Option: VMwareCacheSize
# Size of VMware cache, in bytes.
# VMwareCacheSize=8M
### Option: CacheSize
# Size of configuration cache, in bytes.
# CacheSize=8M   #此值不能太小,否则Zabbix Server 可能无法启动
### Option: CacheUpdateFrequency
# How often Zabbix will perform update of configuration cache, in seconds.
# CacheUpdateFrequency=60
### Option: HistoryCacheSize
# Size of history cache, in bytes.
# HistoryCacheSize=16M
### Option: HistoryIndexCacheSize
# Size of history index cache, in bytes.
# Shared memory size for indexing history cache.
# HistoryIndexCacheSize=4M
### Option: TrendCacheSize
# Size of trend cache, in bytes.
# TrendCacheSize=4M
### Option: ValueCacheSize
# Size of history value cache, in bytes.
# Setting to 0 disables value cache.
# ValueCacheSize=8M
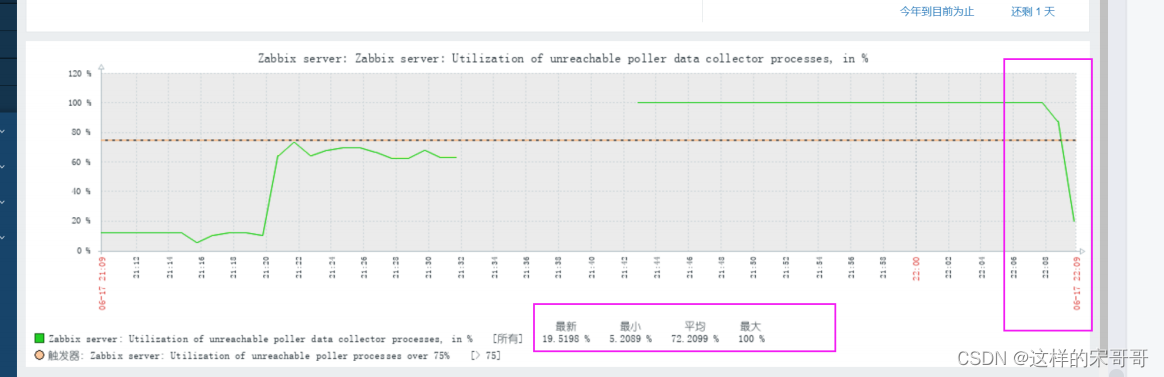
由于添加了很多不可访问的主机,会出现unreachable poller进程繁忙的情况,原因是此进程只有一个
修改配置,加大进程数
[root@zabbix-server ~]#vi /etc/zabbix/zabbix_server.conf
# StartPollersUnreachable=1
StartPollersUnreachable=100
[root@zabbix-server ~]#systemctl restart zabbix-server.service
[root@zabbix-server ~]#ps aux|grep unreachable |wc -l
101
再次观察数据和图形,可以看到繁忙度大幅下降
8.2 高可用
注意: 从 Zabbix 6.0 官方提供了高可用解决方案
官方链接
https://www.zabbix.com/documentation/6.0/zh/manual/concepts/server/ha#implementation-details
8.2.1 keepalived代理zabbix-server

#在两个Zabbix Server 使用下面相同的配置
[root@ka1 ~]#grep -i SourceIP= /etc/zabbix/zabbix_server.conf
SourceIP=10.0.0.10
[root@ka1 ~]#grep -i '^server=' /etc/zabbix/zabbix_agentd.conf
Server=127.0.0.1,10.0.0.10
[root@ka1 ~]#systemctl enable zabbix-server.service
[root@ka2 ~]#systemctl disable zabbix-server.service
#keepalived相关配置
#ka1节点配置
[root@ka1 ~]#cat /etc/keepalived/keepalived.conf
! Configuration File for keepalived
global_defs {


   notification_email {


       [email protected]
   }
   notification_email_from 29308620@qq.com
   smtp_server 127.0.0.1
   smtp_connect_timeout 30
   router_id ka1.magedu.org
   vrrp_skip_check_adv_addr
   #vrrp_strict
   vrrp_garp_interval 0
   vrrp_gna_interval 0
   vrrp_mcast_group4 230.6.6.6
}
#指定检测脚本
vrrp_script check_zabbix_server{


   script "/usr/bin/killall -0 zabbix_server"
   interval 1
   weight -30
   fall 2
   rise 2
   timeout 2
}
include /etc/keepalived/conf.d/*.conf
[root@ka1 ~]#cat /etc/keepalived/conf.d/vip_zabbix.conf
vrrp_instance VI_1 {


   state MASTER
   interface eth0
   virtual_router_id 66
   priority 100
   advert_int 1
   authentication {


       auth_type PASS
       auth_pass 123456
   }
   virtual_ipaddress {


        10.0.0.10/24 dev eth0 label eth0:1
   }
    #notify_master "systemctl start zabbix-server"
    #notify_backup "systemctl stop zabbix-server"
   track_script {


       check_zabbix_server
   }
}
#ka2节点框配置
[root@ka2 ~]#cat /etc/keepalived/conf.d/vip_zabbix.conf
vrrp_instance VI_1 {


   state BACKUP
   interface eth0
   virtual_router_id 66
   priority 80
   advert_int 1
   authentication {


       auth_type PASS
       auth_pass 123456
        }
   virtual_ipaddress {


        10.0.0.10/24 dev eth0 label eth0:1
   }
   notify_master "systemctl start zabbix-server"
   notify_backup "systemctl stop zabbix-server"
   track_script {


    #   check_zabbix_server #在ka2节点不能启用脚本,否则会导致ka2节点也降低优先级,从而
切换失败
   }
}