Android Studio布局详解
布局是什么?
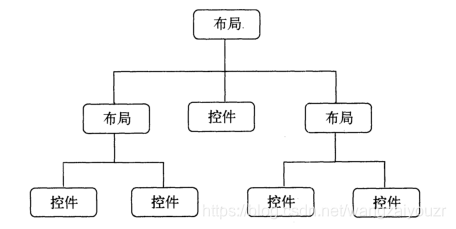
布局就是界面的框架,类似一个可以放很多控件的容器
- 如下图为布局和控件的关系,布局里可嵌套布局和控件,但控件里不可放布局
布局的分类
传统布局:
- 线性布局LinearLayout
- 相对布局RelativeLayout
- 帧布局 FrameLayout (又:层/框架布局)
- 百分比布局PercentFrameLayout/PercentRelativeLayout
- 表格布局TableLayout
- 网格布局GridLayout
- 绝对布局AbsoluteLayout
新型布局:
- 约束布局ConstraintLayout
布局的创建和加载
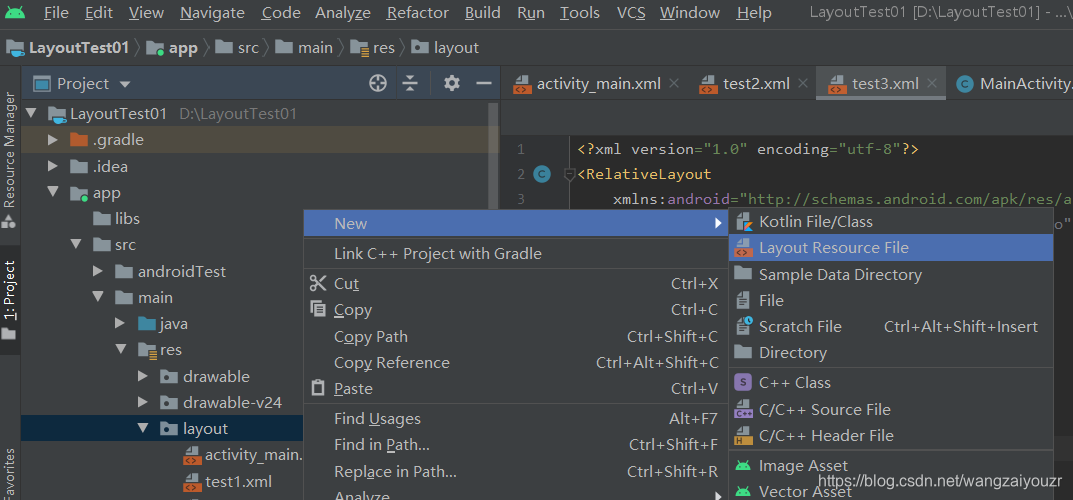
如图在project视图模式下新建,命名test1
然后在MainActivity中加载

8种布局详解
线性布局LinearLayout
线性布局是常用一种布局,按垂直(vertical)或者水平(horizontal)方向来布局控件
orientation决定控件排列方向,在线性布局中必不可少gravity决定内部控件对齐方式,同时也存在于相对布局和表格布局(注意与layout_gravity区分)center居中显示,当LinearLayout线性方向为垂直方向时,center表示水平居中,但是并不能垂直居中,此时等同于center_horizontal的作用;同样当线性方向为水平方向时,center表示垂直居中,等同于center_vertical。layout_weight表示权重,分配当前控件在剩余空间占比大小。要注意,如果在水平方向分配权重,就把width设置为0dp,如果在竖直方向分配权重,就把height设置为0dp (见书中代码演示)
示例:
<?xml version="1.0" encoding="utf-8"?>
<LinearLayout
    xmlns:android="http://schemas.android.com/apk/res/android"
    android:layout_width="match_parent"
    android:layout_height="match_parent"
    android:orientation="vertical">
    <Button
        android:id="@+id/button1"
        android:layout_width="100dp"
        android:layout_height="0dp"
        android:text="Button1"
        android:layout_weight="3"/>
    <Button
        android:id="@+id/button2"
        android:layout_width="100dp"
        android:layout_height="0dp"
        android:text="Button2"
        android:layout_gravity="right"
        android:layout_weight="1"/>
    <Button
        android:id="@+id/button3"
        android:layout_width="100dp"
        android:layout_height="0dp"
        android:text="Button3"
        android:layout_weight="2"/>
</LinearLayout>

相对布局RelativeLayout
相对布局可以让子控件相对于兄弟控件或父控件进行布局
可以设置子控件相对于兄弟控件或父控件进行上下左右对齐
相对于某个视图或者父布局的位置 ,该布局下的子视图可以重叠参照物
RelativeLayout能替换一些嵌套视图,不需要LinearLayout那么复杂
归纳一下RelativeLayout中子控件常用属性:
来自:https://blog.csdn.net/wenzhi20102321/article/details/52677595
相对布局的属性有点相近,使用的时候要细心
1、相对于父控件
用法例如 android:layout_alignParentTop="true"
- android:layout_alignParentTop 控件的顶部与父控件的顶部对齐
- android:layout_alignParentBottom 控件的底部与父控件的底部对齐
- android:layout_alignParentLeft 控件的左部与父控件的左部对齐
- android:layout_alignParentRight 控件的右部与父控件的右部对齐
2、相对给定id控件
用法例如:android:layout_above=“@id/**”
- android:layout_above 控件的底部置于给定ID的控件之上
- android:layout_below 控件的底部置于给定ID的控件之下
- android:layout_toLeftOf 控件的右边缘与给定ID的控件左边缘对齐
- android:layout_toRightOf 控件的左边缘与给定ID的控件右边缘对齐
- android:layout_alignBaseline 控件的baseline与给定ID的baseline对齐
- android:layout_alignTop 控件的顶部边缘与给定ID的顶部边缘对齐
- android:layout_alignBottom 控件的底部边缘与给定ID的底部边缘对齐
- android:layout_alignLeft 控件的左边缘与给定ID的左边缘对齐
- android:layout_alignRight 控件的右边缘与给定ID的右边缘对齐
3、居中
用法例如:android:layout_centerInParent=“true”
- android:layout_centerHorizontal 水平居中
- android:layout_centerVertical 垂直居中
- android:layout_centerInParent 父控件的中央
示例:
<?xml version="1.0" encoding="utf-8"?>
<RelativeLayout
    xmlns:android="http://schemas.android.com/apk/res/android"
    android:layout_width="match_parent"
    android:layout_height="match_parent">
    <Button
        android:id="@+id/button1"
        android:text="button1"
        android:layout_width="wrap_content"
        android:layout_height="wrap_content"

        android:layout_marginTop="200dp"
        android:layout_alignParentTop="true"
        android:layout_centerHorizontal="true" />
    <Button
        android:id="@+id/button2"
        android:text="button2"
        android:layout_width="wrap_content"
        android:layout_height="wrap_content"
        android:layout_toLeftOf="@+id/button1"
        android:layout_marginBottom="100dp"
        android:layout_alignBottom="@id/button1" />
    <Button
        android:id="@+id/button3"
        android:text="button3"
        android:layout_width="wrap_content"
        android:layout_height="wrap_content"
        android:layout_toRightOf="@+id/button1"
        android:layout_alignBottom="@+id/button1" />
    <Button
        android:id="@+id/button4"
        android:text="button4"
        android:layout_width="wrap_content"
        android:layout_height="wrap_content"
        android:layout_below="@+id/button1"
        android:layout_alignLeft="@+id/button1"/>
</RelativeLayout>

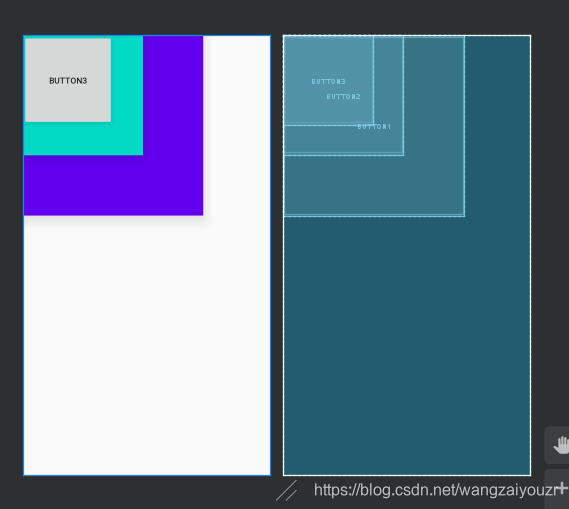
帧布局 FrameLayout
相当于把控件从界面左上角一层层叠加覆盖,可用于地图等功能
示例:
<?xml version="1.0" encoding="utf-8"?>
<FrameLayout
    xmlns:android="http://schemas.android.com/apk/res/android"
    android:layout_width="match_parent"
    android:layout_height="match_parent">
    <Button
        android:id="@+id/button1"
        android:layout_width="300dp"
        android:layout_height="300dp"
        android:text="Button1"
        android:background="@color/colorPrimary"
        android:visibility="visible" />
    <Button
        android:id="@+id/button2"
        android:layout_width="200dp"
        android:layout_height="200dp"
        android:text="Button2"
        android:background="@color/colorAccent"
        android:visibility="visible" />
    <Button
        android:id="@+id/button3"
        android:layout_width="150dp"
        android:layout_height="150dp"
        android:text="Button3"
        android:visibility="visible" />
</FrameLayout>
百分比布局
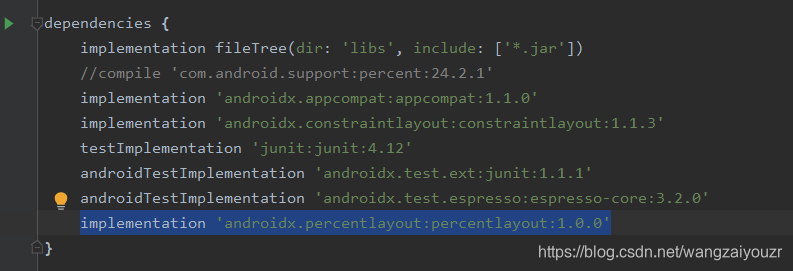
在《第一行代码》中app/build.gradle添加的依赖为:
compile 'com.android.support:percent:24.2.1'
这对于当前版本来说行不通,com.android.support:percent 很久以前就迁移到了 androidx.percentlayout:percentlayout,故不支持原库。
需改为以下内容:
implementation 'androidx.percentlayout:percentlayout:1.0.0'
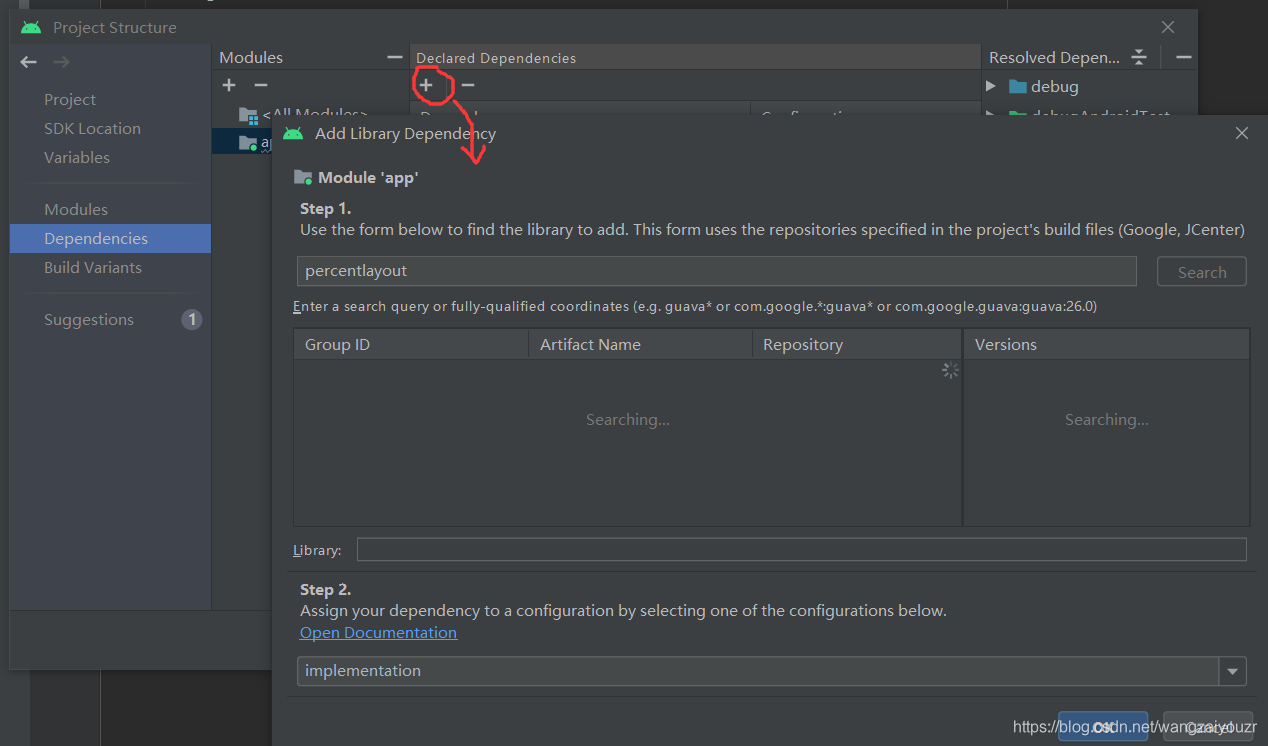
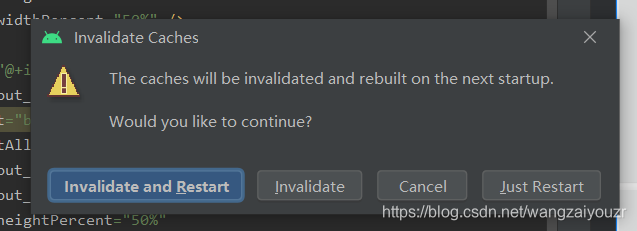
注意在修改依赖后要更新,点击sync now

若无法更新,可试用如下方法:

进入project structure,如图添加
添加成功后,在修改布局时编辑器会像其他布局一样自动填充,书中示例可如下实现:
 <?xml version="1.0" encoding="utf-8"?>
<androidx.percentlayout.widget.PercentFrameLayout
    xmlns:android="http://schemas.android.com/apk/res/android"
    android:layout_width="match_parent"
    android:layout_height="match_parent"
    xmlns:app="http://schemas.android.com/apk/res-auto">
    <Button
        android:id="@+id/button1"
        android:layout_gravity="left|top"
        android:text="button1"
        android:textAllCaps="false"
        android:layout_height="wrap_content"
        android:layout_width="wrap_content"
        app:layout_heightPercent="50%"
        app:layout_widthPercent="50%"/>
    <Button
        android:id="@+id/button2"
        android:layout_gravity="right|top"
        android:text="button2"
        android:textAllCaps="false"
        android:layout_height="wrap_content"
        android:layout_width="wrap_content"
        app:layout_heightPercent="50%"
        app:layout_widthPercent="50%" />
    <Button
        android:id="@+id/button3"
        android:layout_gravity="left|bottom"
        android:text="button3"
        android:textAllCaps="false"
        android:layout_height="wrap_content"
        android:layout_width="wrap_content"
        app:layout_heightPercent="50%"
        app:layout_widthPercent="50%" />
    <Button
        android:id="@+id/button4"
        android:text="button4"
        android:layout_gravity="right|bottom"
        android:layout_height="wrap_content"
        android:layout_width="wrap_content"
        app:layout_widthPercent="50%"
        app:layout_heightPercent="50%"
        />
</androidx.percentlayout.widget.PercentFrameLayout>
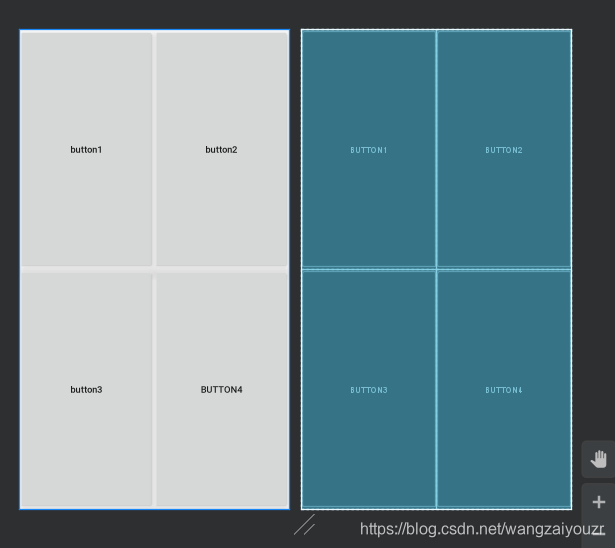
注意layout_gravity,layout_heightPercent的作用。
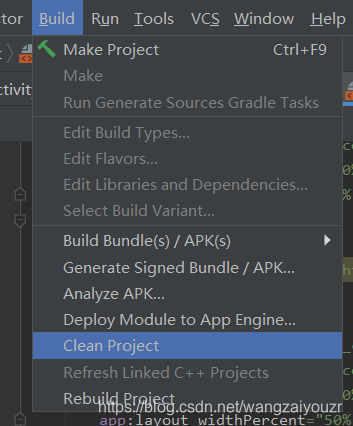
【若在添加依赖时仍报错不能成功,可尝试以下方法,一条一条试一遍,别问我怎么知道的呜呜呜呜。。。】
- 检查是不是网不好!!!
网络的解决方法可参考这个博文:
https://blog.csdn.net/liosen/article/details/81211982
- clean Project或者清缓存
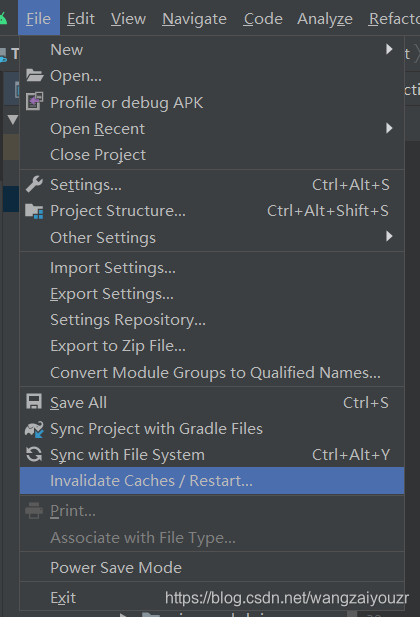
- 本质解决参考:
androidx 和 android support库不能共存:
https://www.jianshu.com/p/4b723bb0a542?utm_campaign=maleskine&utm_content=note&utm_medium=seo_notes&utm_source=recommendation
android androidX迁移库:
https://www.cnblogs.com/loaderman/p/12108359.html
表格布局TableLayout
表格布局是线性布局的子类
TableRow设置行,列数由TableRow中的子控件决定(直接在TableLayout中添加子控件会占据整个一行)
TableLayout常用属性:
参考链接:https://blog.csdn.net/wenzhi20102321/article/details/52677595
- android:shrinkColumns:设置可收缩的列,内容过多就收缩显示到第二行
- android:stretchColumns:设置可伸展的列,将空白区域填充满整个列
- android:collapseColumns:设置要隐藏的列
列的索引从0开始,shrinkColumns和stretchColumns可以同时设置。
子控件常用属性:
- android:layout_column:第几列
- android:layout_span:占据列数
示例:
<?xml version="1.0" encoding="utf-8"?>
<TableLayout
    xmlns:android="http://schemas.android.com/apk/res/android"
    android:layout_width="match_parent"
    android:layout_height="match_parent">
    <TableRow
        android:layout_width="match_parent"
        android:layout_height="match_parent"
        android:id="@+id/tableRow1"
        >
        <Button
            android:id="@+id/button1"
            android:layout_width="wrap_content"
            android:layout_height="wrap_content"
            android:text="Button1"
            android:layout_column="0"/>
        <Button
            android:id="@+id/button2"
            android:layout_width="wrap_content"
            android:layout_height="wrap_content"
            android:text="Button2"
            android:layout_column="1"/>
    </TableRow>
    <TableRow
        android:layout_width="match_parent"
        android:layout_height="match_parent"
        android:id="@+id/tableRow2">
        <Button
            android:id="@+id/button3"
            android:layout_width="wrap_content"
            android:layout_height="wrap_content"
            android:text="Button3"
            android:layout_column="1"
            />
        <Button
            android:id="@+id/button4"
            android:layout_width="wrap_content"
            android:layout_height="wrap_content"
            android:text="Button4"
            android:layout_column="2"/>
    </TableRow>
    <TableRow
        android:layout_width="match_parent"
        android:layout_height="match_parent"
        android:id="@+id/tableRow3">
        <Button
            android:id="@+id/button5"
            android:layout_width="wrap_content"
            android:layout_height="wrap_content"
            android:text="Button5"
            android:layout_column="2"/>
    </TableRow>
</TableLayout>

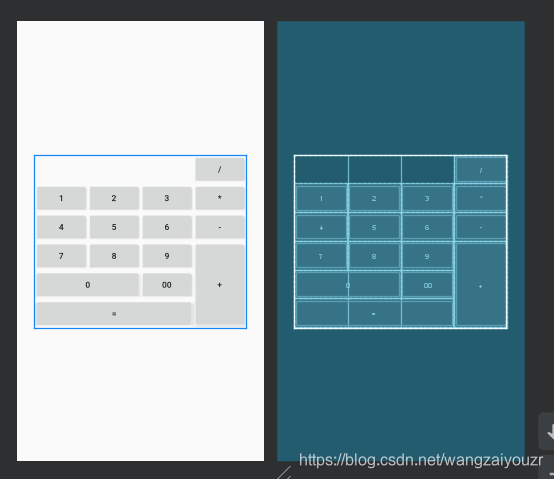
网格布局GridLayout
网格布局与表格布局大同小异
不同的是可以设置容器中组件的对齐方式
容器中的组件可以跨多行也可以跨多列,而TableLayout是直接占一行
排列方式android:orientation ,竖直vertical或者水平horizontal
对齐方式 android:layout_gravity,center,left,right,buttom
设置组件位于几行几列(从0排):
- 组件行数: android:layout_row = “0”
- 组件列数: android:layout_column = “2”
设置组件横跨几行几列:
- 纵向横跨行: android:layout_rowSpan = “2”
- 横向横跨列: android:layout_columnSpan = “3”
示例:
<?xml version="1.0" encoding="utf-8"?>
<GridLayout
    xmlns:android="http://schemas.android.com/apk/res/android"
    android:layout_gravity="center"
    android:layout_width="wrap_content"
    android:layout_height="wrap_content"
    android:columnCount="4"
    android:orientation="horizontal">
    <Button
        android:layout_column="3"
        android:text="/" />
    <Button
        android:text="1" />
    <Button
        android:text="2" />
    <Button
        android:text="3" />
    <Button
        android:text="*" />
    <Button
        android:text="4" />
    <Button
        android:text="5" />
    <Button
        android:text="6" />
    <Button
        android:text="-" />
    <Button
        android:text="7" />
    <Button
        android:text="8" />
    <Button
        android:text="9" />
    <Button
        android:text="+"
        android:layout_gravity="fill"
        android:layout_rowSpan="3"
        />
    <Button
        android:text="0"
        android:layout_gravity="fill"
        android:layout_columnSpan="2"
        />
    <Button
        android:text="00" />
    <Button
        android:text="="
        android:layout_gravity="fill"
        android:layout_columnSpan="3"/>

</GridLayout>
绝对布局AbsoluteLayout
绝对布局在开发过程中绝对不推荐使用
绝对布局也叫坐标布局,指定控件的绝对位置。
子视图通过属性android:layout_x和android:layout_y 来确定当前视图在屏幕上的位置,x,y就是坐标点 x轴的值和y轴的值
直观性强,但是手机屏幕尺寸差别较大,适应性差
(但其他博主有说过,在其他的开发领域,绝对布局还是有点用的,比如机顶盒开发中的界面设计emm)
约束布局ConstraintLayout
新增功能,其与其他七个的区别在于界面编写方式
- 传统:编写xml代码
- 新型:可视化方式(约束布局即是)
详见郭霖大佬讲解:
https://guolin.blog.csdn.net/article/details/53122387