一级缓存实验
接下来通过实验,了解 MyBatis 一级缓存的效果,每个单元测试后都请恢复被修改的数据。
首先是创建示例表 student,创建对应的 POJO 类和增改的方法,具体可以在 entity 包和 mapper 包中查看。
CREATE TABLE `student` (`id` int(11) unsigned NOT NULL AUTO_INCREMENT,`name` varchar(200) COLLATE utf8_bin DEFAULT NULL,`age` tinyint(3) unsigned DEFAULT NULL,PRIMARY KEY (`id`)) ENGINE=InnoDB AUTO_INCREMENT=4 DEFAULT CHARSET=utf8 COLLATE=utf8_bin;
在以下实验中,id 为 1 的学生名称是凯伦。
实验 1
开启一级缓存,范围为会话级别,调用三次getStudentById,代码如下所示:
public void getStudentById() throws Exception {SqlSession sqlSession = factory.openSession(true); // 自动提交事务StudentMapper studentMapper = sqlSession.getMapper(StudentMapper.class);System.out.println(studentMapper.getStudentById(1));System.out.println(studentMapper.getStudentById(1));System.out.println(studentMapper.getStudentById(1));}
执行结果:


我们可以看到,只有第一次真正查询了数据库,后续的查询使用了一级缓存。
实验 2
增加了对数据库的修改操作,验证在一次数据库会话中,如果对数据库发生了修改操作,一级缓存是否会失效。
@Testpublic void addStudent() throws Exception {SqlSession sqlSession = factory.openSession(true); // 自动提交事务StudentMapper studentMapper = sqlSession.getMapper(StudentMapper.class);System.out.println(studentMapper.getStudentById(1));System.out.println("增加了" + studentMapper.addStudent(buildStudent()) + "个学生");System.out.println(studentMapper.getStudentById(1));sqlSession.close();}
执行结果:

我们可以看到,在修改操作后执行的相同查询,查询了数据库,一级缓存失效。
实验 3
开启两个SqlSession,在sqlSession1中查询数据,使一级缓存生效,在sqlSession2中更新数据库,验证一级缓存只在数据库会话内部共享。
@Testpublic void testLocalCacheScope() throws Exception {SqlSession sqlSession1 = factory.openSession(true);SqlSession sqlSession2 = factory.openSession(true);StudentMapper studentMapper = sqlSession1.getMapper(StudentMapper.class);StudentMapper studentMapper2 = sqlSession2.getMapper(StudentMapper.class);System.out.println("studentMapper读取数据: " + studentMapper.getStudentById(1));System.out.println("studentMapper读取数据: " + studentMapper.getStudentById(1));System.out.println("studentMapper2更新了" + studentMapper2.updateStudentName("小岑",1) + "个学生的数据");System.out.println("studentMapper读取数据: " + studentMapper.getStudentById(1));System.out.println("studentMapper2读取数据: " + studentMapper2.getStudentById(1));}
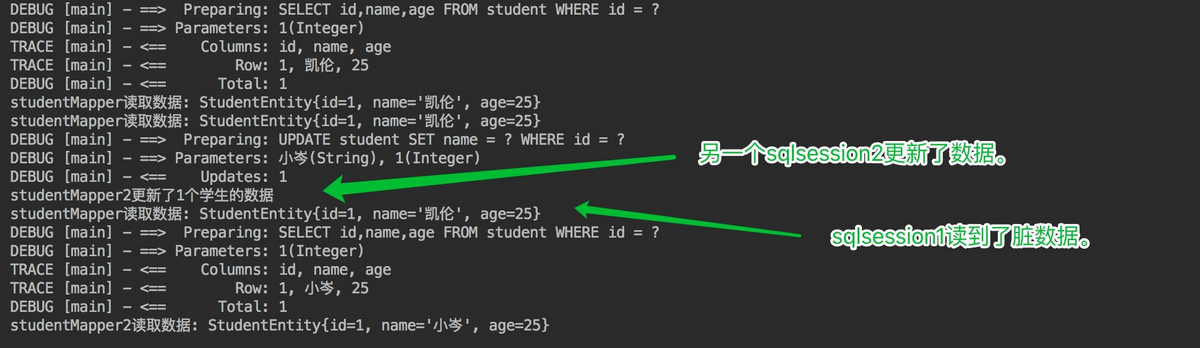
sqlSession2更新了 id 为 1 的学生的姓名,从凯伦改为了小岑,但 session1 之后的查询中,id 为 1 的学生的名字还是凯伦,出现了脏数据,也证明了之前的设想,一级缓存只在数据库会话内部共享。
一级缓存工作流程 &源码分析
那么,一级缓存的工作流程是怎样的呢?我们从源码层面来学习一下。
工作流程
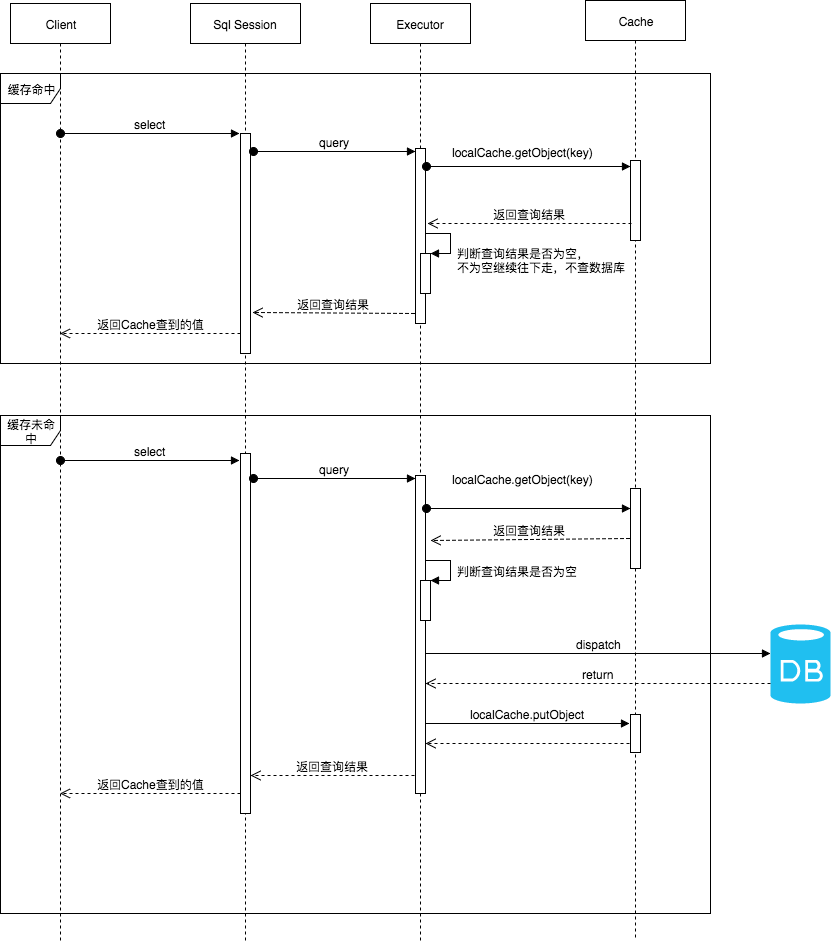
一级缓存执行的时序图,如下图所示。
源码分析
接下来将对 MyBatis 查询相关的核心类和一级缓存的源码进行走读。这对后面学习二级缓存也有帮助。
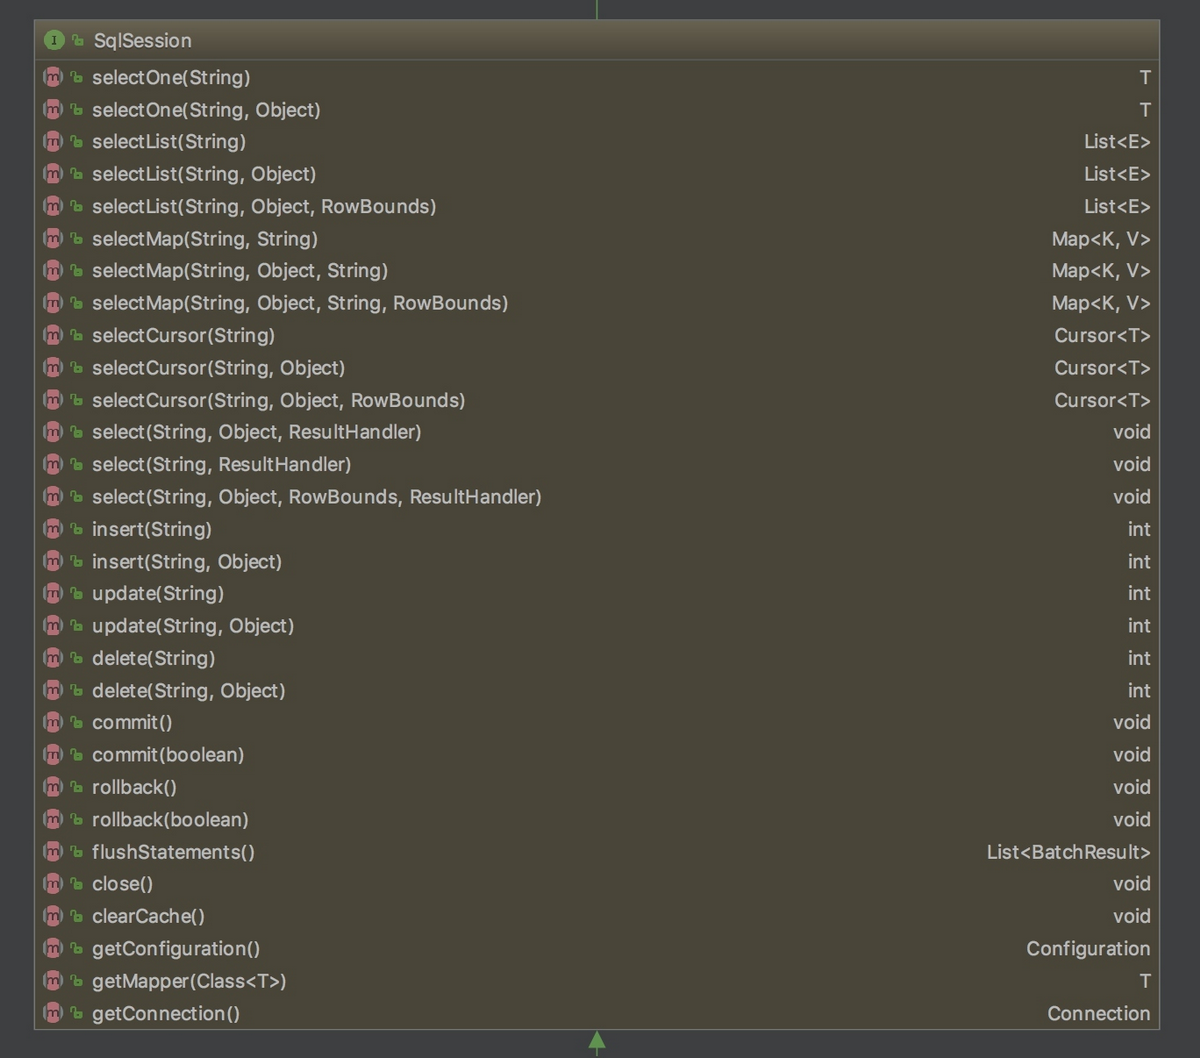
SqlSession: 对外提供了用户和数据库之间交互需要的所有方法,隐藏了底层的细节。默认实现类是DefaultSqlSession。
Executor: SqlSession向用户提供操作数据库的方法,但和数据库操作有关的职责都会委托给 Executor。
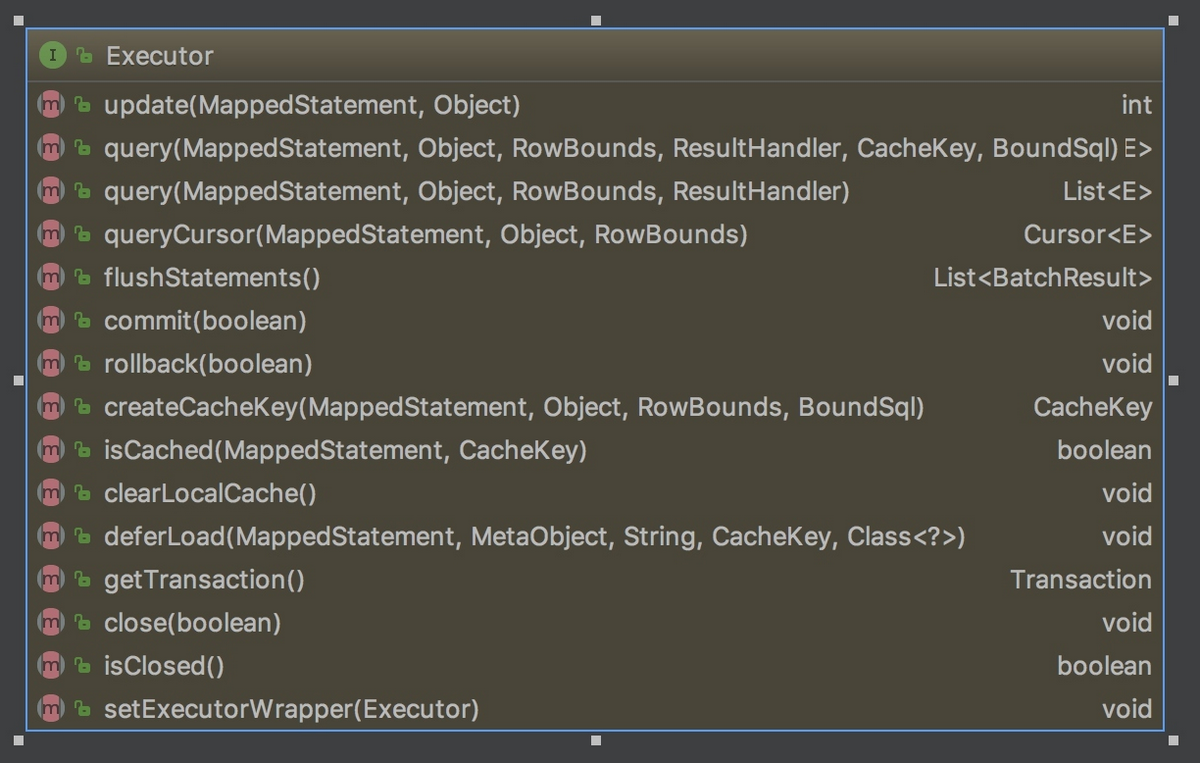
如下图所示,Executor 有若干个实现类,为 Executor 赋予了不同的能力,大家可以根据类名,自行学习每个类的基本作用。
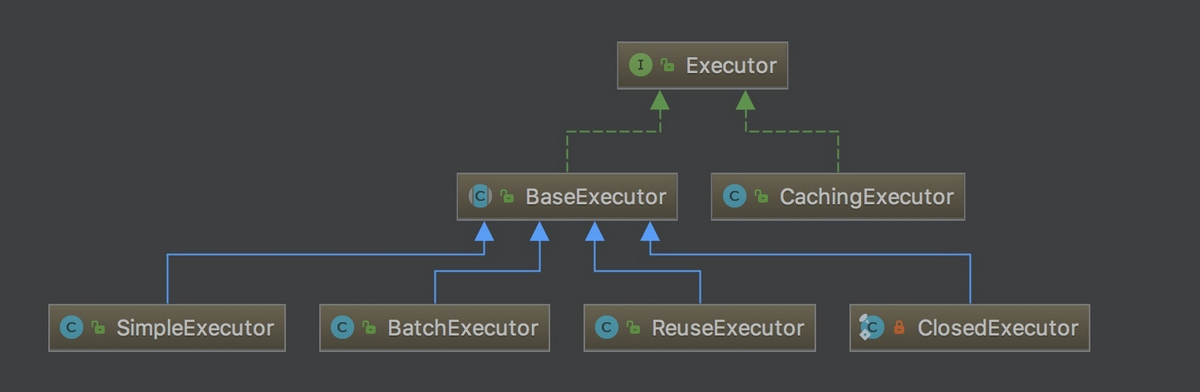
在一级缓存的源码分析中,主要学习BaseExecutor的内部实现。
BaseExecutor: BaseExecutor是一个实现了 Executor 接口的抽象类,定义若干抽象方法,在执行的时候,把具体的操作委托给子类进行执行。
protected abstract int doUpdate(MappedStatement ms, Object parameter) throws SQLException;protected abstract List<BatchResult> doFlushStatements(boolean isRollback) throws SQLException;protected abstract <E> List<E> doQuery(MappedStatement ms, Object parameter, RowBounds rowBounds, ResultHandler resultHandler, BoundSql boundSql) throws SQLException;protected abstract <E> Cursor<E> doQueryCursor(MappedStatement ms, Object parameter, RowBounds rowBounds, BoundSql boundSql) throws SQLException;
在一级缓存的介绍中提到对Local Cache的查询和写入是在Executor内部完成的。在阅读BaseExecutor的代码后发现Local Cache是BaseExecutor内部的一个成员变量,如下代码所示。
public abstract class BaseExecutor implements Executor {protected ConcurrentLinkedQueue<DeferredLoad> deferredLoads;protected PerpetualCache localCache;
Cache: MyBatis 中的 Cache 接口,提供了和缓存相关的最基本的操作,如下图所示:

有若干个实现类,使用装饰器模式互相组装,提供丰富的操控缓存的能力,部分实现类如下图所示:

BaseExecutor成员变量之一的PerpetualCache,是对 Cache 接口最基本的实现,其实现非常简单,内部持有 HashMap,对一级缓存的操作实则是对 HashMap 的操作。如下代码所示:
public class PerpetualCache implements Cache {private String id;private Map<Object, Object> cache = new HashMap<Object, Object>();
在阅读相关核心类代码后,从源代码层面对一级缓存工作中涉及到的相关代码,出于篇幅的考虑,对源码做适当删减,读者朋友可以结合本文,后续进行更详细的学习。
为执行和数据库的交互,首先需要初始化SqlSession,通过DefaultSqlSessionFactory开启SqlSession:
private SqlSession openSessionFromDataSource(ExecutorType execType, TransactionIsolationLevel level, boolean autoCommit) {............final Executor executor = configuration.newExecutor(tx, execType);return new DefaultSqlSession(configuration, executor, autoCommit);}
在初始化SqlSesion时,会使用Configuration类创建一个全新的Executor,作为DefaultSqlSession构造函数的参数,创建 Executor 代码如下所示:
public Executor newExecutor(Transaction transaction, ExecutorType executorType) {executorType = executorType == null ? defaultExecutorType : executorType;executorType = executorType == null ? ExecutorType.SIMPLE : executorType;Executor executor;if (ExecutorType.BATCH == executorType) {executor = new BatchExecutor(this, transaction);} else if (ExecutorType.REUSE == executorType) {executor = new ReuseExecutor(this, transaction);} else {executor = new SimpleExecutor(this, transaction);}// 尤其可以注意这里,如果二级缓存开关开启的话,是使用CahingExecutor装饰BaseExecutor的子类if (cacheEnabled) {executor = new CachingExecutor(executor);}executor = (Executor) interceptorChain.pluginAll(executor);return executor;}
SqlSession创建完毕后,根据 Statment 的不同类型,会进入SqlSession的不同方法中,如果是Select语句的话,最后会执行到SqlSession的selectList,代码如下所示:
@Overridepublic <E> List<E> selectList(String statement, Object parameter, RowBounds rowBounds) {MappedStatement ms = configuration.getMappedStatement(statement);return executor.query(ms, wrapCollection(parameter), rowBounds, Executor.NO_RESULT_HANDLER);}
SqlSession把具体的查询职责委托给了 Executor。如果只开启了一级缓存的话,首先会进入BaseExecutor的query方法。代码如下所示:
@Overridepublic <E> List<E> query(MappedStatement ms, Object parameter, RowBounds rowBounds, ResultHandler resultHandler) throws SQLException {BoundSql boundSql = ms.getBoundSql(parameter);CacheKey key = createCacheKey(ms, parameter, rowBounds, boundSql);return query(ms, parameter, rowBounds, resultHandler, key, boundSql);}