DI:依赖注入,一个BookService类的功能需要依赖另外一个BookDao类配合,同时需要赋上一 个具体的对象,则成这种关系是依赖注入; IOC:控制反转,以前依赖的对象自己直接new,现在不需要new,框架会自动注入对象,创建对 象的权利转移给了框架; spring框架负责所有对象的创建、管理和依赖注入;所有的对象存储的容器叫做IOC容器;
1.创建项目,导入spring的jar包

2.按照如下目录结构创建接口及其实现类,做好准备工作

2.1dao层

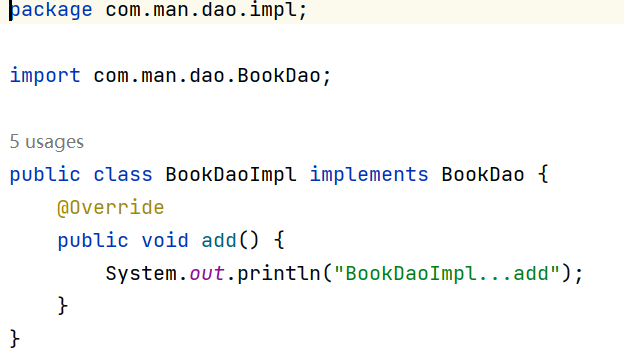
BookDao:

BookDaoImpl:
2.2Services层
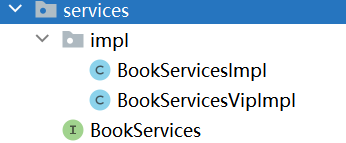
BookServices:
package com.man.services;

public interface BookServices {

    void seav();
}
BookServicesImpl:
package com.man.services.impl;

import com.man.dao.BookDao;
import com.man.dao.impl.BookDaoImpl;
import com.man.services.BookServices;

public class BookServicesImpl implements BookServices {
    BookDao bookDao1 = new BookDaoImpl();
    private BookDao bookDao;
    private String name;

    public void setBookDao(BookDao bookDao) {
        this.bookDao = bookDao;
    }

    public void setName(String name) {
        this.name = name;
    }
    @Override
    public void seav() {
        System.out.println("BookServicesImpl...seav");
        bookDao1.add();
    }
}
BookServicesVipImpl:
package com.man.services.impl;

import com.man.dao.BookDao;
import com.man.dao.impl.BookDaoImpl;
import com.man.services.BookServices;

public class BookServicesVipImpl implements BookServices {
    BookDao bookDao = new BookDaoImpl();
    @Override
    public void seav() {
        System.out.println("BookServicesVipImpl...seav");
        bookDao.add();
    }
}
2.3Servlet层

BookServlet:
package com.man.servlet;

import com.man.services.BookServices;
import org.junit.Test;

public class BookServlet {
    BookServices bookService;
    @Test
    public void add() {
        System.out.println("BookServlet...add");
        bookService.seav();
    }
}
2.4Test测试类
package com.man.test;

import com.man.services.BookServices;
import org.junit.Test;
import org.springframework.context.support.ClassPathXmlApplicationContext;

public class Test01 {

    BookServices bookServices;

    @Test
    public void testso(){
        //对象的框架由spring框架创建,此处只需要直接问IOC容器要
        //1.通过加载获得IOC容器
        ClassPathXmlApplicationContext context = new ClassPathXmlApplicationContext("AppLicationContext.xml");
        bookServices = (BookServices) context.getBean("bookServices");
        System.out.println("testso...");
        bookServices.seav();
    }

}
注意: 此时项目没办法执行,因为没有做依赖对象的注入。
3.使用spring完成IOC的配置和DI依赖注入
3.1创建spring的核心配置文件
<?xml version="1.0" encoding="UTF-8"?>
<beans xmlns="http://www.springframework.org/schema/beans"
       xmlns:xsi="http://www.w3.org/2001/XMLSchema-instance"
       xsi:schemaLocation="http://www.springframework.org/schema/beans
       http://www.springframework.org/schema/beans/spring-beans.xsd">
    <!-- 告诉spring框架,创建营理哪些对象
        id:给创建出来的对象起个名字
        class:要创建对家对应类的全类名-->
<!--    <bean id="bookServices" class="com.man.services.impl.BookServicesImpl"/>-->
    <!--把所有对象创建到spring的IOC容器中,并起上名字
        id:表示给对象起名字
        class:类的全类名-->
    <bean id="bookDao" class="com.man.dao.impl.BookDaoImpl"></bean>
    <bean id="bookServices" class="com.man.services.impl.BookServicesImpl">
        <!--spring的依赖注入:property表示BookServiceImpl的属性,常规属性使用value赋值,
        类型属性使用ref引用-->
        <property name="name" value="张三"/>
        <property name="bookDao" ref="bookDao"/>
    </bean>

</beans>
官方推荐用AppLicationContext.xml 做文件的名字
bean标签表示把对应class的对象创建到IOC容器中,如果当前对象有依赖的其他对象,那么可以 通过property对依赖的对象使用ref引用容器中已经注册过的对象。
注意:BookServiceImpl需要给bookDao属性设置setter方法,框架才能自动注入

代码执行顺序:
1.首先获取IOC的容器; 2.从容器中获取bookService对象; 3.执行方法:servlet执行---service执行,由于spring完成了依赖注入------dao层执行
3.2在Test01中测试代码是否运行
package com.man.test;

import com.man.services.BookServices;
import org.junit.Test;
import org.springframework.context.support.ClassPathXmlApplicationContext;

public class Test01 {

    BookServices bookServices;

    @Test
    public void testso(){
        //对象的框架由spring框架创建,此处只需要直接问IOC容器要
        //1.通过加载获得IOC容器
        ClassPathXmlApplicationContext context = new ClassPathXmlApplicationContext("AppLicationContext.xml");
        bookServices = (BookServices) context.getBean("bookServices");
        System.out.println("testso...");
        bookServices.seav();
    }

}
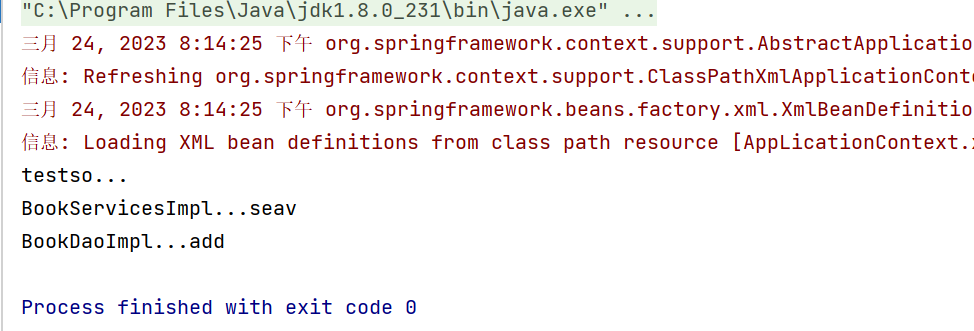
运行获得如下结果: