利用opencv图像处理库制作【图像-关键点json标签】的数据集生成器
背景:关于读取json文件的方法
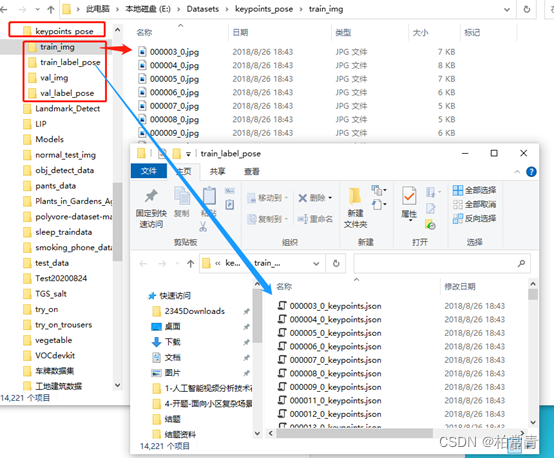
1. 数据
数据目录:
– /keypoints_pose/
- –/train_img/
- –/train_label_pose/
- –/val_img/
- –/val_label_pose/
如图所示:
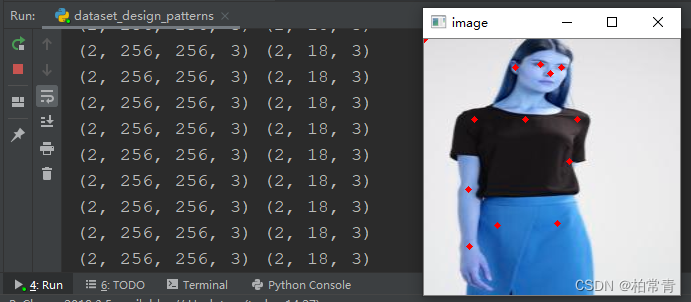
2. 数据集结果展示:(图像,坐标)
3. 代码实现
dataset_json_by_cv2.py
# !/usr/bin/env python
# -*- coding: utf-8 -*-
# @Time    : 2022/5/24 15:32
# @Author  : Hyan Tan
# @File    : dataset_json_by_cv2.py.py
import os
from abc import abstractmethod, ABCMeta
import numpy as np
import pandas as pd
import json

import cv2
from torch.utils.data import Dataset, DataLoader

from torchvision import transforms
from transformation import RandomAdd, ImageResize, RandomCrop, RandomFlip, RandomRotate, Distort


# ---人像-人体关键点数据集生成器---
class KeyPointsPose(Dataset):
    def __init__(self, root_dir=r'E:/Datasets/keypoints_pose/', image_set='train', transforms=None):
        """
        初始化数据集
        :param root_dir: 数据目录(.csv和images的根目录)
        :param image_set: train训练,val验证,test测试
        :param transforms(callable,optional):图像变换-可选
        标签数据文件格式为json_file: 标签json文件(内容:图像相对地址-category类型-标签coordination坐标)
        """
        super(KeyPointsPose, self).__init__()
        self._imgset = image_set
        self._image_paths = []
        self._labels = []
        self._root_dir = root_dir
        self._transform = transforms

        self.__getFileList()  # 图地址列表和标签列表

    def __getFileList(self):
        img_path = os.path.join(self._root_dir, self._imgset + '_img')  # 图像目录
        label_path = os.path.join(self._root_dir, self._imgset + '_label_pose')  # 标签目录
        self._image_paths = os.listdir(img_path)
        for img_ in self._image_paths:
            pose_name = img_.replace('.png', '_keypoints.json').replace('.jpg', '_keypoints.json')  # 标签名和图像对应,后缀不同。
            with open(os.path.join(label_path, pose_name), 'r') as f:
                pose_label = json.load(f)
                try:
                    pose_data = pose_label['people'][0]['pose_keypoints']
                except IndexError:
                    pose_data = [0 for i in range(54)]  # 数据读取失败时,创建18组0,0,0
                pose_data = np.array(pose_data)
                pose_data = pose_data.reshape((-1, 3))
                self._labels.append(pose_data)

    def __getitem__(self, idx):
        label = self._labels[idx]
        image = cv2.imread(os.path.join(self._root_dir + self._imgset + '_img', self._image_paths[idx]),
                           cv2.IMREAD_COLOR)
        imgSize = image.shape  # cv2读取的是图像数组类型  BGR  H W C
        if self._transform:
            image = self._transform(image)
            afterSize = image.shape
            # bi = np.array(afterSize[0:2]) / np.array(imgSize[0:2])
            # 坐标(x,y)代表的是w,h。图像是h,w,c的格式,所以此处反着来
            bi = np.array((afterSize[1], afterSize[0])) / np.array((imgSize[1], imgSize[0]))
            label[:, 0:2] = label[:, 0:2] * bi  # 图像伸缩变换,坐标同步伸缩
        image = image.astype(np.float32)
        return image, label

    def __len__(self):
        return len(self._image_paths)


def showImageAndCoor(img, coords):
    point_size = 1
    point_color = (0, 0, 255)  # BGR
    thickness = 4  # 0 、4、8
    img = cv2.cvtColor(img.astype(np.uint8), cv2.COLOR_BGR2RGB)  # numpy数组和cv2的mat的转换
    cv2.namedWindow("image")
    for coor in coords:
        if coor[2] == -1:  # 略去不存在的点
            pass
        else:
            cv2.circle(img, (int(coor[0]), int(coor[1])), point_size, point_color, thickness)  # 展示图像是正常的
    cv2.imwrite('1.png', img, [int(cv2.IMWRITE_JPEG_QUALITY), 95])
    cv2.imshow("image", img)
    cv2.waitKey(1500)


train_transform = transforms.Compose([
    ImageResize(size=256),
])
val_transform = train_transform
test_transform = transforms.Compose([
    ImageResize(size=288),
    RandomCrop(in_size=288, out_size=256),  # 随机裁剪,测试可用,验证也不可用
    RandomFlip(),  # 随机翻转
    RandomRotate(),  # 随机旋转
    Distort()  # 歪曲
])

if __name__ == "__main__":
    kpp = KeyPointsPose(root_dir=r"E:/Datasets/keypoints_pose/", image_set='train', transforms=train_transform)
    train_loader = DataLoader(kpp, batch_size=4, shuffle=False, drop_last=True)
    # content = Content(root_dir=r"E:/Datasets/keypoints_pose/", image_set='train', strategy='json', outsize=256)
    # train_loader = content.get_dataLoader()
    for i_batch, data in enumerate(train_loader):
        img, label = data
        img, label = img.numpy(), label.numpy()
        print(img.shape, label.shape)
        showImageAndCoor(img[0], label[0])
tranformation.py:
# -*- coding: utf-8 -*-
# @Time    : 2022/5/16 11:38
# @Author  : Hyan Tan
# @File    : transformation.py
import cv2
import random
import os


class RandomAdd:
    def __init__(self, add_path=""):
        self.imgs = []
        for files in os.walk(add_path):
            for file_name in files[2]:
                self.imgs.append(cv2.imread(os.path.join(add_path, file_name)))

    def __call__(self, image):
        if random.random() < 0.2:
            idx = random.randrange(len(self.imgs))
            select_img = self.imgs[idx]
            h, w, _ = select_img.shape
            if h < image.shape[0] // 2 and w < image.shape[1] // 2:
                begin_x = random.randrange(image.shape[1] - w)
                begin_y = random.randrange(image.shape[0] - h)
                image[begin_y:begin_y + h, begin_x:begin_x + w, :] = select_img
        return image


class ImageResize:
    def __init__(self, size=256):
        self._size = size

    def __call__(self, image):
        image = cv2.resize(image, (self._size, self._size))
        return image


class RandomCrop:
    def __init__(self, in_size=256, out_size=224):
        self._in_size = in_size
        self._out_size = out_size

    def __call__(self, image):
        dis = self._in_size - self._out_size
        col_start = random.randint(0, dis)
        row_start = random.randint(0, dis)

        image = image[row_start:(row_start + self._out_size), col_start:(col_start + self._out_size)]
        return image


class RandomFlip:
    def __call__(self, image):
        if random.random() < 0.5:
            image = image[:, ::-1, :]
        return image


class RandomRotate:
    def rotateImg(self, image, angle):
        rows, cols, _ = image.shape
        M = cv2.getRotationMatrix2D(((cols - 1) / 2.0, (rows - 1) / 2.0), angle, 1)
        image = cv2.warpAffine(image, M, (cols, rows))
        return image

    def __call__(self, image):
        if random.randrange(2):
            if random.randrange(2):
                image = self.rotateImg(image, 5)
            else:
                image = self.rotateImg(image, -5)
        return image


class Distort:
    def _convert(self, image, alpha=1, beta=0):
        tmp = image.astype(float) * alpha + beta
        tmp[tmp < 0] = 0
        tmp[tmp > 255] = 255
        image[:] = tmp

    def __call__(self, image):
        if random.randrange(2):

            # brightness distortion
            if random.randrange(2):
                self._convert(image, beta=random.uniform(-32, 32))

            # contrast distortion
            if random.randrange(2):
                self._convert(image, alpha=random.uniform(0.5, 1.5))

            image = cv2.cvtColor(image, cv2.COLOR_BGR2HSV)

            # saturation distortion
            if random.randrange(2):
                self._convert(image[:, :, 1], alpha=random.uniform(0.5, 1.5))

            # hue distortion
            if random.randrange(2):
                tmp = image[:, :, 0].astype(int) + random.randint(-18, 18)
                tmp %= 180
                image[:, :, 0] = tmp

            image = cv2.cvtColor(image, cv2.COLOR_HSV2BGR)

        else:

            # brightness distortion
            if random.randrange(2):
                self._convert(image, beta=random.uniform(-32, 32))

            image = cv2.cvtColor(image, cv2.COLOR_BGR2HSV)

            # saturation distortion
            if random.randrange(2):
                self._convert(image[:, :, 1], alpha=random.uniform(0.5, 1.5))

            # hue distortion
            if random.randrange(2):
                tmp = image[:, :, 0].astype(int) + random.randint(-18, 18)
                tmp %= 180
                image[:, :, 0] = tmp

            image = cv2.cvtColor(image, cv2.COLOR_HSV2BGR)

            # contrast distortion
            if random.randrange(2):
                self._convert(image, alpha=random.uniform(0.5, 1.5))

        return image
4.注意事项:
- cv2读图的数据结构为(h,w,c)=(高,宽,通道),坐标组是(宽x, 高y)。统一伸缩时注意对应。
- 本文输出数据集为了显示并没有对图像数组进行归一化或标准化操作,用的时候需要加上归一化。
- 本文数据集为:图像-人体关键点json标签,读取csv文件用
pandas.read_csv,读取json文件直接用open和json.load(f)方法。