一) 项目中使用SceneDelegate
1)使用Main.StoryBoard(Default)
无需特殊处理,Xcode 11及其以上版本,默认生成使用'Main.StoryBoard'模板
2)不使用Main.StoryBoard
2.1)在info.plist文件中找到Storyboard Name键值对,将其移除
Storyboard Name
2.2)在Base.lproj文件夹中找到Main.storyboard,将其移除
Main
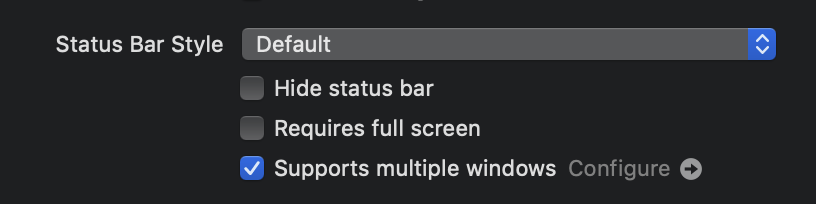
2.3)在侧边栏TARGETS下,选中General选项卡,找到Deployment Info项,在Status Bar Style选项中,勾选Supports multiple windows选项
Status Bar Style
2.4)找到AppDelegate.h文件,新增window属性
@property (strong, nonatomic) UIWindow *window;
2.5)打开SceneDelegate.m文件,在willConnectToSession代理方法中,创建window窗口,初始化rootViewController
- (void)scene:(UIScene *)scene willConnectToSession:(UISceneSession *)session options:(UISceneConnectionOptions *)connectionOptions {
    UIWindowScene *windowScene = (UIWindowScene *)scene;
    self.window = [[UIWindow alloc] initWithWindowScene:windowScene];
    self.window.frame = windowScene.coordinateSpace.bounds;
    self.window.rootViewController = ViewController.new;
    [self.window makeKeyAndVisible];
}
二) 项目中不使用SceneDelegate
1)使用Main.StoryBoard
1.1)在info.plist文件中找到Application Scene Manifest键值对,将其移除
Application Scene Manifest
1.2)打开AppDelegate.m文件,找到UISceneSession lifecycle代理方法,将其全部移除,
即configurationForConnectingSceneSession 和didDiscardSceneSessions两个方法
#pragma mark - UISceneSession lifecycle
- (UISceneConfiguration *)application:(UIApplication *)application configurationForConnectingSceneSession:(UISceneSession *)connectingSceneSession options:(UISceneConnectionOptions *)options {
    // Called when a new scene session is being created.
    // Use this method to select a configuration to create the new scene with.
    return [[UISceneConfiguration alloc] initWithName:@"Default Configuration" sessionRole:connectingSceneSession.role];
}

- (void)application:(UIApplication *)application didDiscardSceneSessions:(NSSet<UISceneSession *> *)sceneSessions {
    // Called when the user discards a scene session.
    // If any sessions were discarded while the application was not running, this will be called shortly after application:didFinishLaunchingWithOptions.
    // Use this method to release any resources that were specific to the discarded scenes, as they will not return.
}
2)不使用Main.StoryBoard
2.1)在 info.plist 文件中找到 Application Scene Manifest 键值对,将其移除
Application Scene Manifest
2.2)在 info.plist 文件中找到 Main storyboard file base name 键值对,将其移除
Main storyboard file base name
2.3)在Base.lproj文件夹中找到Main.storyboard,将其移除
Main
2.4)找到AppDelegate.h文件,新增window属性
@property (strong, nonatomic) UIWindow *window;
2.5)打开AppDelegate.m文件,在didFinishLaunchingWithOptions代理方法中,创建window窗口,初始化rootViewController
- (BOOL)application:(UIApplication *)application didFinishLaunchingWithOptions:(NSDictionary *)launchOptions {
    // Override point for customization after application launch.
    self.window = [[UIWindow alloc] initWithFrame:[UIScreen mainScreen].bounds];
    self.window.backgroundColor = UIColor.whiteColor;
    self.window.rootViewController = UITabBarController.new;
    [self.window makeKeyAndVisible];
    return true;
}
三) 新增SceneDelegate以及分屏 详解
1.主要带来的变化--分屏
先打开一个APP,从底部往上轻滑出dock栏,然后拖动dock栏中的你想分栏的APP图标,放到右边或者左边即可。
五五分还是三七分,按住中间的线,左右拖动即可。
2.分屏目前能在哪些设备上实现
iPhone 暂时不支持分屏。。
3.项目开发需要注意
1.需要分屏。
如果你的项目同时还要兼容iOS13以下版本,可以删除info.plist中的Application Scene Manifest的配置数据。然后把window属性和以前一样的方式,放到AppDelegate中,删除UISceneSession的声明周期方法就OK。
2.不需要分屏。
如果不删除Application Scene Manifest这个配置,就需要做两套配置,来适配iOS 13和以下版本。
iOS 13 主要是在 SceneDelegate中;
iOS 13以下版本 主要是在AppDelegate中
3.需要分屏时,需要做如下两个配置
(1)General 中,勾选Supports multiple windows
(2)info.plist中,将Application Scene Manifest -> Enable Multiple Windows设置为YES