背景
我们公司的系统中有一个业务场景,需要第三方的账户数据同步到我们系统。
同步账号的同时,会将所有同步数据和是否成功记录到一张同步日志表中,方便排查问题和记录。
好了,话不多说,我们直接上代码。
目前的代码
下面是一段伪代码
@Data
@Build
public class Test() {


 private boolean success = true;
}


@Transaction
public void sync() {


 Test test = Test.builder().build();
 try{


  xxxxx
 }catch(Exception e) {


   log.error("xxxx",e)
   test.setSuccess(false);
   throw new ThirdAccountException("同步账号错误:" + e.getMessage());
 } finally {


   testMapper.insert(test);
 }

}
大家能看出来这段代码有什么问题吗?
直接实战演示
数据库新建 账户数据同步记录表
CREATE TABLE `account_log` (
  `id` bigint NOT NULL,
  `data` varchar(255)  DEFAULT NULL COMMENT '第三方数据',
  `success` tinyint(1) DEFAULT NULL COMMENT '是否成功0否1是',
  `error_msg` varchar(255) DEFAULT NULL COMMENT '错误信息',
  PRIMARY KEY (`id`)
) ENGINE=InnoDB DEFAULT CHARSET=utf8mb4 COLLATE=utf8mb4_unicode_ci;
第三方账户数据实体
package com.fandf.demo.transaction;

import cn.hutool.json.JSONUtil;
import io.swagger.annotations.ApiModel;
import lombok.AllArgsConstructor;
import lombok.Data;


@Data
@AllArgsConstructor(staticName = "of")
@ApiModel("第三方数据实体")
public class ThirdAccount {


    private String id;
    private String data;


    public AccountLog toAccountLog() {


        return AccountLog.builder().data(JSONUtil.toJsonStr(this)).build();
    }

}
本地账户同步记录实体
package com.fandf.demo.transaction;

import com.baomidou.mybatisplus.annotation.IdType;
import com.baomidou.mybatisplus.annotation.TableId;
import com.baomidou.mybatisplus.annotation.TableName;
import com.baomidou.mybatisplus.extension.activerecord.Model;
import io.swagger.annotations.ApiModelProperty;
import lombok.Builder;
import lombok.Data;
import lombok.EqualsAndHashCode;


@EqualsAndHashCode(callSuper = true)
@TableName("account_log")
@Data
@Builder
public class AccountLog extends Model<AccountLog> {


    private static final long serialVersionUID = 5648238459610595434L;

    @TableId(type = IdType.ASSIGN_ID)
    private Long id;

    @ApiModelProperty("第三方原始数据")
    private String data;

    @ApiModelProperty("是否成功: 0否1是")
    private boolean success = true;

    @ApiModelProperty("错误数据")
    private String errorMsg;

}
本地账户同步记录实体mapper
package com.fandf.demo.transaction;

import com.baomidou.mybatisplus.core.mapper.BaseMapper;
import org.springframework.stereotype.Repository;


@Repository
public interface AccountLogMapper extends BaseMapper<AccountLog> {


}
同步账户处理的逻辑
package com.fandf.demo.transaction;

import org.springframework.stereotype.Service;

import javax.annotation.Resource;


@Service
public class TestTransaction {


    @Resource
    AccountLogMapper accountLogMapper;

    @Transactional(rollbackFor = Exception.class)
    public void syncAccount(ThirdAccount account) {


        AccountLog accountLog = account.toAccountLog();
        try {


            //模拟id为2 则抛出异常
            if ("2".equals(account.getId())) {


                throw new Exception("模拟抛出异常");
            }
        } catch (Exception e) {


            accountLog.setSuccess(false);
            accountLog.setErrorMsg(e.getMessage());
            throw new IllegalArgumentException("同步第三方账号错误:" + e.getMessage());
        } finally {


            accountLogMapper.insert(accountLog);
        }
    }


}
单元测试
插入成功案例
package com.fandf.demo.transaction;

import org.junit.jupiter.api.Test;
import org.springframework.boot.test.context.SpringBootTest;

import javax.annotation.Resource;

import static org.junit.jupiter.api.Assertions.*;

@SpringBootTest
class TestTransactionTest {


    @Resource
    TestTransaction testTransaction;

    @Test
    void syncAccount() {


        testTransaction.syncAccount(ThirdAccount.of("1", "成功数据"));
    }
}
查看数据库
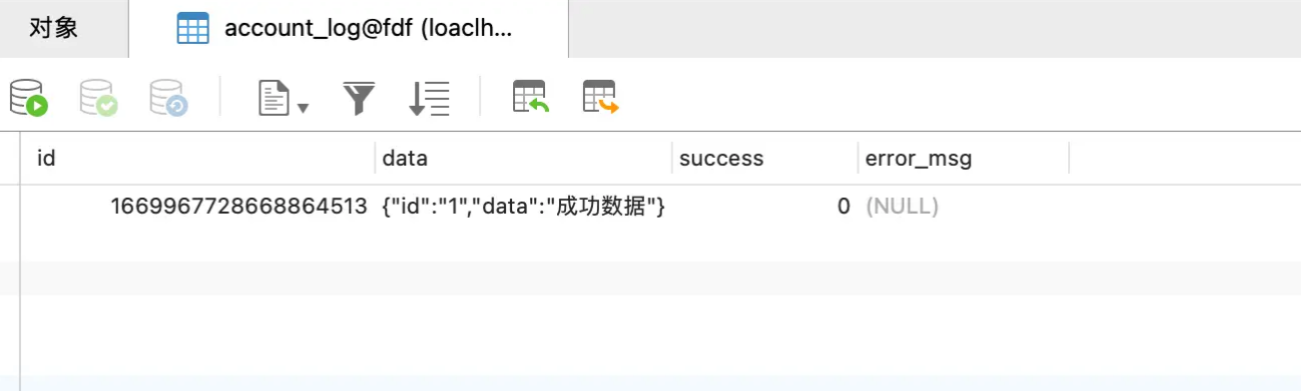
是插入了,但是成功的success应该为1啊,为什么插入了0。
AccountLog.java
@ApiModelProperty("是否成功: 0否1是")
    private boolean success = true;
第三方转为AccountLog实体的方法
 public AccountLog toAccountLog() {


        return AccountLog.builder().data(JSONUtil.toJsonStr(this)).build();
    }
我们来看看编译后的AccountLog.class源码中的AccountLogBuilder部分 success并未赋初始值
public static class AccountLogBuilder {


    private Long id;
    private String data;
    private boolean success;
    private String errorMsg;

    AccountLogBuilder() {


    }

    public AccountLogBuilder id(Long id) {


        this.id = id;
        return this;
    }

    public AccountLogBuilder data(String data) {


        this.data = data;
        return this;
    }

    public AccountLogBuilder success(boolean success) {


        this.success = success;
        return this;
    }

    public AccountLogBuilder errorMsg(String errorMsg) {


        this.errorMsg = errorMsg;
        return this;
    }

    public AccountLog build() {


        return new AccountLog(this.id, this.data, this.success, this.errorMsg);
    }

    public String toString() {


        return "AccountLog.AccountLogBuilder(id=" + this.id + ", data=" + this.data + ", success=" + this.success + ", errorMsg=" + this.errorMsg + ")";
    }
}
我们看到Builder()方法返回了
AccountLogBuilder() {


}
对象。
指定data
public AccountLogBuilder data(String data) {


    this.data = data;
    return this;
}
执行build()方法
public AccountLog build() {


    return new AccountLog(this.id, this.data, this.success, this.errorMsg);
}
success并未赋初始值,所以success=false, 存到数据库就是0了。
那么怎么解决呢?
- 字段加上注解@Builder.Default
@Builder.Default
private boolean success = true;
我们再来测试下
@Test
void syncAccount() {


    testTransaction.syncAccount(ThirdAccount.of("1", "加上@Builder.Default成功数据"));
}
查看数据库
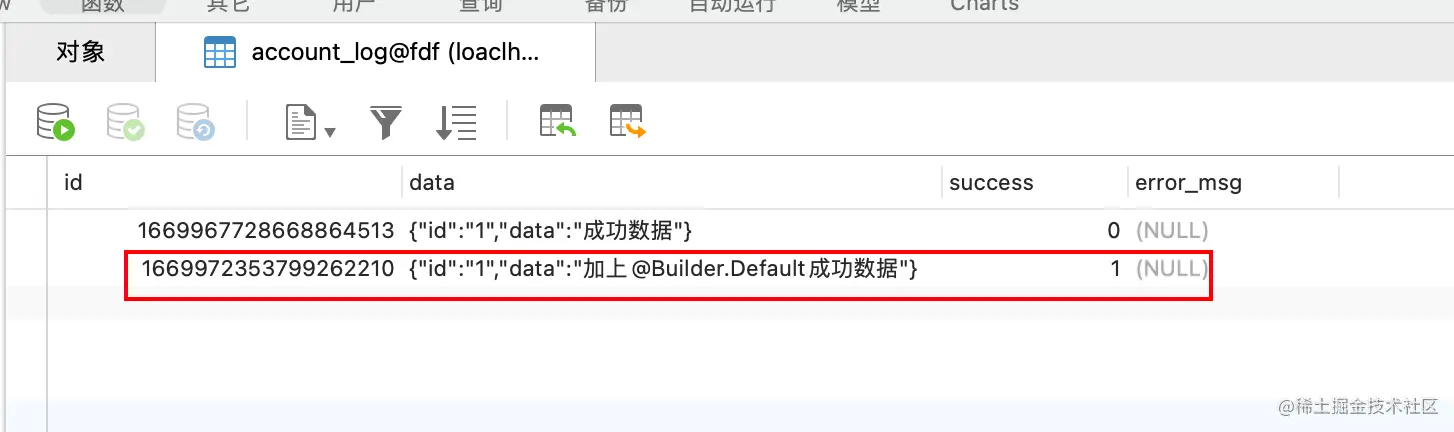
插入成功。
- 手动赋值
 public AccountLog toAccountLog() {


        return AccountLog.builder().success(true).data(JSONUtil.toJsonStr(this)).build();
    }
插入失败案例
@Test
void syncAccount() {


    testTransaction.syncAccount(ThirdAccount.of("2", "测试失败数据"));
}

查看数据库
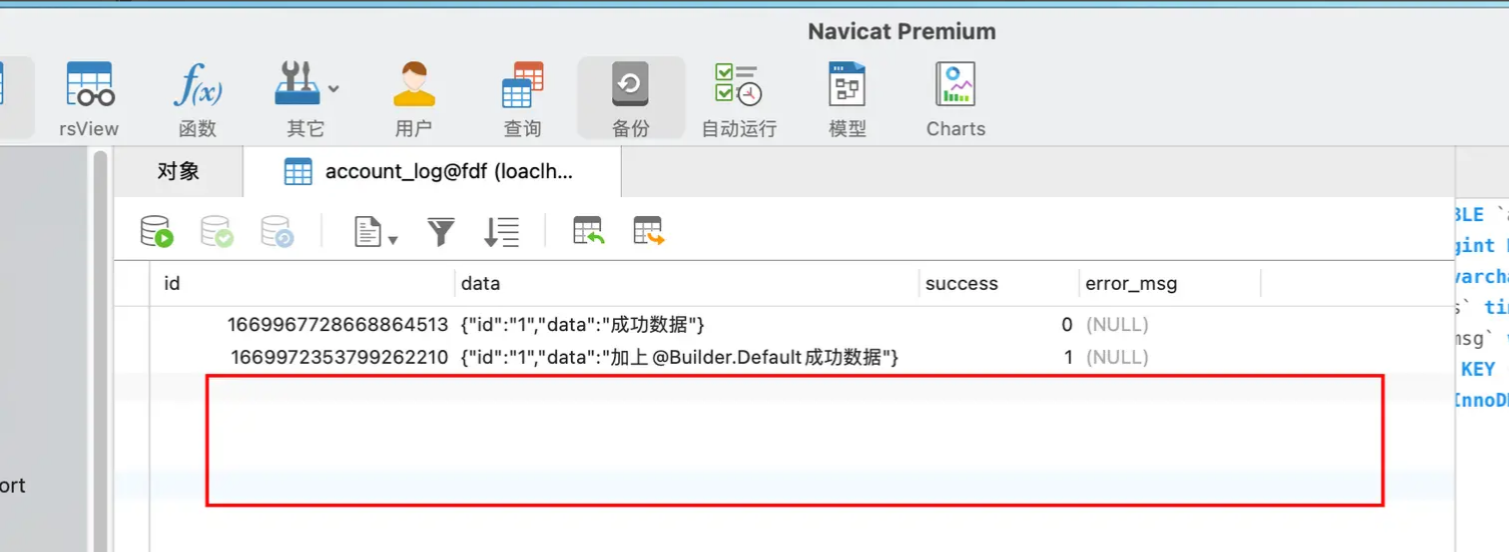
错误数据并没有插入进来。
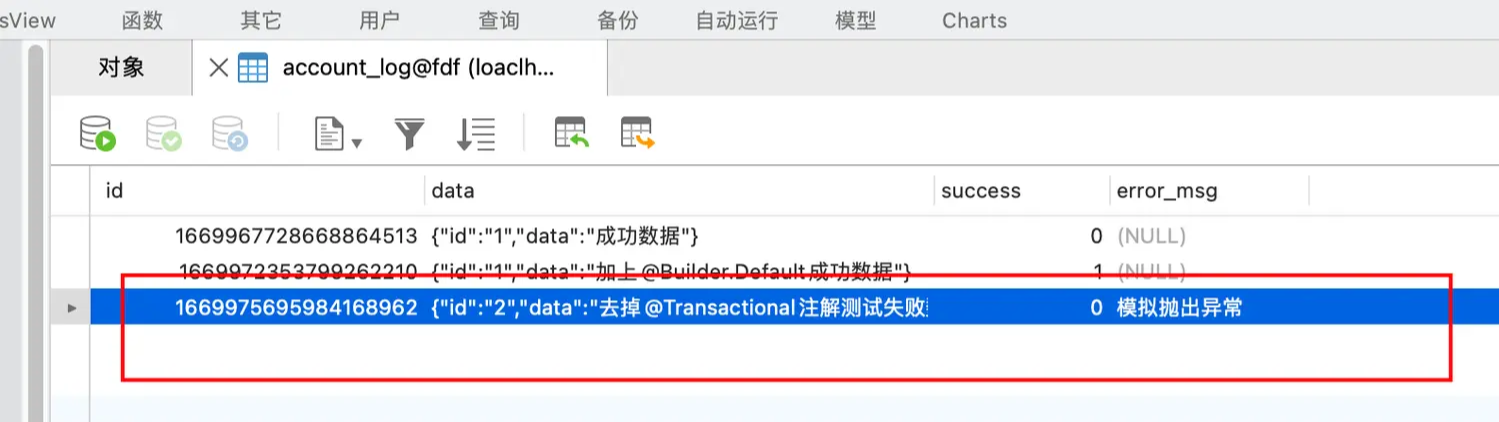
这是因为catch里面抛出了异常,finally里面提交的事务也回滚了,我们去掉syncAccount(ThirdAccount account)方法上面的@Transactional注解。
再执行一次单元测试
@Test
void syncAccount() {


    testTransaction.syncAccount(ThirdAccount.of("2", "去掉@Transactional注解测试失败数据"));
}
查看数据库
总结
- Build并不是对属性赋予默认值,如果想指定默认值可以在字段上使用@Builder.Default注解。
- 如果方法上加了@Transaction注解,catch里面抛出了异常,finally里面的事务会回滚。
当然我们在使用@Transaction注解的时候也需要注意事务的粒度,不能图省事直接在入口加一个Transaction注解。