Spring源码系列整体栏目
| 内容 | 链接地址 |
|---|---|
| 【一】spring源码整体概述 | https://blog.csdn.net/zhenghuishengq/article/details/130940885 |
| 【二】通过refresh方法剖析IOC的整体流程 | https://blog.csdn.net/zhenghuishengq/article/details/131003428 |
| 【三】xml配置文件启动spring时refresh的前置工作 | https://blog.csdn.net/zhenghuishengq/article/details/131066637 |
| 【四】注解方式启动spring时refresh的前置工作 | https://blog.csdn.net/zhenghuishengq/article/details/131113249 |
| 【五】refresh中prepareRefresh的执行流程 | https://blog.csdn.net/zhenghuishengq/article/details/131186016 |
refresh中prepareRefresh方法的执行流程
一,深度剖析refresh的prepareRefresh方法
前两篇谈到了refresh方法的前置工作和准备工作有哪些,注解的方式相对而言会比xml的方式需要做的前置工作更多。接下来就是进入最主要的refresh部分,前面几篇也粗略的对refresh里面的12个方法进行了粗略的概括,接下来的文章中,将对每一个方法做一个详细的概括。
再次查看这个refresh方法,首先会在这个方法上面加一个同步锁 synchronized ,用来保证线程的安全性
@Override
public void refresh() throws BeansException, IllegalStateException {


	synchronized (this.startupShutdownMonitor) {


		//1:准备刷新上下文环境
		prepareRefresh();
		//2:获取告诉子类初始化Bean工厂,不同工厂有不同的实现
        //  并且将配置文件的属性值加载到当前工厂中
		ConfigurableListableBeanFactory beanFactory = obtainFreshBeanFactory();
		//3:对bean工厂进行填充属性
		prepareBeanFactory(beanFactory);
		try {


			// 第四:留个子类去实现该接口,bean工厂的后置处理器
			postProcessBeanFactory(beanFactory);
			// 调用我们的bean工厂的后置处理器.
       	 	//1. 会在此将class扫描成beanDefinition  2.bean工厂的后置处理器调用
			invokeBeanFactoryPostProcessors(beanFactory);
			// 注册我们bean的后置处理器
			registerBeanPostProcessors(beanFactory);
			// 初始化国际化资源处理器.
			initMessageSource();
			// 创建事件多播器
			initApplicationEventMulticaster();
			// 这个方法同样也是留个子类实现的springboot也是从这个方法进行启动tomcat的.
			onRefresh();
			//把我们的事件监听器注册到多播器上
			registerListeners();
			// 实例化我们剩余的单实例bean.
			finishBeanFactoryInitialization(beanFactory);
			// 最后容器刷新 发布刷新事件(Spring cloud也是从这里启动的)
			finishRefresh();
		}
    }
}
1,prepareRefresh()具体的执行流程
接下来就是refresh中的第一个方法,也是本文的重点:prepareRefresh(),顾名思义,就是刷新前的准备工作,接下来进入这个方法中,查看内部详细的执行流程
![[外链图片转存失败,源站可能有防盗链机制,建议将图片保存下来直接上传(img-gB4ydeBy-1686631810191)(img/1686038023143.png)]](https://img-blog.csdnimg.cn/9ece3a34dfbe4a758e05d58b7ec90f8b.png)
其主要代码片段如下
protected void prepareRefresh() {


	// Switch to active.
	this.startupDate = System.currentTimeMillis();
	this.closed.set(false);
	this.active.set(true);
	/**
	 * 比如我们自己写一个类重写了initPropertySources方法,在该方法中设置了一个环境变量的值为A
	 * 启动的时候,我的环境变量中没有该值就会启动抛出异常
	 */
	initPropertySources();

	/**
	 * 用来校验我们容器启动必须依赖的环境变量的值
	 */
	getEnvironment().validateRequiredProperties();

	/**
	 * 创建一个早期事件监听器对象
	 */
	if (this.earlyApplicationListeners == null) {


		this.earlyApplicationListeners = new LinkedHashSet < > (this.applicationListeners);
	} else {


		this.applicationListeners.clear();
		this.applicationListeners.addAll(this.earlyApplicationListeners);
	}
	this.earlyApplicationEvents = new LinkedHashSet < > ();
}
1,首先第一个是记录一下运行这个方法时的起始时间,最后通过方法结束获取的时间,来减去这个时间,就可以得到整个运行refresh方法的差值
this.startupDate = System.currentTimeMillis(); //容器启动的时间
2,随后就是设置两个标志位,一个是设置容器关闭的标志位,一个是设置容器激活的标志位
this.closed.set(false);   //容器关闭的标志位
this.active.set(true);    //容器激活的标志位
3,随后就是一个重要的方法 initPropertySources() ,该方法是一个空方法,主要是留给子类自己去实现,下面会专门举一个小demo来理解这个方法的作用。
protected void initPropertySources() {


	// For subclasses: do nothing by default.
}
4,随后一步就是先获取系统环境对象,在进入refresh方法之前就已经获取的 StandardEnvironment 实例对象,因此这里的环境对象不为空,直接将对象值返回。该对象内部包含了全部的系统变量和系统属性。
@Override
public ConfigurableEnvironment getEnvironment() {


	if (this.environment == null) {


		this.environment = createEnvironment();
	}
	return this.environment;
}
在拿到这个标准的环境对象之后,接下来就是通过这个validateRequiredProperties对里面的属性进行一个验证的操作
getEnvironment().validateRequiredProperties();
其对应的验证操作如下,会循环遍历这些属性,判断属性在系统变量中是否存在,如果不存在则抛出异常
@Override
public void validateRequiredProperties() {


	MissingRequiredPropertiesException ex = new MissingRequiredPropertiesException();
	for (String key: this.requiredProperties) {


        //判断当前属性是否存在set集合中,即是否为系统属性
		if (this.getProperty(key) == null) {


            //如果当前属性不是系统属性,则添加一个异常
			ex.addMissingRequiredProperty(key);
		}
	}
    //如果异常数量不为空,则抛出异常
	if (!ex.getMissingRequiredProperties().isEmpty()) {


		throw ex;
	}
}
在这个抛出的异常中,就打印了这么一句话
The following properties were declared as required but could not be resolved:
5,随后一步就是创建一个事件监听对象,在spring启动的时候,这个早期的earlyApplicationListeners 监听器对象默认为空,但是在springboot中,由于在spring.factories中存在大量的事件需要先加载,因此在springBoot中该对象不为空,相当于是在spring的基础上的一个增强。所以需要对这个earlyApplicationListeners对象判断是都为空。
if (this.earlyApplicationListeners == null) {


    //spring使用,默认为空
	this.earlyApplicationListeners = new LinkedHashSet <> (this.applicationListeners);
} else {


	// Reset local application listeners to pre-refresh state.
	//springboot使用,先清除原有的,再添加
    this.applicationListeners.clear();
	this.applicationListeners.addAll(this.earlyApplicationListeners);
}
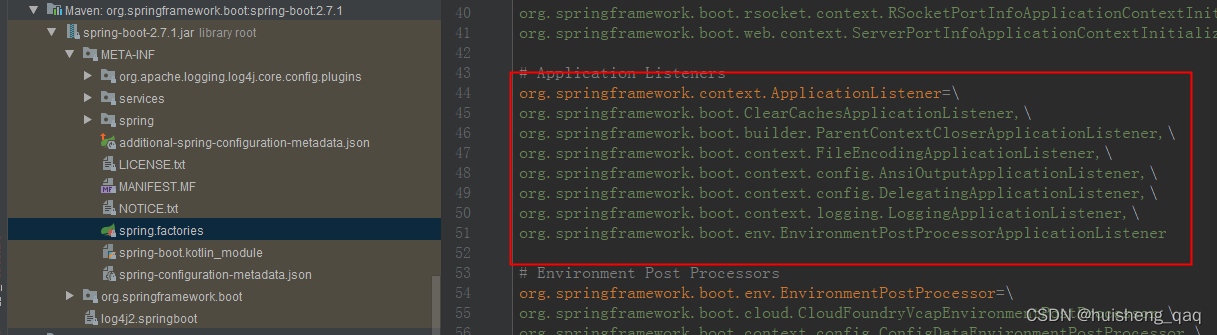
如在spring.factories的文件中,默认就会注入这么多的监听器。该功能主要是springboot的一个扩展机制
6,除了这个监听器在spring启动时为空之外,这个早期Event事件也为空。
this.earlyApplicationEvents = new LinkedHashSet<>();
2,initPropertySources(可扩展)
由于initPropertySources 这个方法内部是一个空方法,主要是留给子类去实现,因此在这里,可以定义一个类继承 ClassPathXmlApplicationContext 这个类,如下
/**
 * @author zhenghuisheng
 * @date : 2023/6/6
 */
public class MyClassPathXmlApplicationContext extends ClassPathXmlApplicationContext {


    //String... locations:xml配置文件的路径
	public MyClassPathXmlApplicationContext(String... locations) {


		super(locations);
	}

	@Override
	protected void initPropertySources() {

     / /初始化属性
		//设置属性
		getEnvironment().setRequiredProperties("USERNAME");
		//获取属性
		String requiredProperty = getEnvironment().getRequiredProperty("USERNAME");
		System.out.println("当前系统用户名称为:" + requiredProperty);
        //获取app名称
		String applicationName = getApplicationName();
		System.out.println("当前应用名称为:" + applicationName);
		//获取前置处理器
		List<BeanFactoryPostProcessor> list = getBeanFactoryPostProcessors();
		System.out.println("定义的bean工厂的后置处理器为的集合长度为:"+ list.size());
        ...
	}
}
在上一篇中有写到,在refresh方法之前的前置工作中,就会获取所有的系统环境和系统变量,如下图就是系统环境变量
![[外链图片转存失败,源站可能有防盗链机制,建议将图片保存下来直接上传(img-JQoMpucv-1686631810193)(img/1685947066781.png)]](https://img-blog.csdnimg.cn/104b300e3c7844c9ad9300ee59f1890b.png)
因此这里可以直接拿到这些环境变量等。随后写一个主启动类进行测试
 public static void main(String[] args) {


    //扩展,用于鉴定属性
	ApplicationContext m = new MyClassPathXmlApplicationContext("classpath.a.xml");
}
由于环境对象可以获取到,因此在这个环境变量里面设置一个属性
getEnvironment().setRequiredProperties("USERNAME");
上面设置的属性 USERNAME值,在设置之后会进行一个验证的操作,主要是验证该值在系统中是否存在,如果不存在则直接抛出异常。
void validateRequiredProperties() throws MissingRequiredPropertiesException;
开发中如果程序是需要包含某个值, 如需要某个属性或者某个前缀之类的,就可以在这一步进行判断,就不用进应用层里面去判断了。如在抽象类 AbstractEnvironment 中,有着这两个的具体实现,可以先设置值,随后会对设置的值进行验证。
//设置相关的属性值
@Override
public void setRequiredProperties(String...requiredProperties) {


	this.propertyResolver.setRequiredProperties(requiredProperties);
}
//验证属性值,属性在在系统属性中不存在,则立马抛出异常
@Override
public void validateRequiredProperties() throws MissingRequiredPropertiesException {


	this.propertyResolver.validateRequiredProperties();
}
验证的流程具体如下:判断当前系统属性有没有这个值,如果系统有这个值,则不管;没有这个值,则抛出异常报错
@Override
public void validateRequiredProperties() {


	MissingRequiredPropertiesException ex = new MissingRequiredPropertiesException();
	for (String key: this.requiredProperties) {


        //判断当前系统属性有没有这个值
		if (this.getProperty(key) == null) {


			ex.addMissingRequiredProperty(key);
		}
	}
    //如果系统有这个值,则不管;没有这个值,则抛出异常报错
	if (!ex.getMissingRequiredProperties().isEmpty()) {


		throw ex;
	}
}
主要作用就是提前做一个参数的校验,实际开发中用的也比较少。
3,总结
在这个prepareRefresh方法中,总结来说就是做了五件事情:设置容器启动时间、设置活跃状态为true、设置关闭状态为false、获取环境对象,并将当前系统的属性值设置到Environment对象中、实例化监听器对象和事件对象,并设置为空。