前言
- 记录Vue3与Pinia的基本用法
- 实现简单的数据状态控制
一、前期准备
二、使用步骤
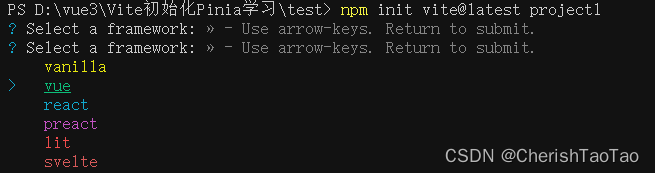
1.使用vite创建vue3项目
npm init vite@latest- 选择vue — vue-ts
- pnpm i 安装依赖
- pnpm run dev 启动初始化项目
安装pinia :pnpm i pinia

2.初始化pinia
import {
createApp } from "vue";
import {
createPinia } from "pinia";
import "./style.css";
import App from "./App.vue";
const app = createApp(App);
const pinia = createPinia();
app.use(pinia);
app.mount("#app");
- src下创建store/index.ts
基本框架:
import {

     defineStore } from "pinia";

export const useFirstStore = defineStore("first", {


  actions: {

    },
  getters: {

    },
  state: () => {


    return {

    };
  },
});
import {
defineStore } from "pinia";
export const useMainStore = defineStore("main", {
state: () => {
return {
count: 1,
foo: "2",
arr: [1, 2],
};
},
getters: {
count10(): number {
console.log("相当于computed,一来就调用");
return this.count++;
},
},
actions: {
changeState(num: number) {
this.count += num;
this.foo = "zwt2";
this.arr.push(666);
},
},
});
3.组件使用
- 修改HelloWord.vue为
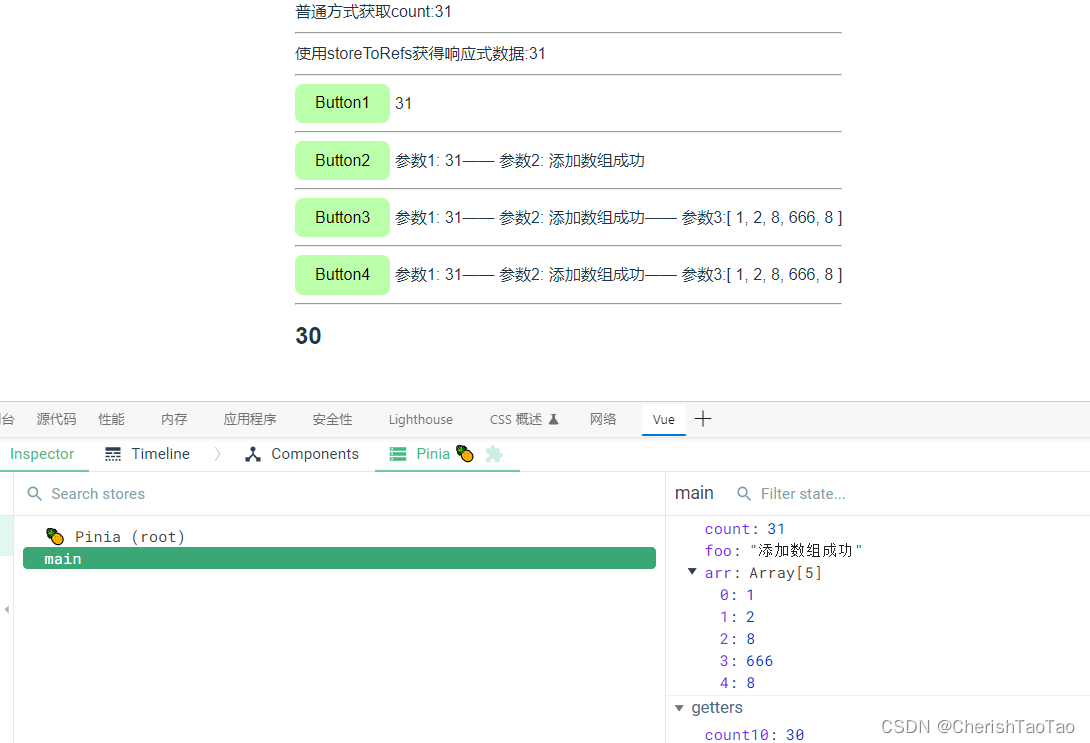
- 四个button包括不同的用法以及注意事项
<template>
<div style="text-align: left">
<h2>Pinia Test</h2>
<ul>
<li v-for="b in buttonContent">{
{
b.id }}——{
{
b.content }}</li>
</ul>
普通方式获取count:{
{
mainStore.count }}
<hr />
使用storeToRefs获得响应式数据:{
{
count }}
<hr />
<button @click="add">Button1</button>
{
{
count }}
<hr />
<button @click="addSome">Button2</button>
参数1: {
{
count }}—— 参数2: {
{
foo }}
<hr />
<button @click="addArr">Button3</button>
参数1: {
{
count }}—— 参数2: {
{
foo }}—— 参数3:{
{
arr }}
<hr />
<button @click="changeInActions">Button4</button>
参数1: {
{
count }}—— 参数2: {
{
foo }}—— 参数3:{
{
arr }}
<hr />
<h2>{
{
mainStore.count10 }}</h2>
<!-- <h2>{
{
mainStore.count11 }}</h2> -->
</div>
</template>
<script setup lang="ts">
import {
useMainStore } from "../store";
import {
storeToRefs } from "pinia";
import {
ref } from "vue";
const buttonContent = ref([
{
id: "button1",
content: "修改state单个数据(用storeToRefs获得响应式数据)",
},
{
id: "button2", content: "使用$patch修改state多个数据" },
{
id: "button3", content: "使用$patch函数方式直接修改state数据" },
{
id: "button4", content: "使用封装在actions中的方法修改state数据" },
]);
const mainStore = useMainStore();
console.log(mainStore);
const {
count, foo, arr } = storeToRefs(mainStore);
const add = () => {
count.value++;
};
const addSome = () => {
mainStore.$patch({
count: count.value + 9,
foo: foo.value + 12,
});
};
const addArr = () => {
mainStore.$patch((state) => {
state.count++;
state.foo = "添加数组成功";
state.arr.push(8);
});
};
const changeInActions = () => {
mainStore.changeState(12);
};
</script>
<style scoped>
button {
background-color: #bfa;
}
</style>
4.效果展示
总结
- 要多思考各个数据逻辑之间的调用关系
- ts语法注意类型转换
- storeToRefs可将state中的数据变为响应式数据在模板中直接使用
- 更多内容见注释详解