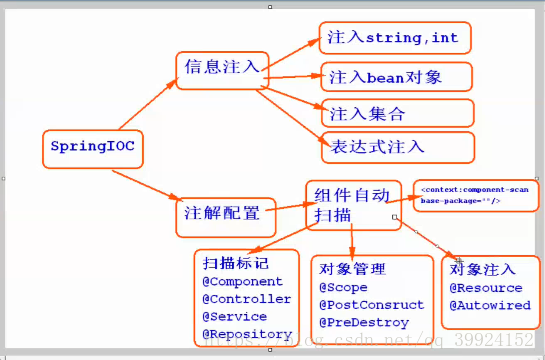
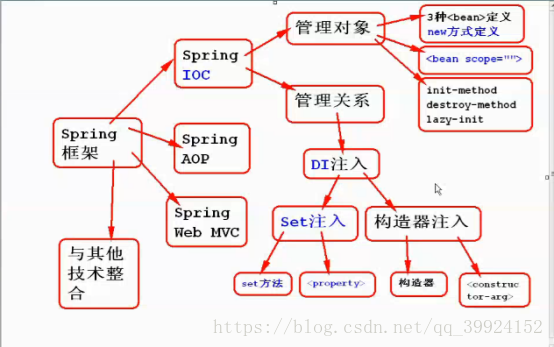

1.搭建springIOC开发环境
---引入jar包
---在src中添加applicationContext.xml配置文件
(1)Spring自带的连接DriverManagerDataSource
<bean id="dataSource1" class="org.springframework.jdbc.datasource.DriverManagerDataSource">
        <property name="driverClassName" value="com.mysql.jdbc.Driver" />
        <property name="url" value="jdbc:mysql://localhost:3306/test" />
        <property name="username" value="root" />
         <property name="password" value="root123" />
    </bean>
(2)apache的dbcp插件连接
<bean id="dataSource"
        class="org.apache.commons.dbcp.BasicDataSource" destroy-method="close">
       <!-- 使用properties来配置 数据库连接池-->
       <!-- 数据库连接方言 -->
        <property name="driverClassName"  value="${jdbc_driverClassName}"></property>
        <property name="url" value="${jdbc_url}"></property>
        <property name="username" value="${jdbc_username}"></property>
        <property name="password" value="${jdbc_password}"></property>
        <!-- 初始化连接大小 -->
        <property name="initialSize" value="10" />
        <!-- 连接池最大使用连接数量 -->
        <property name="maxActive" value="100" />
        <!-- 连接池最小空闲 -->
        <property name="minIdle" value="10" />
        <!-- 超时等待时间以毫秒为单位  -->
        <property name="maxWait" value="100"/>
        <!-- 设置在自动回收超时连接的时候打印连接的超时错误  -->
        <property name="logAbandoned" value="true"/>
        <!-- 设置自动回收超时连接 -->
        <property name="removeAbandoned"  value="true"/>
        <!-- 自动回收超时时间(以秒数为单位) -->
        <property name="removeAbandonedTimeout" value="10"/>
</bean>(3)c3p0插件连接<bean name="dataSource" class="com.mchange.v2.c3p0.ComboPooledDataSource"
p:driverClass="com.mysql.jdbc.Driver"
p:jdbcUrl="jdbc:mysql://localhost:3306/test"
p:user="root"
p:password="123456" >
</bean>