此文不完善,无需浪费时间阅读,谢谢。
感谢博友 @我闹 问题(怎么获得通话建立的时间点,不用广播)的提出,才促使我继续写这篇分析文章。
这篇文是上一篇Sipdorid的分析,进一步说明对外呼出的建立过程,如有错误,请指出。
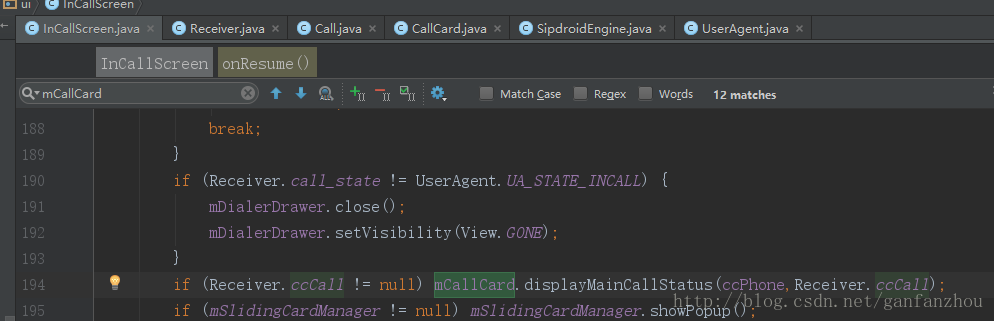
CallCard中有两类注意一下,一个是更新通话界面的方法
//对外暴露的方法:更新如通话时间,通话状态
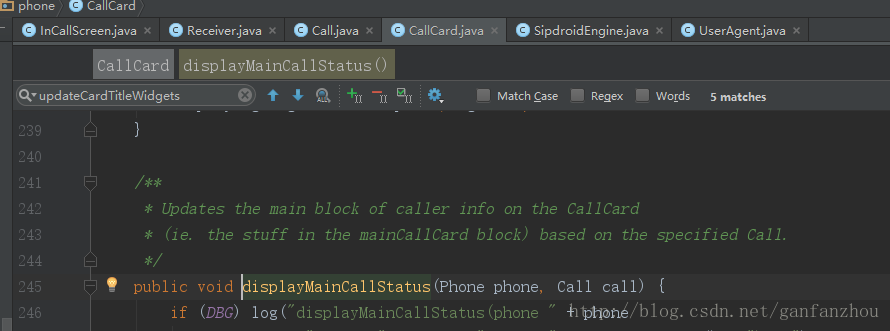
public void displayMainCallStatus(Phone phone, Call call){}第二个私有
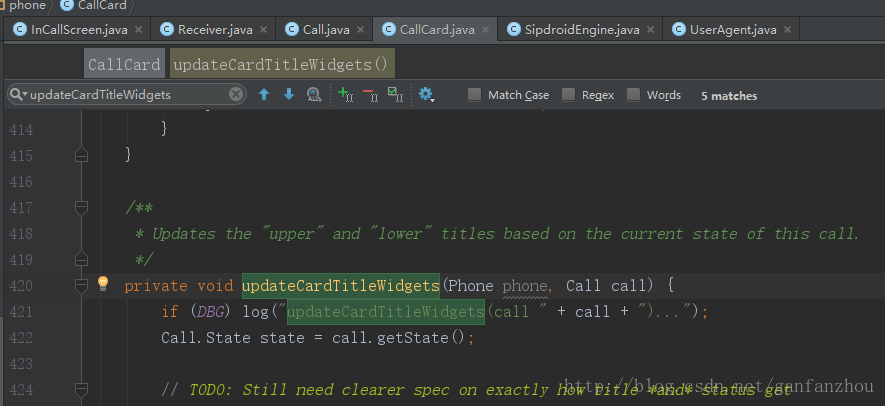
/**
* Updates the "upper" and "lower" titles based on the
* current state of this call.
*/

private void updateCardTitleWidgets(Phone phone, Call call){}在私有方法里面你可以看到Call.State state = call.getState();通话状态的判断,当Call.State.ACTIVE时,计时器mElapsedTime开始计时,从某种状态来说,这个已经算正式接通的状态。所以,更进一步是要对Call状态的实时监听。
调用处:
CallCard的displayMainCallStatus:
CallCard的updateCardTitleWidgets:
Call通话状态枚举
IDLE, ACTIVE, HOLDING, DIALING, ALERTING, INCOMING, WAITING, DISCONNECTED
我们只注意ACTIVE(通话中)这个。
在管理器Receiver中,你可以查看到这里有对Call状态的设置ccCall.setState(...),在我们向外拨打电话同时会发送OFFHOLD广播(摘机)过程,你也可以通过这个广播同时判断Call状态即可获取对外通话正式接通的时刻。
注:OFFHOLD广播会发送两个,一次是开始拨打电话(按了拨号键)状态为Call.State.DIALING,第二次是接通(建立通话),状态为Call.State.ACTIVE
再进一步分析
在Receiver中,你可以看到call状态的改变是在public static void onState(int state,String caller),而这个方法的调用时是依赖UserAgent中的protected synchronized void changeStatus(int state,String caller)
Receiver的onState(int state,String caller)部分代码:
public static void onState(int state,String caller) {
            ...

            if (call_state != state) {
                if (state != UserAgent.UA_STATE_IDLE)
                    call_end_reason = -1;
                call_state = state;
                switch(call_state)
                {
                ...
                case UserAgent.UA_STATE_OUTGOING_CALL:
                    broadcastCallStateChanged("OFFHOOK", caller);
                    ccCall.setState(Call.State.DIALING);
                    ccConn.setUserData(null);
                    ccConn.setAddress(caller,caller);
                    ccConn.setIncoming(false);
                    ccConn.date = System.currentTimeMillis();
                    ccCall.base = 0;
                    moveTop();
                    Checkin.checkin(true);
                    break;
                case UserAgent.UA_STATE_INCALL:
                    broadcastCallStateChanged("OFFHOOK", null);
                    if (ccCall.base == 0) {
                        ccCall.base = SystemClock.elapsedRealtime();
                    }
                    progress();
                    ccCall.setState(Call.State.ACTIVE);
                    stopRingtone();
                    if (wl != null && wl.isHeld())
                        wl.release();
                    mContext.startActivity(createIntent(InCallScreen.class));
                    break;
                ...
                }
                pos(true);
                RtpStreamReceiver.ringback(false);
            }
}在UserAgent中,通话状态由变量call_state保持,而值UserAgent.UA_STATE_INCALL即值3代表通话中,具体见代码,这里不详说,其中建立会话成功是接收到报文”2xx”后被调用onCallReInviteAccepted()(实现CallListener接口)通话建立,这里就开始一系列的变化,改变UserAgent的通话状态call_state,调用Receiver.onState,改变Call.state,发送广播,更新通话界面。
那么,CallListener接口是什么时候创建实现的呢?
在对外呼出,UserAgent会创建一个ExtendedCall对象持有,UserAgent可以理解为通话的一个配置,而ExtendedCall是一个具体是通话实现,他处理报文,将接收的信息继续下发,让其它类解析。
所以让我们回到起点,当我们对外拨打电话时,调用Receiver.engine(mContext).call(xxx,true);,构建一个UserAgent,又构造了ExtendedCall,又创建了InviteDialog,调用invite,最后启动
Message invite = MessageFactory.createInviteRequest(sip_provider,
                request_uri, to_url, from_url,
                contact_url, session_descriptor, icsi);
invite(invite);
向服务器请求建立通话连接,接下来就是等服务器数据的返回,报文解析,这里不详述(因为很久前抓的报文文件删了,找不到)。
从上面分析,一次通话的拨出就已经很清晰了,那么我们想获取到通话正式接通那个时间点,该怎么处理?
- 用广播,最简单,原始代码都不用改动,上面已经说了“OFFHOLD”
- 自定义监听器
很明显,在你拨出界面的做监听,简单点,就是在你调用Receiver.engine(mContext).call(xxx,true);时做监听,这里没有监听方法,你可以在SipdroidEngine增加构造方法,将监听器下传到UserAgent,在UserAgent的onCallReInviteAccepted实现你的回调,如yourListener.onCallReInviteAccepted,假如你要继续下传到ExtendedCall甚至InviteDialog再回调出来也没有关系,你开心就好。
好了,写到这也就够了,下面放构造的代码块,我没有在github上放这个库,反正有开源代码,自己clone后爱怎么改怎么改,it all on you.
SipdroidEngine 代码块:
public boolean call(String target_url,boolean force,InviteListener listener) {
        int p = pref;
        boolean found = false;

        if (isRegistered(p) && Receiver.isFast(p))
            found = true;
        else {
            for (p = 0; p < LINES; p++)
                if (isRegistered(p) && Receiver.isFast(p)) {
                    found = true;
                    break;
                }
            if (!found && force) {
                p = pref;
                if (Receiver.isFast(p))
                    found = true;
                else for (p = 0; p < LINES; p++)
                    if (Receiver.isFast(p)) {
                        found = true;
                        break;
                    }
            }
        }

        if (!found || (ua = uas[p]) == null) {
            if (PreferenceManager.getDefaultSharedPreferences(getUIContext()).getBoolean(Settings.PREF_CALLBACK, Settings.DEFAULT_CALLBACK) &&
                    PreferenceManager.getDefaultSharedPreferences(getUIContext()).getString(Settings.PREF_POSURL, Settings.DEFAULT_POSURL).length() > 0) {
                Receiver.url("n="+Uri.encode(target_url));
                return true;
            }
            return false;
        }

        ua.printLog("UAC: CALLING " + target_url);

        if (!ua.user_profile.audio && !ua.user_profile.video)
        {
            ua.printLog("ONLY SIGNALING, NO MEDIA");
        }
        return ua.call(target_url, false,listener);
    }
UserAgent 代码块:
private InviteListener listener = null;

    public boolean call(String target_url, boolean send_anonymous, InviteListener listener) {
        this.listener = listener;
        return call(target_url, send_anonymous);
    }

    /**
     * Callback function called when arriving a 2xx (re-invite/modify accepted)
     */
    public void onCallReInviteAccepted(Call call, String sdp, Message resp) {
        printLog("onCallReInviteAccepted()", LogLevel.LOW);
        if (call != this.call) {
            printLog("NOT the current call", LogLevel.LOW);
            return;
        }
        printLog("RE-INVITE-ACCEPTED/CALL", LogLevel.HIGH);
        if (statusIs(UA_STATE_HOLD)) {
            changeStatus(UA_STATE_INCALL);
            if(listener!=null){
                listener.onInviteAccepted();
            }
        }else
            changeStatus(UA_STATE_HOLD);
    }
监听器:
public interface InviteListener {
    void onInviteAccepted();
}
use this:
Receiver.engine(mContext).call(xxx,true,this);//interface InviteListener

//here do your job
public void onInviteAccepted(){
}
更新20170916
增加监听器有效是在同一个Activity中操作,但是调用call之后往往会启动另外一个会话界面,如InCallCard,此时的监听器可以说无效了,除非利用eventbus或者广播或者其他方式将该事件传递,否则这个监听是无用的。