最近在学习SpringCloud相关的知识,受益匪浅。谨以此系列博文记录自己的学习历程,同时也为大家学习SpringCloud提供些许参考。后续会根据学习进度适时更新博文。
在上一章,学习了服务的注册和发现(Eureka)。在微服务架构中,整体业务会被拆分成一个个独立的服务,服务之间的通讯是基于Http RESTful的。Spring cloud有两种服务调用方式,一种是Ribbon+RestTemplate,另一种是Feign。在这一篇博文中两者都会涉及。
一、前言
1.1 RESTful简介
RESTful是目前最流行的 API 设计规范,用于 Web 数据接口的设计。
RESTful架构就是符合REST风格的架构实现方式,REST原则主要包含两个方面,URL接口的请求描述和返回描述。请求描述包括接口的设计、接收的参数类型、接收的数据格式、调用方式(Get/Post)等;返回描述包括返回状态码、返回的数据格式等。
其实在我们熟悉的SpringMVC中已经原生态的支持了REST风格的架构设计,举例几个常用的注解:
@RequestMapping
RequestMapping可以标识接口的请求方式,Get|Post|Delete等;也可以接收不同格式的数据,xml或者json;
@PathVariable
PathVariable可以标识接口接受参数的数据类型、参数名等;
@ResponseBody
ResponseBody可以定义接口返回的数据格式等;
同时,还定义了HTTP响应的状态码,200/500/404等等。
总之,SpringCloud微服务架构中各服务之间的通讯是基于RESTful的,意思就是各服务之间的调用满足HTTP通讯原则。
1.2 Ribbon简介
Spring Cloud Ribbon是一个基于HTTP和TCP的客户端负载均衡工具,它基于Netflix Ribbon实现。通过Spring Cloud的封装,可以让我们轻松地将面向服务的REST模版请求自动转换成客户端负载均衡的服务调用。Spring Cloud Ribbon是一个工具类框架,它不像服务注册中心、配置中心、API网关那样需要独立部署,可以说它几乎存在于每一个Spring Cloud构建的微服务和基础设施中。因为微服务间的调用,API网关的请求转发等内容,实际上都是通过Ribbon来实现的,Feign也是基于Ribbon实现的工具。所以,对Spring Cloud Ribbon的理解和使用,对于我们使用Spring Cloud来构建微服务非常重要。
1.3 RestTemplate简介
Spring RestTemplate 是 Spring 提供的用于访问 Rest 服务的客户端。之前我们发起HTTP请求可能采用的是HTTPClient、HttpURLConnection等,现在Spring中已经为我们封装好了这个HTTP交互框架。RestTemplate 提供了多种便捷访问远程Http服务的方法,能够大大提高客户端的编写效率,所以很多客户端比如 Android或者第三方服务商都是使用 RestTemplate 请求 RESTful服务。
1.4 Spring Cloud Feign简介
Spring Cloud Feign是基于Netflix feign实现,整合了Spring Cloud Ribbon和Spring Cloud Hystrix(断路器,后续会讲),除了提供这两者的强大功能外,还提供了一种声明式的Web服务客户端定义的方式。
Spring Cloud Feign帮助我们定义和实现依赖服务接口的定义。在Spring Cloud feign的实现下,只需要创建一个接口并用注解方式配置它,即可完成服务提供方的接口绑定。
Spring Cloud Feign具备可插拔的注解支持,支持Feign注解、JAX-RS注解和Spring MVC的注解。
相比于RestTemplate,Feign具有如下优势:
1、采用注解方式实现声明式调用。支持多种注解,简化了自行封装服务调用客户端的开发量,同时也使代码变的简洁、优雅;
2、Spring Cloud Feign整合了Ribbon和Hystrix,轻松实现负载均衡和熔断机制;
3、在大型项目中更加适合各服务之间的通讯。服务之间的调用、消息同步等。
二、准备工作
这一篇博文基于上一篇博文中创建的工程。启动eureka-server工程;启动eureka-client工程,它的端口为8762;将eureka-client的配置文件中的端口改为8763,再启动一个eureka-client,这时你会发现:eureka-client在eureka-server中注册了2个实例,这就相当于一个小的集群。
如何在idea下启动多个实例,见下图:
点击 Edit Configurations

去掉Single instance only前面的√:

打开浏览器访问localhost:8761,如图所示:

三、两种服务调用方式
3.1 Ribbon+RestTemplate
3.1.1 创建service-ribbon module
在moi-sc-parent中新建一个spring-boot module工程,取名为:service-ribbon;
它的pom.xml继承了父pom文件,并引入了其他依赖。详细代码如下:
<?xml version="1.0" encoding="UTF-8"?>
<project xmlns="http://maven.apache.org/POM/4.0.0"
         xmlns:xsi="http://www.w3.org/2001/XMLSchema-instance"
         xsi:schemaLocation="http://maven.apache.org/POM/4.0.0 http://maven.apache.org/xsd/maven-4.0.0.xsd">
    <parent>
        <artifactId>moi-sc-parent</artifactId>
        <groupId>com.moi</groupId>
        <version>1.0-SNAPSHOT</version>
    </parent>
    <modelVersion>4.0.0</modelVersion>

    <artifactId>service-ribbon</artifactId>
    <packaging>jar</packaging>

    <name>service-ribbon</name>
    <description>ribbon project for Spring Boot</description>

    <dependencies>
        <dependency>
            <groupId>org.springframework.cloud</groupId>
            <artifactId>spring-cloud-starter-netflix-eureka-client</artifactId>
        </dependency>
        <dependency>
            <groupId>org.springframework.boot</groupId>
            <artifactId>spring-boot-starter-web</artifactId>
        </dependency>
        <dependency>
            <groupId>org.springframework.cloud</groupId>
            <artifactId>spring-cloud-starter-netflix-ribbon</artifactId>
        </dependency>
    </dependencies>
</project>
3.1.2 service-ribbon application.yml
在service-ribbon的配置文件中指定服务的注册中心地址为http://localhost:8761/eureka/,程序名称为 service-ribbon,程序端口为8764。配置文件application.yml如下:
eureka:
  client:
    serviceUrl:
      defaultZone: http://localhost:8761/eureka/
server:
  port: 8764
spring:
  application:
    name: service-ribbon
info:
  app.name: atguigu-microservicecloud
  company.name: www.atguigu.com
  build.artifactId: $project.artifactId$
  build.version: $project.version$
3.1.3 service-ribbon启动类
在service-ribbon的启动类中,通过@EnableEurekaClient向服务中心注册;然后向ioc容器中注入一个bean: restTemplate;并通过@LoadBalanced注解表明这个restRemplate开启负载均衡的功能。代码如下:
package com.moi;

import org.springframework.beans.factory.annotation.Value;
import org.springframework.boot.SpringApplication;
import org.springframework.boot.autoconfigure.SpringBootApplication;
import org.springframework.cloud.client.loadbalancer.LoadBalanced;
import org.springframework.cloud.netflix.eureka.EnableEurekaClient;
import org.springframework.context.annotation.Bean;
import org.springframework.web.bind.annotation.RequestMapping;
import org.springframework.web.bind.annotation.RequestParam;
import org.springframework.web.bind.annotation.RestController;
import org.springframework.web.client.RestTemplate;

/**
 * Created by fangw on 2019/2/19.
 */
@SpringBootApplication
@EnableEurekaClient
@RestController
public class ServiceRibbonApplication {
    public static void main(String[] args) {
        SpringApplication.run( ServiceRibbonApplication.class, args );
    }

    @Bean
    @LoadBalanced
    RestTemplate restTemplate() {
        return new RestTemplate();
    }
    @Value("${server.port}")
    String port;

    @RequestMapping("/hello")
    public String home(@RequestParam(value = "name", defaultValue = "fangw") String name) {
        return "hi " + name + " ,i am from port:" + port;
    }
}
注:@EnableEurekaClient和@EnableDiscoveryClient注解都可以将服务实例注册到注册中心。区别在于@EnableEurekaClient只能注册到Eureka注册中心,@EnableDiscoveryClient还可以将服务注册到其他注册中心。
3.1.4 新建Service类消费服务
新建测试类HelloService,通过之前注入ioc容器的restTemplate来消费eureka-client服务的“/hi”接口。在ribbon中它会根据服务名来选择具体的服务实例,在请求服务实例的时候会用具体的url替换掉服务名,代码如下:
package com.moi.service;

import org.springframework.beans.factory.annotation.Autowired;
import org.springframework.stereotype.Service;
import org.springframework.web.client.RestTemplate;

/**
 * Created by fangw on 2019/2/19.
 */
@Service
public class HelloService {
    @Autowired
    RestTemplate restTemplate;
    public String hiService(String name) {
        return restTemplate.getForObject("http://eurka-client/hi?name="+name,String.class);
    }
}
注:
1、这里可以看到调用服务时用的是eurka-client,它比工程名eureka-client少了一个字母e。所以说服务实例名指的是application.yml中设定的spring.application.name,并不是工程名;
2、这里的服务名是不区分大小写的,使用EURKA-CLIENT同样可以访问到实例。
3.1.5 新建controller类发布接口
新建一个controller,在controller中用调用HelloService 的方法,代码如下:
package com.moi.controller;

import com.moi.service.HelloService;
import org.springframework.beans.factory.annotation.Autowired;
import org.springframework.web.bind.annotation.RequestMapping;
import org.springframework.web.bind.annotation.RequestParam;
import org.springframework.web.bind.annotation.RestController;

/**
 * Created by fangw on 2019/2/19.
 */
@RestController
public class HelloControler {

    @Autowired
    HelloService helloService;

    @RequestMapping(value = "/hi")
    public String hi(@RequestParam(value = "name", defaultValue = "fangw") String name) {
        return helloService.hiService( name );
    }
}
service-ribbon工程结构如下:

3.1.6 结果
启动service-ribbon,在浏览器上多次访问http://localhost:8764/hi?name=fangw,浏览器交替显示:

![]()
综上,Ribbon+RestTemplate实现了服务的负载调用,总结如下:
1、RestTemplate工具发起HTTP请求,本文中是采用服务实例名定位到具体的服务;
2、Ribbon起到负载均衡效果,采用注解@LoadBalanced实现。
3.2 Feign 声明式调用
3.2.1 创建service-feign module
在moi-sc-parent中新建一个spring-boot module工程,取名为:service-feign;
它的pom.xml继承了父pom文件,并引入了其他依赖。详细代码如下:
<?xml version="1.0" encoding="UTF-8"?>
<project xmlns="http://maven.apache.org/POM/4.0.0"
         xmlns:xsi="http://www.w3.org/2001/XMLSchema-instance"
         xsi:schemaLocation="http://maven.apache.org/POM/4.0.0 http://maven.apache.org/xsd/maven-4.0.0.xsd">
    <parent>
        <artifactId>moi-sc-parent</artifactId>
        <groupId>com.moi</groupId>
        <version>1.0-SNAPSHOT</version>
    </parent>
    <modelVersion>4.0.0</modelVersion>

    <artifactId>service-feign</artifactId>
    <packaging>jar</packaging>

    <name>service-feign</name>
    <description>feign project for Spring Boot</description>

    <dependencies>
        <dependency>
            <groupId>org.springframework.cloud</groupId>
            <artifactId>spring-cloud-starter-netflix-eureka-client</artifactId>
        </dependency>
        <dependency>
            <groupId>org.springframework.boot</groupId>
            <artifactId>spring-boot-starter-web</artifactId>
        </dependency>
        <dependency>
            <groupId>org.springframework.cloud</groupId>
            <artifactId>spring-cloud-starter-openfeign</artifactId>
        </dependency>
    </dependencies>
</project>
3.2.2 service-feign application.yml
在service-feign的配置文件中指定服务的注册中心地址为http://localhost:8761/eureka/,程序名称为 service-feign,程序端口为8765。配置文件application.yml如下:
eureka:
  client:
    serviceUrl:
      defaultZone: http://localhost:8761/eureka/
server:
  port: 8765
spring:
  application:
    name: service-feign
3.2.3 service-feign启动类
在service-feign的启动类中,通过@EnableEurekaClient向服务中心注册;然后通过@EnableFeignClients注解开启Feign的功能。代码如下:
package com.moi;

import org.springframework.boot.SpringApplication;
import org.springframework.boot.autoconfigure.SpringBootApplication;
import org.springframework.cloud.netflix.eureka.EnableEurekaClient;
import org.springframework.cloud.openfeign.EnableFeignClients;

/**
 * Created by fangw on 2019/2/19.
 */
@SpringBootApplication
@EnableEurekaClient
@EnableFeignClients
public class ServiceFeignApplication {

    public static void main(String[] args) {
        SpringApplication.run( ServiceFeignApplication.class, args );
    }
}
3.2.4 新建Feign接口消费服务
新建一个Feign接口,通过@FeignClient(“服务名”),来指定调用哪个服务。比如调用eurka-client服务的“/hi”接口,代码如下:
package com.moi.service;

import org.springframework.cloud.openfeign.FeignClient;
import org.springframework.web.bind.annotation.RequestMapping;

/**
 * Created by fangw on 2019/2/19.
 */
@FeignClient(name = "eurka-client")
public interface ServiceHi {
    @RequestMapping(value = "/hi")
    String sayHiFromClient(String name);
}
3.2.5 新建controller发布接口
新建controller类,对外暴露一个"/hi"的API接口,通过上面定义的Feign客户端ServiceHi来消费服务。代码如下:
package com.moi.controller;

import com.moi.service.ServiceHi;
import org.springframework.beans.factory.annotation.Autowired;
import org.springframework.web.bind.annotation.RequestMapping;
import org.springframework.web.bind.annotation.RestController;

/**
 * Created by fangw on 2019/2/19.
 */
@RestController
public class HelloController {
    @Autowired
    ServiceHi serviceHi;

    @RequestMapping(value = "/hi")
    public String sayHi(String name) {
        return serviceHi.sayHiFromClient( name );
    }
}
3.2.6 结果
启动service-feign,在浏览器上多次访问http://localhost:8765/hi?name=fangw,浏览器交替显示:

![]()
综上,Feign实现了服务的负载调用,总结如下:
1、Feign采用注解方式实现声明式调用。支持多种注解,代码简洁且可扩展性强;
2、Feign整合了Ribbon轻松实现负载均衡;
3、Feign底层也是通过HttpClient方式调用的http服务。
四、扩展
在实际项目开发中,各服务之间的通讯建议采用Feign方式。目前常用的架构如下:

假如是服务A调用服务B,上述流程图描述:
1、新建springboot工程,命名为ExterInterfaceApi。该项目只负责定义api接口,代码类似于上面的3.2.4 ServiceHi类,但是不要有FeignClient注解。开发完成之后打成jar包,即为上图中的接口jar。参考代码如下:

2、A和B都依赖1中的接口jar,B中新建接口实现类用于实现ExterInterfaceApi中的方法,A中新建子类接口继承ExterInterfaceApi中的接口,此处子类接口需要添加FeignClient注解。参考代码如下:
实现类:

子类接口:
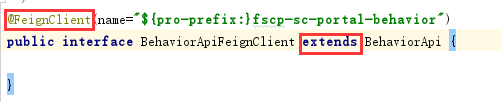
3、这样A中的子类接口就可以调用ExterInterfaceApi中父类的方法。在使用时只需要注入子类接口就可以了。参考代码:

然后behaviorApiFeignClient.getUserInfo(xxxx)实现接口调用。
以上为SpringCloud 教程 | 第二章: 服务消费者(RestTemplate和Feign)。欢迎在评论区留言,我会尽快回复~~~
最后,打波广告。微信搜索公众号"购即省",淘宝购物领券,购物即省钱。
