
请求从客户端出发,到达客户端,也就是servlet,中间有很多过滤器的,其中就有一个过滤器链代理,里面包含了过滤器的一个集合。而且Spring Security Filter并不是直接嵌入到Web Filter中的,而是通过FilterChainProxy 来统一管理 Spring Security Filter, FilterChainProxy 本身则通过 Spring提供的 DelegatingFilterProxy代理过滤器嵌入到Web Filter之中。

可以看到,当请求到达FilterChainProxy之后,FilterChainProxy 会根据请求的路径,将请求转发到不同的Spring Security Filters 上面去,不同的Spring Security Filters 对应了不同的过滤器,也就是不同的请求将经过不同的过滤器。
对项目进行简单的改造

如果访问/web/hello这个路径,Security处理器执行链中将不包含SessionManagementFilter
如果访问/v1/hello这个路径,Security处理器执行链中包含SessionManagementFilter
也就是一组对照实验,我们后面再配置两条过滤器链,分别区分这两个接口,看看两条链是否都生效,第一个接口是可以开启多个会话的,第二个是不允许的。

@Bean
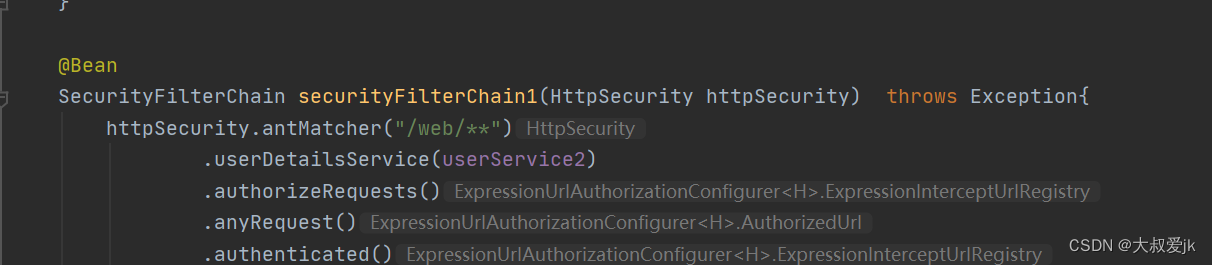
SecurityFilterChain securityFilterChain1(HttpSecurity httpSecurity) throws Exception{
httpSecurity.antMatcher("/web/**").authorizeRequests()
.anyRequest()
.authenticated()
.and()
.formLogin()
//配置处理登录请求的接口,其实就是配置了过滤器里的拦截规则,将来的登录请求就会在过滤器中被处理
.loginProcessingUrl("/web/login")
//配置登录表单中用户名的 key
.usernameParameter("username")
//配置登录表单中的密码 默认也是username 和 password
.passwordParameter("password")
.successHandler((request, response, authentication) -> {
response.setContentType("application/json;charset=utf-8");
ResBean resBean = ResBean.ok("登陆成功web");
String s = new ObjectMapper().writeValueAsString(resBean);
response.getWriter().write(s);
})
.and()
.sessionManagement()
//设置会话的最大并发数
.maximumSessions(1)
//达到最大登录数后,是否要阻止下一个登录
.maxSessionsPreventsLogin(true)
//关闭默认的csrf认证
.and()
.and()
.csrf().disable();
return httpSecurity.build();
}
@Bean
SecurityFilterChain securityFilterChain2(HttpSecurity httpSecurity) throws Exception{
httpSecurity.antMatcher("/v1/**").authorizeRequests()
.anyRequest()
.authenticated()
.and()
//开始配置登录表单
.formLogin()
//配置登录页面,如果访问了一个需要登录以后才能访问的页面,那么就会自动登录到这个页面
.loginPage("/login.html")
//配置处理登录请求的接口,其实就是配置了过滤器里的拦截规则,将来的登录请求就会在过滤器中被处理
.loginProcessingUrl("/v1/login")
//配置登录表单中用户名的 key
.usernameParameter("username")
//配置登录表单中的密码 默认也是username 和 password
.passwordParameter("password")
//配置登录成功后访问的接口
.successHandler((request, response, authentication) -> {
response.setContentType("application/json;charset=utf-8");
ResBean resBean = ResBean.ok("登陆成功v1");
String s = new ObjectMapper().writeValueAsString(resBean);
response.getWriter().write(s);
})
.and()
.sessionManagement().disable()
//关闭默认的csrf认证
.csrf().disable();
return httpSecurity.build();
}
红框里的就是已经添加的过滤器链,感兴趣的可以自己在记事本打开看看。
注意的是,规则一定要统一,一条执行链的规则,如/web/**,下面一切的接口都加/web/**,包括登录的接口
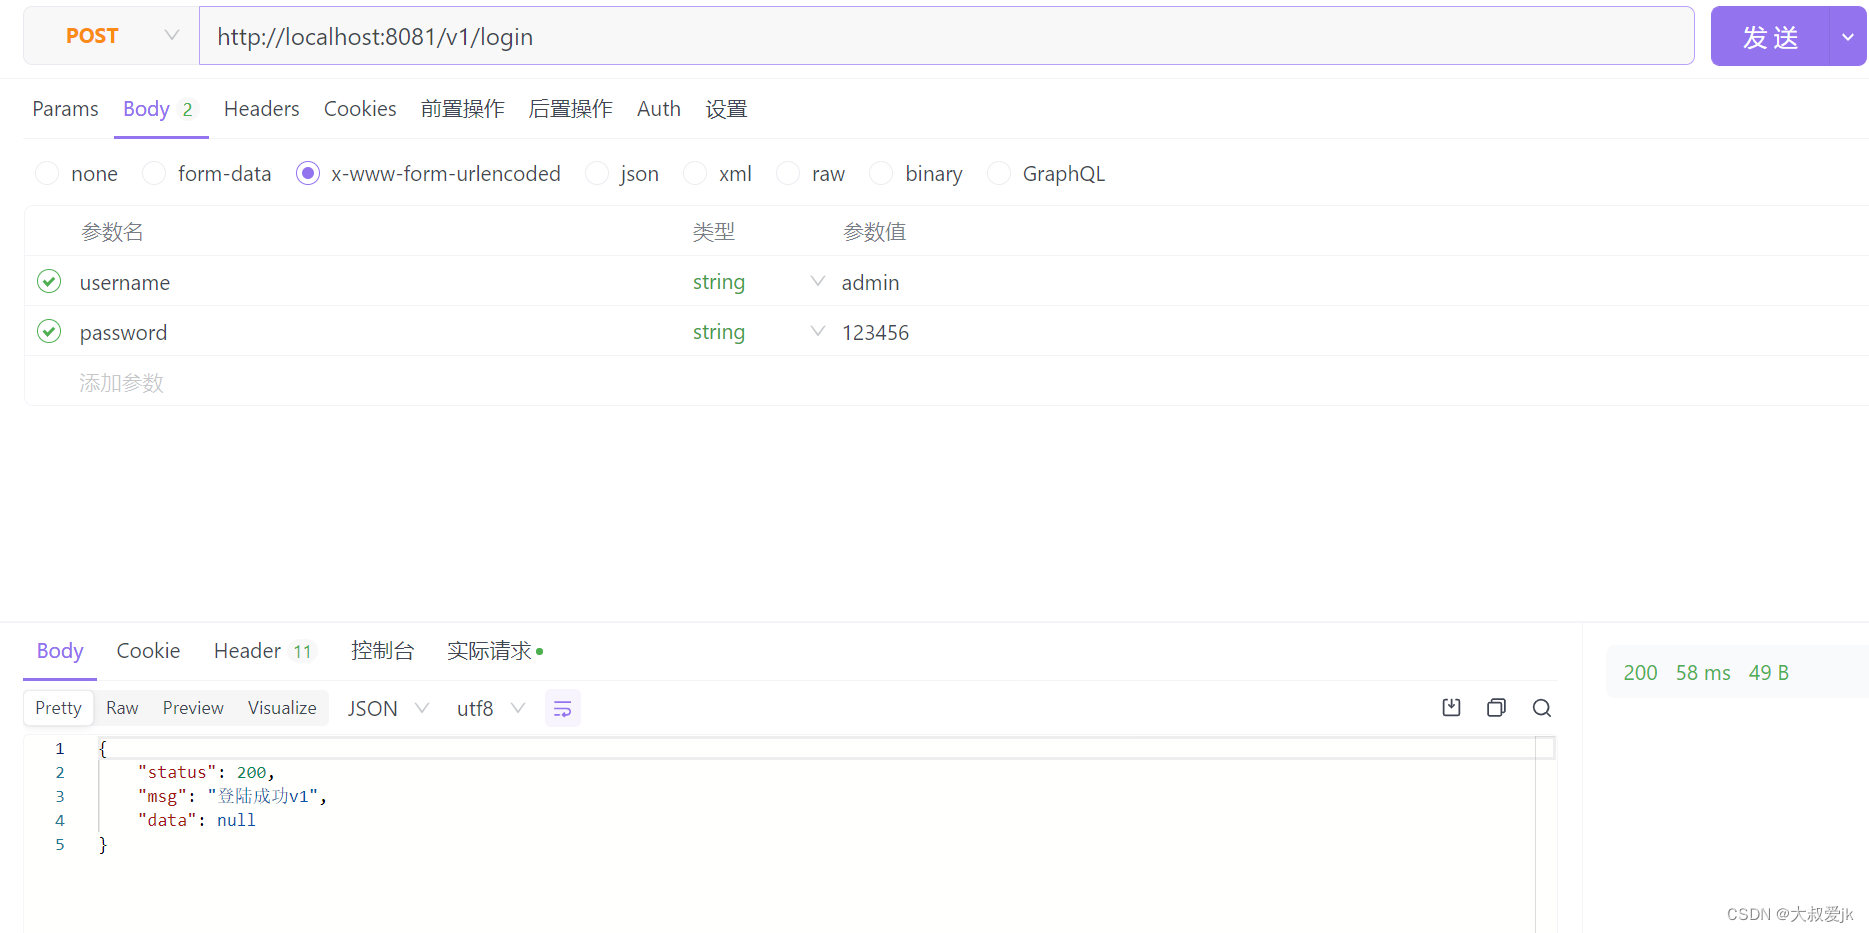
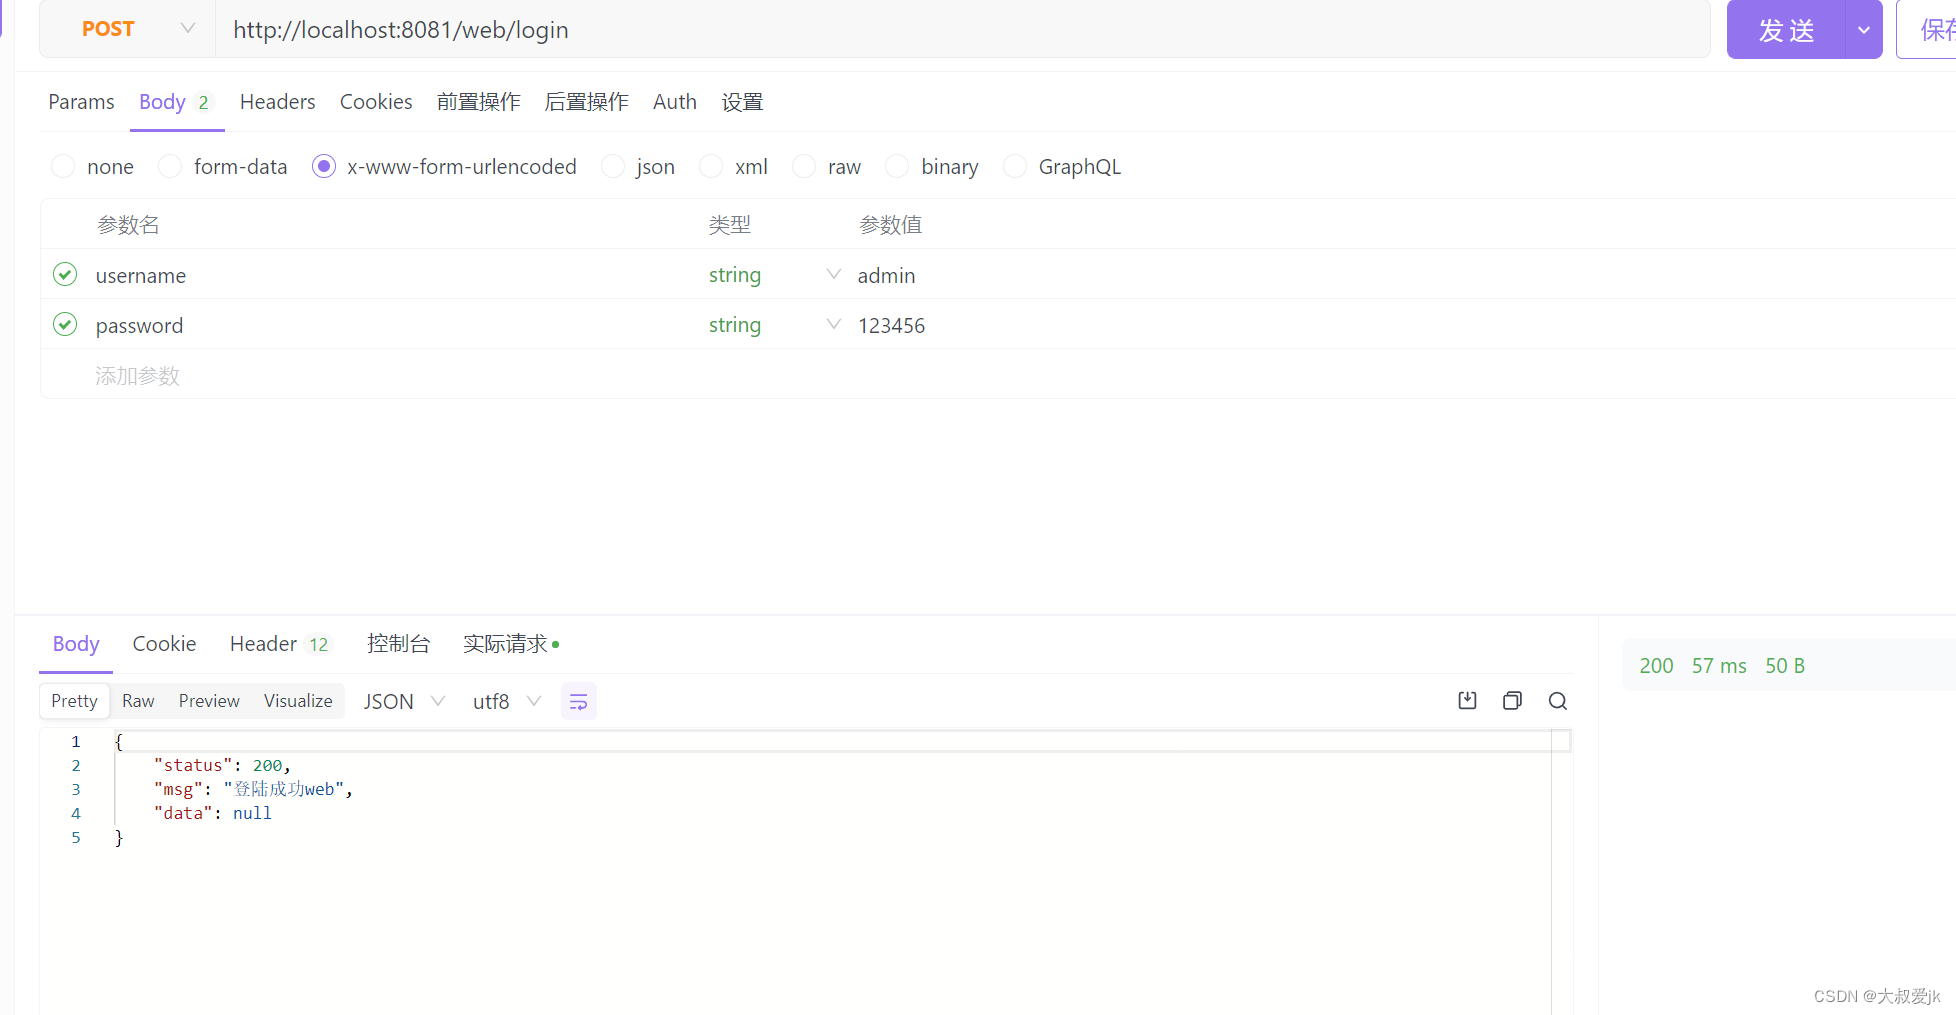
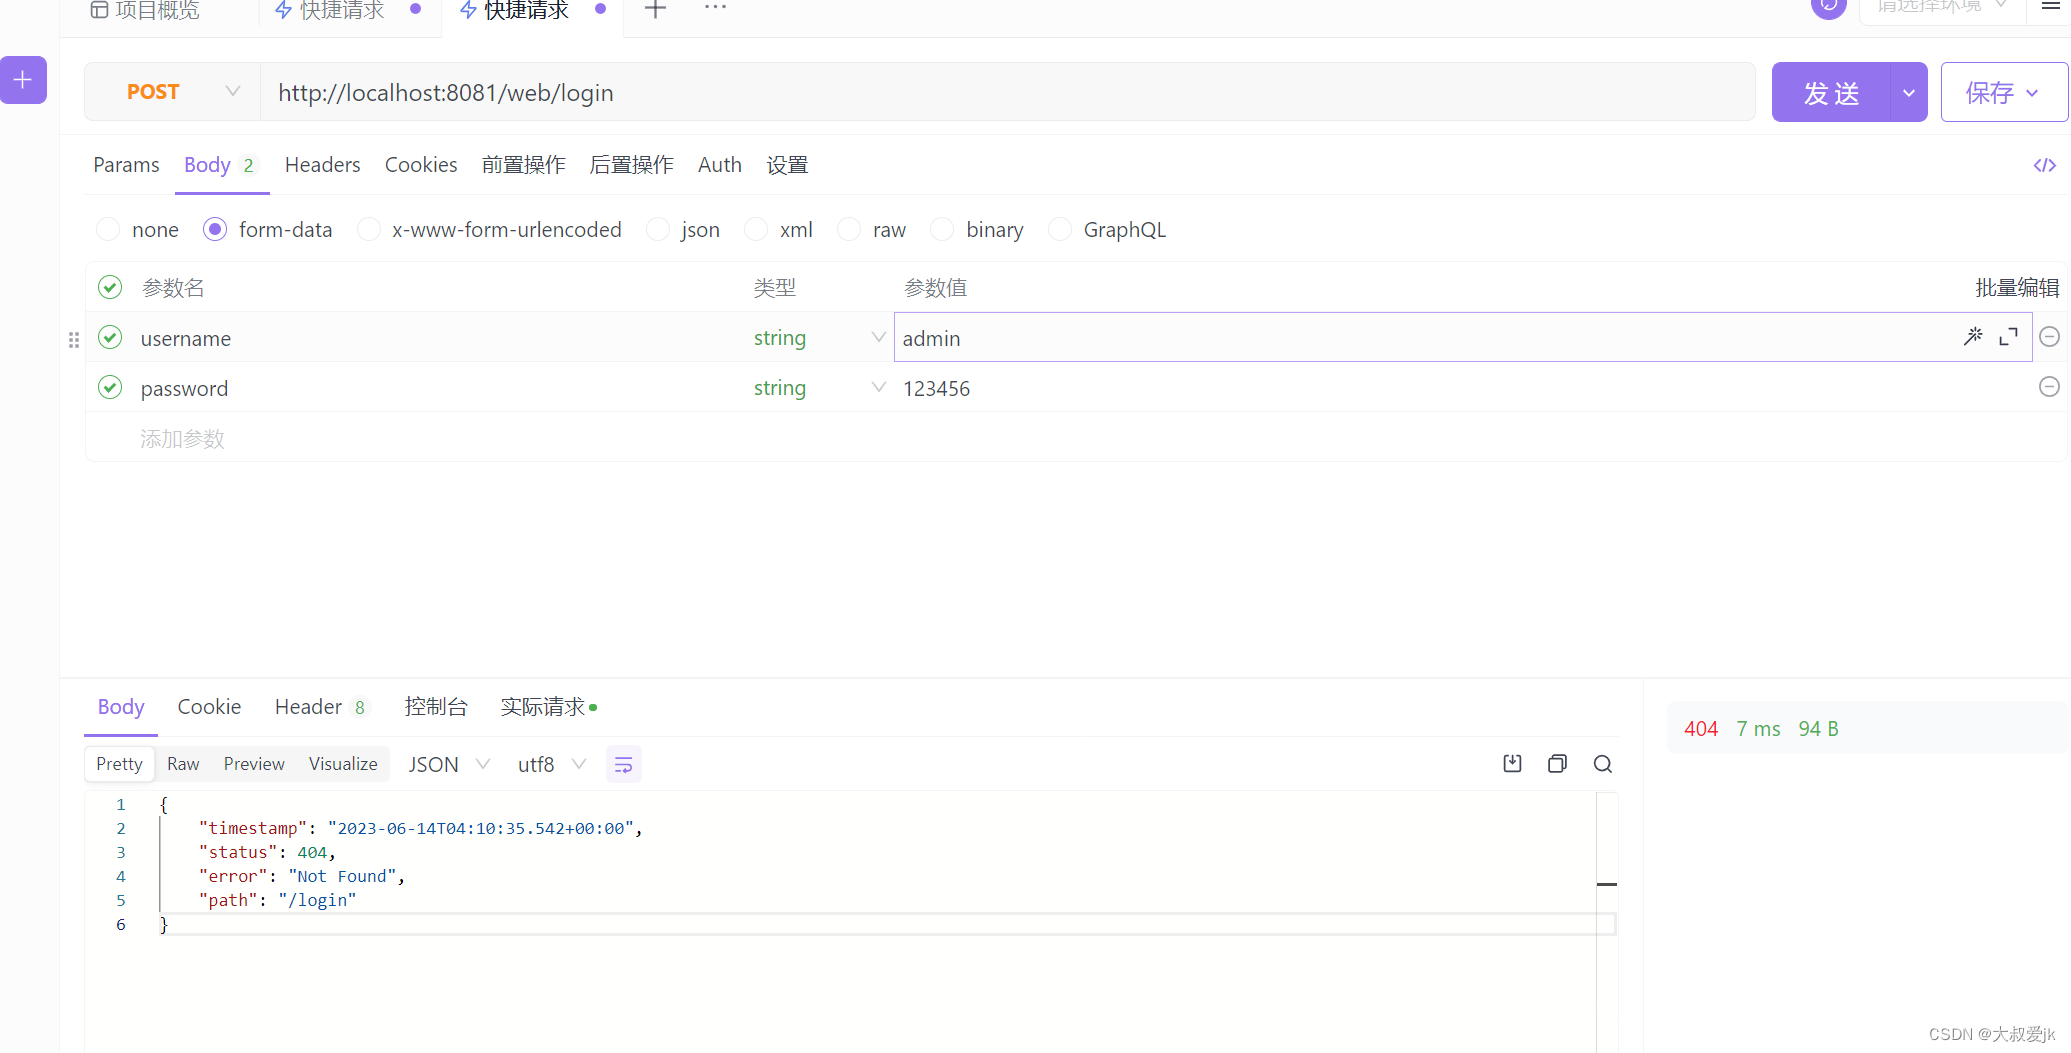
我们再去浏览器登一下看看效果,/web的是设置了最大会话数的,v1的没有设置

报错了
第二个请求肯定是成功的,这里留给大家自己尝试。
再就是多用户了,security也是支持的,也就是有多个UserService
可以是UserService1,UserService2
然后分别注入不同的过滤器执行链中,如下
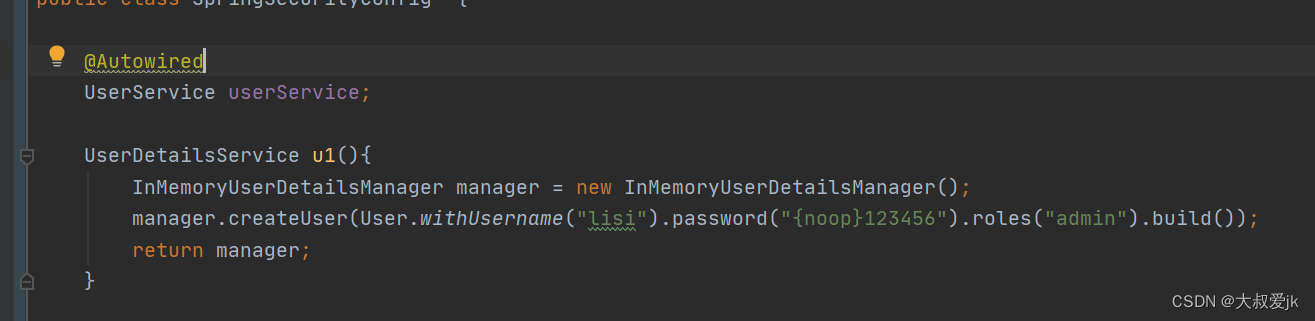

上图,我直接在内存中写了个用户,模拟不同表的用户,下面是数据库的用户登录。

效果就是对应的UserService只能登上对应的过滤器链。
也就是lisi这个账号只能上/v1,admin只能上/web
想看效果的同学可以再复制一个UserService2出来,
这样就能看出效果了,
admin这个账号就哪也登不上了,
zhangsan只能登/web这条链,
lisi也只能登/v1这条链

上图回到了登录页,说明登录失败。
总结一下,当出现多个userService时,过滤器执行链选择了哪个,就只会用那一个userService。另外。
希望大家看完能有所收获。最后贴个demo代码吧security_demo: 一个简单详细的security的学习项目