一、介绍
Staple综合了局部特征HOG和全局特征颜色直方图用于目标跟踪的算法。
首先作者发现颜色分布不足以将目标和背景区分开来。局部特征这样的模板在应对剧烈形变的时候效果往往很差。
作者针对这两个问题做了一些相关工作得到以下结论。
- 卷积滤波器对剧烈形变不鲁棒。
- 在线学习可能会带来模型漂移,也就是算法是将预测作为正样本来训练,更新模型。如果一旦预测不对,后面也跟着错。
- 颜色直方图是不考虑像素位置的,这在一定程度上可以减少形变的影响。
- 相关滤波CF的鲁棒性比较强,在目标颜色和背景颜色区分力度不够时可以发挥作用。
因此作者结合了这些实现目标跟踪。
二、理论方法
2.1 总体方法
p t = a r g m a x p ∈ S t f ( T ( x t , p ) ; θ t − 1 ) p_t=argmax_{p{\in}S_t} f(T(x_t,p);{\theta}_{t-1}) pt=argmaxp∈Stf(T(xt,p);θt−1)
对于 t t t帧,可以通过矩形 p t p_t pt在图像 x t x_t xt中选择一个目标,并令得分函数的值最大。
( f f f是矩形窗口 p p p的得分函数,得分函数 T T T是一种图像变换, θ \theta θ是模型参数)
θ t = a r g m i n θ ∈ Q { L ( θ ; X t + λ R ( θ ) } \theta_t=argmin_{\theta \in Q}\{L(\theta;X_t+\lambda R(\theta)\} θt=argminθ∈Q{ L(θ;Xt+λR(θ)}
X t = { ( x i , p i ) } i = 1 t X_t=\{(x_i,p_i)\}^t_{i=1} Xt={ (xi,pi)}i=1t
可以取一组 θ \theta θ使得整个损失函数最小。
( L L L是和前面帧的目标位置有关的函数, R R R是正则项)
2.2 得分函数
f ( x ) = γ t m p l f t m p l ( x ) + γ h i s t f h i s t ( x ) f(x)={\gamma}_{tmpl}f_{tmpl}(x)+{\gamma}_{hist}f_{hist}(x) f(x)=γtmplftmpl(x)+γhistfhist(x)
f t m p l ( x ; h ) = ∑ u ∈ τ h [ u ] T ϕ x [ u ] f_{tmpl}(x;h)=\sum_{u\in{\tau}}h[u]^T\phi_x[u] ftmpl(x;h)=u∈τ∑h[u]Tϕx[u]
ϕ x : τ → R K \phi_x:\tau\rightarrow\mathbb{R}^K ϕx:τ→RK
τ : ⊂ Z 2 \tau:\subset\mathbb{Z}^2 τ:⊂Z2
f函数是由两项组成,一项是模板的得分,第二项是直方图得分。这个公式代表,假设一张图像x用 Z 2 Z^2 Z2表示
三、论文笔记
STAPLE目标跟踪算法结合了HOG特征和颜色直方图两种方法。由于HOG特征对运动模糊和照度较为鲁棒,但是对形变不够鲁棒,而相对应的颜色直方图对形变非常鲁棒,对光照变化不够鲁棒。因此两种方法可以互补,故同时使用这两种方法,分为两个通道进行处理。
该算法在第一帧使用矩形框指定目标,然后在视频中跟踪一个不熟悉的物体并对其外观的变化保持鲁棒性。由于一个物体的外观在视频中可能会出现很大变化,因此只从使用第一帧计算的模型估算其他帧不会很有效,通常的做法是将跟踪帧中的预测作为训练数据更新模型。在每一帧图像中搜索目标位置时,考虑先将图像的各个旋转中进行搜索,然后再在比例放缩中进行搜索。
四、代码测试
论文作者使用MATLAB实现这个算法。而本人使用的是Github上的大神xuduo35以C++实现的版本,原Github项目链接如下:
论文源代码(MATLAB):
https://github.com/bertinetto/staple
xuduo35(C++):
https://github.com/xuduo35/STAPLE
本文参考xuduo34的代码,调用了该项目中fhog.cpp、fhog.h、sse.hpp、staple_tracker.cpp、staple_tracker.hpp文件,下面只放出main函数代码。
int main(int argc, char * argv[]){


    // 数据定义
    STAPLE_TRACKER staple;  //创建staple跟踪对象
    std::vector<cv::Rect_<float>> result_rects;     //创建矩形容器,存储所有算法识别出的跟踪框
    cv::VideoCapture capture(0);	//创建VideoCapture类
    cv::Mat image;      //用来存储每一帧
    cv::Mat tempImage;  //每一帧的临时变量
    int64 tic, toc;     //算法运行时间起始点与终止点
    double time = 0;
    bool show_visualization = true;
    bool first_image = true;

    // 设置鼠标操作回调函数
    cv::namedWindow("STAPLE");
    cv::setMouseCallback("STAPLE", on_MouseHandle, (void*)&image);

    while(1){


        capture.read(image);	//逐帧读取视频
        flip(image, image, 1);	//将读取的视频左右反转
        if (image.empty()) {

    	//如果视频结束或未检测到摄像头则跳出循环
            break;
        }

        if(drawing_finished == false){


            // 鼠标按下drawing_box=true,在视频画面frame上画矩形
            if( drawing_box ){


                tempImage.copyTo(image);
                cv::rectangle(image,groundtruth_rect.tl(),groundtruth_rect.br(),cv::Scalar(0,0,255));// 画框
            }
            else{


                image.copyTo(tempImage);//拷贝源图到临时变量
            }
        }
        else{


            // 如果是第一帧图像,则进行staple初始化操作,反之则只更新staple
            if (first_image){


                // staple初始化操作
                staple.tracker_staple_initialize(image, groundtruth_rect);
                // staple目标追踪
                staple.tracker_staple_train(image, true);
                first_image = false;
            } else{


                groundtruth_rect = staple.tracker_staple_update(image);
                staple.tracker_staple_train(image, false);
            }
        }
        // 可视化部分
        if (show_visualization) {


            // 显示算法识别的跟踪框
            cv::rectangle(image, groundtruth_rect, cv::Scalar(0, 128, 255), 2);

            // 写入测试视频
            // ******************** //
            // video.write(image);
            // ******************** //

            // 输出图像显示结果
            cv::imshow("STAPLE", image);
            std::cout << "Center: [" << groundtruth_rect.tl().x +groundtruth_rect.width/2 << ", " << groundtruth_rect.tl().y + groundtruth_rect.height/2 << "]" << std::endl;

            char key = cv::waitKey(10);
            if (key == 27 || key == 'q' || key == 'Q')
                break;
        }


    }
    cv::destroyAllWindows();

}


/******************** 函数定义 ********************/
// 使轴对齐
cv::Rect_<float> getAxisAlignedBB(std::vector<cv::Point2f> polygon)
{


    double cx = double(polygon[0].x + polygon[1].x + polygon[2].x + polygon[3].x) / 4.;
    double cy = double(polygon[0].y + polygon[1].y + polygon[2].y + polygon[3].y) / 4.;
    double x1 = std::min(std::min(std::min(polygon[0].x, polygon[1].x), polygon[2].x), polygon[3].x);
    double x2 = std::max(std::max(std::max(polygon[0].x, polygon[1].x), polygon[2].x), polygon[3].x);
    double y1 = std::min(std::min(std::min(polygon[0].y, polygon[1].y), polygon[2].y), polygon[3].y);
    double y2 = std::max(std::max(std::max(polygon[0].y, polygon[1].y), polygon[2].y), polygon[3].y);
    double A1 = norm(polygon[1] - polygon[2])*norm(polygon[2] - polygon[3]);
    double A2 = (x2 - x1) * (y2 - y1);
    double s = sqrt(A1 / A2);
    double w = s * (x2 - x1) + 1;
    double h = s * (y2 - y1) + 1;
    cv::Rect_<float> rect(cx-1-w/2.0, cy-1-h/2.0, w, h);
    return rect;

}
// 获取groundtruth内的矩形坐标
std::vector<cv::Rect_<float>> getgroundtruth(std::string txt_file)
{


    std::vector<cv::Rect_<float>> rects;
    std::ifstream gt;
    gt.open(txt_file.c_str());
    if (!gt.is_open())
        std::cout << "Ground truth file " << txt_file
                  << " can not be read" << std::endl;
    std::string line;
    float x1, y1, x2, y2, x3, y3, x4, y4;
    while (getline(gt, line)) {


        std::replace(line.begin(), line.end(), ',', ' ');
        std::stringstream ss;
        ss.str(line);
        ss >> x1 >> y1 >> x2 >> y2 >> x3 >> y3 >> x4 >> y4;
        std::vector<cv::Point2f>polygon;
        polygon.push_back(cv::Point2f(x1, y1));
        polygon.push_back(cv::Point2f(x2, y2));
        polygon.push_back(cv::Point2f(x3, y3));
        polygon.push_back(cv::Point2f(x4, y4));
        rects.push_back(getAxisAlignedBB(polygon)); //0-index
    }
    gt.close();
    return rects;
}
// 第一帧画框鼠标响应
void on_MouseHandle(int event, int x, int y, int flags, void* param ){


    cv::Mat& image = *(cv::Mat*) param;
    switch( event)
    {


        //鼠标移动消息
        case cv::EVENT_MOUSEMOVE:
        {


            if( drawing_box )//如果是否进行绘制的标识符为真,则记录下长和宽到RECT型变量中
            {


                groundtruth_rect.width = x-groundtruth_rect.x;
                groundtruth_rect.height = y-groundtruth_rect.y;
            }
        }
            break;

            //左键按下消息
        case cv::EVENT_LBUTTONDOWN:
        {


            drawing_box = true;
            groundtruth_rect = cv::Rect( x, y, 0, 0 );//记录起始点
        }
            break;

            //左键抬起消息
        case cv::EVENT_LBUTTONUP:
        {


            drawing_box = false;//置标识符为false
            drawing_finished = true;
            //对宽和高小于0的处理
            if( groundtruth_rect.width < 0 )
            {


                groundtruth_rect.x += groundtruth_rect.width;
                groundtruth_rect.width *= -1;
            }

            if( groundtruth_rect.height < 0 )
            {


                groundtruth_rect.y += groundtruth_rect.height;
                groundtruth_rect.height *= -1;
            }
            //调用函数进行绘制
            cv::rectangle(image,groundtruth_rect.tl(),groundtruth_rect.br(),cv::Scalar(0,0,255));// 画框
        }
            break;
    }
}
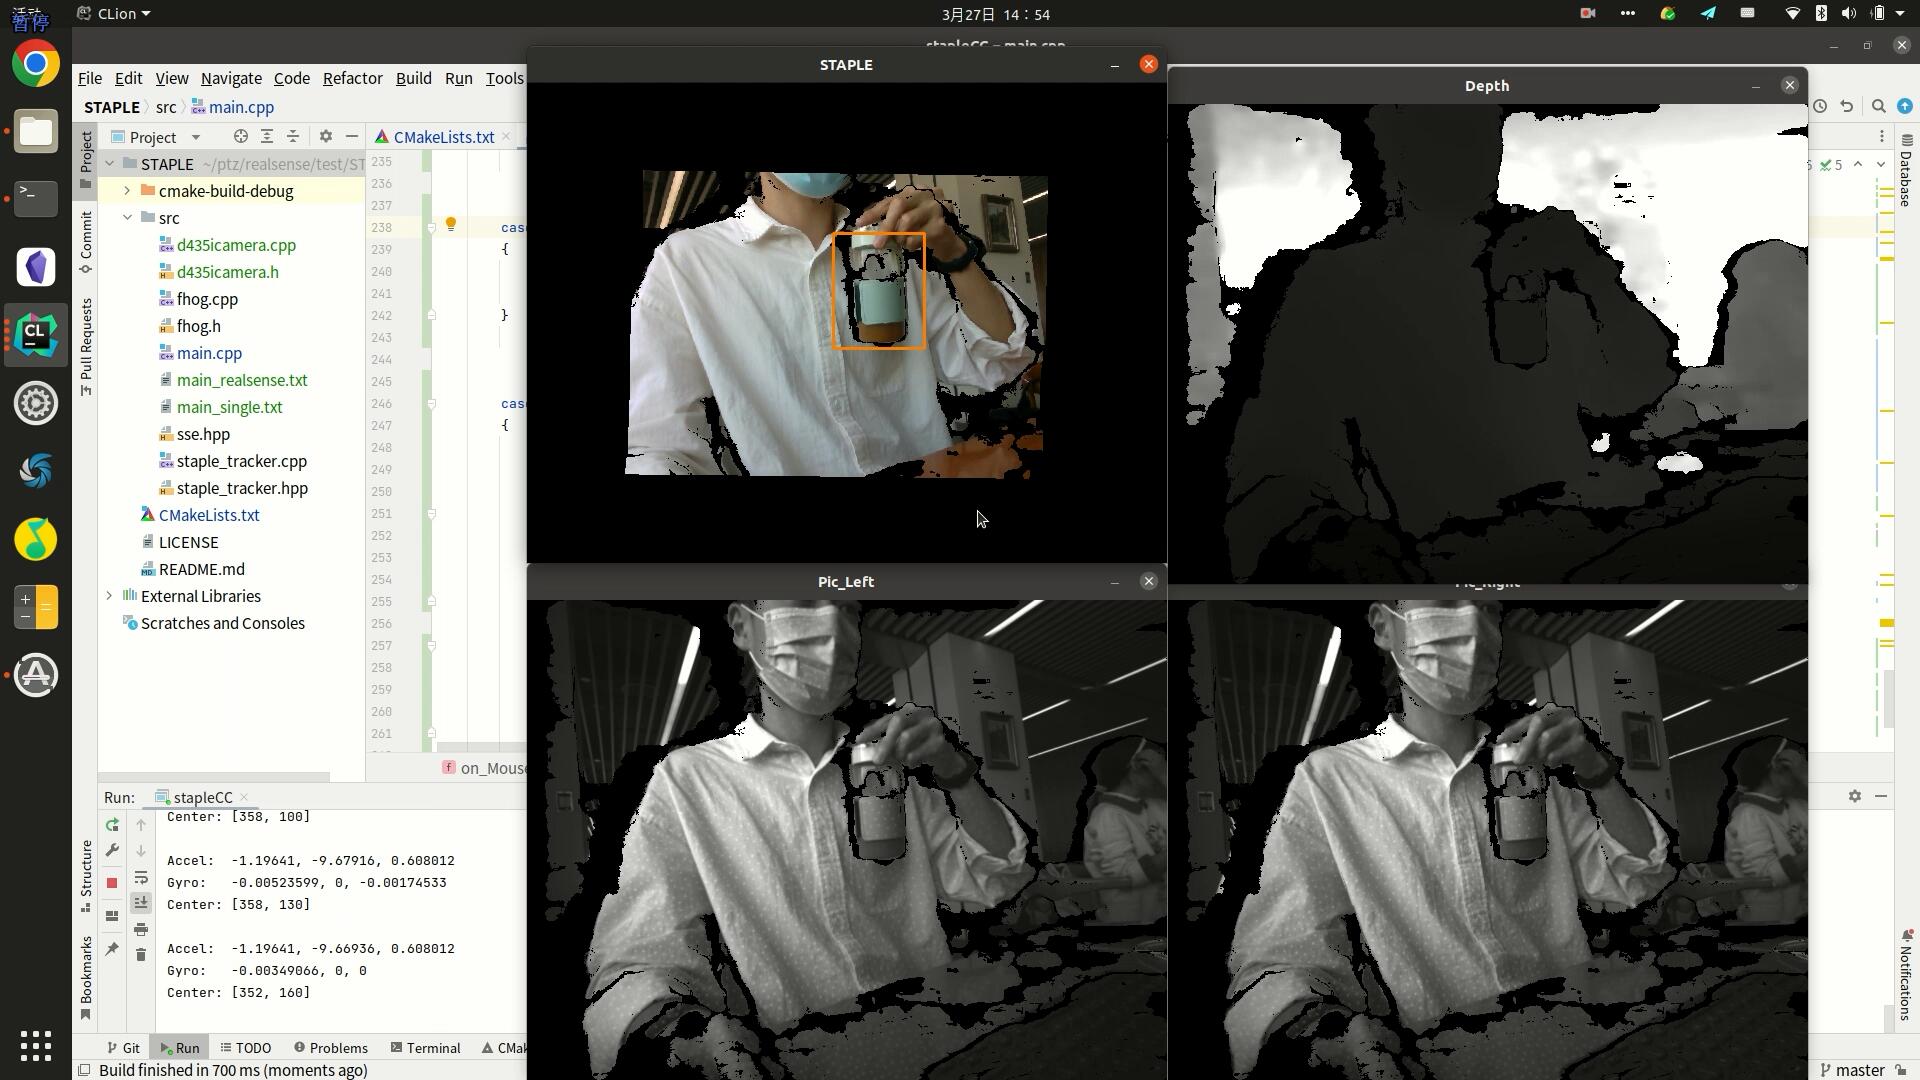
下图为在Staple目标跟踪程序的基础上改编,与Realsense D435i相机的深度图结合的测试程序。
因为是毕设完整代码就不放出来了,大家可以根据自己需求,在xuduo C++版本代码的基础上修改。
本博客文章首先发布于个人博客:https://www.mahaofei.com/,欢迎大家访问。