1.环境准备
Linux centos7.6
nginx-1.18.0 源码包
wget http://nginx.org/download/nginx-1.8.1.tar.gz
nginx-rtmp-module-master 模块包
https://github.com/arut/nginx-rtmp-module
ffmpeg 源码包
wget http://www.ffmpeg.org/releases/ffmpeg-3.4.tar.gz
yasm rpm包
yum install yasm -y

2.依赖环境包安装:
安装依赖包:

其中需要用到pcre zlib openssl
yum install git gcc gcc-c++ openssl openssl-devel pcre pcre-devel zlib zlib-devel -y
3.源码包解压:
3.1解压nginx-rtmp-module-master 先解压后用
[root@imagesrs data]#unzip nginx-rtmp-module-master.zip
4.安装源码包nginx:
[root@imagesrs data]#tar -xvf nginx-1.18.0.tar.gz
[root@imagesrs data]#cd nginx-1.18.0/
[root@imagesrs data]#useradd -r -s /sbin/nologin nginx
[root@imagesrs nginx-1.18.0]#cd nginx-1.18.0/

[root@Centos7 nginx-1.18.0]# ./configure --prefix=/usr/local/nginx \
--user=nginx \
--group=nginx \
--with-http_ssl_module \
--with-http_v2_module \
--with-http_realip_module \
--with-http_stub_status_module \
--with-http_gzip_static_module \
--with-pcre \
--with-stream \
--with-stream_ssl_module \
--with-stream_realip_module \
--add-module=/data/nginx-rtmp-module-master

[root@Centos7 nginx-1.18.0]#make
[root@Centos7 nginx-1.18.0]#make install
创建软链接
[root@Centos7 sbin]# ln -s /usr/local/nginx/sbin/nginx  /usr/sbin/
[root@Centos7 sbin]# ls /usr/sbin/nginx
查看模块/版本:
Nginx -V
5.安装ffmpeg
5.1解压ffmpeg
[root@imagesrs data]# tar -xvf ffmpeg-4.1.tar.gz
[root@imagesrs data]# cd ffmpeg-4.1/
[root@imagesrs ffmpeg-4.1]# ./configure --enable-shared --prefix=/usr/local/ffmpeg
[root@imagesrs ffmpeg-4.1]#make
[root@imagesrs ffmpeg-4.1]#make install
5.2添加库文件:
vim /etc/ld.so.conf
/usr/local/ffmpeg/lib
生效:
[root@imagesrs ffmpeg-4.1]# ldconfig
添加环境变量:
vim /etc/profile
在最后一行加入:
PATH=$PATH:/usr/local/ffmpeg/bin
export PATH
生效:
[root@imagesrs etc]#source /etc/profile

查看ffmpeg是否生效:
[root@imagesrs etc]#ffmpeg -version
5.3添加nginx-rtmp 模块配置文件
user  nginx;
worker_processes  1;

#error_log  logs/error.log;
#error_log  logs/error.log  notice;
#error_log  logs/error.log  info;

#pid        logs/nginx.pid;


events {


    worker_connections  1024;
}
rtmp{


    server{


	listen 1935;
	application myapp{


	live on;
}
application hls{


	live on;
	hls on;
	hls_path /tmp/hls;
	}
    }
}

http {


    include       mime.types;
    default_type  application/octet-stream;

    log_format  main  '$remote_addr - $remote_user [$time_local] "$request" '
                      '$status $body_bytes_sent "$http_referer" '
                      '"$http_user_agent" "$http_x_forwarded_for"';

    access_log  logs/access.log  main;

    sendfile        on;
    #tcp_nopush     on;

    #keepalive_timeout  0;
    keepalive_timeout  65;

    gzip  on;

     server {


        listen       80;
        server_name  localhost;

        #charset koi8-r;

        #access_log  logs/host.access.log  main;

        location / {


            root   html;
            index  index.html index.htm;
        }
	location /hls {


	     types {


		application/vnd.apple.mpegurl m3u8;
		video/mp2t ts;
	  }
		root /tmp;
		add_header Cache-Control no-cache;
	}

        #error_page  404              /404.html;

        # redirect server error pages to the static page /50x.html
        #
        error_page   500 502 503 504  /50x.html;
        location = /50x.html {


            root   html;
        }
 # proxy the PHP scripts to Apache listening on 127.0.0.1:80
        #
        #location ~ \.php$ {


        #    proxy_pass   http://127.0.0.1;
        #}
# pass the PHP scripts to FastCGI server listening on 127.0.0.1:9000
        #
        #location ~ \.php$ {


        #    root           html;
        #    fastcgi_pass   127.0.0.1:9000;
        #    fastcgi_index  index.php;
        #    fastcgi_param  SCRIPT_FILENAME  /scripts$fastcgi_script_name;
        #    include        fastcgi_params;
        #}

        # deny access to .htaccess files, if Apache's document root
        # concurs with nginx's one
        #
        #location ~ /\.ht {


        #    deny  all;
        #}
    }
# another virtual host using mix of IP-, name-, and port-based configuration
    #
    #server {


    #    listen       8000;
    #    listen       somename:8080;
    #    server_name  somename  alias  another.alias;

    #    location / {


    #        root   html;
    #        index  index.html index.htm;
    #    }
    #}
 # HTTPS server
    #
    #server {


    #    listen       443 ssl;
    #    server_name  localhost;

    #    ssl_certificate      cert.pem;
    #    ssl_certificate_key  cert.key;

    #    ssl_session_cache    shared:SSL:1m;
    #    ssl_session_timeout  5m;

    #    ssl_ciphers  HIGH:!aNULL:!MD5;
    #    ssl_prefer_server_ciphers  on;

    #    location / {


    #        root   html;
    #        index  index.html index.htm;
    #    }
    #}
	include /usr/local/nginx/conf.d/*.conf;
}
检查有配置没有问题
Nginx -t
5.4 启动nginx 服务
[root@imagesrs local]# nignx
Rtmp :1935   nginx :80

5.5 使用ffmpeg 进行转换

[root@imagesrs vedio]#ffmpeg -re -i test.mp4 -vcodec copy -codec copy -f flv rtmp://192.168.91.133/hls/cctv
将test.mp4 转换成rtmp://192.168.91.133/hls/cctv 格式输出
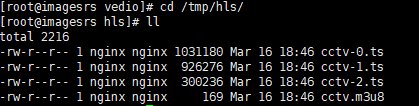
 切片保留位置,结束即刻自动删除
然后利用VLC 进行拉流测试

测试功能
ffmpeg -re -i 123.mp4 -vcodec copy -codec copy -f flv rtmp://你的ip/hls/cctv
测试访问
视频切片保存位置:/tmp/hls/
m3u8视频访问地址:http://你的ip/hls/cctv.m3u8


利用别人得rtmp 进行转换

ffmpeg -re -i rtmp://58.200.131.2:1935/livetv/hunantv -vcodec copy -codec copy -f flv rtmp://192.168.91.133/hls/cctv
参考网址: