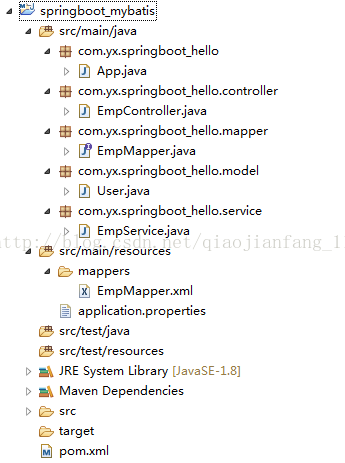
项目结构如图所示:
一、新建Maven工程,如不熟悉可参考 https://blog.csdn.net/qiaojianfang_1148/article/details/80050684
1、在pom.xml引入SpringBoot的依赖包!
<project xmlns="http://maven.apache.org/POM/4.0.0" xmlns:xsi="http://www.w3.org/2001/XMLSchema-instance"
xsi:schemaLocation="http://maven.apache.org/POM/4.0.0 http://maven.apache.org/xsd/maven-4.0.0.xsd">
<modelVersion>4.0.0</modelVersion>
<groupId>com.yx</groupId>
<artifactId>springboot_hello</artifactId>
<version>0.0.1-SNAPSHOT</version>
<!-- 将当前项目作为springboot-starter的一个子模块 -->
<parent>
<groupId>org.springframework.boot</groupId>
<artifactId>spring-boot-starter-parent</artifactId>
<version>1.4.1.RELEASE</version>
</parent>
<!-- 完成全局配置的替换,覆盖 -->
<properties>
<java.version>1.8</java.version>
</properties>
<!-- 引入相关的能力 -->
<dependencies>
<dependency>
<groupId>
org.springframework.boot
</groupId>
<artifactId>spring-boot-starter-web</artifactId>
</dependency>
<!-- jdbc -->
<dependency>
<groupId>mysql</groupId>
<artifactId>mysql-connector-java</artifactId>
</dependency>
<dependency>
<groupId>org.springframework.boot</groupId>
<artifactId>spring-boot-starter-jdbc</artifactId>
</dependency>
<dependency>
<groupId>org.mybatis.spring.boot</groupId>
<artifactId>mybatis-spring-boot-starter</artifactId>
<version>1.0.0</version>
</dependency>
</dependencies>
</project>
2、在配置文件中添加配置信息:
如:
mysql -u root -p
则写成这样:
spring.datasource.username=root
spring.datasource.password=//======================================================
以下内容修改红色部分为自己的配置:
spring.datasource.url=jdbc:mysql://127.0.0.1:3306/修改为自己的数据库名称
spring.datasource.username=数据库登录账号
spring.datasource.password=数据库登录密码
spring.datasource.driver-class-name=com.mysql.jdbc.Driver
spring.datasource.max-idle=10
spring.datasource.max-wait=10000
spring.datasource.min-idle=5
spring.datasource.initial-size=5
server.port=8080
server.session.timeout=10
server.tomcat.uri-encoding=UTF-8
# mybatis.config= classpath:mybatis-config.xml
mybatis.mapperLocations=classpath:mappers/*.xml
# domain object's package
# mybatis.typeAliasesPackage=com.yx.springboot_hello.model
# handler's package
# mybatis.typeHandlersPackage=
# check the mybatis configuration exists
# mybatis.check-config-location=
# mode of execution. Default is SIMPLE
# mybatis.executorType=
3、依次添加mapper的接口类和xml文件
1)在src/main/java中添加mapper类
package com.yx.springboot_mybatis.mapper;
import java.util.List;import com.yx.springboot_mybatis.model.User;
public interface EmpMapper {
List<User> selectAll();
}
2)在src/main/resources 新建mappers文件夹:
<?xml version="1.0" encoding="UTF-8" ?>
<!DOCTYPE mapper PUBLIC "-//mybatis.org//DTD Mapper 3.0//EN" "http://mybatis.org/dtd/mybatis-3-mapper.dtd" >
<mapper namespace="com.yx.springboot_mybatis.mapper.EmpMapper" >
<resultMap id="BaseResultMap" type="com.yx.springboot_mybatis.model.User" >
<id column="emp_id" property="emp_id" jdbcType="INTEGER" />
<result column="loginname" property="loginname" jdbcType="VARCHAR" />
<result column="telephone" property="telephone" jdbcType="VARCHAR" />
</resultMap>
<sql id="Base_Column_List" >
emp_id, loginname, telephone
</sql>
<select id="selectAll" resultMap="BaseResultMap" parameterType="java.lang.String" >
select
<include refid="Base_Column_List" />
from emp
</select>
</mapper>

这里面的内容都要根据实际情况进行修改
User 类:
package com.yx.springboot_mybatis.model;
//user的变量名必须跟mapper中的字段一一对应public class User {
private int emp_id;
private String loginname;
private String telephone;
public int getEmp_id() {
return emp_id;
}
public void setEmp_id(int emp_id) {
this.emp_id = emp_id;
}
public String getLoginname() {
return loginname;
}
public void setLoginname(String loginname) {
this.loginname = loginname;
}
public String getTelephone() {
return telephone;
}
public void setTelephone(String telephone) {
this.telephone = telephone;
}
}
Service类:
package com.yx.springboot_mybatis.service;
import java.util.ArrayList;
import java.util.List;
import org.springframework.beans.factory.annotation.Autowired;
import org.springframework.stereotype.Service;
import com.yx.springboot_mybatis.mapper.EmpMapper;
import com.yx.springboot_mybatis.model.User;
@Service
public class EmpService {
@Autowired
private EmpMapper mapper;
public List<User> getUsers(){
List<User> list = new ArrayList<User>();
list = mapper.selectAll();
return list;
}
}
Controller类:
package com.yx.springboot_mybatis.controller;
import java.util.List;
import org.springframework.beans.factory.annotation.Autowired;
import org.springframework.web.bind.annotation.RequestMapping;
import org.springframework.web.bind.annotation.RestController;
import com.yx.springboot_mybatis.model.User;
import com.yx.springboot_mybatis.service.EmpService;
@RestController
@RequestMapping("/emp")
public class EmpController {
@Autowired
private EmpService service;
@RequestMapping("/getAll")
public List<User> getAllMessage(){
List<User> list = service.getUsers();
return list;
}
}
启动类:
package com.yx.springboot_mybatis;
import org.springframework.boot.SpringApplication;
import org.springframework.boot.autoconfigure.SpringBootApplication;
@SpringBootApplication
public class App {
//启动类
public static void main(String[] args) {
SpringApplication.run(App.class, args);
}
}
运行启动类,成功启动spring boot自带的tomcat,在浏览中输入:
http://localhost:8080/emp/getAll

如需要下载源码,请访问:https://download.csdn.net/download/qiaojianfang_1148/10368246