在App开发中,通常会使用RecyclerView来显示列表数据,并且通常会使用ItemDecoration来设置列表项之间的间距。
最近在开发公司新版App的过程中,遇到了一个特殊的列表,Item的样式是统一的,但是在某两个特定的Item之间添加了分割线,列表分为了上下两部分,如下图:
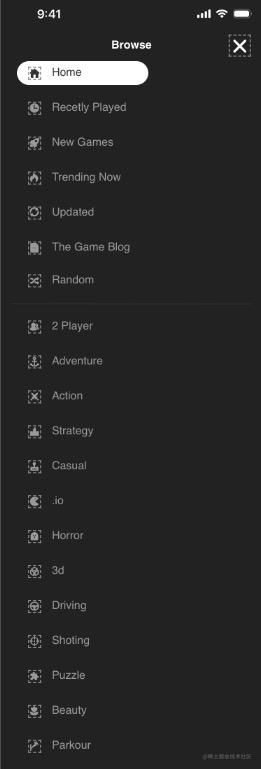
当看到这个图的时候,我的第一反应是,使用两个RecyclerView分别显示一部分数据,在两个RecyclerView中间用一个View来当分割线。这样可以很简单的实现相同的效果,但是有几点问题:
- 当设备屏幕高度不够时,需要在外层再嵌套一个
ScrollView来确保用户可以看到所有数据。 - 列表中的Item是单选的,跨两个
RecyclerView实现单选需要额外的处理。 - 这样的方式有点low哈哈哈。
ItemDecoration
ItemDecoration是RecyclerView的子类,作用是对RecyclerView的ItemView添加边距或者绘制特殊的图形。
源代码如下:
public abstract static class ItemDecoration {

    // 在绘制ItemView之前绘制所需图形,显示在ItemView下层
    public void onDraw(@NonNull Canvas c, @NonNull RecyclerView parent, @NonNull State state) {
        onDraw(c, parent);
    }

    @Deprecated
    public void onDraw(@NonNull Canvas c, @NonNull RecyclerView parent) {
    }

    // 在绘制ItemView之后绘制所需图形,显示在ItemView上层
    public void onDrawOver(@NonNull Canvas c, @NonNull RecyclerView parent,@NonNull State state) {
        onDrawOver(c, parent);
    }

    @Deprecated
    public void onDrawOver(@NonNull Canvas c, @NonNull RecyclerView parent) {
    }

    @Deprecated
    public void getItemOffsets(@NonNull Rect outRect, int itemPosition, @NonNull RecyclerView parent) {
        outRect.set(0, 0, 0, 0);
    }

    // 获取ItemView的偏移参数,outRect用于设置left、top、right、bottom四个方向的间距,默认为0
    public void getItemOffsets(@NonNull Rect outRect, @NonNull View view,@NonNull RecyclerView parent, @NonNull State state) {
        getItemOffsets(outRect, ((LayoutParams) view.getLayoutParams()).getViewLayoutPosition(),parent);
    }
}
自定义ItemDecoration
- 首先拆解需求。
- 每个Item之间的间距是16dp。
- Random项和2 Player项的间距为2倍,并且在两项中居中绘制一条2dp高的分割线,分割线颜色为363636。
- 接下来,自定义
CustomItemDecoration继承ItemDecoration,根据上面拆解的需求,需要重写onDraw和getItemOffsets两个方法,代码如下:
class CustomItemDecoration(
    private val space: Int,
    private val dividerLinePosition: Int,
    private val dividerLineHeight: Int,
    @ColorInt private val dividerLineColor: Int
) : ItemDecoration() {

    private val paint = Paint().apply {
        color = dividerLineColor
        style = Paint.Style.FILL
    }

    override fun getItemOffsets(outRect: Rect, view: View, parent: RecyclerView, state: RecyclerView.State) {
        parent.getChildLayoutPosition(view).let {
            // 指定位置底部间距设置为2倍
            if (it == dividerLinePosition) {
                outRect.bottom = space * 2
            } else {
                outRect.bottom = space
            }
        }
    }

    override fun onDraw(c: Canvas, parent: RecyclerView, state: RecyclerView.State) {
        super.onDraw(c, parent, state)
        // 根据position找到需要绘制分割线的图形
        parent.getChildAt(dividerLinePosition)?.run {
            c.drawRect(parent.paddingStart.toFloat(), (bottom + space - dividerLineHeight / 2).toFloat(), (parent.width - parent.paddingEnd).toFloat(), (bottom + space + dividerLineHeight / 2).toFloat(), paint)
        }
    }
}
Activity和Adapter代码如下:
// Activity
class CustomItemDecorationExampleActivity : AppCompatActivity() {

    override fun onCreate(savedInstanceState: Bundle?) {
        super.onCreate(savedInstanceState)
        val binding = LayoutCustomItemDecorationExampleActivityBinding.inflate(layoutInflater)
        setContentView(binding.root)
        binding.run {
            includeTitle.tvTitle.setTextColor(ContextCompat.getColor(this@CustomItemDecorationExampleActivity, R.color.white))
            includeTitle.tvTitle.text = "Custom ItemDecoration Example"
            val adapter = ItemDecorationExampleAdapter()
            rvExampleDataContainer.addItemDecoration(CustomItemDecoration(DensityUtil.dp2Px(16), 6, DensityUtil.dp2Px(2), ContextCompat.getColor(this@CustomItemDecorationExampleActivity, R.color.color_black_363636)))
            rvExampleDataContainer.adapter = adapter
            adapter.setNewData(arrayListOf(
                ItemDecorationExampleDataEntity(0, "Home", R.mipmap.icon_tag_all, true),
                ItemDecorationExampleDataEntity(1, "Recently Played", R.mipmap.icon_tag_all, false),
                ItemDecorationExampleDataEntity(2, "New Games", R.mipmap.icon_tag_all, false),
                ItemDecorationExampleDataEntity(3, "Trending Now", R.mipmap.icon_tag_all, false),
                ItemDecorationExampleDataEntity(4, "Updated", R.mipmap.icon_tag_all, false),
                ItemDecorationExampleDataEntity(5, "The Game Blog", R.mipmap.icon_tag_all, false),
                ItemDecorationExampleDataEntity(6, "Random", R.mipmap.icon_tag_all, false),
                ItemDecorationExampleDataEntity(7, "2 Player", R.mipmap.icon_tag_all, false),
                ItemDecorationExampleDataEntity(8, "Adventure", R.mipmap.icon_tag_all, false),
                ItemDecorationExampleDataEntity(9, "Action", R.mipmap.icon_tag_all, false),
                ItemDecorationExampleDataEntity(10, "Strategy", R.mipmap.icon_tag_all, false),
                ItemDecorationExampleDataEntity(11, "Casual", R.mipmap.icon_tag_all, false),
                ItemDecorationExampleDataEntity(12, ".io", R.mipmap.icon_tag_all, false),
                ItemDecorationExampleDataEntity(13, "Horror", R.mipmap.icon_tag_all, false),
                ItemDecorationExampleDataEntity(14, "3d", R.mipmap.icon_tag_all, false),
                ItemDecorationExampleDataEntity(15, "Driving", R.mipmap.icon_tag_all, false),
                ItemDecorationExampleDataEntity(16, "Shoting", R.mipmap.icon_tag_all, false),
                ItemDecorationExampleDataEntity(17, "Puzzel", R.mipmap.icon_tag_all, false),
                ItemDecorationExampleDataEntity(18, "Beauty", R.mipmap.icon_tag_all, false),
                ItemDecorationExampleDataEntity(19, "Parkour", R.mipmap.icon_tag_all, false),
            ))
        }
    }
}

// Adapter
class ItemDecorationExampleAdapter : RecyclerView.Adapter<ItemDecorationExampleAdapter.ItemDecorationExampleViewHolder>() {

    private val containerData = ArrayList<ItemDecorationExampleDataEntity>()

    private var lastSelectedItem = -1

    override fun onCreateViewHolder(parent: ViewGroup, viewType: Int): ItemDecorationExampleViewHolder {
        return ItemDecorationExampleViewHolder(LayoutCustomItemDecorationExampleItemBinding.inflate(LayoutInflater.from(parent.context), parent, false))
    }

    override fun getItemCount(): Int {
        return containerData.size
    }

    override fun onBindViewHolder(holder: ItemDecorationExampleViewHolder, position: Int) {
        containerData[position].run {
            if (lastSelectedItem == -1 && selected) {
                lastSelectedItem = holder.bindingAdapterPosition
            }
            holder.itemViewBinding.ivTagIcon.setImageDrawable(ContextCompat.getDrawable(holder.itemView.context, icon))
            holder.itemViewBinding.tvTagText.text = name
            holder.itemViewBinding.ctlContainer.isSelected = selected
            holder.itemView.setOnClickListener { selectItem(position) }
        }
    }

    fun setNewData(newData: ArrayList<ItemDecorationExampleDataEntity>?) {
        val currentItemCount = itemCount
        if (currentItemCount != 0) {
            containerData.clear()
            notifyItemRangeRemoved(0, currentItemCount)
        }
        if (!newData.isNullOrEmpty()) {
            containerData.addAll(newData)
            notifyItemRangeChanged(0, itemCount)
        }
    }

    private fun selectItem(position: Int) {
        if (lastSelectedItem != position) {
            if (lastSelectedItem != -1) {
                containerData[lastSelectedItem].selected = false
                notifyItemChanged(lastSelectedItem)
                lastSelectedItem = position
            }
            if (position >= 0) {
                containerData[position].selected = true
                notifyItemChanged(position)
            }
        }
    }

    class ItemDecorationExampleViewHolder(val itemViewBinding: LayoutCustomItemDecorationExampleItemBinding) : RecyclerView.ViewHolder(itemViewBinding.root)
}
效果如图:
[外链图片转存失败,源站可能有防盗链机制,建议将图片保存下来直接上传(img-ef9KnzbU-1690182489895)(https://p3-juejin.byteimg.com/tos-cn-i-k3u1fbpfcp/51f0f8f7b1e84893a3ba3d979b1765c2~tplv-k3u1fbpfcp-zoom-in-crop-mark:3024:0:0:0.image?)]
可以看到,初始状态下成功在期望的位置绘制了分割线,但是滑动时分割线并没有一直显示在Random项和2Player项中间。
发现问题
经过调试,发现在onDraw中,使用parent.getChildAt获取的ItemView是从可见的ItemView开始计数的,因此同一个position并不是一直对应同一个ItemView,所以最终效果才会如上图。那么现在的问题就是如何确保分割线总是在Random项下方绘制。
改进方法
- 方法1:
在onDraw中用循环和parent.getChildAt遍历获取所有的ItemView,并使用parent.getChildAdapterPosition获取ItemView在适配器中正确的position,判断当ItemView的正确position与设定的position相同时再绘制分割线,代码调整如下:
class CustomItemDecoration(...) : ItemDecoration() {

    ...

    override fun onDraw(c: Canvas, parent: RecyclerView, state: RecyclerView.State) {
        super.onDraw(c, parent, state)
        for (index in 0 until parent.childCount) {
            val itemView = parent.getChildAt(index)
            // 确保itemView在适配器中的position是需要绘制分割线的position
            if (dividerLinePosition == parent.getChildAdapterPosition(itemView)) {
                itemView.run {
                    c.drawRect(parent.paddingStart.toFloat(), (bottom + space - dividerLineHeight / 2).toFloat(), (parent.width - parent.paddingEnd).toFloat(), (bottom + space + dividerLineHeight / 2).toFloat(), paint)
                }
                break
            }
        }
    }
}
效果如图:
[外链图片转存失败,源站可能有防盗链机制,建议将图片保存下来直接上传(img-bPMAeP0E-1690182489896)(https://p9-juejin.byteimg.com/tos-cn-i-k3u1fbpfcp/27a621c323ff44e3bb6d1a4ebff07745~tplv-k3u1fbpfcp-zoom-in-crop-mark:3024:0:0:0.image?)]
- 方法2:
在onDraw中使用循环会对性能有一定的影响,因此想了一种不使用循环的方法,在getItemOffsets时获取并保存Random项的ItemView,在onDraw中使用保存的ItemView进行绘制,代码调整如下:
class CustomItemDecoration(...) : ItemDecoration() {

    ...

    private var specialItemView: View? = null

    override fun getItemOffsets(outRect: Rect, view: View, parent: RecyclerView, state: RecyclerView.State) {
        parent.getChildLayoutPosition(view).let {
            if (it == dividerLinePosition) {
                specialItemView = view
                ...
            } else {
                ...
            }
        }
    }

    override fun onDraw(c: Canvas, parent: RecyclerView, state: RecyclerView.State) {
        super.onDraw(c, parent, state)
        specialItemView?.run {
            c.drawRect(parent.paddingStart.toFloat(), (bottom + space - dividerLineHeight / 2).toFloat(), (parent.width - parent.paddingEnd).toFloat(), (bottom + space + dividerLineHeight / 2).toFloat(), paint)
        }
    }
}
效果如图:
[外链图片转存失败,源站可能有防盗链机制,建议将图片保存下来直接上传(img-zatlJ27Q-1690182489897)(https://p3-juejin.byteimg.com/tos-cn-i-k3u1fbpfcp/6717a6b43ca84738ac0ed025a1e90cf9~tplv-k3u1fbpfcp-zoom-in-crop-mark:3024:0:0:0.image?)]
示例
演示代码已在示例Demo中添加。
最后
如果想要成为架构师或想突破20~30K薪资范畴,那就不要局限在编码,业务,要会选型、扩展,提升编程思维。此外,良好的职业规划也很重要,学习的习惯很重要,但是最重要的还是要能持之以恒,任何不能坚持落实的计划都是空谈。
如果你没有方向,这里给大家分享一套由阿里高级架构师编写的《Android八大模块进阶笔记》,帮大家将杂乱、零散、碎片化的知识进行体系化的整理,让大家系统而高效地掌握Android开发的各个知识点。

相对于我们平时看的碎片化内容,这份笔记的知识点更系统化,更容易理解和记忆,是严格按照知识体系编排的。
全套视频资料:
一、面试合集
二、源码解析合集
三、开源框架合集
欢迎大家一键三连支持,若需要文中资料,直接点击文末CSDN官方认证微信卡片免费领取↓↓↓
