状态管理VueX
VueX介绍
VueX简单介绍
- 对于组件化开发来说,大型应用的状态往往跨越多个组件。在多层嵌套的父子组件之间传递状态已经十分麻烦,而Vue更是没有为兄弟组件提供直接共享数据的办法。
- 基于这个问题,许多框架提供了解决方案——使用全局的状态管理器,将所有分散的共享数据交由状态管理器保管,Vue也不例外。
- Vuex 是一个专为 Vue.js 应用程序开发的状态管理库,采用集中式存储管理应用的所有组件的状态。
- 简单的说,Vuex用于管理分散在Vue各个组件中的数据。
- VueX安装:npm install vuex@next(安装最新版本)
状态管理
- vuex使用在比较复杂的网站开发,并不是必须的。
- 每一个Vuex应用的核心都是一个store(vuex里面统一的实例,全局对象,所有组件要共享的数据都可以存储在store内部,由他进行维护和管理),与普通的全局对象不同的是,基于Vue数据与视图绑定的特点,当store中的状态发生变化时,与之绑定的视图也会被重新渲染(store与视图进行绑定)。
- store中的状态不允许被直接修改,改变store中的状态的唯一途径就是显式地提交(commit)mutation,这可以让我们方便地跟踪每一个状态的变化(便于维护)。
- 在大型复杂应用中,如果无法有效地跟踪到状态的变化,将会对理解和维护代码带来极大的困扰。
- Vuex中有5个重要的概念:State、Getter、Mutation、Action、Module。
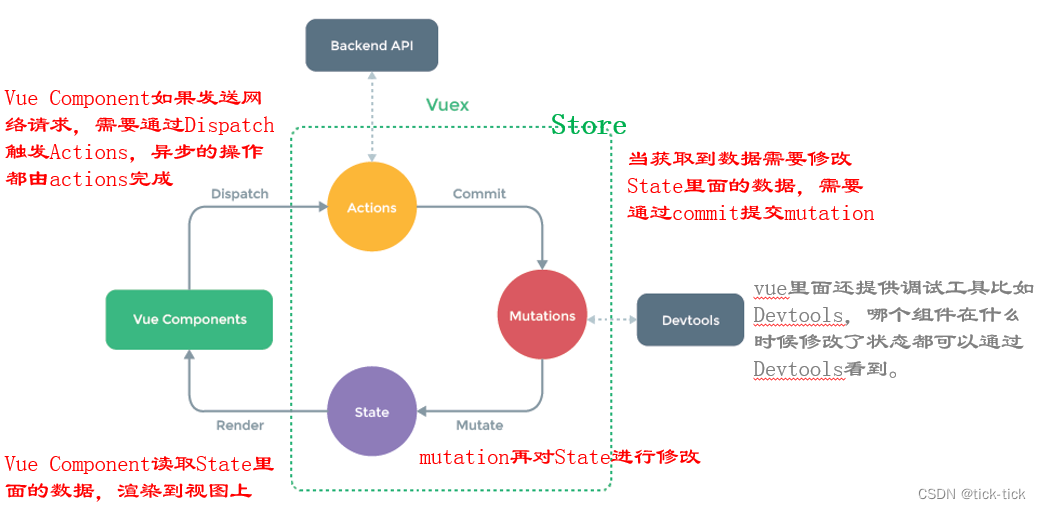
如果有异步请求,通过Dispatch触发Action,Action提交Mutation,最终修改State里面的数据;如果没有异步操作,也可以组件直接提交Mutation,进而修改State里面的值。
Vuex中5个重要概念的使用流程介绍:
以下代码基于vue3,即vuex4- State
State用于维护所有应用层的状态,并确保应用只有唯一的数据源
在组件中,可以直接使用this.$store.state.count访问数据,也可以先用mapState辅助函数将其映射下来
- Getter
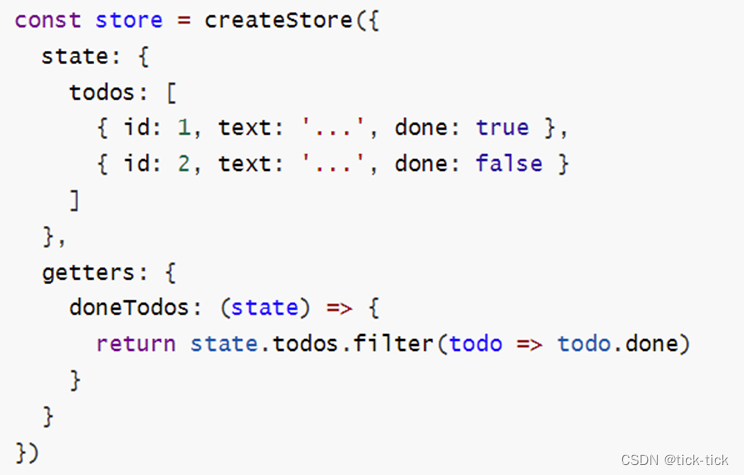
Getter维护由State派生的一些状态,这些状态随着State状态的变化而变化(比如State里面存储一些待办事项,如果完成为真,没有完成为假,在这个界面可能想显示所有已完成的,或者显示所有未完成的)
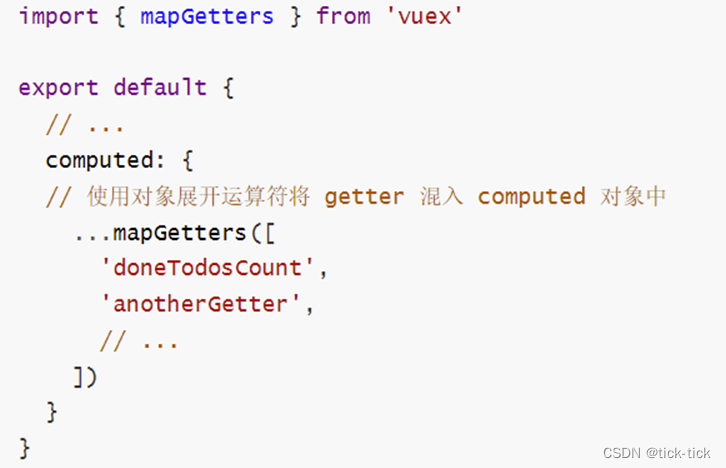
在组件中,可以直接使用this.$store.getters.doneTodos,也可以先用mapGetters辅助函数将其映射下来,代码如下:
- Mutation
Mutation提供修改State状态的方法。
在组件中,可以直接使用store.commit来提交mutation
也可以先用mapMutation辅助函数将其映射下来

- Action
-
Mutation里面只能做一些同步的操作,为了追踪状态的变化,如果是一些异步的操作,使用Action
-
Action类似Mutation,不同在于:Action不能直接修改状态,只能通过提交mutation来修改,Action可以包含异步操作。
-
Action里面定义的也是方法,参数是contex(上下文对象),不是直接修改状态,而是提交mutation。(比如网络请求获取的数据需要更新State里面的数据,使用context提交mutation,进而间接修改State里面的数据,之所以这样设计,是为了能在Action里面记录State的变化)
在组件中,可以直接使用this.$store.dispatch(‘xxx’)分发 action,或者使用mapActions辅助函数先将其映射下来

- State
VueX安装与使用
VueX安装
方法一:
在创建vue项目时选中vuex模块进行安装
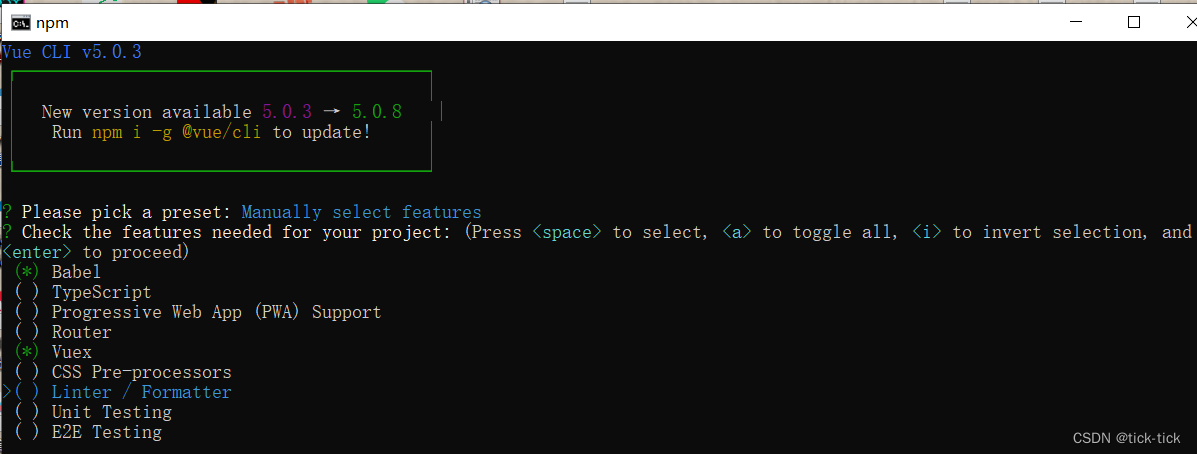
方法二:
使用npm install进行安装
vue2: npm install vuex@3
vue3: npm install vuex@4
VueX 使用
VueX使用关于State
src/store/index.js
import Vue from 'vue'
import Vuex from 'vuex'
Vue.use(Vuex)
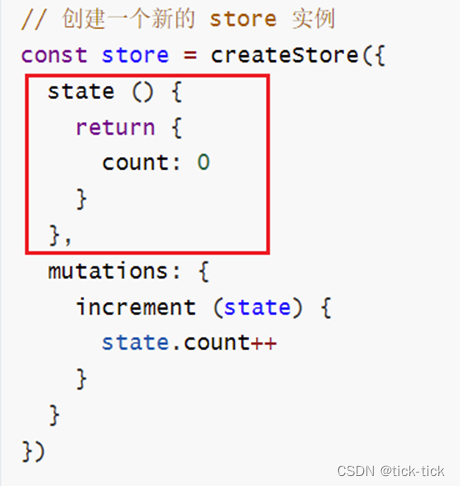
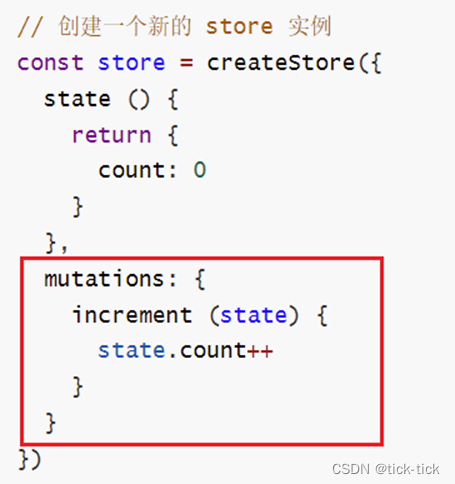
const store = new Vuex.Store({
state: {
count: 0
},
mutations: {
increment(state) {
state.count++
}
}
})
export default store
main.js
import Vue from 'vue'
import App from './App.vue'
import store from './store'

Vue.config.productionTip = false

new Vue({


  store,
  render: h => h(App)
}).$mount('#app')
HelloWorld.vue
<template>
  <div class="hello">
      {

   { this.$store.state.count }}
      <button @click="add">+1</button>
  </div>
</template>

<script>
export default {


  name: 'HelloWorld',
  methods:{


    add(){


      // this.$store.state.count = this.$store.state.count +1
      this.$store.commit("increment")
    }
  }

}
</script>
HelloWorld.vue更简便写法
或者
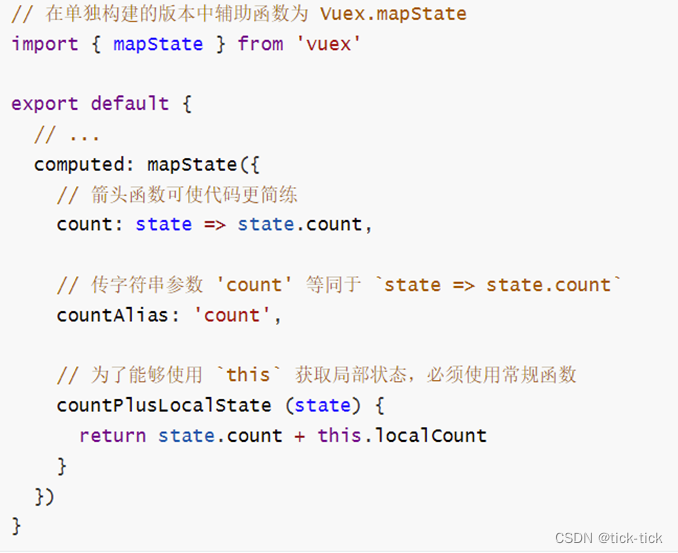
使用mapState辅助函数
在需要使用的组件中进行导入:

import {

     mapState } from 'vuex'
修改computed部分(以下三种方式均可):
 computed: mapState({


    // 箭头函数可使代码更简练
    count: state => state.count,

    // 传字符串参数 'count' 等同于 `state => state.count`
    countAlias: 'count',

    // 为了能够使用 `this` 获取局部状态,必须使用常规函数
    countPlusLocalState (state) {


      return state.count + this.localCount
    }
  })
当映射的计算属性的名称与 state 的子节点名称相同时,我们也可以给 mapState 传一个字符串数组。
computed: mapState([
  // 映射 this.count 为 store.state.count
  'count'
])
VueX使用关于Getter
src/store/index.js
使用mapGetters,代码示例:
HelloWorld.vue
<template>
  <div class="hello">
      <!-- {

    { this.$store.state.count }} -->
      {

   { count }}
      <button @click="add">+1</button>

      <!-- Getter -->
      <ul>
      <li v-for="todo in doneTodos" :key="todo.id">{

   { todo.text }}</li>
    </ul>
  </div>
</template>
<script>
import {

       mapState,mapGetters } from 'vuex'
export default {


  name: 'HelloWorld',
  //mapState与mapGetters同时使用
  computed:{


      ...mapState([
    'count','todos'
      ]),
      ...mapGetters([
          'doneTodos'
      ])
  },
  methods:{


  add(){


    // this.$store.state.count = this.$store.state.count +1
    this.$store.commit("increment")
  }
}

}
</script>
VueX使用关于Mutation
可以向 store.commit 传入额外的参数,即 mutation 的 载荷(payload):
src/store/index.js
mutations: {


        // increment(state) {


        //     state.count++
        // }
        increment(state, n) {


            state.count += n
        }
    },
HelloWorld.vue
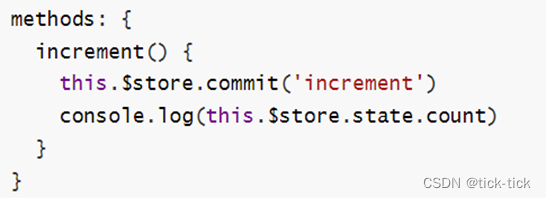
methods:{


  add(){


    // this.$store.state.count = this.$store.state.count +1
    this.$store.commit("increment",2)
  }
}
可以在组件中使用 this.$store.commit(‘xxx’) 提交 mutation,或者使用 mapMutations 辅助函数将组件中的 methods 映射为 store.commit 调用(需要在根节点注入 store)。
import {

     mapMutations } from 'vuex'

export default {


  // ...
  methods: {


    ...mapMutations([
      'increment', // 将 `this.increment()` 映射为 `this.$store.commit('increment')`

      // `mapMutations` 也支持载荷:
      'incrementBy' // 将 `this.incrementBy(amount)` 映射为 `this.$store.commit('incrementBy', amount)`
    ]),
    ...mapMutations({


      add: 'increment' // 将 `this.add()` 映射为 `this.$store.commit('increment')`
    })
  }
}
VueX使用关于Action
之所以要抽象出Action,是为了记录异步数据的状态变化
注册一个简单的Action
src/store/index.js
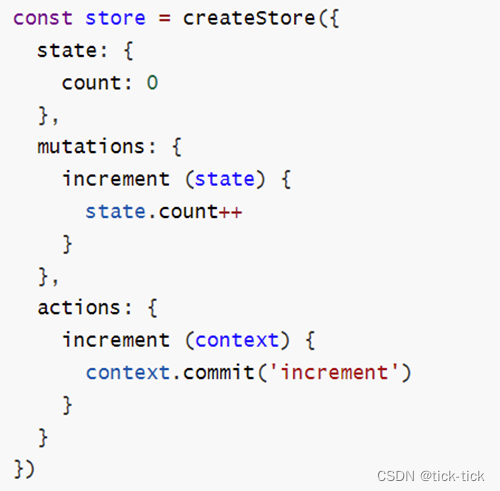
const store = new Vuex.Store({


  state: {


    count: 0
  },
  mutations: {


    increment (state) {


      state.count++
    }
  },
  actions: {


    increment (context) {


      context.commit('increment')
    }
  }
})
分发Action
Action 通过 store.dispatch 方法触发:
store.dispatch('increment')
在组件中分发 Action
在组件中使用 this.$store.dispatch(‘xxx’) 分发 action,或者使用 mapActions 辅助函数将组件的 methods 映射为 store.dispatch 调用(需要先在根节点注入 store):
HelloWorld.vue
import {

     mapActions } from 'vuex'

export default {


  // ...
  methods: {


    ...mapActions([
      'increment', // 将 `this.increment()` 映射为 `this.$store.dispatch('increment')`

      // `mapActions` 也支持载荷:
      'incrementBy' // 将 `this.incrementBy(amount)` 映射为 `this.$store.dispatch('incrementBy', amount)`
    ]),
    ...mapActions({


      add: 'increment' // 将 `this.add()` 映射为 `this.$store.dispatch('increment')`
    })
  }
}
VueX使用关于Module
如果应用数据特别多,vue允许分割模块。
Vuex 允许我们将 store 分割成模块(module)。每个模块拥有自己的 state、mutation、action、getter、甚至是嵌套子模块——从上至下进行同样方式的分割:
const moduleA = {


  state: () => ({

     ... }),
  mutations: {

     ... },
  actions: {

     ... },
  getters: {

     ... }
}

const moduleB = {


  state: () => ({

     ... }),
  mutations: {

     ... },
  actions: {

     ... }
}

const store = new Vuex.Store({


  modules: {


    a: moduleA,
    b: moduleB
  }
})

store.state.a // -> moduleA 的状态
store.state.b // -> moduleB 的状态