事件
(
1
)什么是事件?
事件是在编程时系统内发生的
动作
或者发生的事情,比如用户在网页上
单击
一个按钮
(
2
)什么是事件监听?
就是让程序检测是否有事件产生,一旦有事件触发,就立即调用一个函数做出响应,也称为
注册
事件
(3)
事件监听三要素:
Ø
事件源: 那个
dom
元素被事件触发了,要获取
dom
元素
Ø
事件: 用什么方式触发,比如鼠标单击
click
、鼠标经过
mouseover
等
Ø
事件调用的函数: 要做什么事
(4)事件类型:
1.鼠标事件:click、mousecenter、mouseleave
2.焦点事件:focus(获取焦点)、blur(失去焦点)
3.键盘事件:keydown(键盘按下触发)、keyup(键盘抬起触发)
4.文本事件:input(用户输入触发)
案例:
1.
小米搜索框案例
需求:当表单得到焦点,显示下拉菜单,失去焦点隐藏下来菜单
分析:
①
:开始下拉菜单要进行隐藏
②
:表单获得焦点
focus
,则显示下拉菜单,并且文本框变色(添加类)
③
:表单失去焦点,反向操作
代码:
<!DOCTYPE html>
<html lang="en">

<head>
    <meta charset="UTF-8">
    <meta http-equiv="X-UA-Compatible" content="IE=edge">
    <meta name="viewport" content="width=device-width, initial-scale=1.0">
    <title>Document</title>
    <style>
        * {
            margin: 0;
            padding: 0;
            box-sizing: border-box;
        }

        ul {
            list-style: none;
            display: none;
        }

        .a {
            display: block;
        }

        .mi {
            position: relative;
            width: 223px;
            margin: 100px auto;
        }

        .mi input {
            width: 223px;
            height: 48px;
            padding: 0 10px;
            font-size: 14px;
            line-height: 48px;
            border: 1px solid #e0e0e0;
            outline: none;
        }

        .mi .search {
            border: 1px solid #ff6700;
        }

        .result-list {
            position: absolute;
            left: 0;
            top: 48px;
            width: 223px;
            border: 1px solid #ff6700;
            border-top: 0;
            background: #fff;
        }

        .result-list a {
            display: block;
            padding: 6px 15px;
            font-size: 12px;
            color: #424242;
            text-decoration: none;
        }

        .result-list a:hover {
            background-color: #eee;
        }
    </style>
</head>

<body>
    <div class="mi">
        <input type="search" placeholder="小米笔记本" />
        <ul class="result-list">
            <li><a href="#">全部商品</a></li>
            <li><a href="#">小米11</a></li>
            <li><a href="#">小米10S</a></li>
            <li><a href="#">小米笔记本</a></li>
            <li><a href="#">小米手机</a></li>
            <li><a href="#">黑鲨4</a></li>
            <li><a href="#">空调</a></li>
        </ul>
    </div>
    <script>
        let inputEle = document.querySelector("input")
        let ulEle = document.querySelector(".result-list")
        inputEle.addEventListener("focus", function () {
            ulEle.classList.add("a")
            console.log("11111")
        })
        inputEle.addEventListener("blur", function () {
            ulEle.classList.remove("a")
        })
    </script>
</body>

</html>
效果: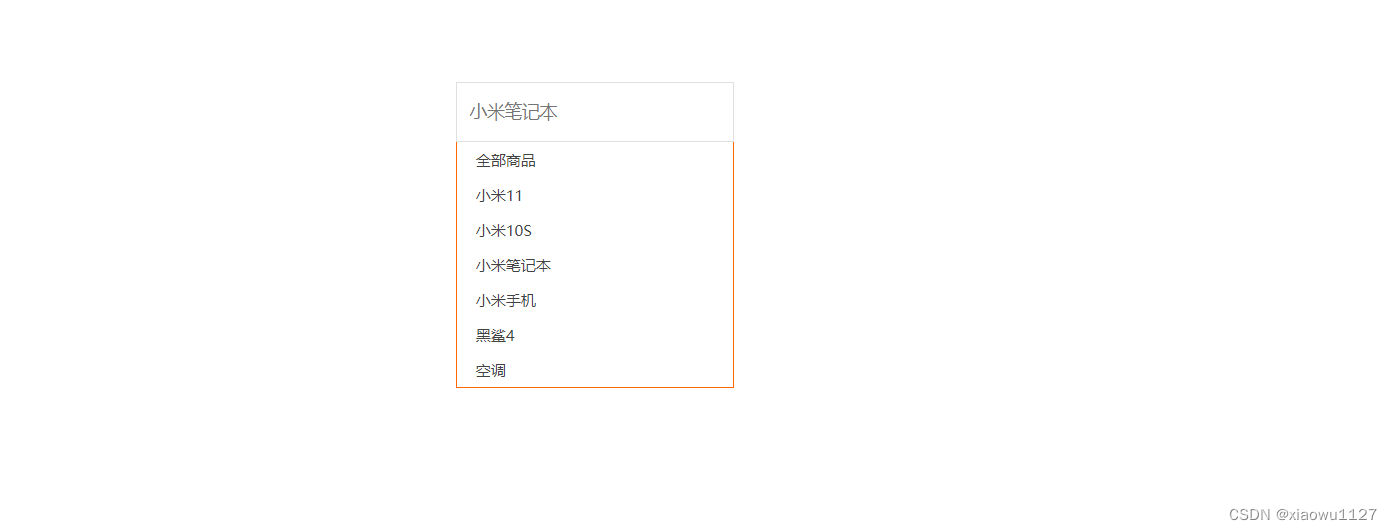
2.
全选文本框案例
需求:用户点击全选,则下面复选框全部选择,取消全选则全部取消
,
文字对应变化
代码:
<!DOCTYPE html>
<html>

<head lang="en">
    <meta charset="UTF-8">
    <title></title>
    <style>
        * {
            padding: 0;
            margin: 0;
        }

        .wrap {
            width: 300px;
            margin: 100px auto 0;
        }

        table {
            border-collapse: collapse;
            border-spacing: 0;
            border: 1px solid #c0c0c0;
            width: 300px;
        }

        th,
        td {
            border: 1px solid #d0d0d0;
            color: #404060;
            padding: 10px;
        }

        th {
            background-color: #09c;
            font: bold 16px "微软雅黑";
            color: #fff;
        }

        td {
            font: 14px "微软雅黑";
        }

        tbody tr {
            background-color: #f0f0f0;
        }

        tbody tr:hover {
            cursor: pointer;
            background-color: #fafafa;
        }
    </style>

</head>

<body>
    <div class="wrap">
        <table>
            <thead>
                <tr>
                    <th>
                        <input type="checkbox" id="j_cbAll" />
                        <span class="a">全选</span>
                    </th>
                    <th>商品</th>
                    <th>价钱</th>
                </tr>
            </thead>
            <tbody id="j_tb">
                <tr>
                    <td>
                        <input type="checkbox" />
                    </td>
                    <td>iPhone8</td>
                    <td>8000</td>
                </tr>
                <tr>
                    <td>
                        <input type="checkbox" />
                    </td>
                    <td>iPad Pro</td>
                    <td>5000</td>
                </tr>
                <tr>
                    <td>
                        <input type="checkbox" />
                    </td>
                    <td>iPad Air</td>
                    <td>2000</td>
                </tr>
                <tr>
                    <td>
                        <input type="checkbox" />
                    </td>
                    <td>Apple Watch</td>
                    <td>2000</td>
                </tr>

            </tbody>
        </table>
    </div>
    <script>
        let all = document.querySelector("#j_cbAll")
        let a = document.querySelectorAll("#j_tb input")
        let f = document.querySelector(".a")
        all.addEventListener("change", function () {
            if (all.checked == false) {
                f.innerHTML = "全选"
            }
            else {
                f.innerHTML = "取消"
            }
            let change = all.checked
            for (let i = 0; i < a.length; i++) {
                a[i].checked = change
            }
        })
        for (let i = 0; i < a.length; i++) {
            a[i].addEventListener("change", function () {
                let c = document.querySelectorAll("#j_tb input:checked")
                if (c.length == a.length) {
                    all.checked = true;
                    f.innerHTML = "取消"
                }
                else {
                    all.checked = false;
                    f.innerHTML = "全选"
                }


            })
        }

    </script>
</body>

</html>
效果图: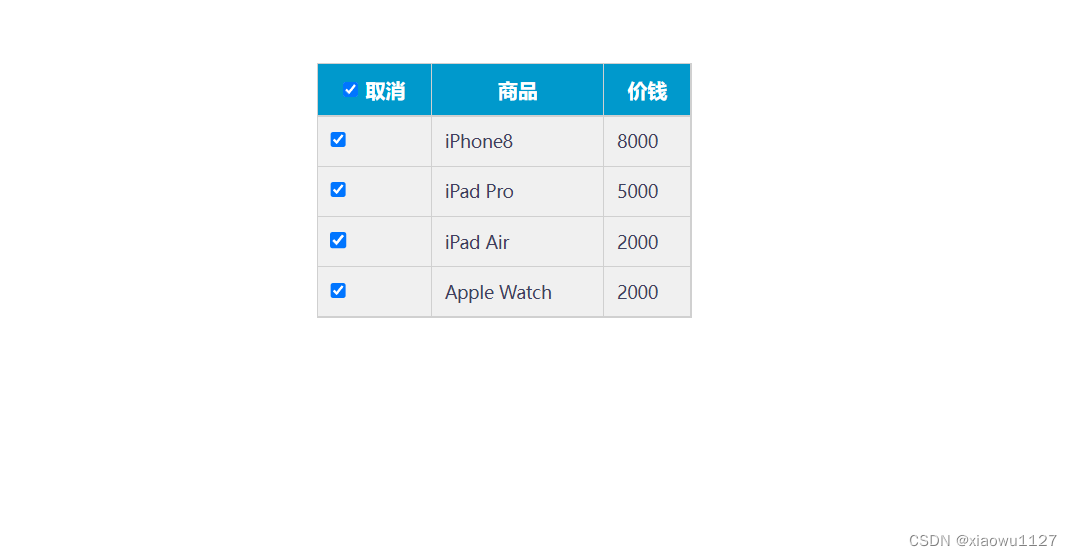
以上两个案例是比较基础的运用,学会了事件获取与修改之后能有很多丰富有趣的案例可以实现