背景
直播SDK一开始使用的FFmpeg 2.8版本的,现在的FFmpeg最新版已经是4.4了。播放器编辑器使用的FFmpeg都是4.0的版本;新版本FFmpeg在内部结构也做了优化,效率、稳定性相比较旧版本都提升了不少。所以直播SDK FFmpeg也要必须升级了。
简介
直播SDK内部主要3部分使用了FFmpeg:
- 使用libavcodec 编码Audio;
- 使用libavcodec 编码Video;
- 使用libavformat 合成/推流;
我会先讲解使用旧AP Ilibavcodec编码Audio、Video的过程。然后再讲解使用新API编码Audio、Video的过程,通过前后的对比就可以很容易的知道直播SDK FFmpeg升级点在哪里?这里只是通过分析新旧API的使用来对比出我们直播SDK的更新点,同时也可以学习如何通过FFmpeg新旧API编码Audio、Video、Muxer。因为篇幅有限,这里并不会具体去讲解每个API内部的源码逻辑,感兴趣可以自行了解。
libavcodec旧API编码Audio
文本阐述感觉是比较枯燥的,这里先上图了解下通过FFmpeg libavcodec模块旧API如何编码Audio。后面在具体介绍API的作用与功能。
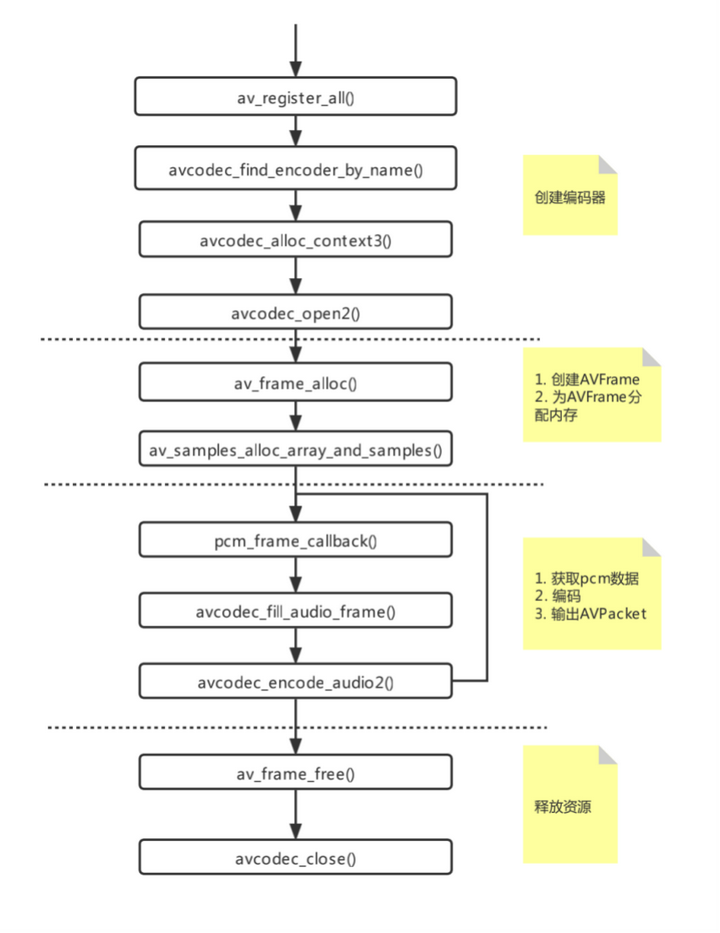
编码器注册
av_register_all()也可以使用avcodec_register_all()代替。查看源码可以发现av_register_all()内部调用了avcodec_register_all()。它的作用更就是注册所有的编解码器。
查找编码器
编码器注册好了之后就可以通过avcodec_find_encoder_by_name()、avcodec_find_encoder()获取我们想要的编码器。例如:通过avcodec_find_encoder(AV_CODEC_ID_AAC), 如果我们想使用libfdk-aac编码器编码音频必须在FFmpeg交叉编译的时候链接进去。否则我们在获取编码器的时候会使用FFmpeg内部默认的AAC编码器。
创建 AVCodecContext
当编码器创建好了之后,就需要根据编码器创建AVCodecContext,并初始化编码参数:采样里、声道数、采样格式等。
AVCodecContext *avCodecContext = avcodec_alloc_context3(codec);
avCodecContext->codec_type = AVMEDIA_TYPE_AUDIO;
avCodecContext->sample_rate = 44100;
avCodecContext->bit_rate = 64000;
avCodecContext->sample_fmt = AV_SAMPLE_FMT_S16;
avCodecContext->channel_layout = AV_CH_LAYOUT_STEREO;
avCodecContext->channels = av_get_channel_layout_nb_channels(avCodecContext->channel_layout);
avCodecContext->profile = FF_PROFILE_AAC_LOW;
avCodecContext->flags |= CODEC_FLAG_GLOBAL_HEADER;
avCodecContext->codec_id = codec->id;
打开编码器
编码器的参数设置好了之后,就可以打开编码器了。
if (avcodec_open2(avCodecContext, codec, NULL) < 0) {
   return -1;
}
创建AVFrame,并申请一块PCM内存
在FFmpeg 中编码前、解码后的数据用AVFrame表示;编码后,解码前的数据使用AVPacket表示;
这里需要为我们即将编码的数据创建一个AVFrame,并为它创建一个存放数据的空间。
// 创建AVFrame
AVFrame *encode_frame = av_frame_alloc();
encode_frame->nb_samples = avCodecContext->frame_size;
encode_frame->format = avCodecContext->sample_fmt;
encode_frame->channel_layout = avCodecContext->channel_layout;
encode_frame->sample_rate = avCodecContext->sample_rate;

// 申请一块PCM内存
int ret = av_samples_alloc_array_and_samples(&pcm_buffer, &src_samples_linesize, avCodecContext->channels, audio_nb_samples, avCodecContext->sample_fmt, 0);
if (ret < 0) {
    return -1;
}
编码
编码的过程是一个持续的循环过程。
- 从PCM队列中获取一帧音频数据到pcm_buffer
- 把pcm_buffer填充到AFrame中
- 音频编码,获取到编码后AVPacket数据
// 从PCM队列中获取一帧音频数据到pcm_buffer
pcm_frame_callback(pcm_buffer);

int ret;
int got_packet;
AVPacket *pkt = av_packet_alloc();
pkt->duration = (int) AV_NOPTS_VALUE;
pkt->pts = pkt->dts = 0;

// 把pcm_buffer填充到AFrame中
avcodec_fill_audio_frame(encode_frame, avCodecContext->channels, avCodecContext->sample_fmt, pcm_buffer[0], audioSamplesSize, 0);

// 音频编码,获取到编码后AVPacket数据
ret = avcodec_encode_audio2(avCodecContext, pkt, encode_frame, &got_packet);
if (ret < 0 || !got_packet) {
    av_packet_free(&pkt);
    return ret;
}

// write、enqueue
销毁
if (NULL != pcm_buffer) {
    av_free(pcm_buffer);
}
if (NULL != encode_frame) {
    av_frame_free(&encode_frame);
}
if (NULL != avCodecContext) {
   avcodec_close(avCodecContext);
   av_free(avCodecContext);
}
libavcodec 新API编码Audio
这里先上图了解下通过FFmpeg libavcodec模块新API如何编码Audio。后面在具体介绍核心API的作用与功能。
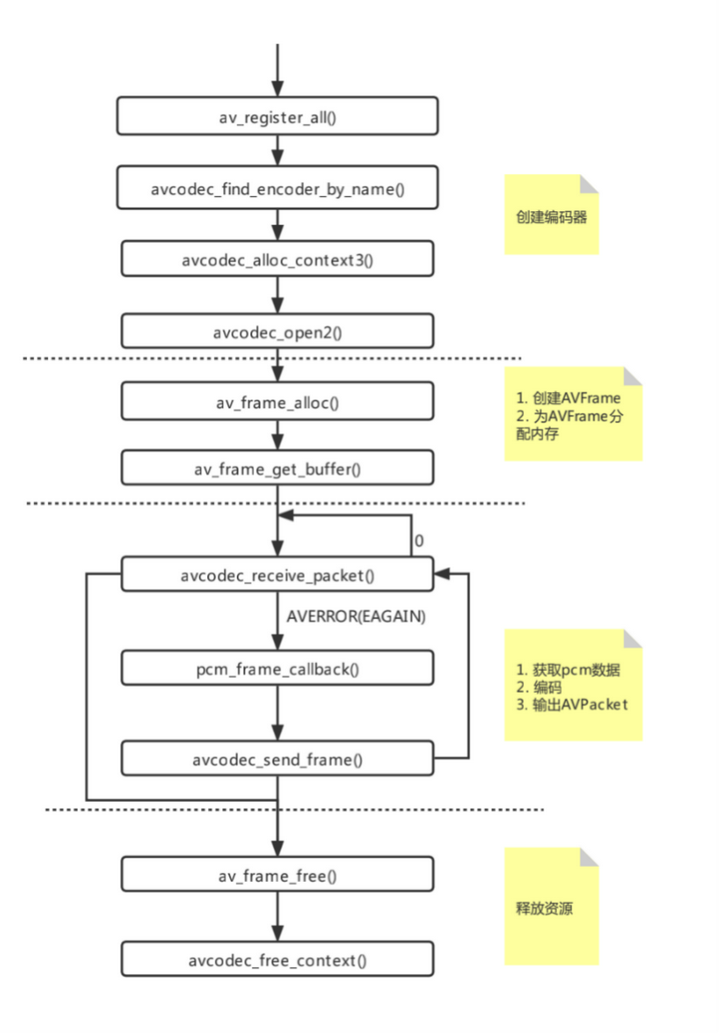
通过上图可以知道,FFmpeg新API在总编码过程中思想是不变的,只是调用的API改变了。这里重点介绍新API的使用,与旧API相同的部分就不再讲解。
创建AVFrame,并申请一块PCM内存
旧API创建方式:先申请一块内存,待填充好了pcm数据之后,再把该内存挂载到AVFrame上。
新API直接可以通过av_frame_get_buffer()为AVFrame创建好了内存。不过在调用av_frame_get_buffer()之前必须为AVFrame设置好采样率、声道数、采样格式、采样大小。
// 创建AVFrame
AVFrame *encode_frame = av_frame_alloc();
encode_frame->nb_samples = avCodecContext->frame_size;
encode_frame->format = avCodecContext->sample_fmt;
encode_frame->channel_layout = avCodecContext->channel_layout;
encode_frame->sample_rate = avCodecContext->sample_rate;

// 申请一块PCM内存
int ret = av_frame_get_buffer(encode_frame, 0);
if (ret < 0) {
    return -1;
}
编码
FFmpeg新API编码通过avcodec_send_frame()、avcodec_receive_packet()实现。他们内部实现原理可以参考文章底部的介绍。
    AVPacket pkt = { 0 };
    av_init_packet(&pkt);
    pkt.duration = (int) AV_NOPTS_VALUE;
    pkt.pts = pkt.dts = 0;

    while (true){
        do{
            ret = avcodec_receive_packet(avCodecContext, &pkt);
            // ret >= 0 获取编码后的视频流
            if(ret >= 0){

                av_free_packet(&pkt);
                return ret;
            }
            //
            if (ret == AVERROR(EAGAIN)) {
                // 跳出该循环。
                break;
            }
            // 编码出错
            if (ret < 0) {
                av_free_packet(&pkt);
                return ret;
            }
        }while (true);

        // 获取pcm数据
        pcm_frame_callback(encode_frame->data);
        ret = avcodec_send_frame(avCodecContext, encode_frame);
        if(ret >= 0){
//            LOGI("avcodec_send_frame success");
        }else{
            LOGI("avcodec_send_frame error: %s\n", av_err2str(ret));
        }
        av_packet_unref(&pkt);
    }
销毁
if (NULL != encode_frame) {
    av_frame_free(&encode_frame);
}
if (NULL != avCodecContext) {
   avcodec_free_context(avCodecContext);
}
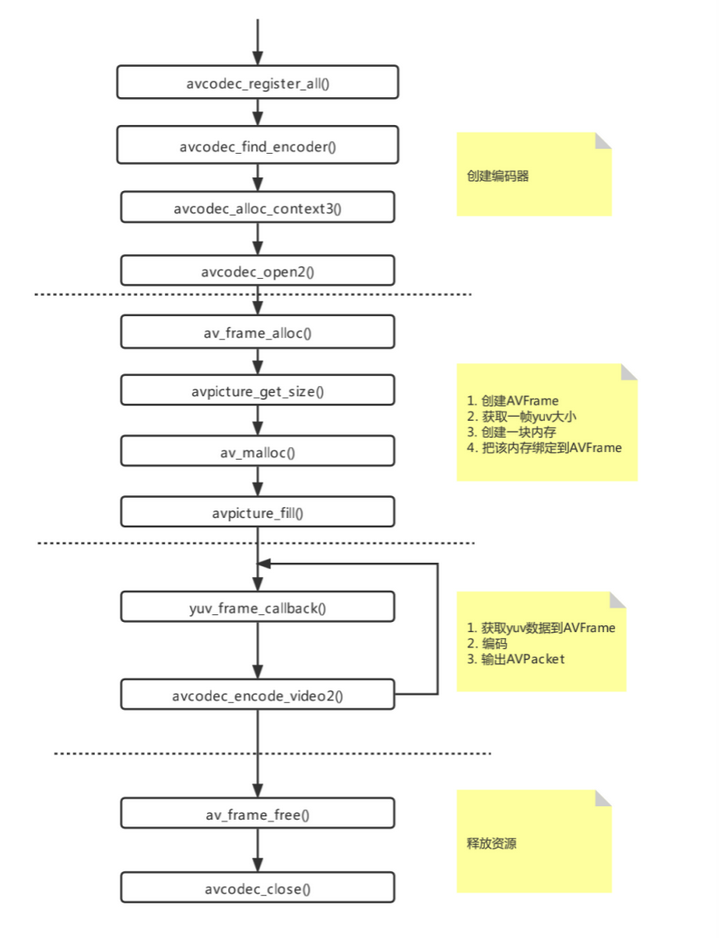
libavcodec 旧API编码Video
FFmpeg中通过libavcodec旧API编码Video,它的过程与libavcodec旧API编码Audio是非常相似的。我这里只给出API调用流程图,流程图过程中的每一步就不再详细分析了。你只要看懂了上面的分析,这里是非常简单的。
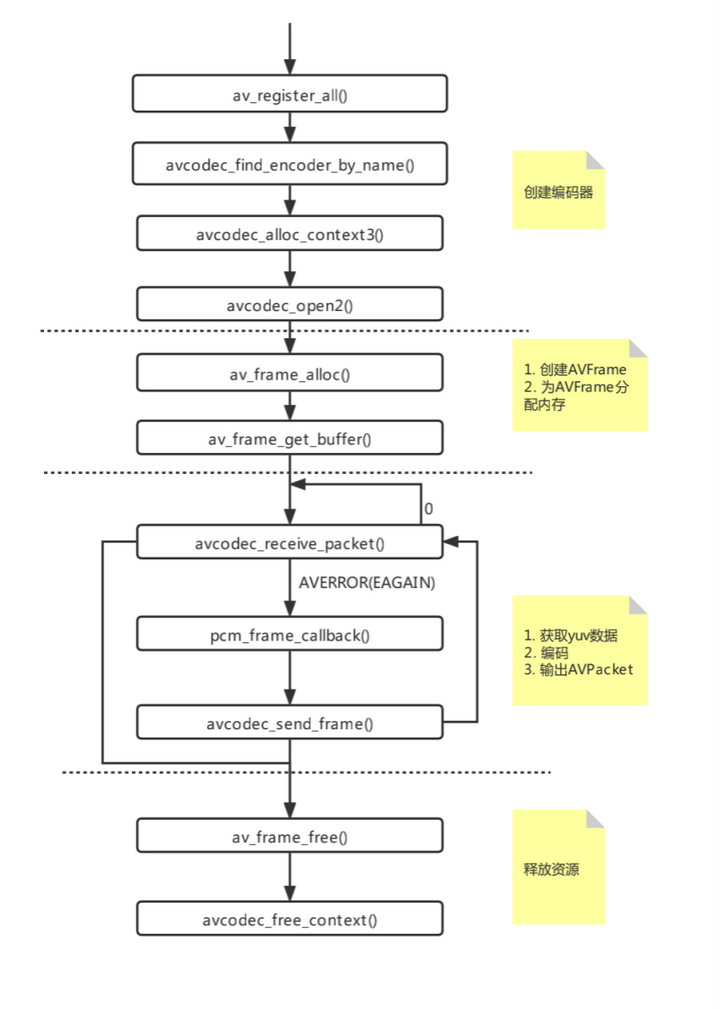
libavcodec新API编码Video
FFmpeg中通过libavcode新API编码Video,它的过程与libavcodec新API编码Audio是非常相似的。我这里只给出API调用流程图,流程图过程中的每一步就不再详细分析了。你只要看懂了上面的分析,这里是非常简单的。
音视频编解码器基本原理
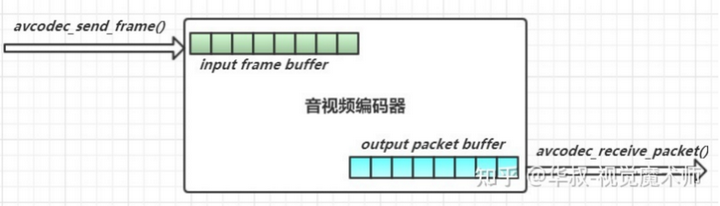
在FFMPEG中 avcodec_send_frame() 和 avcodec_receive_packet() 通常是同时使用的,先调用 avcodec_send_frame() 送入要编码的音视频帧,然后调用 avcodec_receive_packet()获取编码后的数据包。但是需要注意的是:编码器内部是有缓冲区数据处理的,因此并不保证每送入一个音视频帧,就一定有相应的编码数据包输出,这两个函数对于数据处理,在时序上并不同步,这一点特别需要注意。
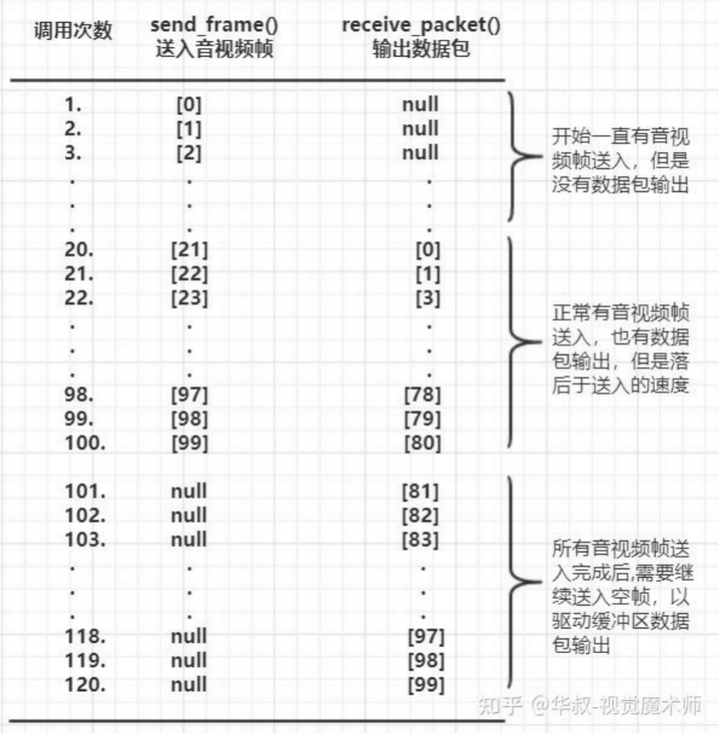
通常解码开始,通过avcodec_send_frame()送入几十个音视频帧,对应的avcodec_receive_packet()都没有数据包输出。等送入的帧足够多后,avcodec_receive_packet()才开始输出前面一开始送入进行编码的数据包。最后几十没有数据帧送入了,也要调用avcodec_send_frame()送入空帧,以驱动编码模块继续编码缓冲区中的数据,此时avcodec_receive_packet()还是会有数据包输出,直到返回AVERROR_EOF才表示所有音视频帧编码完成。
举个例子:
总计有100个视频帧要送入编码器编码,最终输出视频帧也是100个数据包输出。
前面20次调用 avcodec_send_frame()可以不断的送入第1~20个视频帧,但是前面20次调用avcodec_receive_packet()函数总是返回AVERROR(EAGAIN),没有数据包输出。
从第21次调用avcodec_send_frame()送入第21个视频帧开始,这次再调用avcodec_receive_packet()函数可以返回0,并且有数据包输出,但是输出的数据包pts是0(也即第一个数据包对应的视频帧),之后avcodec_send_frame()不断送入第22、23…个视频帧,avcodec_receive_packet()不断输出第1、2…个数据
最后第100个数据包通过avcodec_send_frame()送入完成了,但是此时avcodec_receive_packet()才获取到第82帧输出数据包,此时需要继续不断调用avcodec_send_frame()送入空帧,同时不断调用avcodec_receive_packet()获取输出数据包,直到返回AVERROR_EOF,可以获取到最后第100个输出的数据包。
音视频编解码器基本原理参考文档:
原文 FFmpeg 新旧API编码_ffmpeg版本差异_BetterDaZhang的博客-CSDN博客
★文末名片可以免费领取音视频开发学习资料,内容包括(FFmpeg ,webRTC ,rtmp ,hls ,rtsp ,ffplay ,srs)以及音视频学习路线图等等。
见下方!↓↓↓↓↓↓↓↓↓↓↓↓↓↓↓↓↓↓↓↓↓↓↓↓↓↓↓↓↓↓↓↓↓↓↓↓↓