通过Swagger2快速构建RESTful API 文档。
演示效果如下:

下面开始贴代码:
1.在pom文件中引入Swagger依赖
 <!--swagger-->
        <dependency>
            <groupId>io.springfox</groupId>
            <artifactId>springfox-swagger2</artifactId>
            <version>2.2.2</version>
        </dependency>
        <dependency>
            <groupId>io.springfox</groupId>
            <artifactId>springfox-swagger-ui</artifactId>
            <version>2.2.2</version>
        </dependency>
2.创建Swagger2配置类
package org.spring.springboot.configuration;

import org.springframework.context.annotation.Bean;
import org.springframework.context.annotation.Configuration;
import org.springframework.web.bind.annotation.RequestMethod;
import springfox.documentation.builders.ApiInfoBuilder;
import springfox.documentation.builders.PathSelectors;
import springfox.documentation.builders.RequestHandlerSelectors;
import springfox.documentation.builders.ResponseMessageBuilder;
import springfox.documentation.service.ApiInfo;
import springfox.documentation.spi.DocumentationType;
import springfox.documentation.spring.web.plugins.Docket;
import springfox.documentation.swagger2.annotations.EnableSwagger2;
import java.util.Date;
import static com.google.common.collect.Lists.newArrayList;


/**
 *
 * Created by uknowzxt on 27/03/2018.
 */
@Configuration
@EnableSwagger2
public class Swagger2 {
    @Bean
    public Docket createRestApi() {
        return new Docket(DocumentationType.SWAGGER_2)
                .apiInfo(apiInfo())
                .select()
                .apis(RequestHandlerSelectors.basePackage("org.spring.springboot"))//扫描接口的路径包 不要忘记换成自己的路径
                .paths(PathSelectors.any())
                .build()
                .directModelSubstitute(Date.class,String.class)//将date类型全部转化称string
                .useDefaultResponseMessages(false)  //是否启用默认的http码
                .globalResponseMessage(RequestMethod.GET, //配置全局错误码
                        newArrayList(
                                new ResponseMessageBuilder().code(0).message("请求处理成功").build(),
                                new ResponseMessageBuilder().code(1).message("系统错误").build()))
                .globalResponseMessage(RequestMethod.POST,
                        newArrayList(
                                new ResponseMessageBuilder().code(0).message("请求处理成功").build(),
                                new ResponseMessageBuilder().code(1).message("系统错误").build()))
                .globalResponseMessage(RequestMethod.PUT,
                        newArrayList(
                                new ResponseMessageBuilder().code(0).message("请求处理成功").build(),
                                new ResponseMessageBuilder().code(1).message("系统错误").build()))
                .globalResponseMessage(RequestMethod.DELETE,
                        newArrayList(
                                new ResponseMessageBuilder().code(0).message("请求处理成功").build(),
                                new ResponseMessageBuilder().code(1).message("系统错误").build()));
    }

    private ApiInfo apiInfo() {
        return new ApiInfoBuilder()
                .title("使用Swagger2构建RESTful API")
                .description("在记录与总结中进步")
                .termsOfServiceUrl("https://blog.csdn.net/uknowzxt")
                .contact("uknowzxt")
                .version("1.0")
                .build();
    }
}
3.创建文档内容
package org.spring.springboot.controller;

import io.swagger.annotations.*;
import org.spring.springboot.domain.City;
import org.spring.springboot.service.CityService;
import org.springframework.beans.factory.annotation.Autowired;
import org.springframework.web.bind.annotation.*;
import java.util.List;

/**
 * 城市 Controller 实现 Swagger 服务
 *
 * Created by uknowzxt on 27/03/2018.
 */
@Api(description = "城市API" )
@RestController
public class CityRestController {

    @Autowired
    private CityService cityService;

    @ApiOperation("查询一条")
    @ApiImplicitParams({
            @ApiImplicitParam(name = "id", value = "城市id", paramType = "query", required = true, dataType = "Integer"),
    })@ApiResponses(value = {//方法的返回
            @ApiResponse(code = 200, message = "OK"),
            @ApiResponse(code = 405, message = "城市不存在")
    })
    @RequestMapping(value = "/api/city/{id}", method = RequestMethod.GET)
    public City findOneCity(@PathVariable("id") Long id) {
        return cityService.findCityById(id);
    }

    @ApiOperation("查询列表")
    @ApiImplicitParams({

    })@ApiResponses(value = {//方法的返回
            @ApiResponse(code = 200, message = "OK")
    })
    @RequestMapping(value = "/api/city", method = RequestMethod.GET)
    public List<City> findAllCity() {
        return cityService.findAllCity();
    }

    @ApiOperation("新增")
    @ApiImplicitParams({
    })@ApiResponses(value = {//方法的返回
            @ApiResponse(code = 200, message = "OK")
    })
    @RequestMapping(value = "/api/city", method = RequestMethod.POST)
    public void createCity(@RequestBody City city) {
        cityService.saveCity(city);
    }

    @ApiOperation("修改")
    @ApiImplicitParams({
            @ApiImplicitParam(name = "id", value = "参数描述", paramType = "query", required = true, dataType = "Integer"),
    })@ApiResponses(value = {//方法的返回
            @ApiResponse(code = 200, message = "OK"),
            @ApiResponse(code = 405, message = "城市不存在")
    })
    @RequestMapping(value = "/api/city", method = RequestMethod.PUT)
    public void modifyCity(@RequestBody City city) {
        cityService.updateCity(city);
    }

    @ApiOperation("删除")
    @ApiImplicitParams({
            @ApiImplicitParam(name = "id", value = "参数描述", paramType = "query", required = true, dataType = "Integer"),
    })@ApiResponses(value = {//方法的返回
            @ApiResponse(code = 200, message = "OK"),
            @ApiResponse(code = 405, message = "城市不存在")
    })
    @RequestMapping(value = "/api/city/{id}", method = RequestMethod.DELETE)
    public void modifyCity(@PathVariable("id") Long id) {
        cityService.deleteCity(id);
    }
}
4.在实体类上加入注解(不是必要)
package org.spring.springboot.domain;

import io.swagger.annotations.ApiModel;
import io.swagger.annotations.ApiModelProperty;

/**
 * 城市实体类
 *
 * Created by uknowzxt on 27/03/2018.
 */
@ApiModel("城市")
public class City {

    /**
     * 城市编号
     */
    @ApiModelProperty("城市编号")
    private Long id;

    /**
     * 省份编号
     */
    @ApiModelProperty("省份编号")
    private Long provinceId;

    /**
     * 城市名称
     */
    @ApiModelProperty("城市名称")
    private String cityName;

    /**
     * 描述
     */
    @ApiModelProperty("描述")
    private String description;

    public Long getId() {
        return id;
    }
    ......
}
5.访问
http://localhost:8080/swagger-ui.html
就能看到前文所展示的RESTful API的页面。我们可以再点开具体的API请求,以POST类型的请求为例,可找到上述代码中我们配置的Notes信息以及参数City的描述信息,如下图所示。
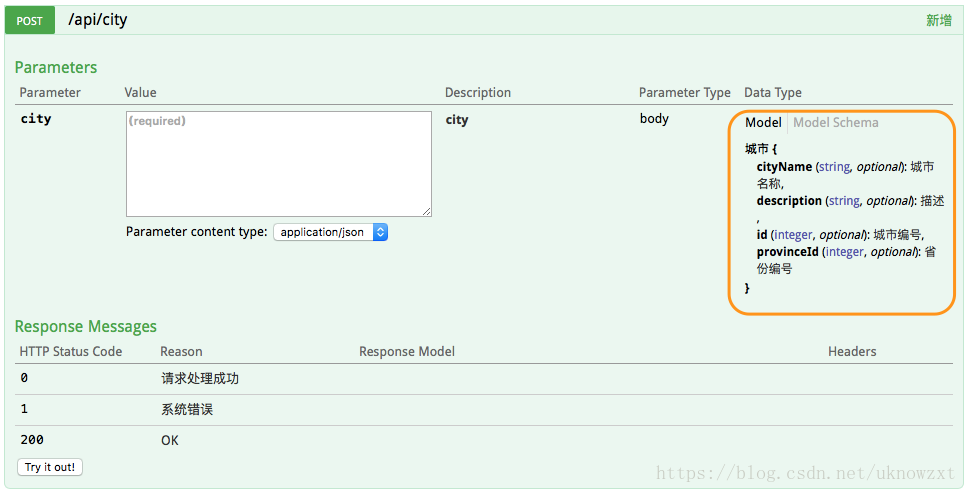
如果不对实体类加注解,框中内容是不会有注释的
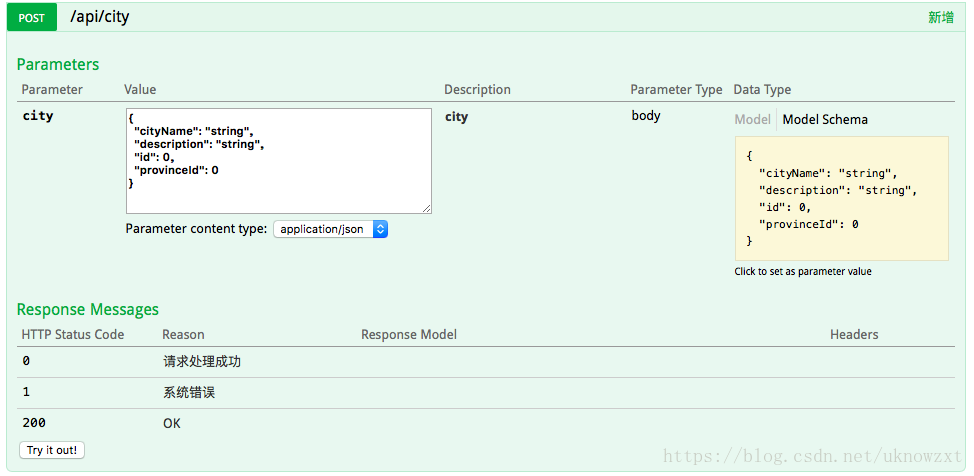
点击Model右边的Model Schema 出现如下示例,双击此处,左侧Value框中回出现数据,这时点击下方的Try it out! 可以直接在API中对接口进行测试。