一、说明
在本教程中,我们将学习Python Tkinter Animation。在这里,我们将了解如何在 python 中使用 Tkinter 创建动画,并将介绍与动画相关的不同示例。我们还将讨论这些主题
二、Python Tkinter 动画
在本节中,我们将学习 Python Tkinter 动画。通过动画,我们的意思是在任何对象上创建瞬间的幻觉。在下面的代码中,我们采用了“x”和“y”的两个起始位置,并给了一个窗口一定的宽度和高度,在其中,我们使用画布制作了一个球,并在屏幕空间内为球添加了一个时刻我们创造了什么。
代码:
import tkinter
import time


Window_Width=800

Window_Height=600

Ball_Start_XPosition = 50

Ball_Start_YPosition = 50

Ball_Radius = 30

Ball_min_movement = 5

Refresh_Sec = 0.01


def create_animation_window():
  Window = tkinter.Tk()
  Window.title("Python Guides")

  Window.geometry(f'{Window_Width}x{Window_Height}')
  return Window


def create_animation_canvas(Window):
  canvas = tkinter.Canvas(Window)
  canvas.configure(bg="Blue")
  canvas.pack(fill="both", expand=True)
  return canvas


def animate_ball(Window, canvas,xinc,yinc):
  ball = canvas.create_oval(Ball_Start_XPosition-Ball_Radius,
            Ball_Start_YPosition-Ball_Radius,
            Ball_Start_XPosition+Ball_Radius,
            Ball_Start_YPosition+Ball_Radius,
            fill="Red", outline="Black", width=4)
  while True:
    canvas.move(ball,xinc,yinc)
    Window.update()
    time.sleep(Refresh_Sec)
    ball_pos = canvas.coords(ball)
    # unpack array to variables
    al,bl,ar,br = ball_pos
    if al < abs(xinc) or ar > Window_Width-abs(xinc):
      xinc = -xinc
    if bl < abs(yinc) or br > Window_Height-abs(yinc):
      yinc = -yinc


Animation_Window = create_animation_window()
Animation_canvas = create_animation_canvas(Animation_Window)
animate_ball(Animation_Window,Animation_canvas, Ball_min_movement, Ball_min_movement)
以下是给定代码的一些主要亮点。
- Canvas.create_oval()用于为球赋予椭圆形形状。
- Canvas.move() = 球的运动
- time.sleep()它将执行暂停给定的秒数。
输出:
运行上面的代码后,我们可以看到以下输出,其中球正在改变其位置。球上下移动并显示动画示例。

输出
三、Python Tkinter 加载动画
在本节中,我们将学习 python Tkinter 加载动画。所谓加载,是指通过互联网处理任何页面或加载任何数据。
代码:
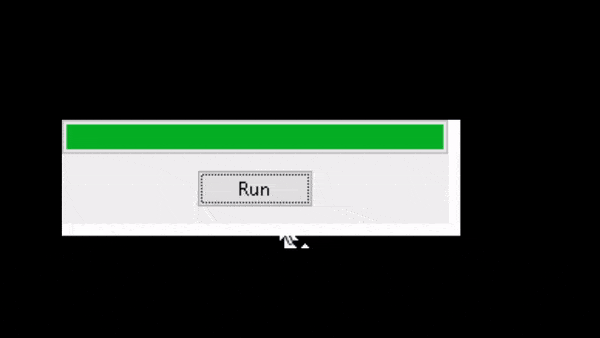
在下面的代码中,我们制作了一个处理栏,该处理栏在单击运行按钮后运行,并显示我们正在页面中加载。
- Progressbar()用于显示加载栏。
- mode='确定'显示将起点移动到终点的指示器。
from tkinter import *
from tkinter.ttk import *

ws=Tk()
Progress_Bar=Progressbar(ws,orient=HORIZONTAL,length=250,mode='determinate')

def Slide():
    import time
    Progress_Bar['value']=20
    ws.update_idletasks()
    time.sleep(1)
    Progress_Bar['value']=50
    ws.update_idletasks()
    time.sleep(1)
    Progress_Bar['value']=80
    ws.update_idletasks()
    time.sleep(1)
    Progress_Bar['value']=100

Progress_Bar.pack()
Button(ws,text='Run',command=Slide).pack(pady=10)
mainloop()
输出:
运行以下代码后,我们得到以下输出,其中向我们展示了如何在 python Tkinter 中完成加载。在这里,我们可以看到当用户单击“运行”按钮时,页面上开始加载数据。
输出
四、Python tkinter 定时器动画
在本节中,我们将学习 python Tkinter 计时器动画。通过计时器,我们的意思是为警报设置任何时间计数以记住我们的任务。了解计时器的最好例子是我们在日常工作中使用的闹钟。
代码:
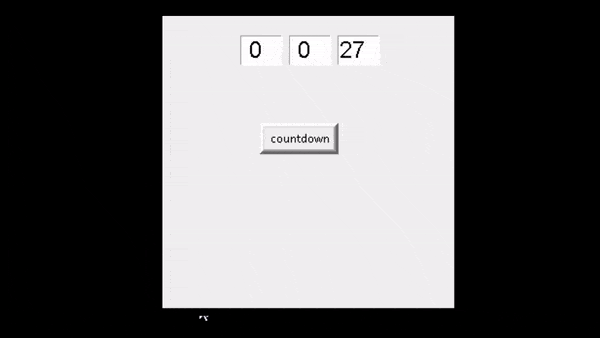
在下面的代码中,我们导入了一个用于定义小时、分钟和秒的时间库。这里,用户正在设置一些时间计数器,其作用类似于在时间到后发出警报。
import time
from tkinter import *
from tkinter import messagebox

ws = Tk()

ws.geometry("300x300")

ws.title("Python Guides")

Hour=StringVar()
Minute=StringVar()
Second=StringVar()

Hour.set("00")
Minute.set("00")
Second.set("00")

Hour_entry= Entry(ws, width=3, font=("Arial",18,""),
				textvariable=Hour)
Hour_entry.place(x=80,y=20)

Minute_entry= Entry(ws, width=3, font=("Arial",18,""),
				textvariable=Minute)
Minute_entry.place(x=130,y=20)

Second_entry= Entry(ws, width=3, font=("Arial",18,""),
				textvariable=Second)
Second_entry.place(x=180,y=20)


def OK():
	try:

		temp = int(Hour.get())*3600 + int(Minute.get())*60 + int(Second.get())
	except:
		print("Please Input The Correct Value")
	while temp >-1:

		Mins,Secs = divmod(temp,60)


		Hours=0
		if Mins >60:


			Hours, Mins = divmod(Mins, 60)


		Hour.set("{0:2d}".format(Hours))
		Minute.set("{0:2d}".format(Mins))
		Second.set("{0:2d}".format(Secs))


		ws.update()
		time.sleep(1)


		if (temp == 0):
			messagebox.showinfo("Time Countdown", "Time up ")


		temp -= 1


button = Button(ws, text=' countdown', bd='5',
			command= OK)
button.place(x = 100,y = 110)

ws.mainloop()
输出:
运行上面的代码后,我们可以看到用户设置了一些计时器几秒钟,并且它按照计时器的顺序工作。
输出
阅读:如何在 Python Tkinter 中创建贪吃蛇游戏
五、Python tkinter matplotlib 动画
Matplotlib是一个用于绘制图形的 Python 库。它是一个我们可以自由使用的开源库。它是用 Python 语言编写的。这是一个专门用于处理matplotlib函数的工具,名为“ MATLAB ”。在这里,Numpy 是它的数值数学扩展,用于表示其轴的图形值。
代码:
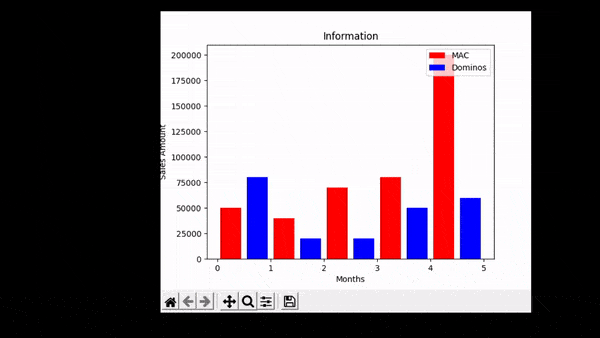
- plt.bar()用于表示使用X 轴和Y 轴值绘制条形图。
- ptl.xlabel()用于表示 x 轴。
- plt.ylabel()用于表示 y 轴。
- plt.title()用于为条形图提供标题。
from matplotlib import pyplot as plt
plt.bar([0.25,1.25,2.25,3.25,4.25],[50000,40000,70000,80000,200000],label="MAC",color='r',width=.4)
plt.bar([0.75,1.75,2.75,3.75,4.75],[80000,20000,20000,50000,60000],label="Dominos",color='b',width=.4)
plt.legend(loc='upper right')
plt.xlabel('Months')
plt.ylabel('Sales Amount')
plt.title('Information')
plt.show()
输出:
运行以下代码后,我们看到条形图已生成。以下是代表数据点的x 轴和y 轴值的月份和销售额变量,条形代表一个月内的总销售额。在下面的 gif 中,我们可以看到当我们将鼠标悬停在条形上时, x 轴和y 轴给出了一些值。
输出
六、Python tkinter 简单动画
在下面的部分中,我们将学习 python Tkinter 的简单动画。在此,我们创建了一个按钮,通过单击该按钮可以更改背景颜色。
代码:
在下面的代码中,我们使用一个随机库,为我们的选项提供随机选择,并在顶部添加一个带有文本“click me”的按钮,该按钮可以随机更改背景颜色。
- random.choice()返回一个随机选择颜色的列表。
- ws.title用于为窗口指定标题。
- Button()用于运行命令以在其中生成随机颜色。
from tkinter import *
import random

def gen_color():
    ws.configure(background=random.choice(["black", "red" , "green" , "blue"]))

ws =Tk()
ws.title("Python Guides")
ws.geometry('500x500')


button=Button(ws,text='Click Me',command = gen_color).pack()
ws.mainloop()
输出:
运行上面的代码后,我们可以在 python Tkinter 的帮助下运行一个简单的动画。
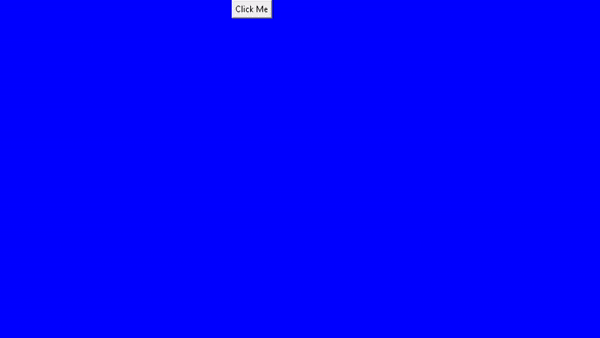
简单的动画
七、Python tkinter 按钮动画
在本节中,我们将学习 Python Tkinter 动画按钮。
代码:
from tkinter import *
ws = Tk()
ws.title("Python Guides")

def convert():
    if(a1['state']==NORMAL):
        a1["state"] = DISABLED
        a2["text"]="enable"
    elif (a1['state']==DISABLED):
        a1["state"]=NORMAL
        a2["text"]="disable"

#--Buttons
a1=Button(ws, text="button")
a1.config(height = 8, width = 9)
a1.grid(row=0, column=0)
a2 = Button(text="disable", command=convert)
a2.grid(row=0,column=1)
ws.mainloop()
在上面的代码中,首先,我们创建了一个按钮对象“ a1 ”,然后,我们使用IF语句来检查按钮的状态。最后,我们使用状态来更改按钮的行为以获得所需的结果。
输出:
运行以下代码后,我们得到以下输出,其中我们看到当我们单击它们时按钮将被禁用。当我们再次单击它们时,该按钮将被启用。
