nginx(二) nginx编译安装 及 配置WEB服务
在前面《nginx详解》文章中,我们对nginx有了一个基本的认识:包括应用场景、nginx基本架构、功能特性、并发模型以及配置说明等,我们知道nginx应用比较多的场景是WEB服务器和反向代理服务器。
下面将先进行nginx编译安装,然后再进行nginx的WEB服务相关的应用配置:包括设置配置文件vim下语法高亮显示、配置虚拟主机、基于IP的访问控制、基于用户认证的访问控制、建立下载站点下载列表、URL地址重写/重定向、防盗链、提供Nginx状态页面、配置gzip压缩、日志、基于SSL提供https服务等。
1、配置环境准备

1、WEB服务器:
主机系统:CentOS 6.4 x86_64;
IP:192.168.18.242 (host name:node2.tjiyu.com);
2、Client端:
IP:192.168.18.245;
一般浏览器;
2、下载编译安装
去nginx官网上把最新稳定版本的源码包下载下来,我们这里使用nginx-1.10.2版本;然后把源码包放到我们操作的主机上,下面开始编译安装。
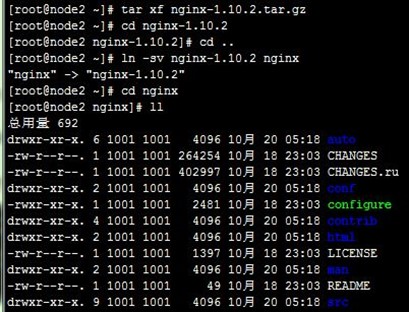
2-1、解压,创建软链接
- [root@node2 ~]# tar xf nginx-1.10.2.tar.gz
- [root@node2 ~]# ln -sv nginx-1.10.2 nginx
- [root@node2 ~]# cd nginx
- [root@node2 nginx]# ll
2-2、安装编译开发工具类库
用yum安装、更新开发工具"Development Tools"和"Server Platform Deveopment",而nginx会依赖openssl-devel和pcre-devel类库,安装如下:
- [root@node2 nginx]# yum groupinstall "Development Tools" "Server Platform Deveopment"
- [root@node2 ~]# yum install openssl-devel pcre-devel

2-3、创建用户和用户组
分别创建名为"nginx"的用户和组,用来运行nginx的worker进程,操作如下:
- [root@node2 nginx]# groupadd -r nginx
- [root@node2 nginx]# useradd -r -g nginx nginx
2-4、编译并安装
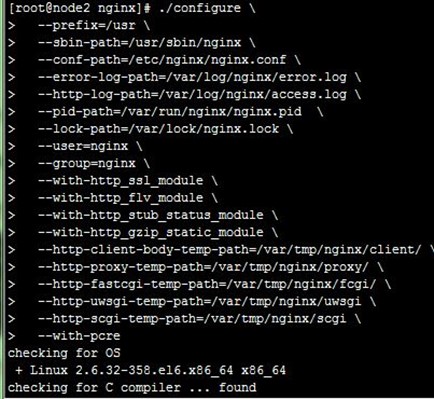
先configure指定编译选项,如安装目录、上面创建的运行用户、需要的扩展模块(SSL、FastCGI)等,选项及参数说明:http://nginx.org/en/docs/configure.html,操作如下:
- [root@node2 nginx]# ./configure \
- --prefix=/usr \
- --sbin-path=/usr/sbin/nginx \
- --conf-path=/etc/nginx/nginx.conf \
- --error-log-path=/var/log/nginx/error.log \
- --http-log-path=/var/log/nginx/access.log \
- --pid-path=/var/run/nginx/nginx.pid \
- --lock-path=/var/lock/nginx.lock \
- --user=nginx \
- --group=nginx \
- --with-http_ssl_module \
- --with-http_flv_module \
- --with-http_stub_status_module \
- --with-http_gzip_static_module \
- --http-client-body-temp-path=/var/tmp/nginx/client/ \
- --http-proxy-temp-path=/var/tmp/nginx/proxy/ \
- --http-fastcgi-temp-path=/var/tmp/nginx/fcgi/ \
- --http-uwsgi-temp-path=/var/tmp/nginx/uwsgi \
- --http-scgi-temp-path=/var/tmp/nginx/scgi \
- --with-pcre
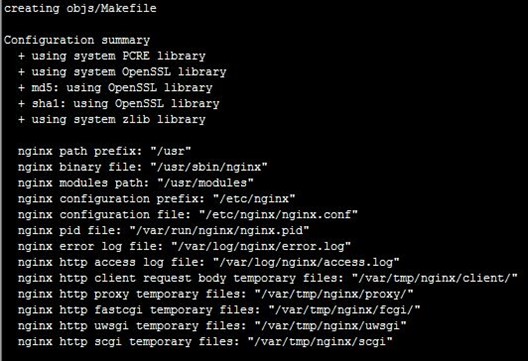
Configure成功如下:
接着开始编译并安装,如下:

2-5、为nginx提供SysV init服务脚本
先创建/etc/init.d/nginx服务脚本,这基于ngInx自身提供的命令实现的,脚本内容如下:
- #!/bin/sh
- # nginx - this script starts and stops the nginx daemon
- # chkconfig: - 85 15
- # description: Nginx is an HTTP(S) server, HTTP(S) reverse \
- # proxy and IMAP/POP3 proxy server
- # processname: nginx
- # config: /etc/nginx/nginx.conf
- # config: /etc/sysconfig/nginx
- # pidfile: /var/run/nginx.pid
- # Source function library.
- . /etc/rc.d/init.d/functions
- # Source networking configuration.
- . /etc/sysconfig/network
- # Check that networking is up.
- [ "$NETWORKING" = "no" ] && exit 0
- nginx="/usr/sbin/nginx"
- prog=$(basename $nginx)
- NGINX_CONF_FILE="/etc/nginx/nginx.conf"
- [ -f /etc/sysconfig/nginx ] && . /etc/sysconfig/nginx
- lockfile=/var/lock/subsys/nginx
- make_dirs() {
- # make required directories
- user=`nginx -V 2>&1 | grep "configure arguments:" | sed 's/[^*]*--user=[]∗[]∗.*/\1/g' -`
- options=`$nginx -V 2>&1 | grep 'configure arguments:'`
- for opt in $options; do
- if [ `echo $opt | grep '.*-temp-path'` ]; then
- value=`echo $opt | cut -d "=" -f 2`
- if [ ! -d "$value" ]; then
- # echo "creating" $value
- mkdir -p $value && chown -R $user $value
- fi
- fi
- done
- }
- start() {
- [ -x $nginx ] || exit 5
- [ -f $NGINX_CONF_FILE ] || exit 6
- make_dirs
- echo -n $"Starting $prog: "
- daemon $nginx -c $NGINX_CONF_FILE
- retval=$?
- echo
- [ $retval -eq 0 ] && touch $lockfile
- return $retval
- }
- stop() {
- echo -n $"Stopping $prog: "
- killproc $prog -QUIT
- retval=$?
- echo
- [ $retval -eq 0 ] && rm -f $lockfile
- return $retval
- }
- restart() {
- configtest || return $?
- stop
- sleep 1
- start
- }
- reload() {
- configtest || return $?
- echo -n $"Reloading $prog: "
- killproc $nginx -HUP
- RETVAL=$?
- echo
- }
- force_reload() {
- restart
- }
- configtest() {
- $nginx -t -c $NGINX_CONF_FILE
- }
- rh_status() {
- status $prog
- }
- rh_status_q() {
- rh_status >/dev/null 2>&1
- }
- case "$1" in
- start)
- rh_status_q && exit 0
- $1
- ;;
- stop)
- rh_status_q || exit 0
- $1
- ;;
- restart|configtest)
- $1
- ;;
- reload)
- rh_status_q || exit 7
- $1
- ;;
- force-reload)
- force_reload
- ;;
- status)
- rh_status
- ;;
- condrestart|try-restart)
- rh_status_q || exit 0
- ;;
- *)
- echo $"Usage: $0 {start|stop|status|restart|condrestart|try-restart|reload|force-reload|configtest}"
- exit 2
- esac
并为此脚本赋予执行权限,然后添加到系统服务管理列表,并让其开机自动启动,操作如下:
- [root@node2 nginx]# vim /etc/init.d/nginx
- [root@node2 nginx]# chmod +x /etc/init.d/nginx
- [root@node2 nginx]# chkconfig --add nginx
- [root@node2 nginx]# chkconfig nginx on
- [root@node2 nginx]# chkconfig --list nginx

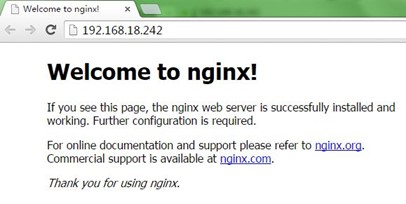
2-6、启动并访问测试
启动nginx,我们看到因为httpd占用80端口而失败,关闭httpd后再启动nginx正常;查看网络状态,可以看到nginx正在监听80端口;用测试主机访问nginx主机的IP,可以看到nginx的欢迎页面,过程如下:
- [root@node2 nginx]# service nginx start
- [root@node2 nginx]# netstat -ntulp | grep nginx

3、配置Nginx
前面编译nginx的时候,我们用选项--conf-path=/etc/nginx/nginx.conf(默认也是这个目录),指定的了配置文件及所在目录,所以我们到/etc/nginx/下可以看到nginx.conf配置文件,而.default结尾的是nginx默认编译选项的配置文件,已经没有意义了。
前面《nginx详解》我们已经详细分析说明nginx配置文件的几个配置区域块和大部分的配置选项,下面就不一一说明了,只说明一些用到的配置选项。
3-1、设置配置文件vim下语法高亮显示
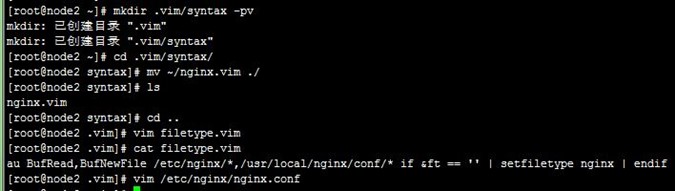
linux系统下vim或者vi编辑器默认是没有对nginx配置的语法高亮设置。但是我们可以到http://www.vim.org/scripts/script.php?script_id=1886下载nginx.vim,然后根据它上面的说明,进行简单的配置,如下:
- [root@node2 ~]# mkdir .vim/syntax -pv
- [root@node2 ~]# cd .vim/syntax/
- [root@node2 syntax]# mv ~/nginx.vim ./
- [root@node2 syntax]# ls
- nginx.vim
- [root@node2 syntax]# cd ..
- [root@node2 .vim]# vim filetype.vim
- [root@node2 .vim]# cat filetype.vim
- au BufRead,BufNewFile /etc/nginx/*,/usr/local/nginx/conf/* if &ft == '' | setfiletype nginx | endif
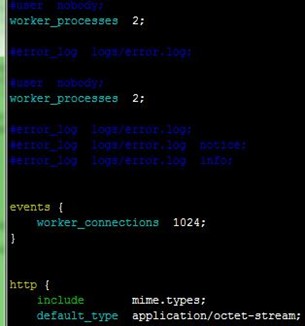
- [root@node2 .vim]# vim /etc/nginx/nginx.conf
3-2、配置虚拟主机
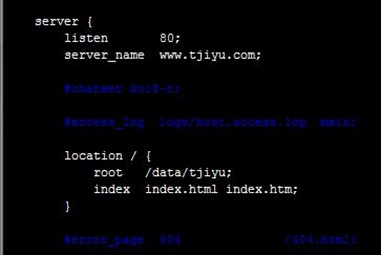
编辑nginx.conf,配置两个虚拟主机www.tjiyu.com和www.test.com,资源文件目录分别/data/tjiyu和/data/test,可以看到最简单的配置只需要三行,操作如下:
- [root@node2 nginx]# cp nginx.conf nginx.conf.bak
- [root@node2 nginx]# vim nginx.conf
- server {
- listen 80;
- server_name www.tjiyu.com;
- location / {
- root /data/tjiyu;
- index index.html index.htm;
- }
- }
- server {
- listen 80 default_server; #配置默认虚拟主机
- server_name www.test.com;
- root /data/test;
- }

然后分别创建资源目录,提供index.html测试页面,然后使nginx重新加载配置,操作如下:
- [root@node2 nginx]# mkdir /data
- [root@node2 nginx]# mkdir /data/tjiyu
- [root@node2 nginx]# echo "<h1>www.tjiyu.com</h1>" > /data/tjiyu/index.html
- [root@node2 nginx]# mkdir /data/test
- [root@node2 nginx]# echo "<h1>www.test.com</h1>" >
- [root@node2 nginx]# service nginx reload


在我们的测试主机上配置hosts,让访问虚拟主机名可以指向主机IP,win7 x86_64上C:\Windows\System32\drivers\etc\HOSTS添加如下两行记录,如上:
- 192.168.18.242 www.tjiyu.com
- 192.168.18.242 www.test.com
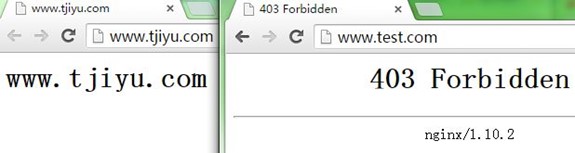
然后访问两个访问虚拟主机,可以看到提供的测试页面;因为我们在www.test.com的listen选项配置了default_server,所以直接访问主机IP是返回的是该虚拟主机的页面,如下:

3-3、基于IP的访问控制
基于IP的访问控制是ngx_http_access_module模块的功能,只有允许选项allow和禁止选项deny。
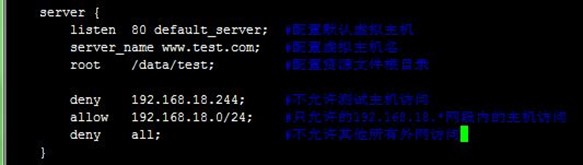
配置第二台虚拟主机只允许的192.168.18.*网段内的主机访问,但除测试主机192.168.18.244外,注意,多个规则是自上而下进行匹配的,所以不允许测试主机访问得在最上面;测试访问www.test.com可以看到返回403禁止访问页面,而访问www.tjiyu.com是正常的,过程如下:
- [root@node2 nginx]# vim nginx.conf
- root@node2 nginx]# service nginx reload
- server {
- listen 80 default_server;
- server_name www.test.com;
- root /data/test;
- deny 192.168.18.244; #不允许测试主机访问
- allow 192.168.18.0/24; #只允许的192.168.18.*网段内的主机访问
- deny all; #不允许其他所有外网访问

3-4、基于用户认证的访问控制
基于用户认证的访问控制是ngx_http_auth_basic_module模块的功能,只有配置名称(或者off)选项auth_basic和配置文件选项auth_basic_user_file,文件由htpasswd生成,包括用户和密码。
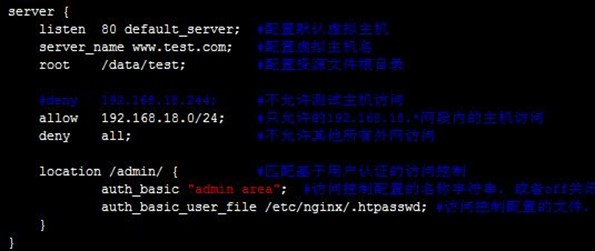
先创建需要用户认证的目录/data/test/admin,提供一个测试页面;然后用htpasswd生成认证文件;编辑配置文件,用location匹配/data/test/admin目录,接着在里面配置访问控制配置的名称字符串和访问控制配置的文件,过程如下:
- [root@node2 nginx]# mkdir /data/test/admin
- [root@node2 nginx]# echo "<h1>admin area</h1>" > /data/test/admin/index.html
- [root@node2 nginx]# htpasswd -c -m /etc/nginx/.htpasswd admin
- [root@node2 nginx]# vim nginx.conf
- [root@node2 nginx]# service nginx reload
- server {
- listen 80 default_server; #配置默认虚拟主机
- server_name www.test.com; #配置虚拟主机名
- root /data/test; #配置资源文件根目录
- #deny 192.168.18.244; #不允许测试主机访问
- allow 192.168.18.0/24; #只允许的192.168.18.*网段内的主机访问
- deny all; #不允许其他所有外网访问
- location /admin/ { #匹配基于用户认证的访问控制
- auth_basic "admin area"; #访问控制配置的名称字符串,或者off关闭
- auth_basic_user_file /etc/nginx/.htpasswd; #访问控制配置的文件,htpasswd生成,包含用户名用密码
- }
- }

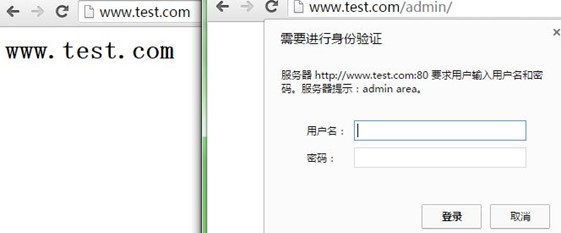
测试访问www.test.com正常,访问www.test.com/admin/需要用户和密码认证,也就实现了目录/data/test/admin里的资源需要用户认证,如下:

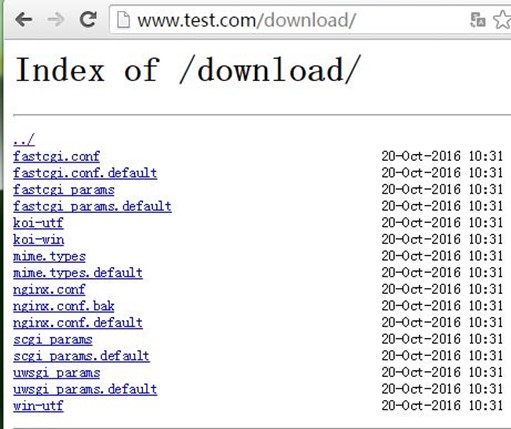
3-5、建立下载站点下载列表
下载站点下载列表是ngx_http_autoindex_module模块的功能,有几个选项,最基本就是开关选项autoindex on | off和显示时间选项autoindex_localtime on | off。
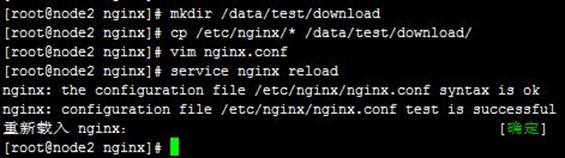
先创建存放下载资源的目录/data/test/download,复制一些文件进去提供测试;然后编辑配置文件,用location匹配/data/test/download目录,接着在里面配置打开下载列表功能;测试访问www.test.com/download可以看到下载列表,过程如下:
- [root@node2 nginx]# mkdir /data/test/download
- [root@node2 nginx]# cp /etc/nginx/* /data/test/download/
- [root@node2 nginx]# vim nginx.conf
- [root@node2 nginx]# service nginx reload
- server {
- listen 80 default_server;
- server_name www.test.com;
- root /data/test;
- location /download/ {
- autoindex on; #打开下载列表功能
- autoindex_localtime on; #显示时间
- }
- }

3-6、URL地址重写/重定向
URL地址重写/重定向是ngx_http_rewrite_module模块的功能,通过正则匹配,把匹配的URL重写为指定的URL,以重写的URL来请求响应。主要应用在实现URL跳转、域名跳转、站点镜像等,比如网站改版,目录结构发生改变,但不希望不改变页面中的URL,用URL地址重写来实现。
1、if和rewrite选项
这里有两个比较重要的选项,if和rewrite:If在上面已经介绍过了,在很多地方都用到,这里用于检测条件是否成立;而rewrite regex replacement [flag],匹配regex正则表达式(可以省略,直接重写),以replacement重写代替,flag为标志位,主要有:
- last:一旦被当前规则匹配并重写后立即停止检查后续饿的其他rewrite的规则,而后通过重写后的规则重新发起请求;
- break:一旦被当前规则匹配并重写后立即停止检查后续饿的其他rewrite的规则,而后继续由nginx进行后续的操作;
- redirect:返回302临时重定向代码;
- permanent:返回301永久重定向;
注意:当有多个rewrite规则一起使用时,可能会循环匹配,nginx最多循环10次,超出之后返回500错误;一般将rewrite写在location中时都使用break标志,或者将rewrite写if上下文中。
2、配置
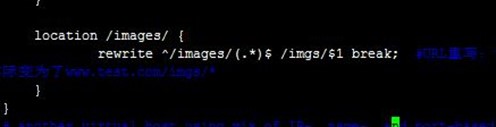
配置www.test.com虚拟主机的当目录$root_dir/images改为$root_dir /imgs时,可以通过URL重写,让www.test.com/images/*请求还能和原来一样,不过实际变为了www.test.com/imgs/*。
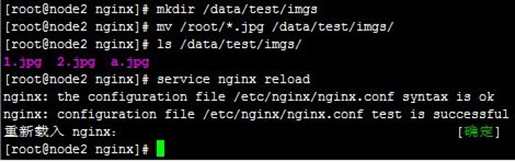
直接创建/data/test/imgs目录,放一些图片文件进去用来测试;然后配置文件;测试访问www.test.com/images/2.jpg可以正常看到刚才放到/data/test/imgs图片,过程如下:
- [root@node2 nginx]# mkdir /data/test/imgs
- [root@node2 nginx]# mv /root/*.jpg /data/test/imgs/
- [root@node2 nginx]# ls /data/test/imgs/
- [root@node2 nginx]# vim nginx.conf
- [root@node2 nginx]# service nginx reload
- server {
- listen 80 default_server;
- server_name www.test.com;
- root /data/test;
- location /images/ {
- rewrite ^/images/(.*)$ /imgs/$1 break; #URL重写:让www.test.com/images/*请求还能和原来一样,不>过实际变为了www.test.com/imgs/*
- }
- }

3-7、防盗链
防盗链基于是ngx_http_referer_module模块的功能,主要通过请求头部"Referer"字段识别,配置有两点:
(1)valid_referers选项,定义合规引用
- valid_referers none |blocked |server_names|string ...
- none表示没有"Referer",blocked表示 "Referer" 没有没有以"http://"或"https://"开头;
(2)($invaild_referer变量,判断不合规的引用,返回一个提示
- if ($invaild_referer) {
- rewrite ^/.*$ http://www.a.com/403.html
- }
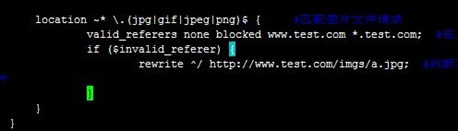
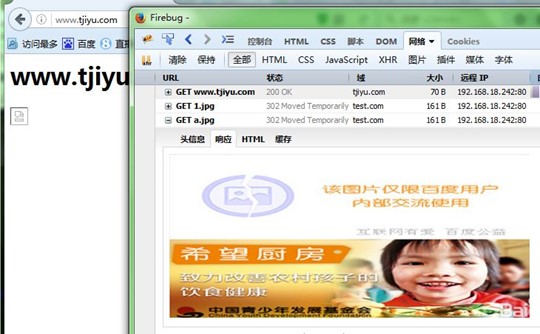
下面配置当www.tjiyu.com虚拟主机页面引用www.test.com虚拟主机上的图片时,返回一个"图片仅供内部交流使用的图片"。www.test.com虚拟主机上配置location匹配图片文件,valid_referers定义合规引用,包括自己的虚拟主机名称等,然后if ($invaild_referer)判断不合规的引用,用URL地址重写返回一个提示图片,操作配置如下:
- [root@node2 nginx]# vim nginx.conf
- location ~* \.(jpg|gif|jpeg|png)$ { #匹配图片文件请求
- valid_referers none blocked www.test.com *.test.com; #定义合规引用,包括自己站主机等
- if ($invalid_referer) {
- rewrite ^/ http://www.test.com/imgs/a.jpg; #判断不合规的引用,用URL地址重写返回一个提示>图片
- }
- }
然后在www.tjiyu.com虚拟主机测试页面加入图片引用,测试访问www.tjiyu.com可以看到引用的http://www.test.com/imgs/1.jpg,但返回的是我们配置http://www.test.com/imgs/a.jpg,过程如下:
- [root@node2 nginx]# vim /data/tjiyu/index.html
- [root@node2 nginx]# service nginx reload
- <img src="http://www.test.com/imgs/1.jpg">
3-8、提供Nginx状态页面
提供Nginx状态页面指的是ngx_http_stub_status_module模块的功能,还有一个可以提供更详细信息的ngx_http_status_module模块,配置都很简单,不过编译nginx时需要指定包含进来。
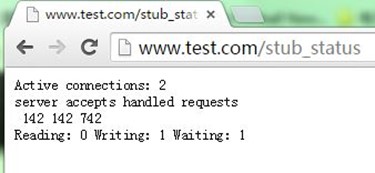
可以看到的信息有:
当下处于活动状态的总数;
接受的总数,已经建立和处理总数,请求的总数;
正在接受的并发请求个数,正在读取的个数或发往客户端的,长连接中的处于活动状态的值;
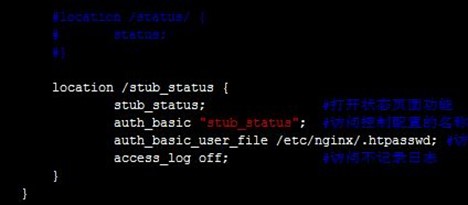
配置一个location匹配访问,里面"stub_status;"就可以打开状态页面功能,注意1.7.5版本前需要"stub_status on;",然后加入用户认证和不记录日志,以防信息泄露,过程如下:
- [root@node2 nginx]# vim nginx.conf
- [root@node2 nginx]# service nginx reload
- location /stub_status {
- stub_status; #打开状态页面功能
- auth_basic "stub_status"; #访问控制配置的名称字符串,或者off关闭
- auth_basic_user_file /etc/nginx/.htpasswd; #访问控制配置的文件,htpasswd生成,包含用户名用密码
- access_log off; #访问不记录日志
- }
3-9、配置gzip压缩
提供gzip压缩指的是ngx_http_gzip_module模块的功能,nginx默认会附带gzip压缩的功能,而ngx_http_gzip_static_module模块是提供gzip预压缩功能,需要编译指定。
配置选项有:
- gzip on|off
- gzip_buffer 使用的缓存大小
- gzip_comp_level 压缩的级别
- gzip_disable 不压缩的类型或浏览器
- gzip_min_length 最少压缩的大小
- gzip_http_version 压缩完成以后发送http的版本
- gzip_types:只压缩的格式
nginx将响应报文发送至客户端之前可以启用压缩功能,这能够有效地节约带宽,并提高响应至客户端的速度。可以在http块或server块中配置,一般在http块中配置,配置如下:
- gzip on; #打开gzip压缩功能
- gzip_http_version 1.0; #使用1.0版本
- gzip_comp_level 4; #压缩级别为4
- gzip_min_length 64; #内容超过最少长度后才开启压缩:64k gzip_types text/plain text/css application/x-javascript text/xml application/xml application/xml+rss text/javascript application/javascript application/json; #压缩的文件类型:文本压
- gzip_disable msie6; #不压缩的浏览器类型:ie6不支持
3-10、配置日志
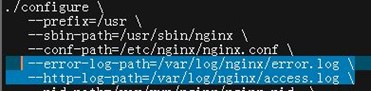
Nginx常用的日志分为:错误日志error_log,这是nginx核心模块ngx_core_module提供的,前面《nginx详解》已有详细的说明;http访问日志access_log,这是ngx_http_log_module模块提供的。
这两种日志默认都是打开记录的,而我们configure配置编译的时候已经指定了日志存放的目录,我们可以看到目录下已经存在这两个日志文件,如下:
下面就来配置http访问日志,配置选项有:
- access_log off | path [format [buffer=size] [gzip[=level]] [flush=time] [if=condition]]; #设置存放路径、(引用)日志格式、缓存区大小、压缩等级、缓存时间等;
- log_format name string ...; #定义日志格式,access_log引用
- open_log_file_cache max=N [inactive=time] [min_uses=N] [valid=time]; #设置日志文件缓存
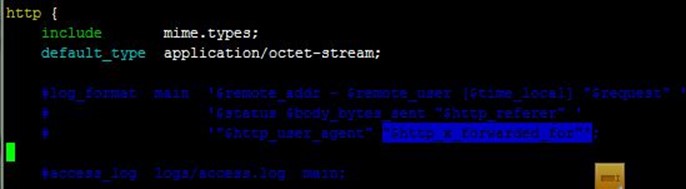
注意,默认access_log logs/access.log combined; log_format combined "...";也就是说日志格式为combined,如下:
- log_format combined '$remote_addr - $remote_user [$time_local] '
- '"$request" $status $body_bytes_sent '
- '"$http_referer" "$http_user_agent"';
格式定义中可以使用公共变量和仅日志格式中的变量。
典型应用配置:如果请求经过nginx反向代理服务器,后端web服务器无法直接获取到客户端真实的IP地址(因为$remote_addr获取到的是反向代理IP地址)。可以配置反向代理服务器在转发请求的http头信息中增加"x-Forwarded-For"行信息,该信息中记录客户端IP地址和客户端请求的服务器地址;而后在后端服务器就配置重新定义日志格式,增加"$http_x_forwarded_for"变量信息到格式,就如原来配置文件中存在的配置(已注释,后面介绍nginx负载均衡再配置),如下:
3-11、配置基于SSL提供https服务
提供基于SSL提供https服务的是ngx_mail_ssl_module模块,需要编译指定。
1、创建CA自签证书
- [root@node2 ~]# cd /etc/pki/CA/
- [root@node2 CA]# ls
- certs crl newcerts private
- [root@node2 CA]# cd private/
- [root@node2 private]# ls
- [root@node2 private]# (umask 077; openssl genrsa 2048 > cakey.pem)
- Generating RSA private key, 2048 bit long modulus
- ....+++
- ..........................................................+++
- e is 65537 (0x10001)
- [root@node2 private]# openssl req -new -x509 -key ./cakey.pem -out ../cacert.pem
- You are about to be asked to enter information that will be incorporated
- into your certificate request.
- What you are about to enter is what is called a Distinguished Name or a DN.
- There are quite a few fields but you can leave some blank
- For some fields there will be a default value,
- If you enter '.', the field will be left blank.
- -----
- Country Name (2 letter code) [XX]:CN
- State or Province Name (full name) []:HZ
- Locality Name (eg, city) [Default City]:ZJ
- Organization Name (eg, company) [Default Company Ltd]:TJIYU
- Organizational Unit Name (eg, section) []:TEST
- Common Name (eg, your name or your server's hostname) []:ca.tjiyu.com
- Email Address []:[email protected]
- [root@node2 private]# ll
- 总用量 4
- -rw-------. 1 root root 1675 10月 20 17:18 cakey.pem
- [root@node2 private]# cd ..
- [root@node2 CA]# touch serial
- [root@node2 CA]# echo 01 > serial
- [root@node2 CA]# touch index.txt
- [root@node2 CA]# ll
- 总用量 24
- -rw-r--r--. 1 root root 1383 10月 20 17:25 cacert.pem
- drwxr-xr-x. 2 root root 4096 9月 27 20:30 certs
- drwxr-xr-x. 2 root root 4096 9月 27 20:30 crl
- -rw-r--r--. 1 root root 0 10月 20 17:26 index.txt
- drwxr-xr-x. 2 root root 4096 9月 27 20:30 newcerts
- drwx------. 2 root root 4096 10月 20 17:18 private
- -rw-r--r--. 1 root root 3 10月 20 17:26 serial
2、生成证书申请
- [root@node2 CA]# mkdir /etc/nginx/ssl
- [root@node2 CA]# cd /etc/nginx/ssl/
- [root@node2 ssl]# (umask 077; openssl genrsa 1024 > nginx.key)
- Generating RSA private key, 1024 bit long modulus
- ....................................................++++++
- ..............++++++
- e is 65537 (0x10001)
- [root@node2 ssl]# openssl req -new -key nginx.key -out nginx.csr
- You are about to be asked to enter information that will be incorporated
- into your certificate request.
- What you are about to enter is what is called a Distinguished Name or a DN.
- There are quite a few fields but you can leave some blank
- For some fields there will be a default value,
- If you enter '.', the field will be left blank.
- -----
- Country Name (2 letter code) [XX]:CN
- State or Province Name (full name) []:HZ
- Locality Name (eg, city) [Default City]:ZJ
- Organization Name (eg, company) [Default Company Ltd]:TJIYU
- Organizational Unit Name (eg, section) []:TEST
- Common Name (eg, your name or your server's hostname) []:www.test.com
- Email Address []:
- Please enter the following 'extra' attributes
- to be sent with your certificate request
- A challenge password []:
- An optional company name []:
3、让CA签名并颁发证书
- [root@node2 ssl]# openssl ca -in nginx.csr -out nginx.crt -days 3650
- Using configuration from /etc/pki/tls/openssl.cnf
- Check that the request matches the signature
- Signature ok
- Certificate Details:
- Serial Number: 1 (0x1)
- Validity
- Not Before: Oct 20 09:31:01 2016 GMT
- Not After : Oct 18 09:31:01 2026 GMT
- Subject:
- countryName = CN
- stateOrProvinceName = HZ
- organizationName = TJIYU
- organizationalUnitName = TEST
- commonName = www.test.com
- X509v3 extensions:
- X509v3 Basic Constraints:
- CA:FALSE
- Netscape Comment:
- OpenSSL Generated Certificate
- X509v3 Subject Key Identifier:
- AD:3D:C4:0D:11:A0:68:51:1B:CE:5E:45:B3:7C:A0:A8:2C:01:A8:27
- X509v3 Authority Key Identifier:
- keyid:5B:22:1A:8A:67:E6:C2:8A:CA:DA:F5:5C:97:86:76:5B:09:94:88:48
- Certificate is to be certified until Oct 18 09:31:01 2026 GMT (3650 days)
- Sign the certificate? [y/n]:y
- 1 out of 1 certificate requests certified, commit? [y/n]y
- Write out database with 1 new entries
- Data Base Updated
- [root@node2 ssl]# ll
- 总用量 12
- -rw-r--r--. 1 root root 3736 10月 20 17:33 nginx.crt
- -rw-r--r--. 1 root root 635 10月 20 17:30 nginx.csr
- -rw-------. 1 root root 887 10月 20 17:27 nginx.key
4、修改配置文件
使用另外一个server配置SSL监听433端口,注意,配置如下:
- server {
- listen 443 ssl; #打开SSL,监听433端口
- server_name localhost;
- ssl_certificate /etc/nginx/ssl/nginx.crt; #证书文件
- ssl_certificate_key /etc/nginx/ssl/nginx.key; #证书key文件
- ssl_session_cache shared:SSL:1m; #所有worker进程共享会话缓存
- ssl_session_timeout 5m; #会话超时时间:5分钟
- ssl_protocols SSLv2 SSLv3 TLSv1 TLSv1.1 TLSv1.2; #支持SSL协议,从1.1.13和1.0.12版本开始支持TLSv1.1和TLSv1.2
- ssl_ciphers HIGH:!aNULL:!MD5; #加密方法
- ssl_prefer_server_ciphers on; #由服务器选择加密方法
- location / {
- root html;
- index index.html index.htm;
- }
- }
5、测试
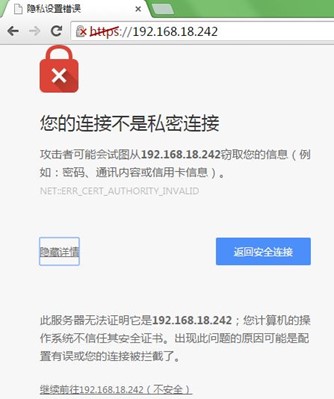
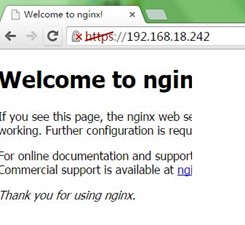
重新加载配置后,查看网络状态,可以看到nginx监听了433端口;访问可以看到警告提示,因为我们的证书不是正规机构申请的,无法认证;继续访问可以看到正常页面 ,如下:

到这里,我们成功对nginx进行了编译安装以及配置WEB服务相关内容,后面将进行nginx的反向代理、负载均衡、后端健康检测和缓存等相关功能配置……
【参考资料】
1、nginx官网文档:http://nginx.org/en/docs/
2、nginx详解:http://blog.csdn.net/tjiyu/article/details/53027619
3、Web服务器之Nginx详解:http://freeloda.blog.51cto.com/2033581/1285722