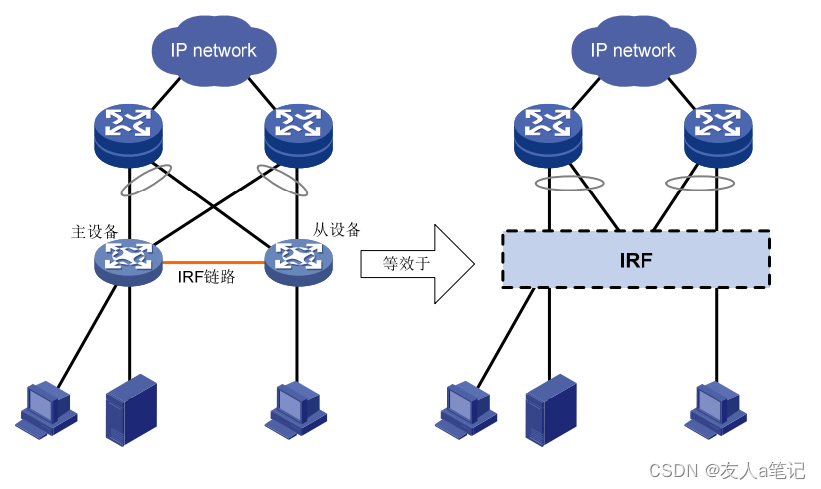
1. IRF简介
IRF它的核心思想是将多台设备连接在一起,进行必要的配置后,虚拟化成一台设备
1.1 实验环境
H3C模拟器版本

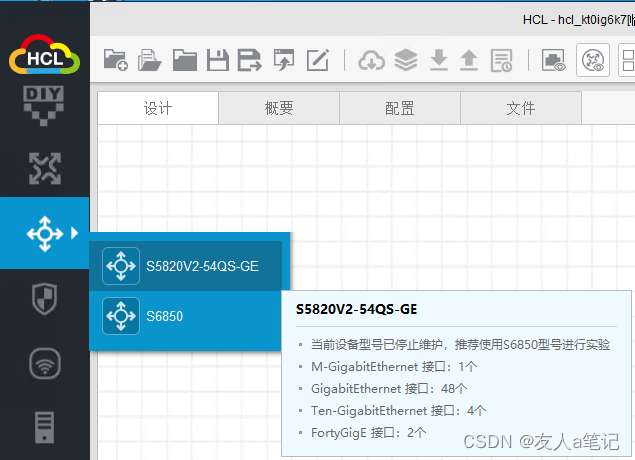
1.2 添加交换机
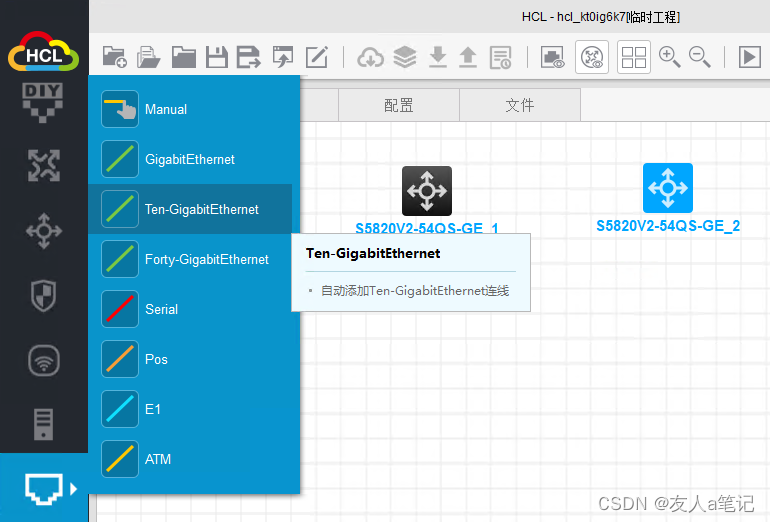
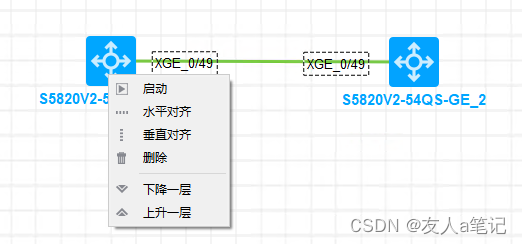
1.3 添加连接线
1.4 启动设备
1.5 修改设备名称
SW1:
<H3C>system-view
[H3C]sysname SW1
[SW1]
SW2:
扫描二维码关注公众号,回复:
16670758 查看本文章

<H3C>system-view
[H3C]sysname SW2
[SW2]
1.6 关闭IRF物理端口
SW1:
[SW1]interface  Ten-GigabitEthernet1/0/49
[SW1-Ten-GigabitEthernet1/0/49]shutdown
[SW1-Ten-GigabitEthernet1/0/49]quit
SW2:
[SW2]interface  Ten-GigabitEthernet1/0/49
[SW2-Ten-GigabitEthernet1/0/49]shutdown
[SW2-Ten-GigabitEthernet1/0/49]quit
1.7 设置IRF域编号
SW1:
[SW1]irf domain 10
SW2:
[SW2]irf domain 10
1.8 设置member成员编号
SW1:
[SW1]irf member 1 renumber 1
Renumbering the member ID may result in configuration change or loss. Continue?[Y/N]:y
SW2:
[SW2]irf member  1 renumber 2
Renumbering the member ID may result in configuration change or loss. Continue?[Y/N]:y
1.9 配置IRF端口并与物理端口绑定
如果SW1使用 1/1,那SW2只能使用1/2
SW1:
[SW1]irf-port 1/1
[SW1-irf-port1/1]port group interface Ten-GigabitEthernet 1/0/49
You must perform the following tasks for a successful IRF setup:
Save the configuration after completing IRF configuration.
Execute the "irf-port-configuration active" command to activate the IRF ports.
[SW1-irf-port1/1]quit
SW2:
[SW2]irf-port 1/2
[SW2-irf-port1/2]port  group interface Ten-GigabitEthernet 1/0/49
You must perform the following tasks for a successful IRF setup:
Save the configuration after completing IRF configuration.
Execute the "irf-port-configuration active" command to activate the IRF ports.
[SW2-irf-port1/2]quit
1.10 开启IRF物理端口,保存配置
SW1:
[SW1]interface  Ten-GigabitEthernet1/0/49
[SW1-Ten-GigabitEthernet1/0/49]un
[SW1-Ten-GigabitEthernet1/0/49]undo  shu
[SW1-Ten-GigabitEthernet1/0/49]undo  shutdown
[SW1-Ten-GigabitEthernet1/0/49]quit
[SW1]save
The current configuration will be written to the device. Are you sure? [Y/N]:y
Please input the file name(*.cfg)[flash:/startup.cfg]
(To leave the existing filename unchanged, press the enter key):
Validating file. Please wait...
Saved the current configuration to mainboard device successfully.
SW2:
[SW2]interface  Ten-GigabitEthernet 1/0/49
[SW2-Ten-GigabitEthernet1/0/49]undo  shutdown
[SW2-Ten-GigabitEthernet1/0/49]quit
[SW2]save
The current configuration will be written to the device. Are you sure? [Y/N]:y
Please input the file name(*.cfg)[flash:/startup.cfg]
(To leave the existing filename unchanged, press the enter key):
Validating file. Please wait...
Saved the current configuration to mainboard device successfully.
1.11 激活IRF端口下的配置
SW1:
[SW1]irf-port-configuration active
SW2:
[SW2]irf-port-configuration active
重启SW2
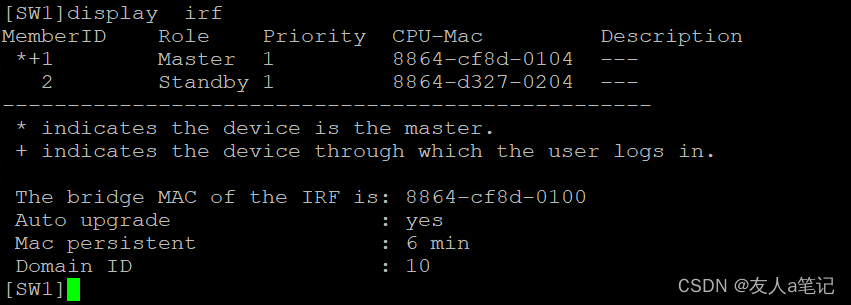
1.12 查看irf状态
SW1是Master,SW2是Standby
*表示Master设备
+表示当前通过那台设备登陆
2. IRF角色选举
确定成员设备角色为主设备或从设备的过程称为角色选举。角色选举会在以下情况下进行:IRF 建立、主设备离开或者故障、两个 IRF 合并等。
角色选举规则如下:
- 当前主设备优先,IRF 不会因为有新的成员设备加入而重新选举主设备。不过,当 IRF形成时,因为没有主设备,所有加入的设备都认为自己是主设备,则继续下一条规则的比较。
- 成员优先级大的优先。如果优先级相同,则继续下一条规则的比较。
- 系统运行时间长的优先。在 IRF 中,成员设备启动时间间隔精度为 10 分钟,即 10分钟之内启动的设备,则认为它们是同时启动的,则继续下一条规则的比较。
- CPU MAC 小的优先。通过以上规则选出的最优成员设备即为主设备,其它成员设备则均为从设备。
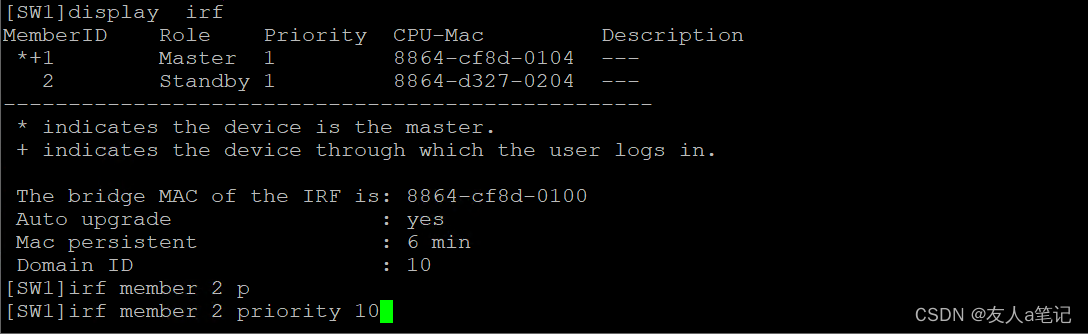
2.1 更改优先级改变master
默认优先级为1,更改后并不会重新选举,需要member 1重启(谨慎)
[SW1]irf member 2 priority 10
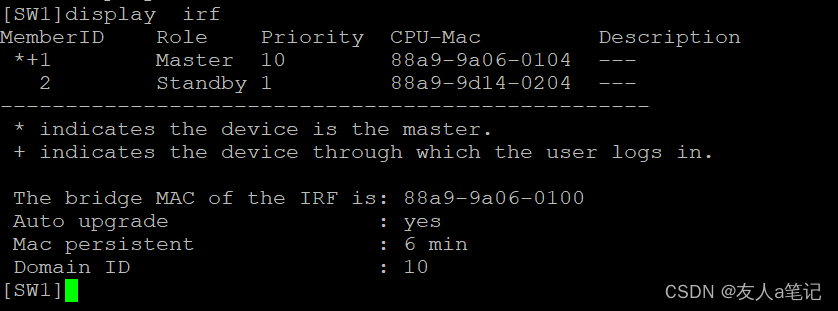
2.2 member 2成为Master

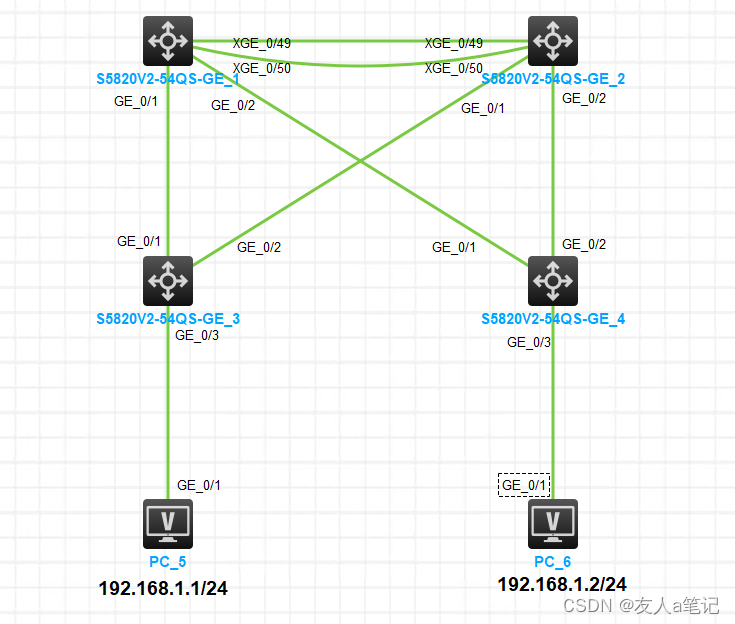
3. 案例
拓扑
3.1 SW1
#irf区域设置

[H3C]sysname SW1
[SW1]irf domain 10

#设置member 1优先级
[SW1]irf member 1 priority 10

#关闭irf物理端口

[SW1]interface range Ten-GigabitEthernet 1/0/49 to Ten-GigabitEthernet 1/0/50
[SW1-if-range]shutdown
[SW1-if-range]quit

#创建irf-port 1/1 ( member号/逻辑口编号),然后加入irf物理端口
[SW1]irf-port 1/1
[SW1-irf-port1/1]port group interface Ten-GigabitEthernet 1/0/49
[SW1-irf-port1/1]port group interface Ten-GigabitEthernet 1/0/50
[SW1-irf-port1/1]quit


#开启irf物理端口,保存配置
[SW1]interface  range Ten-GigabitEthernet  1/0/49 to  Ten-GigabitEthernet  1/0/50
[SW1-if-range]undo  shutdown
[SW1-if-range]quit
[SW1]save

#激活irf端口下的配置
[SW1]irf-port-configuration active
3.2 SW2
#irf区域设置
[H3C]sysname  SW2
[SW2]irf domain  10

#设置member成员编号(irf内两台设备成员编号不能一致)
[SW2]irf member 1 renumber 2

#重启
<SW2>reboot

#关闭irf物理端口
[SW2]interface  range Ten-GigabitEthernet  2/0/49 to Ten-GigabitEthernet 2/0/50
[SW2-if-range]shutdown
[SW2-if-range]quit

#创建irf-port 2/2 ( member号/逻辑口编号,逻辑口编号两台设备之间只能选1或者2,不能同时1或者同时2),然后加入irf物理端口
[SW2]irf-port 2/2
[SW2-irf-port2/2]port group interface Ten-GigabitEthernet 2/0/49
[SW2-irf-port2/2]port group interface Ten-GigabitEthernet 2/0/50
[SW2-irf-port2/2]quit

#开启irf物理端口,保存配置
[SW2]interface  range Ten-GigabitEthernet  2/0/49 to Ten-GigabitEthernet 2/0/50
[SW2-if-range]undo  shutdown
[SW2-if-range]quit
[SW2]save

#激活irf端口下的配置
[SW2]irf-port-configuration active
SW2会自动重启并加入irf
3.3 查看irf
3.4 IRF-SW配置链路聚合
将SW1的g1/0/1与g2/0/1端口做聚合1

[SW1]interface Bridge-Aggregation 1
[SW1-Bridge-Aggregation1]quit

#将物理接口加入到聚合口1
[SW1]interface  GigabitEthernet 1/0/1
[SW1-GigabitEthernet1/0/1]port link-aggregation group 1
[SW1-GigabitEthernet1/0/1]quit
[SW1]interface  GigabitEthernet  2/0/1
[SW1-GigabitEthernet2/0/1]port link-aggregation group 1
[SW1-GigabitEthernet2/0/1]quit

[SW1]interface Bridge-Aggregation 1
[SW1-Bridge-Aggregation1]port link-type trunk
[SW1-Bridge-Aggregation1]port trunk permit vlan 10
[SW1-Bridge-Aggregation1]quit
将SW1的g1/0/2与g2/0/2端口做聚合2

[SW1]interface  Bridge-Aggregation 2
[SW1-Bridge-Aggregation2]quit

[SW1]interface  GigabitEthernet 1/0/2
[SW1-GigabitEthernet1/0/2]port link-aggregation group 2
[SW1-GigabitEthernet1/0/2]quit
[SW1]interface  GigabitEthernet  2/0/2
[SW1-GigabitEthernet2/0/2]port link-aggregation group  2
[SW1-GigabitEthernet2/0/2]quit

[SW1]interface  Bridge-Aggregation 2
[SW1-Bridge-Aggregation2]port link-type trunk
[SW1-Bridge-Aggregation2]port trunk permit vlan 10
[SW1-Bridge-Aggregation2]quit
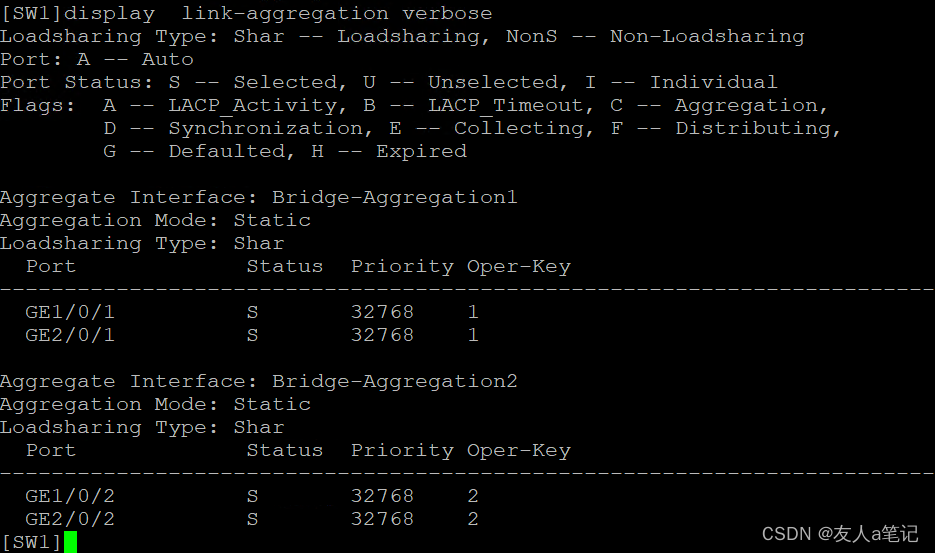
3.5 查看聚合端口结果
3.6 接入层交换机配置聚合口
SW3:
[H3C]sysname SW3
[SW3]interface  Bridge-Aggregation 1
[SW3-Bridge-Aggregation1]quit


[SW3]interface  GigabitEthernet  1/0/1
[SW3-GigabitEthernet1/0/1]port link-aggregation group 1
[SW3-GigabitEthernet1/0/1]quit
[SW3]interface  GigabitEthernet  1/0/2
[SW3-GigabitEthernet1/0/2]port link-aggregation group 1
[SW3-GigabitEthernet1/0/2]quit

[SW3]interface  Bridge-Aggregation 1
[SW3-Bridge-Aggregation1]port link-type trunk
[SW3-Bridge-Aggregation1]port trunk permit vlan 10
[SW3-Bridge-Aggregation1]quit
SW4:
[H3C]sysname SW4
[SW4]interface  Bridge-Aggregation  2
[SW4-Bridge-Aggregation2]quit


[SW4]interface  GigabitEthernet  1/0/1
[SW4-GigabitEthernet1/0/1]port link-aggregation group 2
[SW4-GigabitEthernet1/0/1]quit
[SW4]interface  GigabitEthernet  1/0/2
[SW4-GigabitEthernet1/0/2]port link-aggregation group  2
[SW4-GigabitEthernet1/0/2]quit

[SW4]interface  Bridge-Aggregation  2
[SW4-Bridge-Aggregation2]port link-type trunk
[SW4-Bridge-Aggregation2]port trunk permit vlan  10
[SW4-Bridge-Aggregation2]quit
3.7 接入层交换机配置vlan
SW3
[SW3]vlan 10
[SW3-vlan10]quit

[SW3]interface  GigabitEthernet  1/0/3
[SW3-GigabitEthernet1/0/3]port access  vlan  10
[SW3-GigabitEthernet1/0/3]quit
SW4
[SW4]vlan 10
[SW4-vlan10]port GigabitEthernet 1/0/3
[SW4-vlan10]quit
PC1 ping PC2 聚合端口任意一条线故障都不会影响