Google为了保护硬件厂商的信息,在Android中添加了一层,它就是大名鼎鼎的HAL层。
在看HAL的编写方法的过程中,会发现整个模块貌似没有一个入口。一般说来模块都要有个入口,比如应用程序的main函数,可以被加载器进行加载执行,dll文件有dllmain,而对于我们自己写的动态链接库,我们可以对库中导出的任何符号进行调用。
那么问题来了,Android中的HAL是具有通用性的,需要上层的函数对其进行加载调用,Android的HAL加载器是如何实现对不同的Hardware Module进行通用性的调用的呢?我们今天将以Sensor hal模块的加载为例,剖析下hal层的具体调用逻辑。
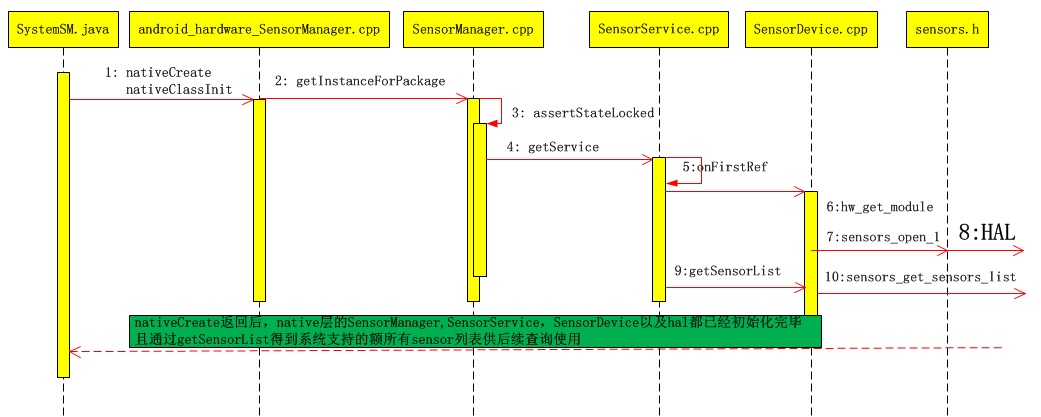
SensorService启动
在看Sensor架构的时候,SensorService服务启动后,在随后的第一次被强引用时,其onFirstRef会被调用,紧接着,它会获取我们的SensorDevice实例:
void SensorService::onFirstRef()
{
    ALOGD("nuSensorService starting...");
    SensorDevice& dev(SensorDevice::getInstance());

    if (dev.initCheck() == NO_ERROR) {
        sensor_t const* list;
        ssize_t count = dev.getSensorList(&list);
附上这部分的流程
SensorDevice作为Sensor架构中native的最后一个文件,与Hal层进行通信,故而在SensorDevice的构造方法中,我们就可以看到著名的hw_get_module和Sensor_Open方法了:
SensorDevice::SensorDevice()
    :  mSensorDevice(0),
       mSensorModule(0)
{
    status_t err = hw_get_module(SENSORS_HARDWARE_MODULE_ID,
            (hw_module_t const**)&mSensorModule);

    ALOGE_IF(err, "couldn't load %s module (%s)",
            SENSORS_HARDWARE_MODULE_ID, strerror(-err));

    if (mSensorModule) {
        err = sensors_open_1(&mSensorModule->common, &mSensorDevice);

        ALOGE_IF(err, "couldn't open device for module %s (%s)",
                SENSORS_HARDWARE_MODULE_ID, strerror(-err));

        if (mSensorDevice) {
            if (mSensorDevice->common.version == SENSORS_DEVICE_API_VERSION_1_1 ||
                mSensorDevice->common.version == SENSORS_DEVICE_API_VERSION_1_2) {
                ALOGE(">>>> WARNING <<< Upgrade sensor HAL to version 1_3");
            }

            sensor_t const* list;
            ssize_t count = mSensorModule->get_sensors_list(mSensorModule, &list);
            mActivationCount.setCapacity(count);
            Info model;
            for (size_t i=0 ; i<size_t(count) ; i++) {
                mActivationCount.add(list[i].handle, model);
                mSensorDevice->activate(
                        reinterpret_cast<struct sensors_poll_device_t *>(mSensorDevice),
                        list[i].handle, 0);
            }
        }
    }
}
其中SENSORS_HARDWARE_MODULE_ID是在hardware/sensors.h中定义的module名字:
/**
 * The id of this module
 */
#define SENSORS_HARDWARE_MODULE_ID "sensors"
而mSensorModule就是我们的sensors_module_t结构体,这些都是在hal层sensors.h中定义的:
struct sensors_module_t {
    struct hw_module_t common;

    /**
     * Enumerate all available sensors. The list is returned in "list".
     * @return number of sensors in the list
     */
    int (*get_sensors_list)(struct sensors_module_t* module,
            struct sensor_t const** list);

    /**
     *  Place the module in a specific mode. The following modes are defined
     *
     *  0 - Normal operation. Default state of the module.
     *  1 - Loopback mode. Data is injected for the the supported
     *      sensors by the sensor service in this mode.
     * @return 0 on success
     *         -EINVAL if requested mode is not supported
     *         -EPERM if operation is not allowed
     */
    int (*set_operation_mode)(unsigned int mode);
};
可以看到sensors_module_t结构体扩展了hw_module_t,他里面额外提供了get_sensor_list方法来获取系统支持的sensor列表以及一个模式设置方法。
接下来,我们跟进hw_get_module方法,看看它到底做了什么?
hw_get_module
该函数具体实现在hardware/libhardware/hardware.c中
int hw_get_module(const char *id, const struct hw_module_t **module)
{
    return hw_get_module_by_class(id, NULL, module);
}
int hw_get_module_by_class(const char *class_id, const char *inst,
                           const struct hw_module_t **module)
{
    int i = 0;
    char prop[PATH_MAX] = {0};
    char path[PATH_MAX] = {0};
    char name[PATH_MAX] = {0};
    char prop_name[PATH_MAX] = {0};


    if (inst)
        snprintf(name, PATH_MAX, "%s.%s", class_id, inst);
    else
        strlcpy(name, class_id, PATH_MAX);

    /*
     * Here we rely on the fact that calling dlopen multiple times on
     * the same .so will simply increment a refcount (and not load
     * a new copy of the library).
     * We also assume that dlopen() is thread-safe.
     */

    /* First try a property specific to the class and possibly instance */
    snprintf(prop_name, sizeof(prop_name), "ro.hardware.%s", name);
    if (property_get(prop_name, prop, NULL) > 0) {
        if (hw_module_exists(path, sizeof(path), name, prop) == 0) {
            goto found;
        }
    }

    /* Loop through the configuration variants looking for a module */
    for (i=0 ; i<HAL_VARIANT_KEYS_COUNT; i++) {
        if (property_get(variant_keys[i], prop, NULL) == 0) {
            continue;
        }
        if (hw_module_exists(path, sizeof(path), name, prop) == 0) {
            goto found;
        }
    }

    /* Nothing found, try the default */
    if (hw_module_exists(path, sizeof(path), name, "default") == 0) {
        goto found;
    }

    return -ENOENT;

found:
    /* load the module, if this fails, we're doomed, and we should not try
     * to load a different variant. */
    return load(class_id, path, module);
}
我们主要看hw_get_module_by_class,这里传入的参数分别是“sensors”,null,以及我们的mSensorModule结构体。
首先将字符串拷贝给name:
strlcpy(name, class_id, PATH_MAX);
接着拼接prop_name为ro.hardware.name,即prop_name=ro.hardware.sensors
通过property_get方法并没有得到这个值的定义(因为在系统中并没有对其定义),所以接下来会进入下面的循环:
for (i=0 ; i<HAL_VARIANT_KEYS_COUNT; i++) {
        if (property_get(variant_keys[i], prop, NULL) == 0) {
            continue;
        }
        if (hw_module_exists(path, sizeof(path), name, prop) == 0) {
            goto found;
        }
    }
/**
 * There are a set of variant filename for modules. The form of the filename
 * is "<MODULE_ID>.variant.so" so for the led module the Dream variants
 * of base "ro.product.board", "ro.board.platform" and "ro.arch" would be:
 *
 * led.trout.so
 * led.msm7k.so
 * led.ARMV6.so
 * led.default.so
 */

static const char *variant_keys[] = {
    "ro.hardware",  /* This goes first so that it can pick up a different
                       file on the emulator. */
    "ro.product.board",
    "ro.board.platform",
    "ro.arch"
};
根据上面的解析我门也可以看到,将会分别查找sensors.variant.so,sensors.product.so,sensors.platform.so,以及sensors.default.so,最终我们会在/system/lib/hw/路径下找到sensors.msm8952.so,然后将其通过load方法加载进内存中运行。由此也可知,我分析的是高通8952平台。
小细节:当我们实现了自己的HAL层module,并且写了一个应用程序测试module是否正常工作,那么在编译的时候,下面的参数应该要这样写:
LOCAL_MODULE := moduleName.default
或者
LOCAL_MODULE := moduleName.$(TARGET_BOARD_PLATFORM)
由于上面源码的原因,如果module名字对应不到,你的这个模块将不会被正常的load进去,因而也就无法正常工作了。
接着我们分析load的实现。
static int load(const char *id,
        const char *path,
        const struct hw_module_t **pHmi)
{
    int status = -EINVAL;
    void *handle = NULL;
    struct hw_module_t *hmi = NULL;

    /*
     * load the symbols resolving undefined symbols before
     * dlopen returns. Since RTLD_GLOBAL is not or'd in with
     * RTLD_NOW the external symbols will not be global
     */
    handle = dlopen(path, RTLD_NOW);
    if (handle == NULL) {
        char const *err_str = dlerror();
        ALOGE("load: module=%s\n%s", path, err_str?err_str:"unknown");
        status = -EINVAL;
        goto done;
    }

    /* Get the address of the struct hal_module_info. */
    const char *sym = HAL_MODULE_INFO_SYM_AS_STR;
    hmi = (struct hw_module_t *)dlsym(handle, sym);
    if (hmi == NULL) {
        ALOGE("load: couldn't find symbol %s", sym);
        status = -EINVAL;
        goto done;
    }

    /* Check that the id matches */
    if (strcmp(id, hmi->id) != 0) {
        ALOGE("load: id=%s != hmi->id=%s", id, hmi->id);
        status = -EINVAL;
        goto done;
    }

    hmi->dso = handle;

    /* success */
    status = 0;

    done:
    if (status != 0) {
        hmi = NULL;
        if (handle != NULL) {
            dlclose(handle);
            handle = NULL;
        }
    } else {
        ALOGV("loaded HAL id=%s path=%s hmi=%p handle=%p",
                id, path, *pHmi, handle);
    }

    *pHmi = hmi;

    return status;
}
1. 首先通过dlopen打开sensors.xxx.so模块,获得其句柄handle
2.调用dlsym去获取结构体hw_module_t结构体的地址,注意这里传入的字符串为HAL_MODULE_INFO_SYM_AS_STR,定义在hardware.h头文件中
/**
 * Name of the hal_module_info
 */
#define HAL_MODULE_INFO_SYM         HMI

/**
 * Name of the hal_module_info as a string
 */
#define HAL_MODULE_INFO_SYM_AS_STR  "HMI"
这里为什么要去取名字为HMI的地址,我猜想它应该是HAL模块的入口了。
课外知识—ELF文件格式:
ELF = Executable and Linkable Format,可执行连接格式,是UNIX系统实验室(USL)作为应用程序二进制接口(Application Binary Interface,ABI)而开发和发布的,扩展名为elf。一个ELF头在文件的开始,保存了路线图(road map),描述了该文件的组织情况。sections保存着object 文件的信息,从连接角度看:包括指令,数据,符号表,重定位信息等等。通过file命令我们可知sensors.xx.so是一个ELF文件格式
tiny.hui@build-server:~$ file sensors.msm8952.so
sensors.msm8952.so: ELF 32-bit LSB shared object, ARM, version 1 (SYSV), dynamically linked (uses shared libs), BuildID[md5/uuid]=0x25812b01ab4700281b41f61327075611, not stripped
因此,通过linux的readelf命令我们可以查看该文件的内部布局及符号表等信息。
tiny.hui@build-server:~$ readelf -s sensors.msm8952.so

Symbol table '.dynsym' contains 157 entries:
   Num:    Value  Size Type    Bind   Vis      Ndx Name
     0: 00000000     0 NOTYPE  LOCAL  DEFAULT  UND
     1: 00000000     0 FUNC    GLOBAL DEFAULT  UND __cxa_finalize@LIBC (2)
     2: 00000000     0 FUNC    GLOBAL DEFAULT  UND __cxa_atexit@LIBC (2)
     3: 00000000     0 FUNC    GLOBAL DEFAULT  UND __register_atfork@LIBC (2)
     4: 00000000     0 FUNC    GLOBAL DEFAULT  UND pthread_mutex_lock@LIBC (2)
        …………………………// 省略无关信息
   108: 00006d5c    16 FUNC    WEAK   DEFAULT   13 __aeabi_ldiv0
   109: 000042d5    14 FUNC    WEAK   DEFAULT   13 _ZNSt3__13mapIi10FullHand
   110: 000053d7    12 FUNC    WEAK   DEFAULT   13 _ZTv0_n12_NSt3__114basic_
   111: 0000a0cd     0 NOTYPE  GLOBAL DEFAULT  ABS _end
   112: 000054b1    40 FUNC    GLOBAL DEFAULT   13 _ZN16SensorEventQueue7deq
   113: 0000a00c   136 OBJECT  GLOBAL DEFAULT   23 HMI
   114: 000053eb    52 FUNC    GLOBAL DEFAULT   13 _ZN16SensorEventQueueC1Ei
   115: 00006d5c    16 FUNC    WEAK   DEFAULT   13 __aeabi_idiv0
   116: 00003879    14 FUNC    WEAK   DEFAULT   13 _ZNSt3__115basic_streambu
   117: 00003c75    76 FUNC    WEAK   DEFAULT   13 _ZNSt3__113basic_filebufI
   118: 0000a098    12 OBJECT  GLOBAL DEFAULT   24 full_to_global
由符号表可知,HMI的地址为000a00c,拿到函数地址,当然就可以执行对应的代码了。
QualComm Sensor HAL
因此我们接着看sensor_hal层,高通的Sensor实现了自己的HAL,其源码在vendor/qcom/proprietary/sensors/dsps/libhalsensors路径下,通过Android.mk我们也可以确定他确实是我们前面load方法打开的动态链接库,其编译后会生成sensor.msm8952.so:
# vendor/qcom/proprietary/sensors/dsps/libhalsensors/Android.mk
ifeq ($(USE_SENSOR_MULTI_HAL),true)
LOCAL_MODULE := sensors.ssc
LOCAL_CLANG := false
else
LOCAL_MODULE := sensors.$(TARGET_BOARD_PLATFORM)
LOCAL_MODULE_RELATIVE_PATH := hw
endif
那么HMI的入口到底定义在这里的那个文件中呢?
功夫不负有心人,在sensors_hal.cpp中,我们终于找到了HMI的入口,即下面的结构体:
static struct hw_module_methods_t sensors_module_methods = {
    .open = sensors_open
};

struct sensors_module_t HAL_MODULE_INFO_SYM = {
    .common = {
        .tag = HARDWARE_MODULE_TAG,
        .module_api_version = (uint16_t)SENSORS_DEVICE_API_VERSION_1_3,
        .hal_api_version = HARDWARE_HAL_API_VERSION,
        .id = SENSORS_HARDWARE_MODULE_ID,
        .name = "QTI Sensors Module",
        .author = "Qualcomm Technologies, Inc.",
        .methods = &sensors_module_methods,
        .dso = NULL,
        .reserved = {0},
    },
    .get_sensors_list = sensors_get_sensors_list,
    .set_operation_mode = sensors_set_operation_mode
};
HAL_MODULE_INFO_SYM即上文提到的HMI变量,恭喜各位,这里我们就开启了QualComm Sensor HAL的大门。
最后这个hw_module_t的结构体句柄会返回给我们的SensorDevice的构造函数里:
SensorDevice::SensorDevice()
    :  mSensorDevice(0),
       mSensorModule(0)
{
    status_t err = hw_get_module(SENSORS_HARDWARE_MODULE_ID,
            (hw_module_t const**)&mSensorModule);

    ALOGE_IF(err, "couldn't load %s module (%s)",
            SENSORS_HARDWARE_MODULE_ID, strerror(-err));

    if (mSensorModule) {
        err = sensors_open_1(&mSensorModule->common, &mSensorDevice);
接着,通过sensors_open_1方法将module->common传入,打开我们的sensor驱动。
// hardware/libhardware/include/hardware/sensors.h
static inline int sensors_open_1(const struct hw_module_t* module,
        sensors_poll_device_1_t** device) {
    return module->methods->open(module,
            SENSORS_HARDWARE_POLL, (struct hw_device_t**)device);
}

static inline int sensors_close_1(sensors_poll_device_1_t* device) {
    return device->common.close(&device->common);
}
回过头去看看HMI的结构体定义,其中module->common->open被赋值为sensors_module_methods,其只有一个open方法,因此,module->methods->open最终会调用sensors_open方法来打开驱动程序。
到这里native到hal层的逻辑其实已经基本上分析完了。
总结
通过hw_get_module去加载我们的HAL层实现库,并且得到入口函数句柄,拿着这个句柄就可以继而操作HAL层提供的方法了,通过上面的分析,相信大家已经对这部分已经有了一个更清晰的认识,其他hal层的业务逻辑大抵如此,当你看到hw_get_module,你就该知道去哪里看接下来的逻辑了。
后续sensors_open的内容,我会在后面的章节连载剖析,欢迎关注。