五、博客详情页
写好博客列表页后,点击 “跳转全文”,正文出现的都是我们测试时写好的内容,
点击 “跳转全文”:127.0.0.1:8080/blog_system/blog_detail.html?blogId=5
这是获取博客详情页,发送的请求,此处希望得到的页面,页面里就能显示出当前这个博客的正文内容~~
这个正文内容就要继续通过 ajax 来进行获取,在 blog_detail.html 页面加载的时候,触发 ajax 请求来访问服务器,获取到博客内容再次填充到博客详情页里面!
1、约定交互接口
请求:
GET /blog?blogId=1
响应:
HTTP/1.1 200 OK
Content-Type:application/json;

{


	blogId: 1,
    title: "第一篇博客",
    content: "这个正文",
    userId: 1,
    postTime: '2022-05-25' 13:33:33'
}
和获取博客列表的区别:
-
请求里面,带有参数 blogld
-
响应结果不是 json 数组了,而只是单一的对象
-
响应的博客正文,不再截断了
2、修改 BlogServlet
后端代码实现和博客列表页的获取,基本相同,就直接放到一个方法中来实现了。使用 blogld 参数来区分是获取博客列表还是详情~
获取博客列表请求 GET /blog 不带参数的,
// 通过这个类, 来处理 /blog 路径对应的请求
@WebServlet("/blog")
public class BlogServlet extends HttpServlet {


    private ObjectMapper objectMapper = new ObjectMapper();

    // 这个方法用来获取到数据库中的博客列表.
    @Override
    protected void doGet(HttpServletRequest req, HttpServletResponse resp) throws ServletException, IOException {


        resp.setContentType("application/json; charset=utf8");

        // 先尝试获取到 req 中的 blogId 参数. 如果该参数存在, 说明是要请求博客详情
        // 如果该参数不存在, 说明是要请求博客的列表.
        BlogDao blogDao = new BlogDao();
        String param = req.getParameter("blogId");
        if (param == null) {


            List<Blog> blogs = blogDao.selectAll();
            // 把 blogs 对象转成 JSON 格式.
            String respJson = objectMapper.writeValueAsString(blogs);
            // 构造响应的时候 这里的这两行代码 顺序不能颠倒.
            // 如果先 write 了 body, 再设置 ContentType,设置的 ContentType就会不生效!!
            // 包括说 即使不是写 body,构造 sendRedirect 这种, 其实也是类似的情况~~
            resp.getWriter().write(respJson);
        } else {


            // 有 blogId,获取博客详情
            int blogId = Integer.parseInt(param);
            Blog blog = blogDao.selectOne(blogId);
            String respJson = objectMapper.writeValueAsString(blog);
            resp.getWriter().write(respJson);
        }
    }
}
Postman 构造请求测试:127.0.0.1:8080/blog_system/blog?blogId=3
body:根据 blogId 获取的博客详情
{


    "blogId": 3,
    "title": "这是第三篇博客",
    "content": "从前天开始, 我要认真学 Java",
    "userId": 1,
    "postTime": "2022-51-27 02:51:36"
}
3、前端代码 blog_detail.html
1). 修改右侧内容
修改 blog_detail.html,让这个页面加载的时候,能够调用上述接口,来从服务器获取到博客数据!
<!-- 右侧内容详情 -->
<div class="right">
    <!-- 包裹整个博客的内容详情 -->
    <div class="blog-content">
        <!-- 博客标题 -->
        <h3></h3>
        <!-- 博客日期 -->
        <div class="date"></div>
        <!-- 博客的正文内容 -->
        <div id="content">

        </div>
    </div>
</div>
2). 下方添加 ajax
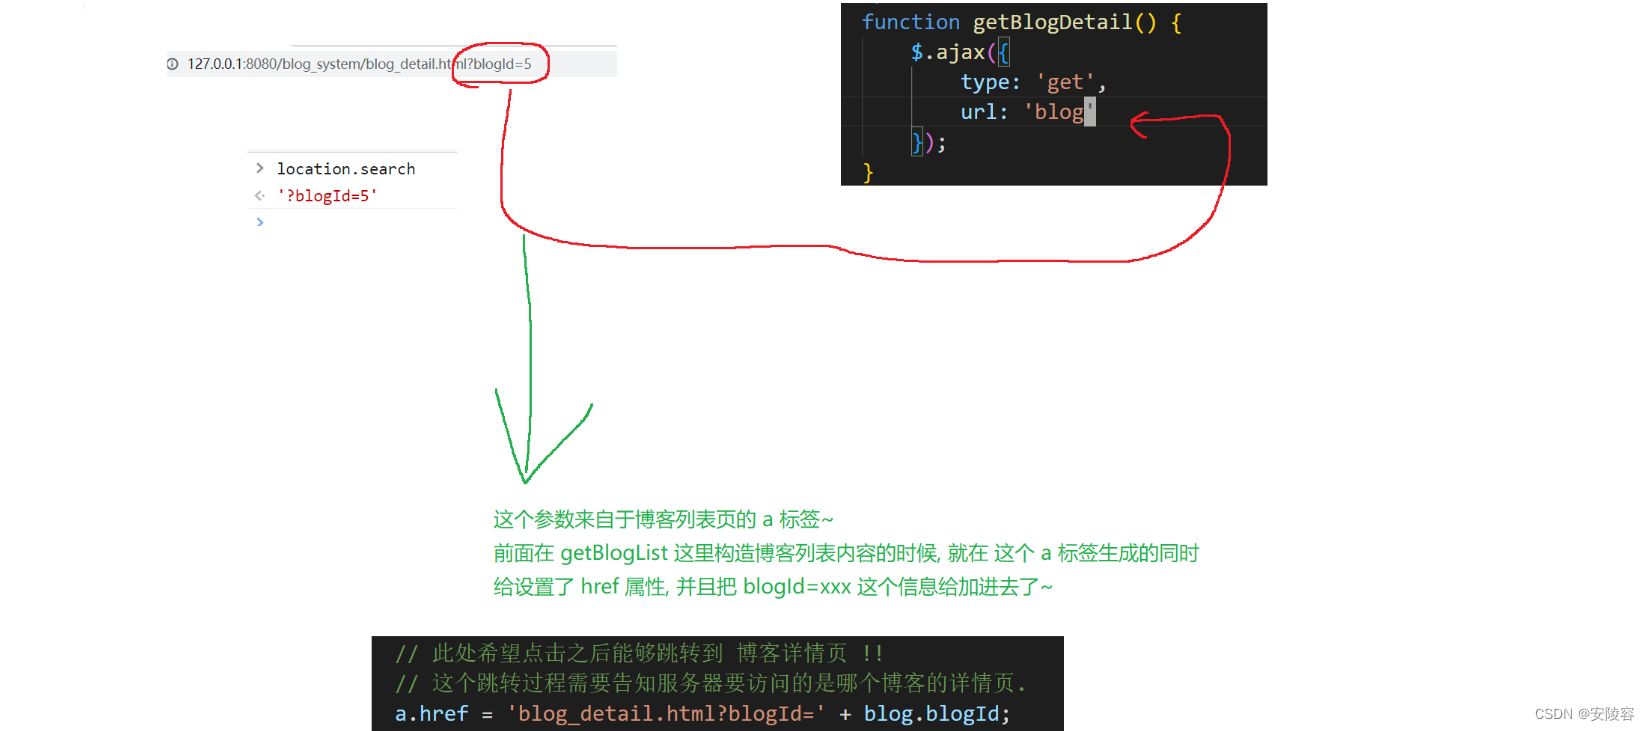
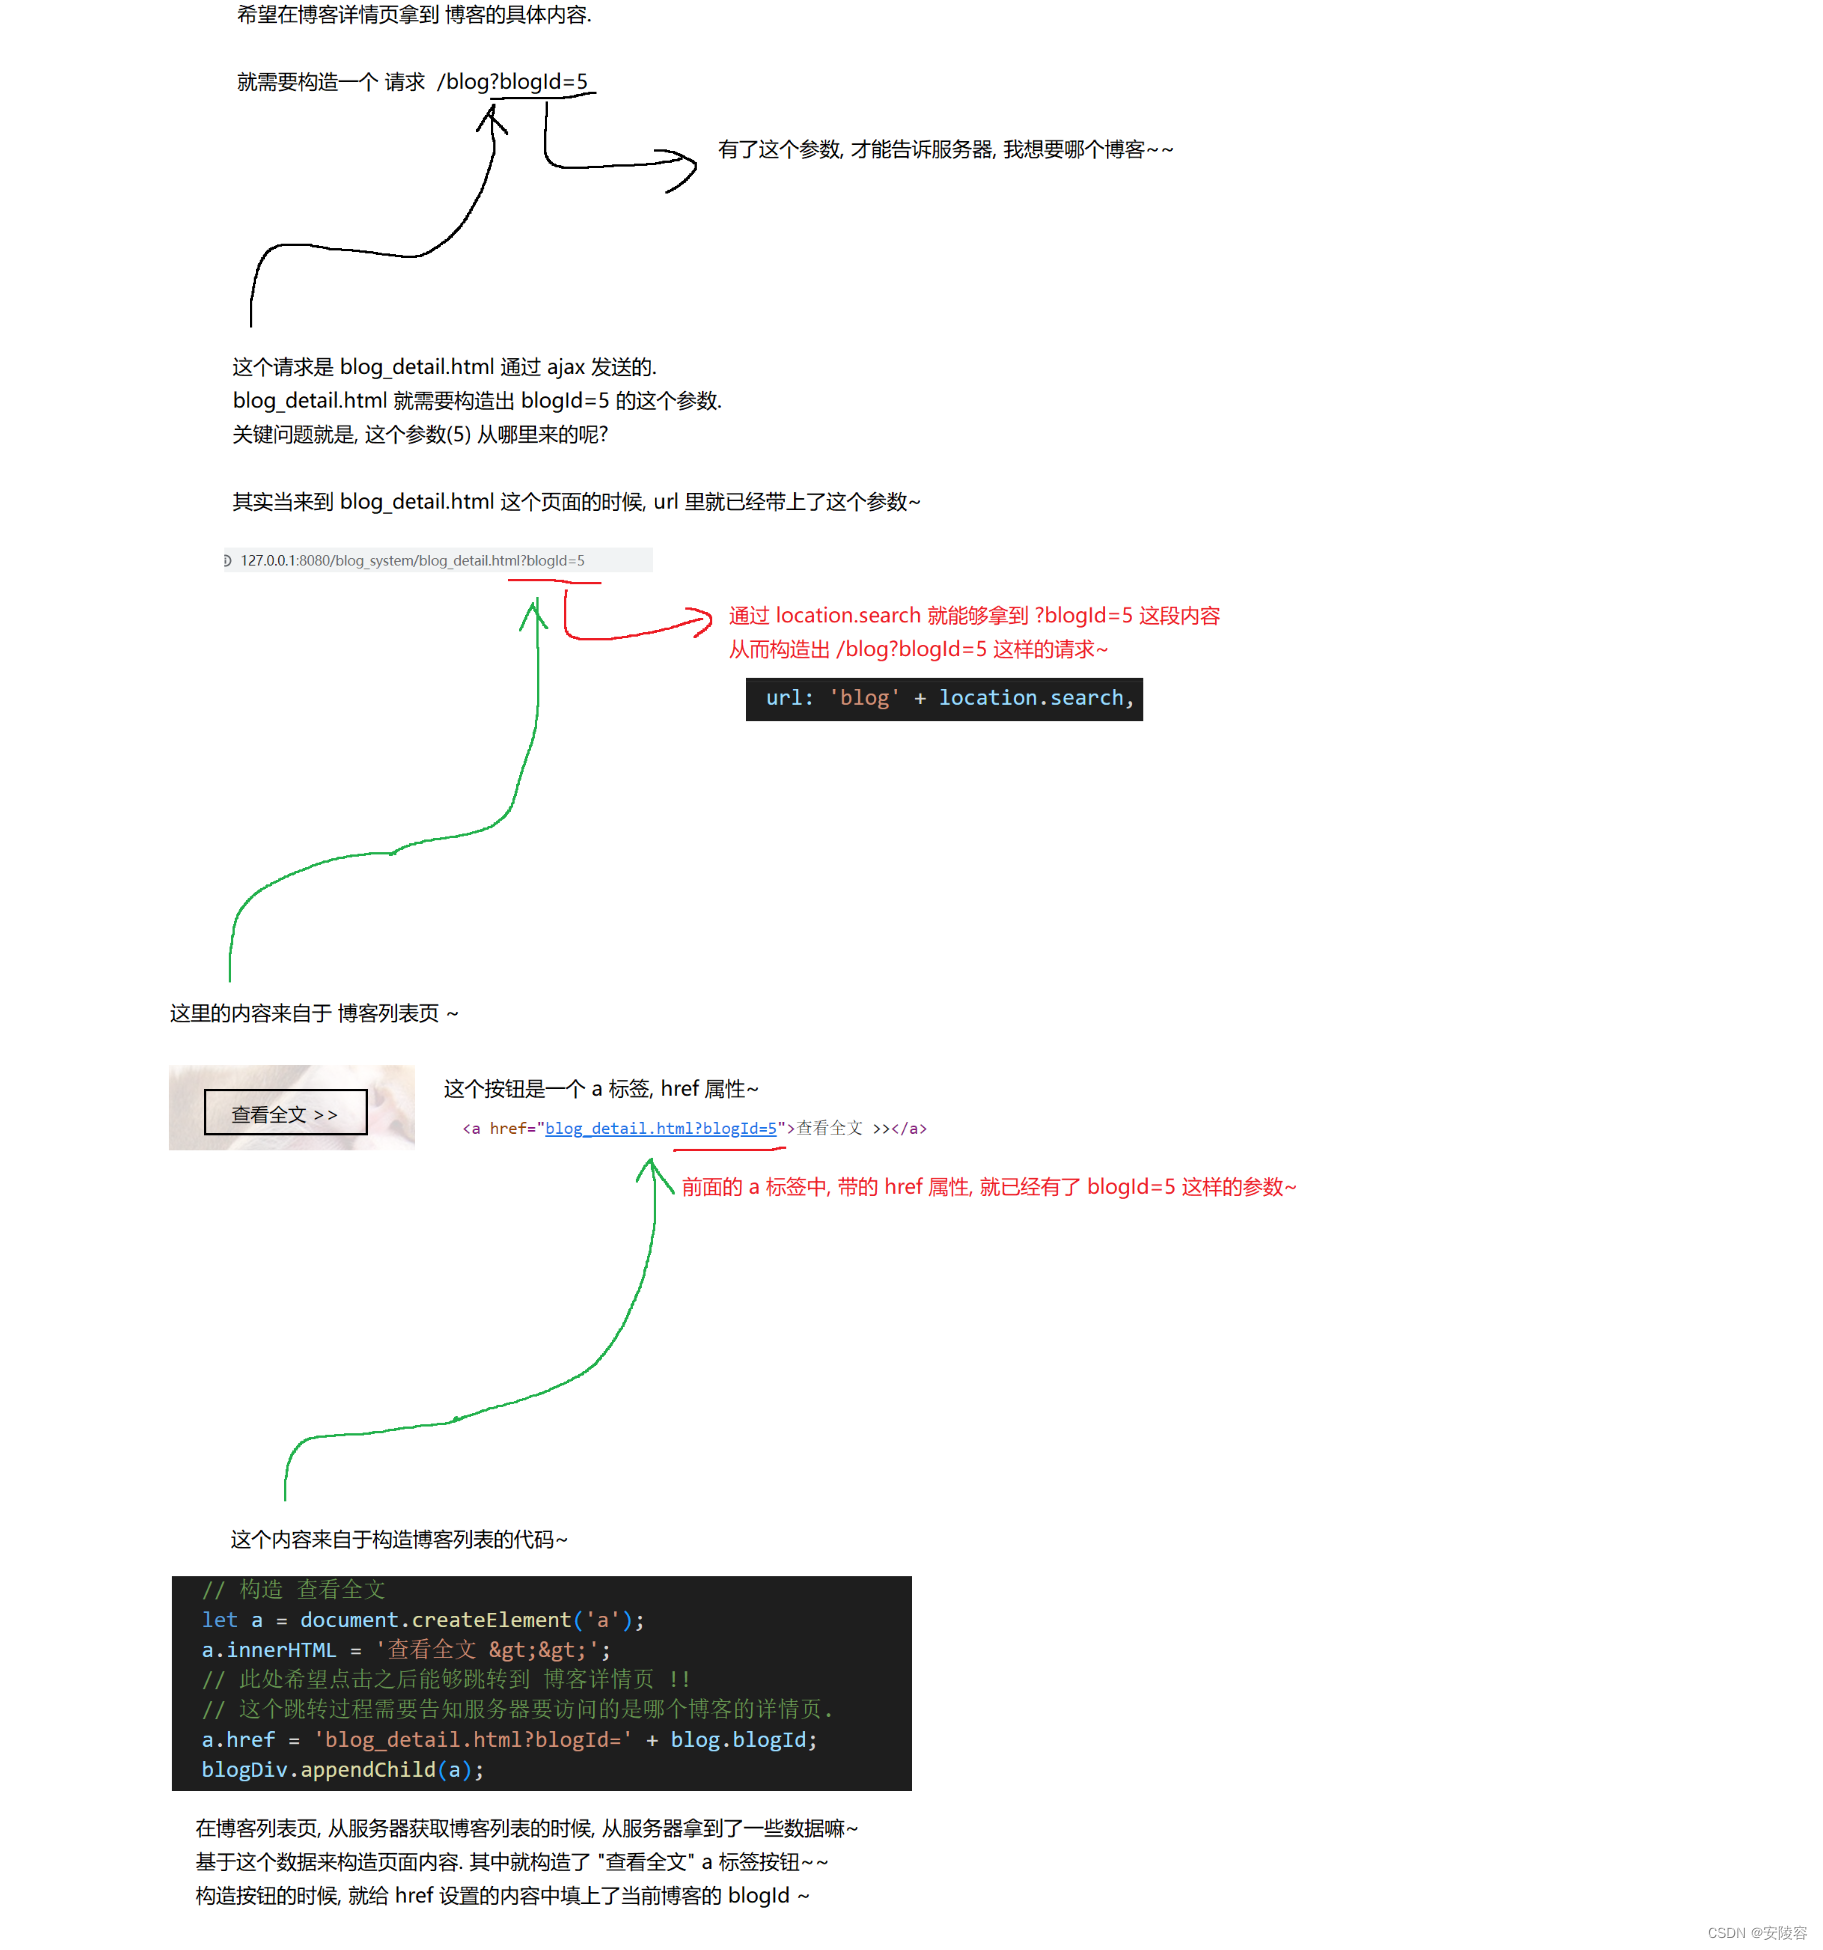
在前端代码这边,要想构造一个请求获取博客详情,就得知道当前用户点击的博客的 id !!
这个 id 就已经包含在当前的 blog_detail.html 页面的 url 里面了!!
问题一: 如何拿到 blogId:location.search

<script src="http://libs.baidu.com/jquery/2.0.0/jquery.min.js"></script>
<script>
    function getBlogDetail() {


        $.ajax({


            type: 'get',
            // location.search 拿到了形如 '?blogId=5' 这样的一段内容
            url: 'blog' + location.search,
            success: function(body) {

     // body 中就是一个 js 对象
                // 根据 body 中的内容来构造页面
                // 1. 构造博客标题
                let h3 = document.querySelector('.blog-content>h3');
                h3.innerHTML = body.title;
                // 2. 构造博客发布时间
                let dateDiv = document.querySelector('.date');
                dateDiv.innerHTML = body.postTime;
                // 3. 构造博客正文
                let contentDiv = document.querySelector('#content');
                contentDiv.innerHTML = body.content;
            }
        });
    }
    getBlogDetail();
</script>
问题二: 当前咱们的博客正文,并不是单纯的文本!! 其实是带有一定的格式化的 markdown 数据!!
如果我们在代码中,就使用上述逻辑,直接把 content 设为 innerHTML 意味着界面最终的展示效果,就是左侧,而我们需要的效果是右侧的格式

既然如此,那应该如何处理? 能够让我们这里的 markdown 文本内容,被渲染成带有特定样式的 html 片段呢? 仍然要使用 editor.md 这个库来完成
这个库不仅提供了 markdown 编辑器,也提供了渲染功能~~
完整代码:
<!DOCTYPE html>
<html lang="en">
<head>
    <meta charset="UTF-8">
    <meta http-equiv="X-UA-Compatible" content="IE=edge">
    <meta name="viewport" content="width=device-width, initial-scale=1.0">
    <title>博客详情页</title>
    <link rel="stylesheet" href="css/common.css">
    <link rel="stylesheet" href="css/blog_detail.css">

    <!-- 引入 editor.md 的依赖 -->
    <link rel="stylesheet" href="editor.md/css/editormd.min.css" />
    <script src="js/jquery.min.js"></script>
    <script src="editor.md/lib/marked.min.js"></script>
    <script src="editor.md/lib/prettify.min.js"></script>
    <script src="editor.md/editormd.js"></script>
</head>
<body>

    <!-- 导航栏 -->
    <div class="nav">
        <img src="image/picture.jpg" alt="">
        <span>我的博客系统</span>

        <!-- 空白元素 用来占位 -->
        <div class="spacer"></div>

        <a href="blog_list.html">主页</a>
        <a href="blog_edit.html">写博客</a>
        <a href="#">注销</a>
    </div>

    <!-- .container 作为页面的版心 -->
    <div class="container">
        <!-- 左侧个人信息 -->
        <div class="left">
            <!-- 整个用户信息区 -->
            <div class="card">
                <img src="image/picture.jpg" alt="">
                <h3>小吴的博客</h3>
                <a href="#">github 地址</a>
                <div class="counter">
                    <span>文章</span>
                    <span>分类</span>
                </div>
                <div class="counter">
                    <span>2</span>
                    <span>1</span>
                </div>
            </div>
        </div>

        <!-- 右侧内容详情 -->
        <div class="right">
            <!-- 包裹整个博客的内容详情 -->
            <div class="blog-content">
                <!-- 博客标题 -->
                <h3></h3>
                <!-- 博客日期 -->
                <div class="date"></div>
                <!-- 博客的正文内容 -->
                <div id="content" style="opacity: 73%;">

                </div>
            </div>
        </div>
    </div>

    <script>
        function getBlogDetail() {


            $.ajax({


                type: 'get',
                // location.search 拿到了形如 '?blogId=5' 这样的一段内容
                url: 'blog' + location.search,
                success: function(body) {

       // body 中就是一个 js 对象
                    // 根据 body 中的内容来构造页面
                    // 1. 构造博客标题
                    let h3 = document.querySelector('.blog-content>h3');
                    h3.innerHTML = body.title;
                    // 2. 构造博客发布时间
                    let dateDiv = document.querySelector('.date');
                    dateDiv.innerHTML = body.postTime;
                    // 3. 构造博客正文
                    // let contentDiv = document.querySelector('#content');
                    // contentDiv.innerHTML = body.content;
                    // 如果直接把 content 设为 innerHTML, 此时展示在界面上的内容, 是原始的 markdown 字符串
                    // 咱们需要的是渲染后的, 带有格式的效果

                    // 第一个参数对应 id=content 的 html 标签. 渲染后得到的 html 片段就会被放到这个 标签下.
                    editormd.markdownToHTML('content', {


                        markdown: body.content
                    });
                }
            });
        }

        getBlogDetail();
    </script>

</body>
</html>
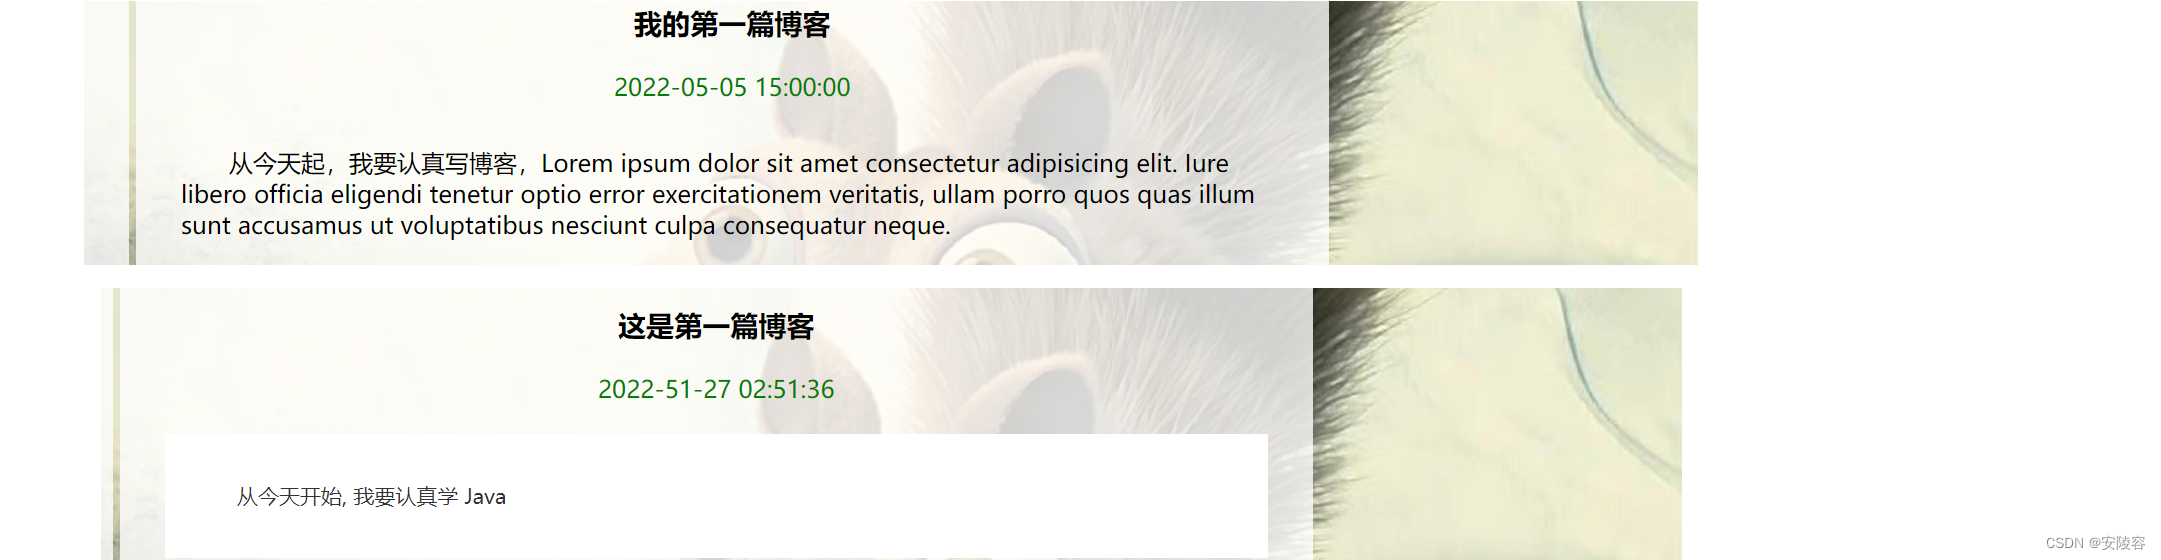
4、——验证
访问列表页,点击 “查看全文”,发现此时页面没有变化
注意: 当在进行程序验证的时候,要时刻牢记,浏览器缓存可能会影响到结果
之前已经访问过 blog_detail 页面了,因此浏览器就可能把这个页面给保存到本地,下次再尝试访问的时候就直接访问本地内容了~~
加入一条 sql:
insert into blog values(null, '这是第三篇博客', '# 一级标题\n ### 三级标题\n > 这是引用内容', 2, now());
点击全文,博客的页面都是 markdown 格式
六、登录页
1、约定交互接口
请求: 这里的逻辑,可以直接使用 form 表单来进行提交,没必要非得使用 ajax (使用 ajax 也是完全可以的!!)
如果要使用表单,就需要把按钮改成 input type="submit"
POST /login
Content-Type:application/x-www-form-urlencoded
响应:
HTTP/1.1 302
Location:blog_list_html
当登录成功之后,就自动跳转到,主页 (博客列表页)
2、前端代码 blog_login.html
这回先写客户端,把登录页面稍加调整~~
修改 login-container :
-
给 login-dialog 这部分代码套上一层
form标签! -
给 input 加上
name属性~-
加上的这个属性,就是后续提交数据的键值对的 key ~
username=zhangsan&password=123
-
-
把 button 按钮换成
input标签~
<div class="login-container">
    <form action="login" method="post">
        <div class="login-dialog">
            <h3>登录</h3>
            <div class="row">
                <span>用户名</span>
                <input type="text" id="username" name="username">
            </div>
            <div class="row">
                <span>密码</span>
                <input type="password" id="password" name="password">
            </div>
            <div class="row">
                <!-- <button>提交</button> -->
                <input type="submit" id="submut" value="提交">
            </div>
        </div>
    </form>
</div>
启动运行,提交按钮的样式没有起作用
在前端页面开发的过程中,html 页面结构 是非常重要的,后续的 CSS 和 JS 很多都依赖了这个页面结构,一旦页面结构发生了调整,就可能导致 css 或者 js 失效~~
按钮设置 id,调整样式,调整完,如果没有改变,ctrl + f5
原来的样式:
.row button {


    width: 300px;
    height: 50px;
    border-radius: 10px;
    color: white;
    background-color: rgba(0, 128, 0);
    border: none;

    margin-top: 20px;
}

/* 鼠标按下未弹起 */
.row button:active {


    background-color: #666;
}
调整:
.row #submit {


    width: 300px;
    height: 50px;
    border-radius: 10px;
    color: white;
    background-color: rgba(0, 128, 0);
    border: none;

    margin-top: 20px;
}

/* 鼠标按下未弹起 */
.row #submit:active {


    background-color: #666;
}
完整代码:
<!-- 导航栏 -->
<div class="nav">
    <img src="image/picture.jpg" alt="">
    <span>我的博客系统</span>

    <!-- 空白元素 用来占位 -->
    <div class="spacer"></div>

    <a href="blog_list.html">主页</a>
    <a href="blog_edit.html">写博客</a>
    <!-- 登录页面没有注销 -->
    <!-- <a href="#">注销</a> -->
</div>

<div class="login-container">
    <form action="login" method="post">
        <div class="login-dialog">
            <h3>登录</h3>
            <div class="row">
                <span>用户名</span>
                <input type="text" id="username" name="username">
            </div>
            <div class="row">
                <span>密码</span>
                <input type="password" id="password" name="password">
            </div>
            <div class="row">
                <!-- <button>提交</button> -->
                <input type="submit" id="submit" value="提交">
            </div>
        </div>
    </form>
</div>
3、后端代码 LoginServlet
此处约定的路径是 /login,这是一个新的路径,就需要使用一个新的 servlet 来处理~
创建 LoginServlet 类
username=zhangsan&password=123 请求中的数据是这个格式,因此就需要使用
String username = req.getParameter("username");
使用 getParameter 读取参数的时候,如果参数的值,是纯英文,那么还好,一般没啥问题。如果参数的值是中文,此时直接读取参数,很容易出现乱码!!!
中文就涉及到字符编码
前端页面,已经告诉了浏览器,汉字是 utf8 <meta charset="UTF-8">
因此接下来浏览器在输入框输入的汉字,也会使用 utf8 来编码,但是 Servlet 默认并不是按照 utf8 来解析的
就需要告诉 Servlet 也要按照 utf8 来解析请求!!
req.setCharacterEncoding("utf8");
这是针对请求进行设置的,意思是使用 utf8 格式来解析请求。如果请求中不加这个编码,就会出现这个乱码的情况,从而不能正确的在数据库中查询了
resp.setCharacterEncoding("utf8"); 这是针对响应进行设置的,意思是构造的数据要按照 utf8 构造
package controller;

import model.User;
import model.UserDao;

import javax.servlet.ServletException;
import javax.servlet.annotation.WebServlet;
import javax.servlet.http.HttpServlet;
import javax.servlet.http.HttpServletRequest;
import javax.servlet.http.HttpServletResponse;
import javax.servlet.http.HttpSession;
import java.io.IOException;

@WebServlet("/login")
public class LoginServlet extends HttpServlet {


    @Override
    protected void doPost(HttpServletRequest req, HttpServletResponse resp) throws ServletException, IOException {


        req.setCharacterEncoding("utf8");
        resp.setCharacterEncoding("utf8");
        // 1. 获取到请求中的参数
        String username = req.getParameter("username");
        String password = req.getParameter("password");
        System.out.println("username=" + username + ", password=" + password);
        if (username == null || "".equals(username) || password == null || "".equals(password)) {


            resp.setContentType("text/html; charset=utf8"); //
            resp.getWriter().write("当前用户名或密码为空!");
            return;
        }
        // 2. 和数据库中的内容进行比较
        UserDao userDao = new UserDao();
        User user = userDao.selectByName(username);
        if (user == null || !user.getPassword().equals(password)) {


            // 用户没有查到 或 密码不匹配, 也是登录失败!
            resp.setContentType("text/html; charset=utf8"); //
            resp.getWriter().write("用户名或密码错误!");
            return;
        }
        // 3. 如果比较通过, 就创建会话.
        HttpSession session = req.getSession(true);
        // 把刚才的用户信息, 存储到会话中.
        session.setAttribute("user", user);
        // 4. 用户名密码正确 返回一个重定向报文, 跳转到博客列表页.
        resp.sendRedirect("blog_list.html");
    }
}
4、——验证
访问 http://127.0.0.1:8080/blog_system/blog_login.html

七、检查登录状态
当登录功能完成了之后,就需要调整一下之前的两个页面 (博客列表和博客详情)
让这两个页面,必须登录后才能访问~~
此处就做出这样的限制 (这样限制一下,后面实现一些其他功能会更简单)
在进入博客列表页 / 详情页的时候,先检查一下用户的登录状态,如果用户当前已经是登录状态,才能继续使用。
如果是未登录状态,则强制此跳转到 login 页面
如何实现上述功能:
- 可以在博客列表页 / 详情页,加载的时候,通过
ajax,访问一下服务器,获取当前的登录状态,看看能不能获取到 - 如果获取到了,就说明当前确实是已经登录了,此时就可以留在这个页面了
- 如果没有获取到,说明就未登录,就需要跳转到登录页面
1、约定交互接口
请求:
GET /login
响应:
HTTP/1.1 200 OK
Content-Type:application/json;

{


	userId: 1,
	username: 'zhangsan',
}
登录了,就直接返回当前登录的用户信息;未登录,则直接返回一个 userld 为 0 的对象 (此处只是一种典型的约定方式,完全也可以采取其他的方式来约定比如使用 403 表示当前未登录…)
2、 修改 LoginServlet
加入 doGet 方法:
类中加入:
private ObjectMapper objectMapper = new ObjectMapper();
修改 User 属性:
    private int userId = 0;
    private String username = "";
    private String password = "";
doGet 方法:
在服务器这边拿到了 session 并且也拿到了里面 user 视为是登录成功!
(如果登录成功的话,服务器会给客户端返回 sessionld,浏览器就会保存这个 sessionld,下次请求的时候就会带上这个 id)
服务器拿到 sessionld 就可以去 hash 表里查就知道了当前的 session 对象是谁~~
	// 这个方法用来让前端检测当前的登录状态.
    @Override
    protected void doGet(HttpServletRequest req, HttpServletResponse resp) throws ServletException, IOException {


        resp.setContentType("application/json; charset=utf8"); // 加载的时候,通过 ajax ,访问一下服务器,获取当前的登录状态
        HttpSession session = req.getSession(false);
        if (session == null) {


            // 检测下会话是否存在, 不存在说明未登录!
            User user = new User();
            resp.getWriter().write(objectMapper.writeValueAsString(user));
            return;
        }
        User user = (User) session.getAttribute("user");
        if (user == null) {


            // 虽然有会话, 但是会话里没有 user 对象, 也视为未登录.
            user = new User();
            resp.getWriter().write(objectMapper.writeValueAsString(user));
            return;
        }
        // 已经登录的状态!!
        // 注意:此处不要把密码给返回到前端
        user.setPassword("");
        resp.getWriter().write(objectMapper.writeValueAsString(user));
    }
3、修改前端代码 common.js
创建 common.js
前端页面跳转方法:location.assign('login.html');
// 这个文件里放一些页面公共的代码

// 加上一个逻辑, 通过 GET /login 这个接口来获取下当前的登录状态
function getUserInfo() {


    $.ajax({


        type: 'get',
        url: 'login',
        success: function(body) {


            // 判定此处的 body 是不是一个有效的 user 对象(userId 是否非 0)
            if (body.userId && body.userId > 0) {


                // 登录成功!
                // 不做处理!
                console.log("当前用户登录成功!用户名: " + body.username);
            } else {


                // 登录失败!
                // 弹窗提示让用户 让前端页面, 跳转到 login.html
                alert("当前您尚未登录! 请登录后再访问博客列表!");
                location.assign('blog_login.html');
            }
        },
        error: function() {


            alert("当前您尚未登录! 请登录后再访问博客列表!");
            location.assign('blog_login.html');
        }
    });
}

getUserInfo();
在列表页和详情页引入:
<!-- 在这里引入上述的 js 文件, 就可以执行到里面的代码, 也就进行了登录状态的监测了 -->
<script src="js/common.js"></script>
4、——验证

重启服务器,再次访问列表页,此时再次弹窗,点击登录
虽然咱们刚才登录过,但是会话信息是保存在服务器内存中的 (HttpSession 的 hash 表,是内存里的),当服务器进程重启之后,自然内存中的数据就没了~~
所以每次重启服务器之后,就都得重新登录~~