前提:
假设有2个环境信息,dev和beta;
同一配置信息,在不同环境中值不一样。
1.新建配置信息
有关Properties的介绍参考【Properties类读配置文件、修改配置文件】Properties类读配置文件、修改配置文件_properties文件怎么修改_西晋的no1的博客-CSDN博客
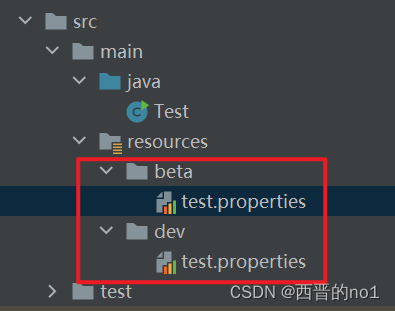
新建一个test.Properties文件,文件内容如下
name = beta
或
name = dev
放置位置如下:
2.设置不同环境中的配置文件的路径
build元素用于定义项目的构建配置。它包含了项目的编译、打包、生成文档等操作的相关配置信息。
在pom.xml文件中进行配置,内容如下:
<project>
  ...
  <build>
    ...
    <resources>
      <resource>
        <directory>src/main/resources</directory>
        <includes>
          <include>**/*.properties</include>
          <include>**/*.xml</include>
        </includes>
        <filtering>true</filtering>
      </resource>
    </resources>
    ...
  </build>
  ...
</project>
在上述示例中,元素包含了一个子元素。该子元素指定了资源目录为src/main/resources,包含了所有以.properties和.xml结尾的文件,并将过滤处理设置为true。这意味着在构建过程中,Maven会处理该目录下的资源文件,并根据需要进行过滤和替换操作。
对于本文要叙述的目标来说,可以用下述内容:
<build>
    <resources>
        <resource>
            <directory>src/main/resources/${profiles.active}</directory>
            <includes>
                <include>*.*</include>
            </includes>
            <filtering>false</filtering>
        </resource>
    </resources>
</build>
本内容重点是${profiles.active},这是由用户选择的配置文件所在位置。
3.用户选择环境信息
profiles元素用于定义项目的配置文件。它可以在POM文件中定义一个或多个profile,每个profile包含一组配置信息,可以在项目构建时根据需要选择和激活。
以下是一个包含profiles元素的POM文件示例:
<project>
  ...
  <profiles>
    <profile>
      <id>dev</id>
      <activation>
        <activeByDefault>true</activeByDefault>
      </activation>
      <properties>
        <database.url>jdbc:mysql://localhost:3306/mydb</database.url>
      </properties>
    </profile>
    <profile>
      <id>production</id>
      <properties>
        <database.url>jdbc:mysql://example.com:3306/mydb</database.url>
      </properties>
    </profile>
  </profiles>
  ...
</project>
在上述示例中,profiles元素定义了两个profile:dev和production。dev profile被设置为默认激活,它的属性中定义了一个开发环境的数据库连接URL。production profile也定义了一个属性,表示生产环境的数据库连接URL。
对于本文要叙述的目标来说,可以用下述内容:
<profiles>
    <profile>
        <id>dev</id>
        <properties>
            <profiles.active>dev</profiles.active>
        </properties>
        <activation>
            <activeByDefault>true</activeByDefault>
        </activation>
    </profile>
    <profile>
        <id>beta</id>
        <properties>
            <profiles.active>beta</profiles.active>
        </properties>
    </profile>
</profiles>
将上述内容写入pom.xml文件后,可在IDEA中看到下图,任意选择一个,表示选择某个环境的配置文件

4.设置构建jar的名称
做完上述3步后,就可以实现根据需要将不同环境下的配置信息打包,为了修改默认的jar名称,可以按照下述内容进行修改。
如果你使用的是Maven,你可以在pom.xml文件中通过<build>部分的<finalName>标签来设置构建的JAR名称。例如:
<project>
  ...
  <build>
    <finalName>your-project-name</finalName>
    ...
  </build>
  ...
</project>
在这里,your-project-name应替换为你想要的JAR名称。