第四章:组件化-插槽-混入-生命周期-系统API-登录
01_(理解)组件化-页面中直接调用子组件的方法
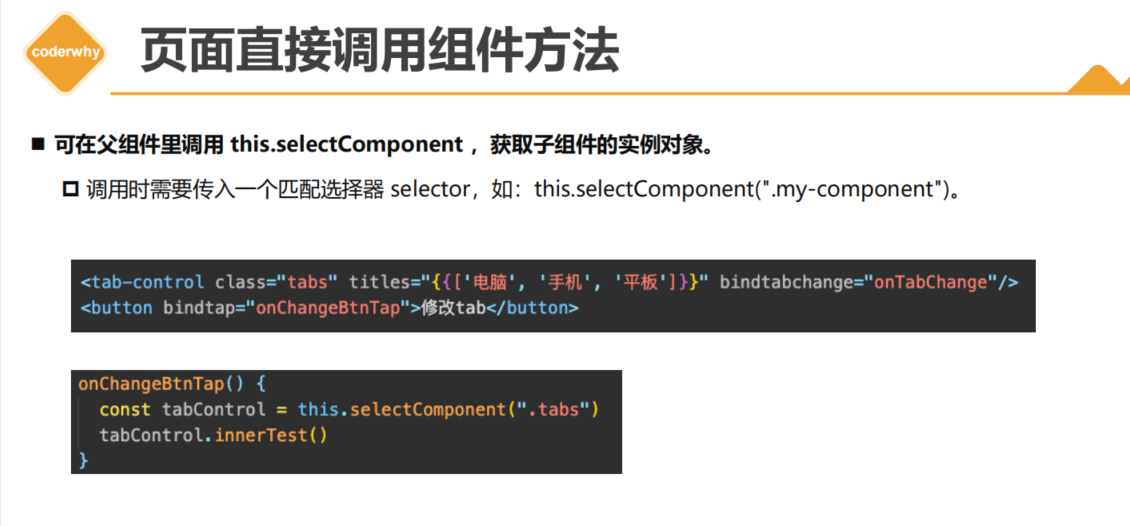
可在父组件里调用 this.selectComponent ,获取子组件的实例对象 --1.获取对应的组件实例对象–通过定义的class获取
页面直接调用组件方法—必须给组件定义一个class类便于获取组件
子组件方法
test(index) {


      console.log("tab control test function exec");
      this.setData({


        currentIndex: index
      })
    }

父组件
必须给组件定义一个class类便于获取组件
<!-- 4.tab-control的使用 -->
<tab-control
  class="tab-control"
  titles="{

    {digitalTitles}}"
  bind:indexchange="onTabIndexChange"
/>
<!-- 必须给组件定义一个class类便于获取组件 -->
<button bindtap="onExecTCMethod">调用TC方法</button>

父组件在方法中调用子组件
  onExecTCMethod() {


    // 1.获取对应的组件实例对象--通过定义的class获取
    const tabControl = this.selectComponent(".tab-control")
    // 2.调用组件实例的方法
    tabControl.test(2)
  }
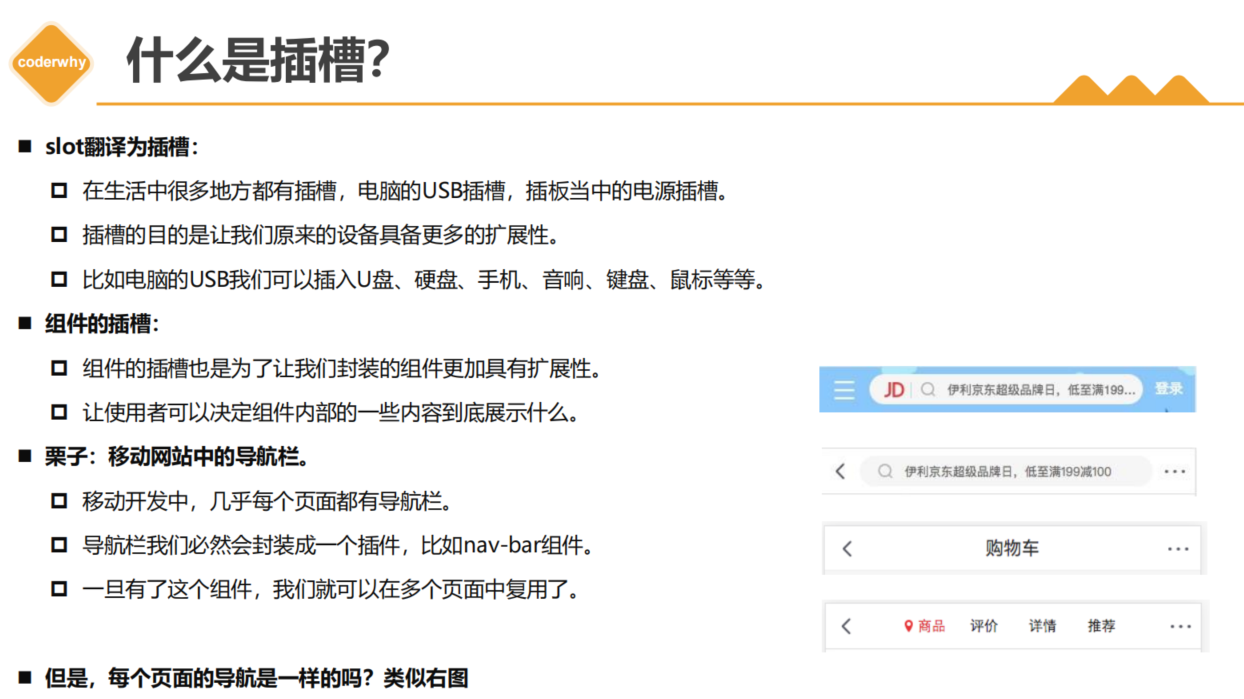
02_(掌握)组件化-插槽-单个插槽的使用和默认值
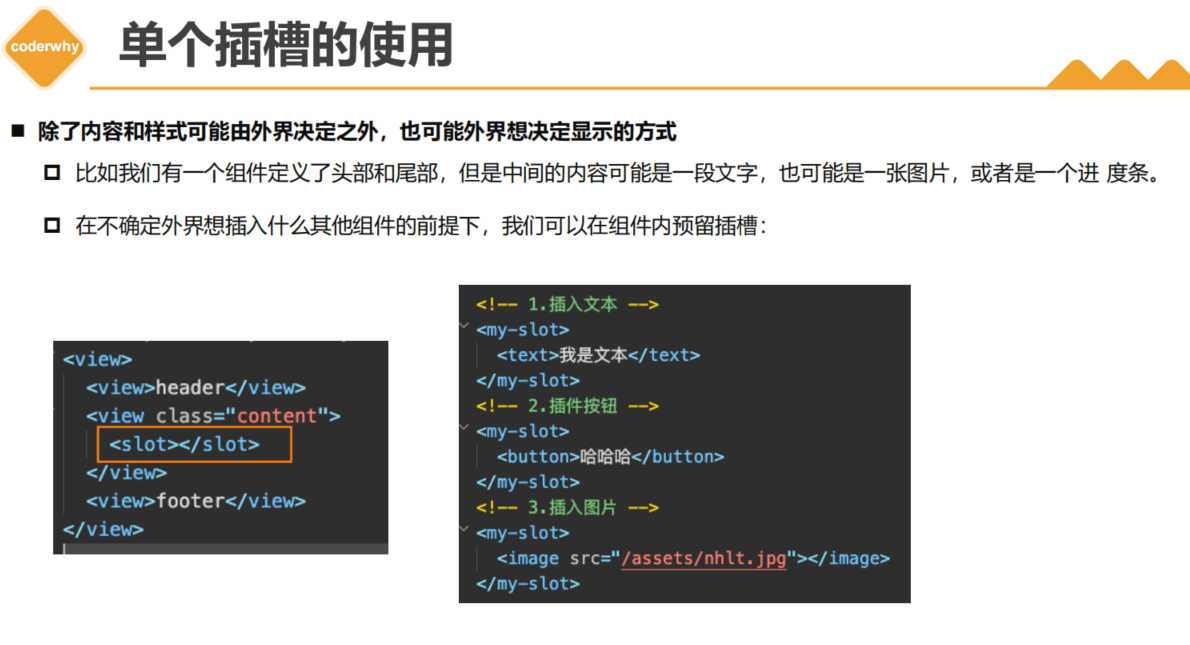
要点:小程序中slot插槽不支持默认值
通过css实现插值默认值,通过兄弟选择器
<view class="content">
    <!-- 小程序中插槽是不支持默认值的 -->
    <slot></slot>
  </view>
  <view class="default">哈哈哈哈</view>


.default {


  display: none;
}

.content:empty + .default {


  display: block;
}
代码实现
my-slot
<!--components/my-slot/my-slot.wxml-->
<view class="my-slot">
  <view class="header">Header</view>
  <view class="content">
    <!-- 小程序中插槽是不支持默认值的 -->
    <slot></slot>
  </view>
  <view class="default">默认值</view>
  <view class="footer">Footer</view>
</view>

/* components/my-slot/my-slot.wxss */
.my-slot {


  margin: 20px 0;
}

.default {


  display: none;
}

.content:empty + .default {


  display: block;
}
08_learn_slot
{


  "usingComponents": {


    "my-slot": "/components/my-slot/my-slot"
  }
}

<!--pages/08_learn_slot/index.wxml-->
<!-- 1.单个插槽的使用 -->
<my-slot>
  <button>我是按钮</button>
</my-slot>
<my-slot>
  <image src="/assets/nhlt.jpg" mode="widthFix"></image>
</my-slot>

<my-slot></my-slot>
03_(掌握)组件化-插槽-多个插槽的使用和配置
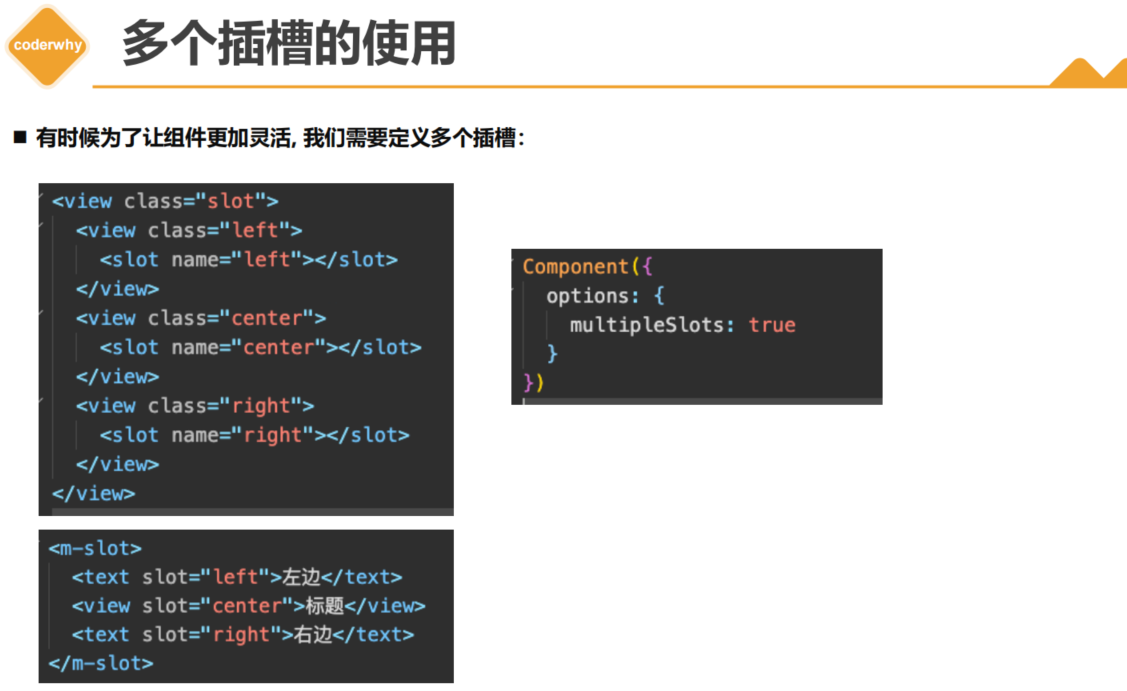
-多个插槽的使用需要给插槽命名(具名插槽)和在Component实例中设置options:{multipleSlots:true}
1.使用多个插槽需要在Component实例中设置options:{multipleSlots:true}
2.给插槽命名具名插槽
3.给组件设置样式
4.在页面中json中注册组件usingComponents
5.使用组件–给标签添加slot属性并指定查找名
1.// components/mul-slot/mul-slot.js
Component({


  options: {


    multipleSlots: true
  }
})
2.
<!--components/mul-slot/mul-slot.wxml-->
<view class="mul-slot">
  <view class="left">
  <!-- 具名插槽 -->
    <slot name="left"></slot>
  </view>
  <view class="center">
    <slot name="center"></slot>
  </view>
  <view class="right">
    <slot name="right"></slot>
  </view>
</view>
3.
/* components/mul-slot/mul-slot.wxss */
.mul-slot {


  display: flex;
  text-align: center;
}

.left, .right {


  width: 160rpx;
}

.center {


  flex: 1;
}
4.
{


  "usingComponents": {


    "mul-slot": "/components/mul-slot/mul-slot"

  }
}
5.
<!-- 2.多个插槽的使用 -->
<mul-slot>
<!-- 给标签添加slot属性并指定查找名 -->
  <button slot="left" size="mini">left</button>
  <view slot="center">哈哈哈</view>
  <button slot="right" size="mini">right</button>
</mul-slot>
04_(理解)组件化-组件的代码复用-Behaviors
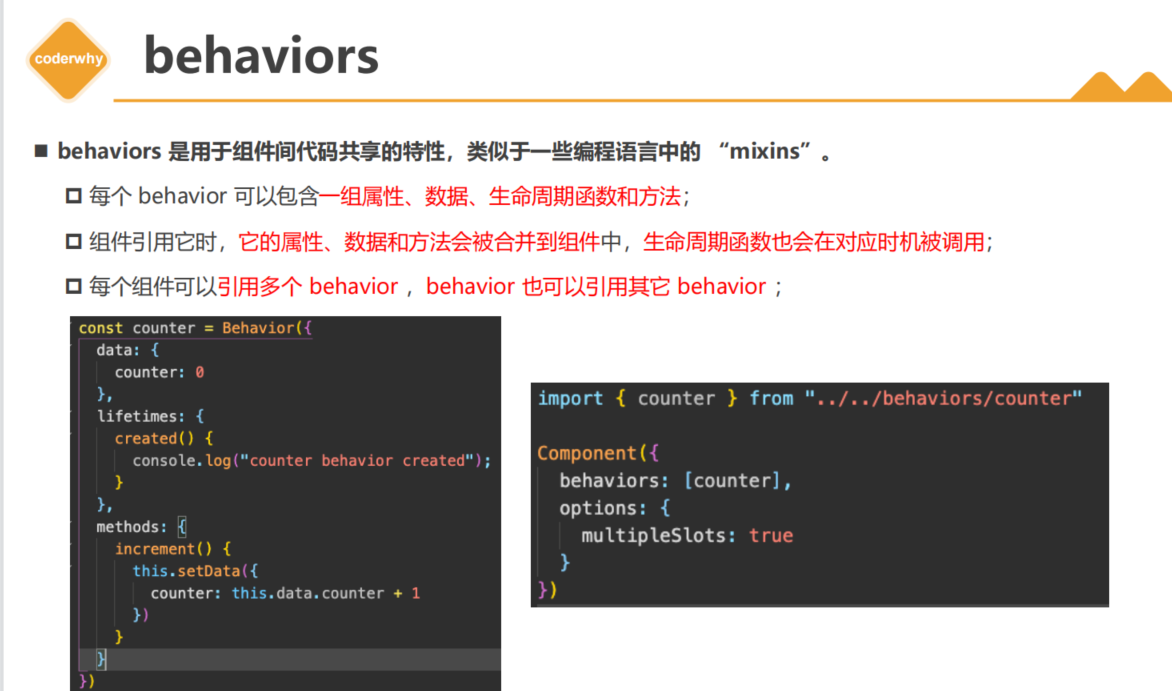
◼ behaviors 是用于组件间代码共享的特性,类似于一些编程语言中的 “mixins”。
混入的实现步骤
1.注册组件、使用组件
2.定义混入的js文件
3.在组件中·使用混入,导入、注册、使用
 1.
"c-behavior": "/components/c-behavior/c-behavior"

<!-- 3.组件的混入 -->
<c-behavior/>

2.
export const counterBehavior = Behavior({


  data: {


    counter: 100
  },
  methods: {


    increment() {


      this.setData({

     counter: this.data.counter + 1 })
    },
    decrement() {


      this.setData({

     counter: this.data.counter - 1 })
    }
  }
})

3.
// components/c-behavior/c-behavior.js
// 使用类似mixins的behaviors的混入的步骤
// 1.导入
import {

     counterBehavior } from "../../behaviors/counter"
// 2.注册
Component({


  behaviors: [counterBehavior]
})

<!--components/c-behavior/c-behavior.wxml-->
<view>
<!-- 3.使用混入的数据 -->
  <view class="counter">当前计数: {

    {

    counter}}</view>
  <button bindtap="increment">+1</button>
  <button bindtap="decrement">-1</button>
</view>
05_(理解)组件化-组件的生命周期函数
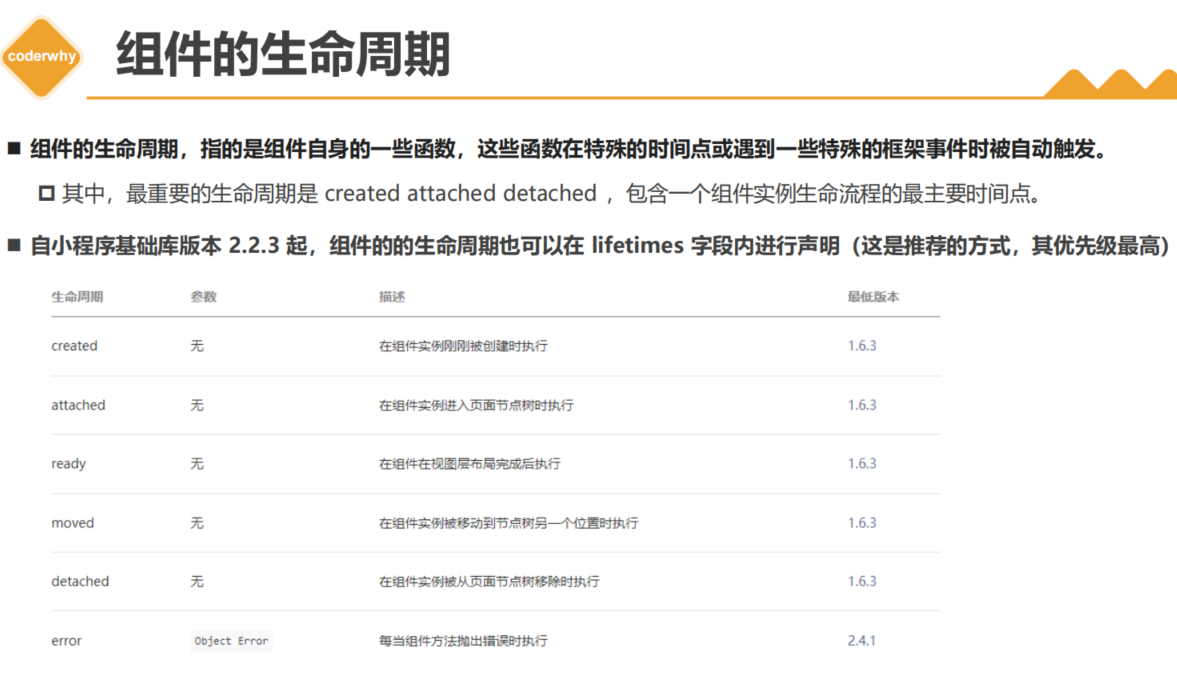
- 组件生命周期的针对于本组件,页面的生命周期针对于本页面
- 注册、使用
1.
<text>c-lifetime组件</text>
// components/c-lifetime/c-lifetime.js
Component({
// 组件生命周期的书写位置
lifetimes: {
created() {
console.log("组件被创建created");
},
attached() {
console.log("组件被添加到组件树中attached");
},
detached() {
console.log("组件从组件树中被移除detached");
}
},
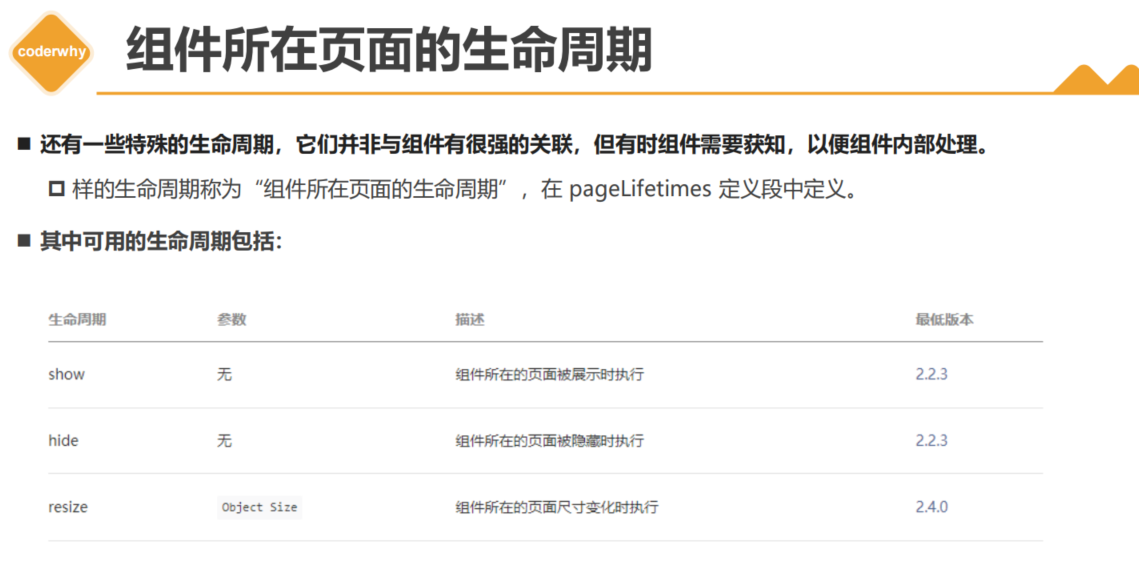
// 页面的生命周期
pageLifetimes: {
show() {
console.log("page show");
},
hide() {
console.log("page hide");
}
}
})
2.
"c-lifetime": "/components/c-lifetime/c-lifetime"
<!-- 4.组件的生命周期 -->
<button bindtap="onChangeTap">切换</button>
<c-lifetime wx:if="{
{isShowLiftTime}}"/>
// pages/08_learn_slot/index.js
Page({
data: {
isShowLiftTime: true
},
onChangeTap() {
this.setData({
isShowLiftTime: !this.data.isShowLiftTime })
}
})
06_(掌握)组件化-Component函数可以传入的选项


第四章:小程序系统API调用
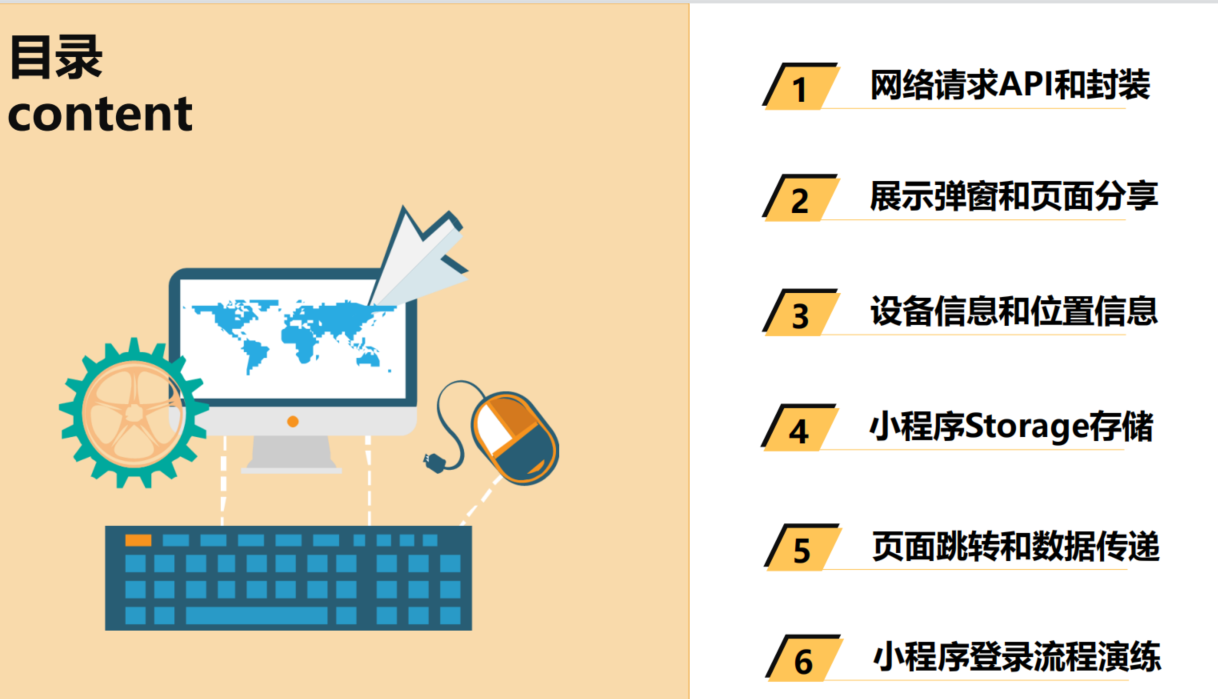
07_(了解)API-常见API的内容介绍
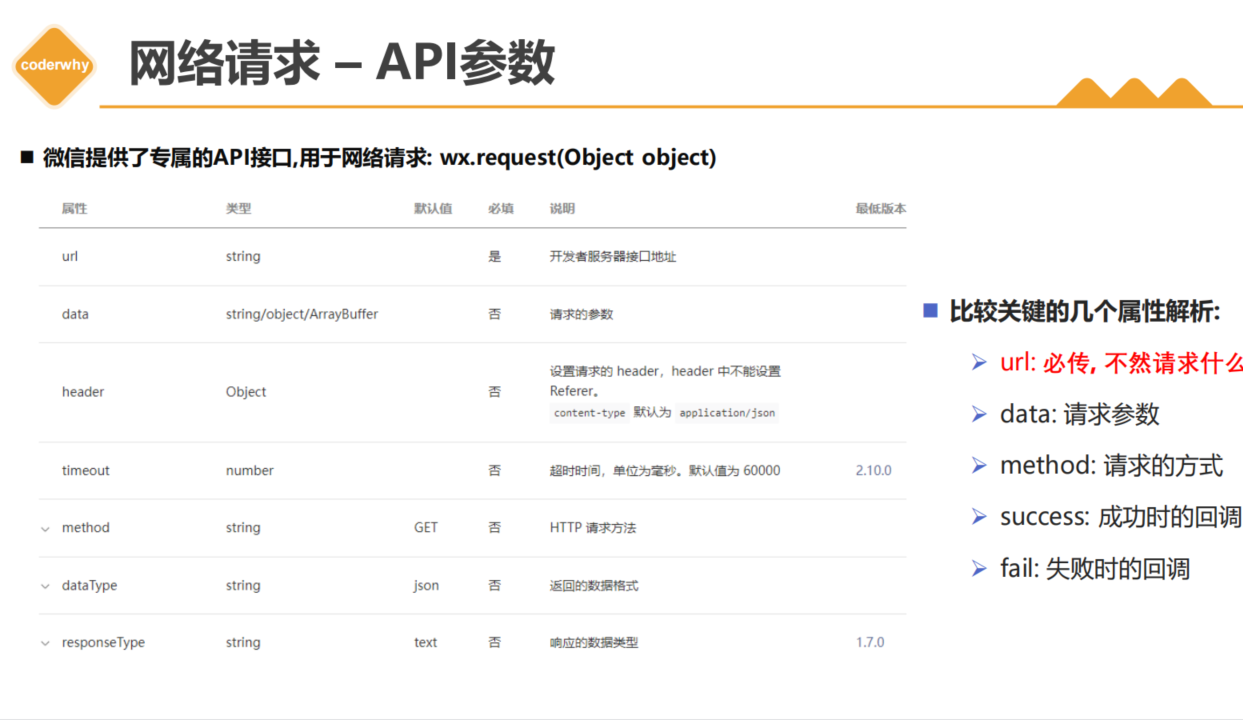
08_(掌握)API-网络请求API的基本使用
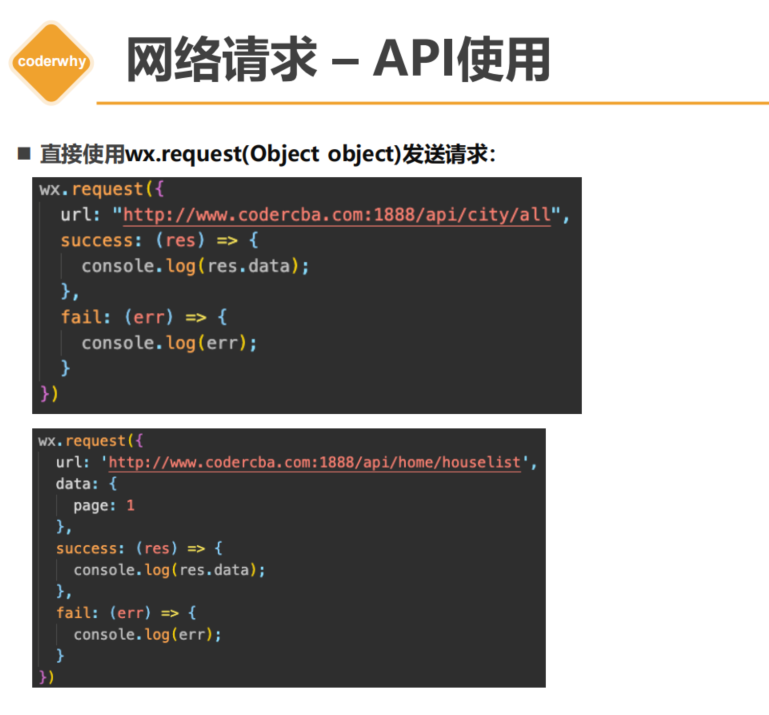
1.在onload中发起网络请求wx,request({})传入参数
2.在wxml中展示数据
1.
// pages/09_learn_api/index.js

Page({
  data: {
    allCities: {},
    houselist: [],
  },
  onLoad() {
    // 1.网络请求基本使用
    // wx.request({
    //   url: "http://123.207.32.32:1888/api/city/all",
    //   success: (res) => {
    //     const data = res.data.data
    //     console.log(data);
    //     this.setData({ allCities: data })
    //   },
    //   fail: (err) => {
    //     console.log("err:", err);
    //   }
    // })
    wx.request({
      url: "http://123.207.32.32:1888/api/home/houselist",
      data:{page:1},
      success: (res) => {
        const data = res.data.data
        console.log(data);
        this.setData({ houselist: data })
      }
    })
  }
})
2.
<!--pages/09_learn_api/index.wxml-->
<view class="house-list">
  <block wx:for="{

   {houselist}}" wx:key="{

   {item.data.houseId}}">
    <view class="item">
      <image src="{

   {item.data.image.url}}"></image>
      <view class="title">{

   {item.data.houseName}}</view>
    </view>
  </block>
</view>
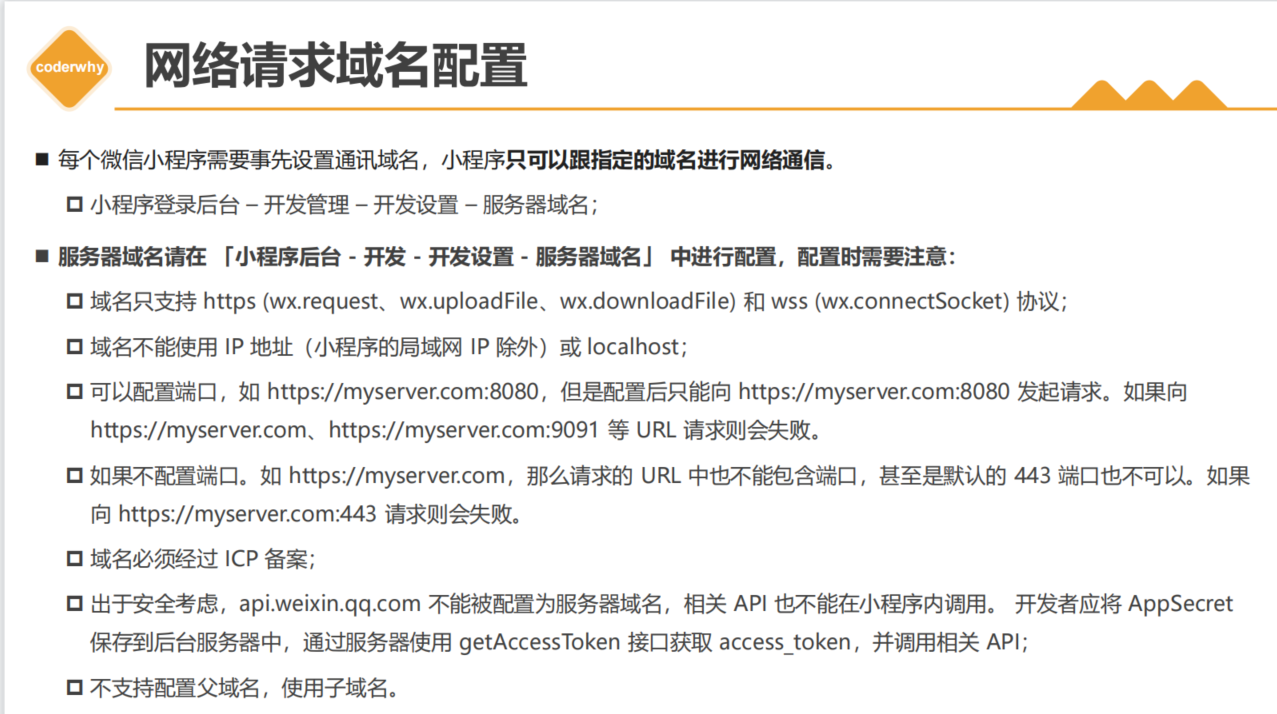
09_(理解)API-网络请求域名的后台配置
10_(掌握)API-网络请求的函数封装和使用
网络请求封装成函数实现步骤
1.在service文件夹中创建index.js文件,通过解构和promise封装
1-2.引入service文件夹中的index.js文件
2.使用封装的函数 promise有点并行的感觉,第一个请求的结果没出来之前也会发送第二个请求
3.await/async 同步 第一个请求的结果没出来之前不会发送第二个请求,容易堵塞,不过可以放到单独的方法中
4.将请求封装到一个单独函数中(推荐),异步方法不会阻塞。方法单独定义,在onLoad调用就行
5.下拉加载更多
1.
// 封装成函数
export function hyRequest(options) {


  return new Promise((resolve, reject) => {


    wx.request({


      ...options,
      success: (res) => {


        resolve(res.data)
      },
      fail: reject
    })
  })
}
1-2
// pages/09_learn_api/index.js
import {

     hyRequest, hyReqInstance } from "../../service/index"

Page({


  data: {


    allCities: {

    },
    houselist: [],
    currentPage: 1
  },
  async onLoad() {


    // 1.网络请求基本使用
    // wx.request({


    //   url: "http://codercba.com:1888/api/city/all",
    //   success: (res) => {


    //     const data = res.data.data
    //     this.setData({ allCities: data })
    //   },
    //   fail: (err) => {


    //     console.log("err:", err);
    //   }
    // })

    // wx.request({


    //   url: 'http://codercba.com:1888/api/home/houselist',
    //   data: {


    //     page: 1
    //   },
    //   success: (res) => {


    //     const data = res.data.data
    //     this.setData({ houselist: data })
    //   }
    // })
2.
    // 2.使用封装的函数 promise有点并行的感觉,第一个请求的结果没出来之前也会发送第二个请求,
    // hyRequest({
    //   url: "http://codercba.com:1888/api/city/all"
    // }).then(res => {


    //   this.setData({ allCities: res.data })
    // })

    // hyRequest({


    //   url: "http://codercba.com:1888/api/home/houselist",
    //   data: {


    //     page: 1
    //   }
    // }).then(res => {


    //   this.setData({ houselist: res.data })
    // })
3.
    // 3.await/async 同步 第一个请求的结果没出来之前不会发送第二个请求,容易堵塞,不过可以放到单独的方法中
    // const cityRes = await hyRequest({
    //   url: "http://codercba.com:1888/api/city/all"
    // })
    // this.setData({ allCities: cityRes.data })

    // const houseRes = await hyRequest({


    //   url: "http://codercba.com:1888/api/home/houselist",
    //   data: { page: 1 }
    // })
    // this.setData({ houselist: houseRes.data })
4.
    // 4.将请求封装到一个单独函数中(推荐),异步方法不会阻塞
    this.getCityData()
    this.getHouselistData()

    // 5.使用类的实例发送请求
    hyReqInstance.get({


      url: "/city/all"
    }).then(res => {


      console.log(res);
    })
  },
5.
  async getCityData() {


    const cityRes = await hyRequest({


      url: "http://codercba.com:1888/api/city/all"
    })
    this.setData({

     allCities: cityRes.data })
  },
  async getHouselistData() {


    const houseRes = await hyRequest({


      url: "http://codercba.com:1888/api/home/houselist",
      data: {

     page: this.data.currentPage }
    })
    const finalHouseList = [...this.data.houselist, ...houseRes.data]
    this.setData({

     houselist: finalHouseList })
    // 思考: 为什么这里不需要setData?因为页面不需要刷新
    this.data.currentPage++
  },
5.  // 下拉加载更多
  onReachBottom() {


    this.getHouselistData()
  }
})
可不可以怎么写
   一个测试
hyRequest({


      url: "http://codercba.com:1888/api/city/all"
    }).then(res => {


      this.setData({

     allCities: res.data })
    },err=>{

    console.log("err");})
11_(掌握)API-网络请求的类封装和使用过程

1.先封装class的网络请求–封装成类
2.引入class
3.使用类的实例发送request请求
  1.
// 封装成类 -> 实例
class HYRequest {


  constructor(baseURL) {


    this.baseURL = baseURL
  }
  request(options) {


    const {

     url } = options
    return new Promise((resolve, reject) => {


      wx.request({


        ...options,
        url: this.baseURL + url,
        success: (res) => {


          resolve(res.data)
        },
        fail: (err) => {


          console.log("err:", err);
        }
      })
    })
  }
  get(options) {


    return this.request({

     ...options, method: "get" })
  }
  post(options) {


    return this.request({

     ...options, method: "post" })
  }
}

export const hyReqInstance = new HYRequest("http://codercba.com:1888/api")

2.
import {

     hyRequest, hyReqInstance } from "../../service/index"

3.
  // 5.使用类的实例发送请求
    hyReqInstance.get({


      url: "/city/all"
    }).then(res => {


      console.log(res);
    })
    // 6.使用类的实例发送request请求
    // hyReqInstance.request({


    //   url: "/home/houselist?page=1"
    // }).then(res => {


    //   this.setData({ houselist: res.data })
    // })
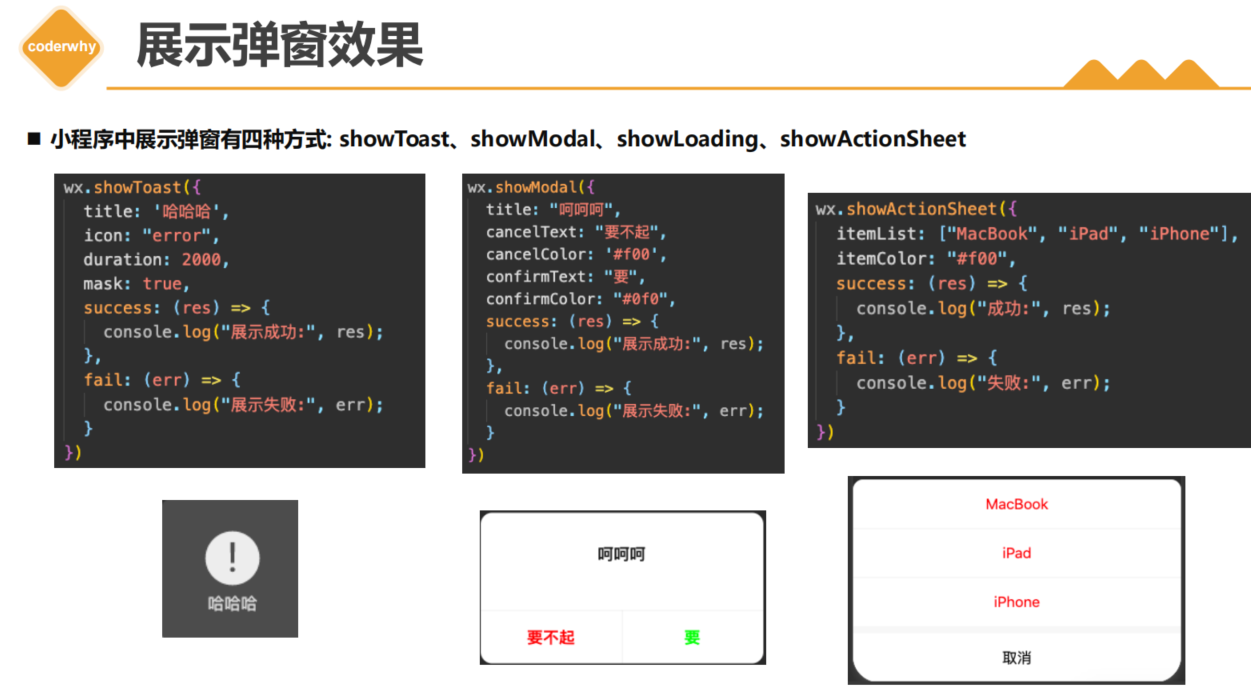
12_(了解)API-小程序中的弹窗相关API
<!--pages/10_learn_api/index.wxml-->
<!-- 1.展示弹窗 -->
<view>
  <button size="mini" bindtap="onShowToast">showToast</button>
  <button size="mini" bindtap="onShowModal">showModal</button>
  <button size="mini" bindtap="onShowAction">showAction</button>
</view>


// pages/10_learn_api/index.js
Page({


  // 1.弹窗相关的API
  onShowToast() {


    wx.showToast({


      title: '购买失败!',
      icon: "error",
      duration: 1000,
        //蒙版:在未消失的时候可不可以点击后面的操作
      mask: true,
      success: (res) => {


        console.log("res:", res);
      },
      fail: (err) => {


        console.log("err:", err);
      }
    })

    // wx.showLoading({


    //   title: "加载中ing"
    // })
  },
  onShowModal() {


    wx.showModal({


      title: "确定购买吗?",
      content: "确定购买的话, 请确定您的微信有钱!",
      confirmColor: "#f00",
      cancelColor: "#0f0",
      success: (res) => {


        if (res.cancel) {


          console.log("用户点击取消");
        } else if (res.confirm) {


          console.log("用户点击了确定");
        }
      }
    })
  },
  onShowAction() {


    wx.showActionSheet({


      itemList: ["衣服", "裤子", "鞋子"],
      success: (res) => {


        console.log(res.tapIndex);
      },
      fail: (err) => {


        console.log("err:", err);
      }
    })
  },


}
13_(理解)API-小程序的分享API回调函数
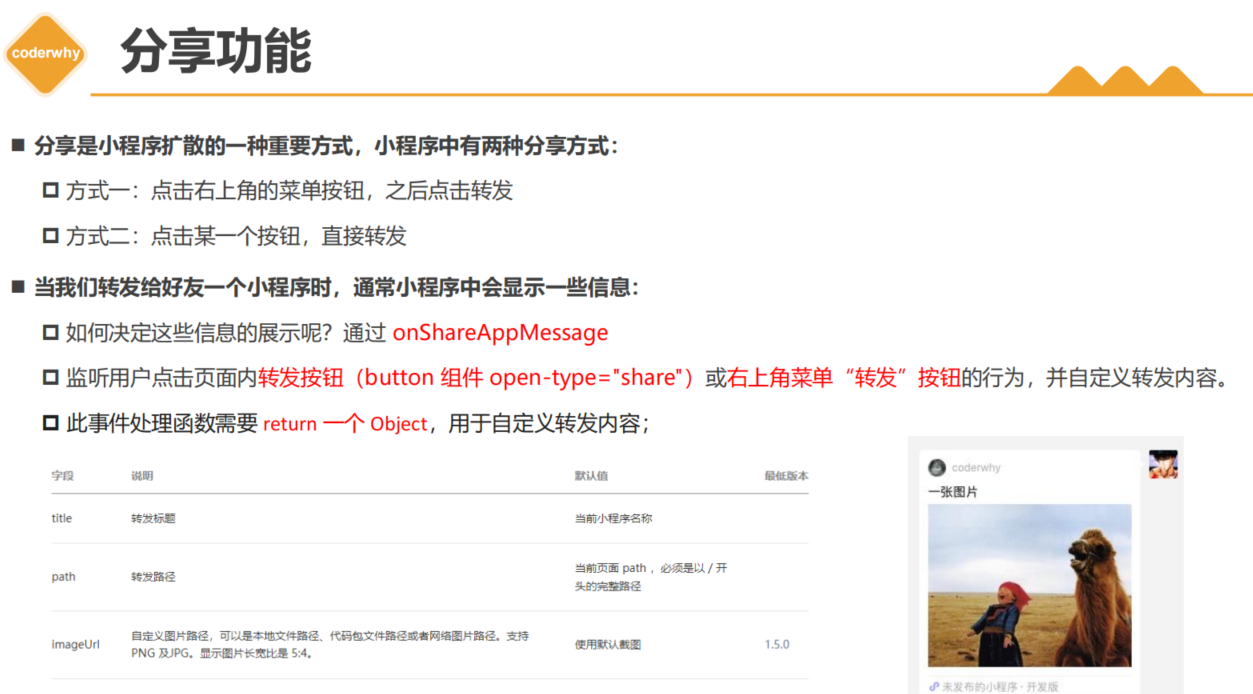
// 2.分享功能
  onShareAppMessage() {


    return {


      title: "旅途的内容",
      path: "/pages/favor/favor",
      imageUrl: "/assets/nhlt.jpg"
    }
  },
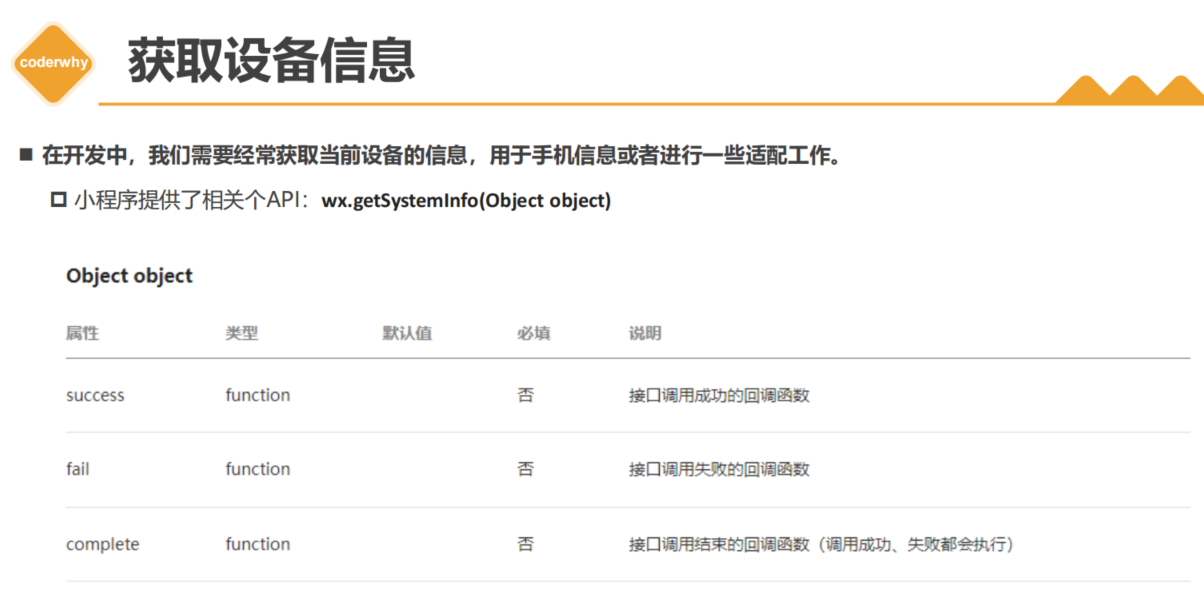
14_(掌握)API-小程序的设备信息和位置信息
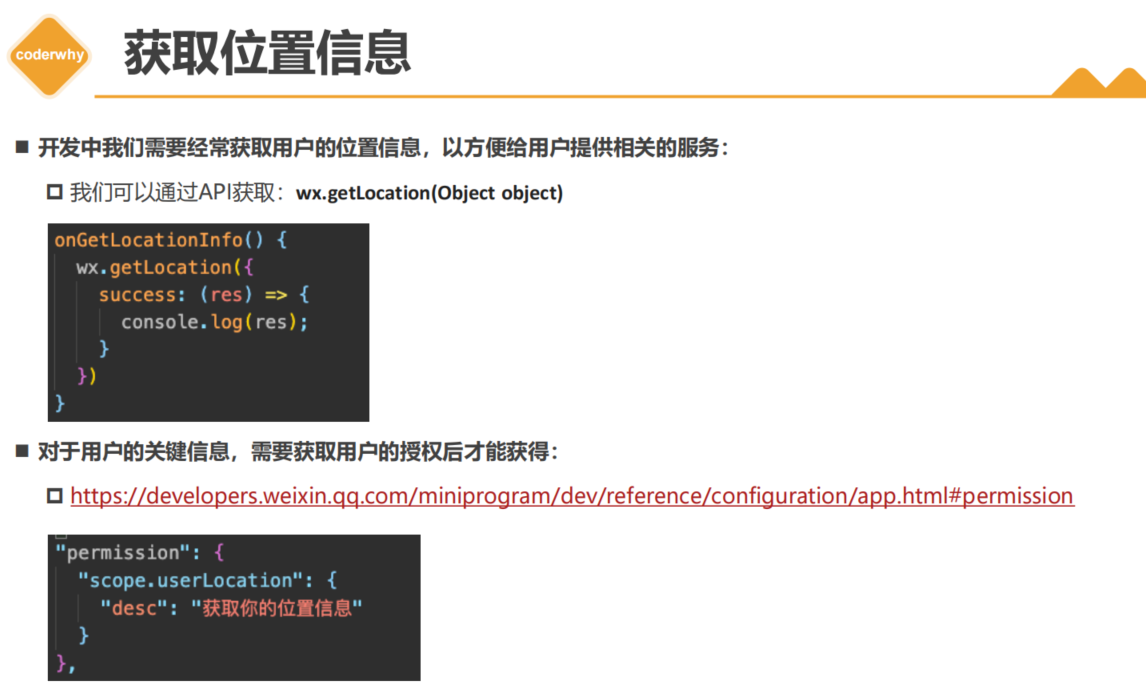
对于用户的关键信息,需要获取用户的授权后才能获得:
app.json中配置
"permission": {


    "scope.userLocation": {


      "desc": "需要获取您的位置信息"
    }
  },


<!-- 3.设备信息 -->
<button bindtap="onGetSystemInfo">设备信息</button>

  // 3.获取用户的设备信息
  onGetSystemInfo() {


    // 1.获取手机的基本信息
    // wx.getSystemInfo({


    //   success: (res) => {


    //     console.log(res);
    //   }
    // })

    // 2.获取当前的位置信息
    wx.getLocation({


      success: (res) => {


        console.log("res:", res);
      }
    })
  },
15_(掌握)API-本地存储Storage的API使用
[外链图片转存失败,源站可能有防盗链机制,建议将图片保存下来直接上传(img-y12gk531-1675304800111)(null)]
<!-- 4.本地存储 -->
<button bindtap="onLocalStorage">本地存储</button>

// 4.本地存储方式
  onLocalStorage() {


    // 同步操作,执行完上一行,才可以执行下一行
    // 1.存储一些键值对
    // wx.setStorageSync('name', "why")
    // wx.setStorageSync('age', 18)
    // wx.setStorageSync('friends', ["abc", "cba", "nba"])

    // 2.获取storage中内容
    // const name = wx.getStorageSync('name')
    // const age = wx.getStorageSync('age')
    // const friends = wx.getStorageSync('friends')
    // console.log(name, age, friends);

    // 3.删除storage中内容
    // wx.removeStorageSync('name')

    // 4.清空storage中内容
    // wx.clearStorageSync()

    // 异步操作 ,执行的时候不会阻塞下一行代码的执行
    wx.setStorage({


      key: "books",
      data: "哈哈哈",
      // 加密但是有版本限制--2.21.3
      encrypt: true,
      success: (res) => {


        wx.getStorage({


          // 获取
          key: "books",
          encrypt: true,
          success: (res) => {


            console.log(res);
          }
        })
      }
    })

    console.log("-------");
  }
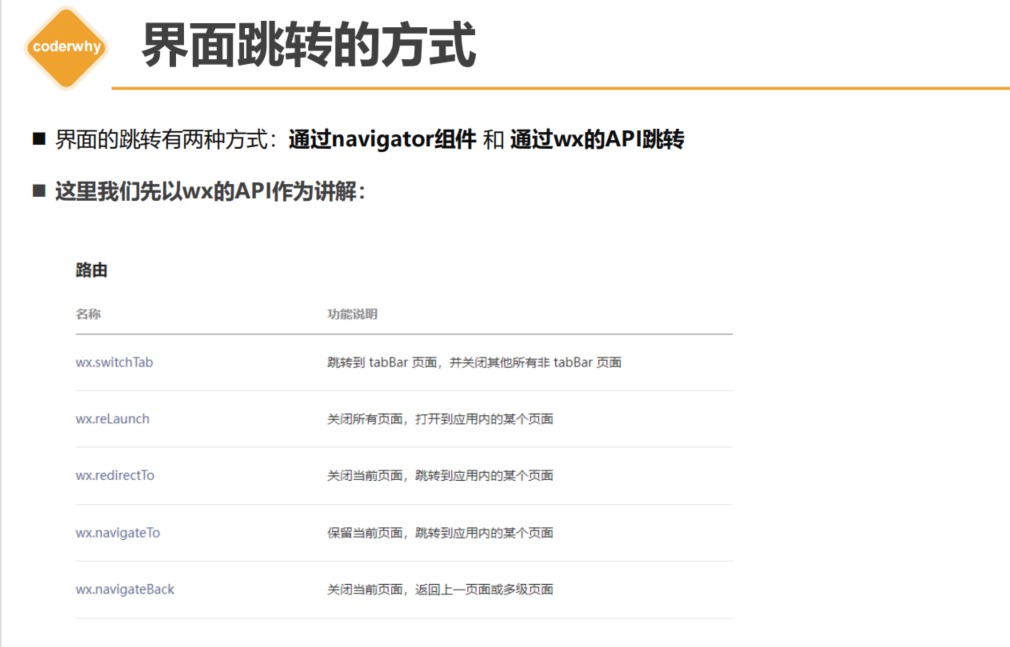
16_(了解)API-页面跳转-跳转不同的方法
页面跳转存在页面栈–会记录页面跳转的记录,以下方法记录跳转的不同方法
17_(掌握)API-页面的跳转和页面的返回
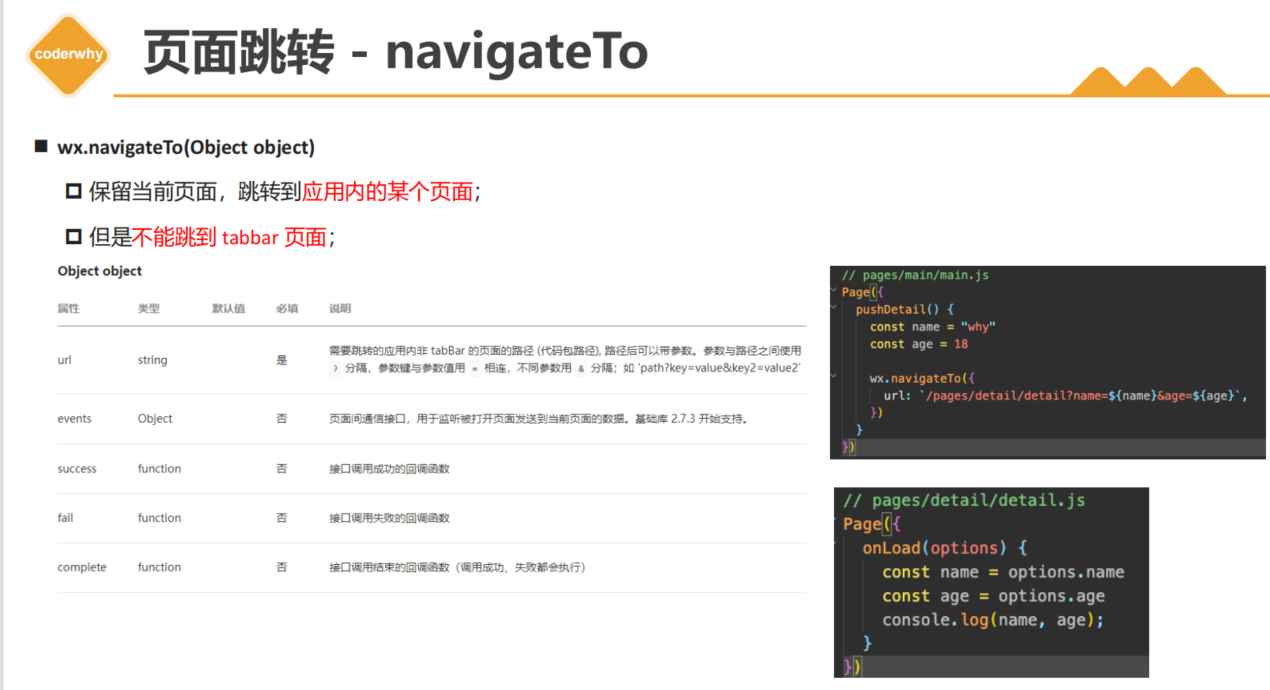
页面跳转wx.navigateTo({})
<button bindtap="onNavTap">跳转</button>

// pages/11_learn_nav/index.js
Page({


  data: {


    name: "kobe",
    age: 30,
  },
  onNavTap() {


    const name = this.data.name
    const age = this.data.age

    // 页面导航操作
    wx.navigateTo({


      // 跳转的过程, 传递一些参数过去
      url: `/pages2/detail/detail?name=${

      name}&age=${

      age}`,
    })
  }
})

跳转过后的页面
// pages2/detail/detail.js
Page({


  data: {


    name: "",
    age: 0
  },

  onLoad(options) {


    // options里面就是跳转时携带的参数
    console.log(options);
    const name = options.name
    const age = options.age
    this.setData({

     name, age })


  },
})
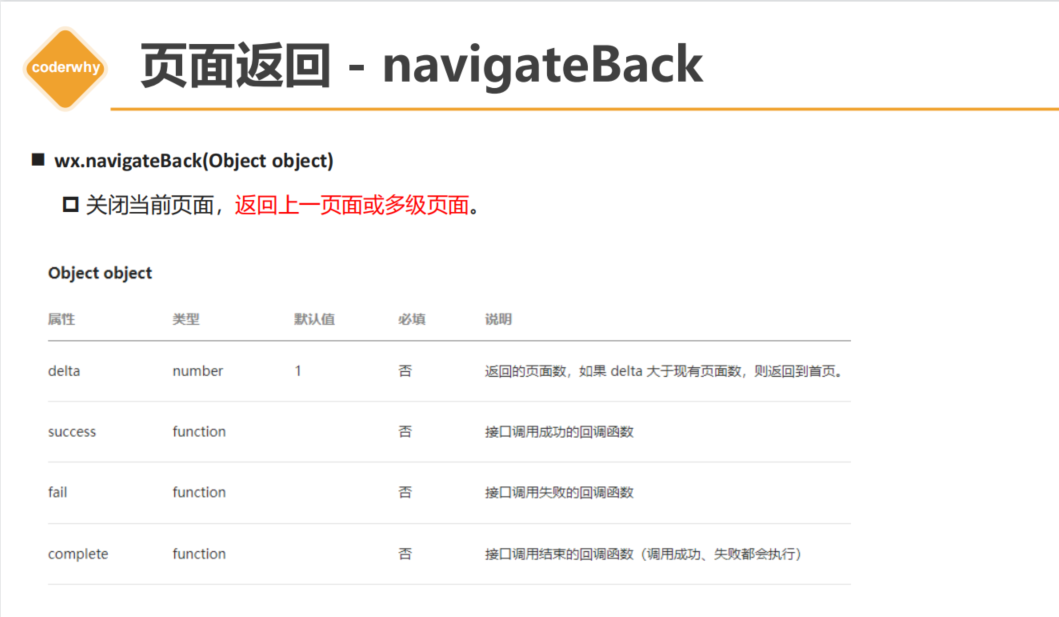
<button size="mini" type="primary" bindtap="onBackTap">返回</button>

 onBackTap() {


    // 1.返回导航
    wx.navigateBack({


      // 默认值是1.跳转上级页面目录
      delta:2
    })
  }
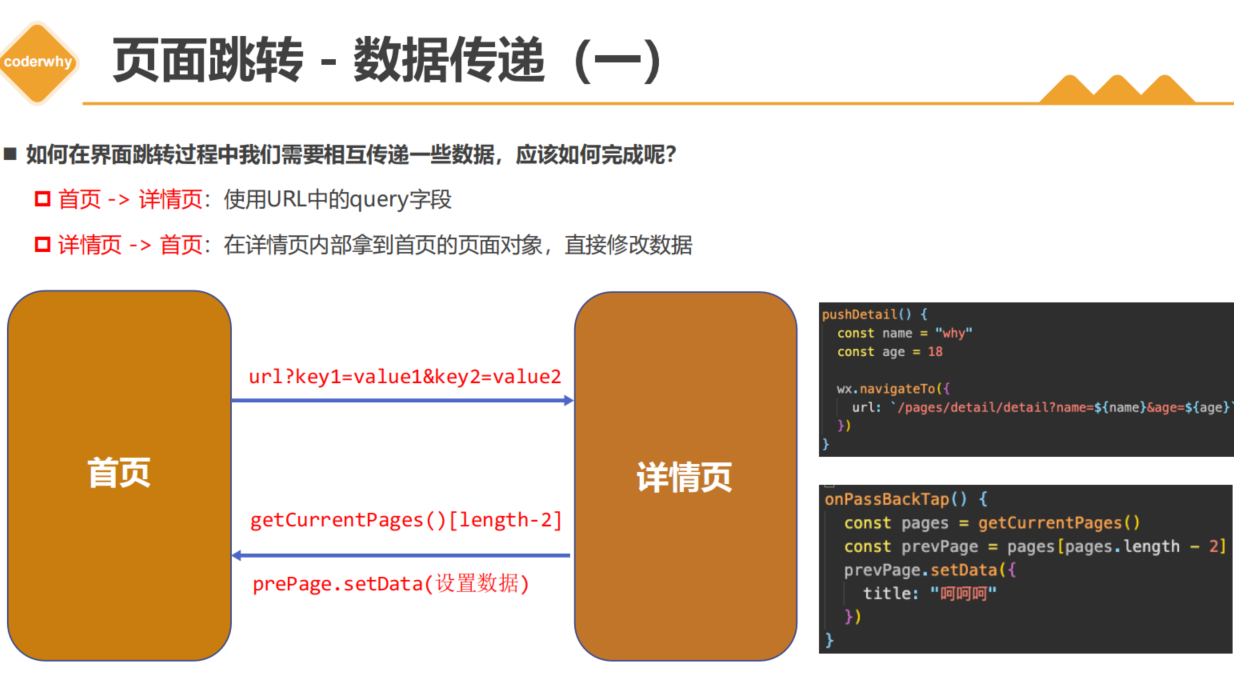
18_(掌握)API-页面的返回数据传递方式
[外链图片转存失败,源站可能有防盗链机制,建议将图片保存下来直接上传(img-voZBEjeV-1675304800287)(null)]
<view>{

   {message}}</view>

message: "哈哈哈"

detail
  <button size="mini" type="primary" bindtap="onBackTap">返回</button>

onBackTap() {
    // 1.返回导航
    wx.navigateBack()

    // 2.方式一: 给上一级的页面传递数据
    // 2.1. 获取到上一个页面的实例
    // const pages = getCurrentPages()
    // // console.log(pages);通过打印看当前页面和上一个页面的位置,通过pages[pages.length-2]获取到上一个页面
    // const prePage = pages[pages.length-2]
    // // 2.2.通过setData给上一个页面设置数据
    // prePage.setData({ message: "呵呵呵" })
  },
    //  页面卸载的生命周期,只用在这里写,就都可以实现了
    onUnload() {
      // 2.1. 获取到上一个页面的实例
      const pages = getCurrentPages()
      const prePage = pages[pages.length-2]

      // 2.2.通过setData给上一个页面设置数据
      prePage.setData({ message: "呵呵呵" })
    }
19_(掌握)API-页面的返回数据传递方式二

// pages/11_learn_nav/index.js
Page({


  data: {


    name: "kobe",
    age: 30,
    message: "哈哈哈"
  },
  onNavTap() {


    const name = this.data.name
    const age = this.data.age
 3.   const that = this
    // 页面导航操作
    wx.navigateTo({


      // 跳转的过程, 传递一些参数过去
      url: `/pages2/detail/detail?name=${

      name}&age=${

      age}`,
      // 方式二,通过 events:回调函数接受数据
2.      events: {


        backEvent(data) {


          console.log("back:", data);
          const names = data.name
3.          // 修改值携带进来
          that.setData({

    name:names})
        },
        coderwhy(data) {


          console.log("why:", data);
        }
      }
    })
  }
})

 onBackTap() {


    // 1.返回导航
    wx.navigateBack()

    // 2.方式一: 给上一级的页面传递数据
    // 2.1. 获取到上一个页面的实例
    // const pages = getCurrentPages()
    // // console.log(pages);通过打印看当前页面和上一个页面的位置,通过pages[pages.length-2]获取到上一个页面
    // const prePage = pages[pages.length-2]

    // // 2.2.通过setData给上一个页面设置数据
    // prePage.setData({ message: "呵呵呵" })

2.    // 3.方式二: 回调events的函数
    // 3.1. 拿到eventChannel
    const eventChannel = this.getOpenerEventChannel()

    // 3.2. 通过eventChannel回调函数
    eventChannel.emit("backEvent", {

     name: "back", age: 111 })
    eventChannel.emit("coderwhy", {

     name: "why", age: 10 })


  },
20_(了解)API-navigator组件的跳转和返回
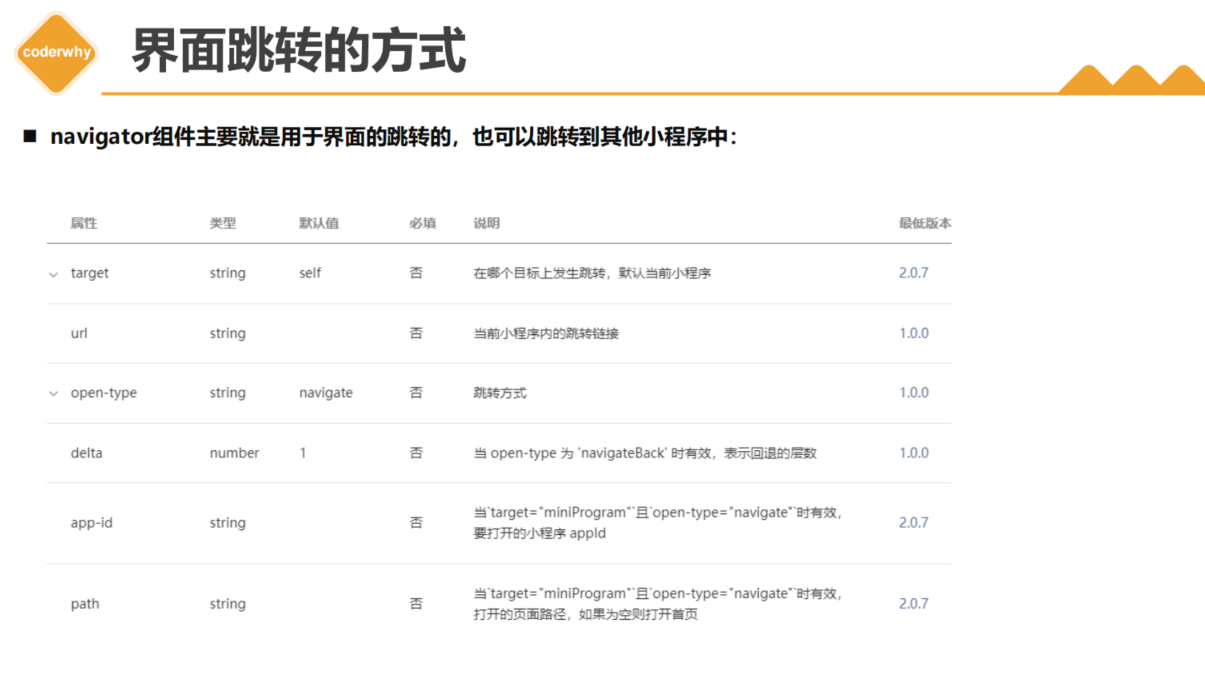
<navigator open-type="navigateBack">返回</navigator>

<navigator class="nav" url="/pages2/detail/detail?name=why&age=18">跳转</navigator>
21_(理解)登录流程-登录中身份标识的验证
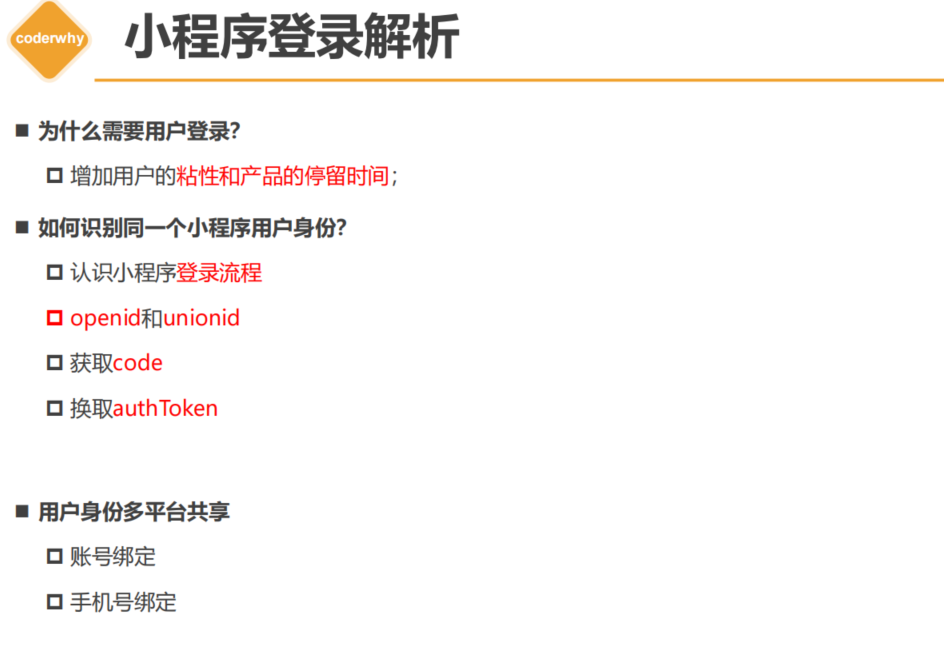
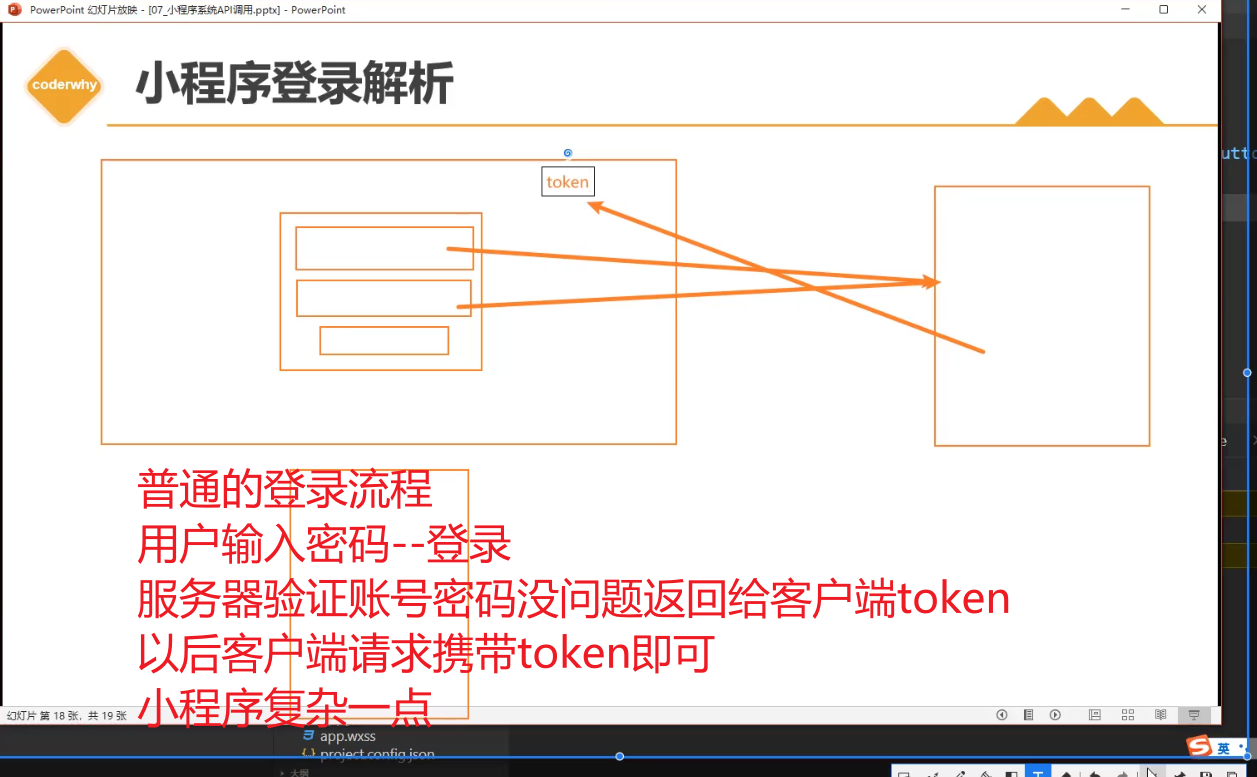
小程序登录不用登录账号和密码,因为直接在微信上登录
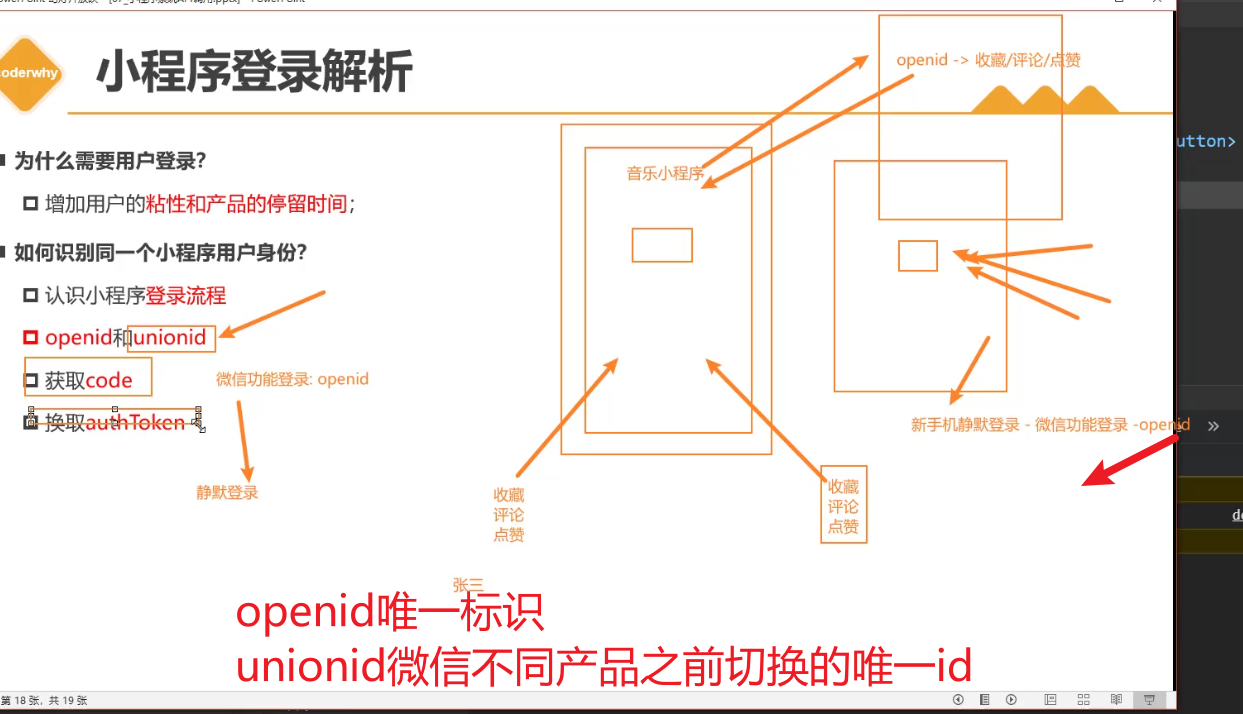

小程序通过openid来验证身份
如果账号注册公众号可以获取unionid
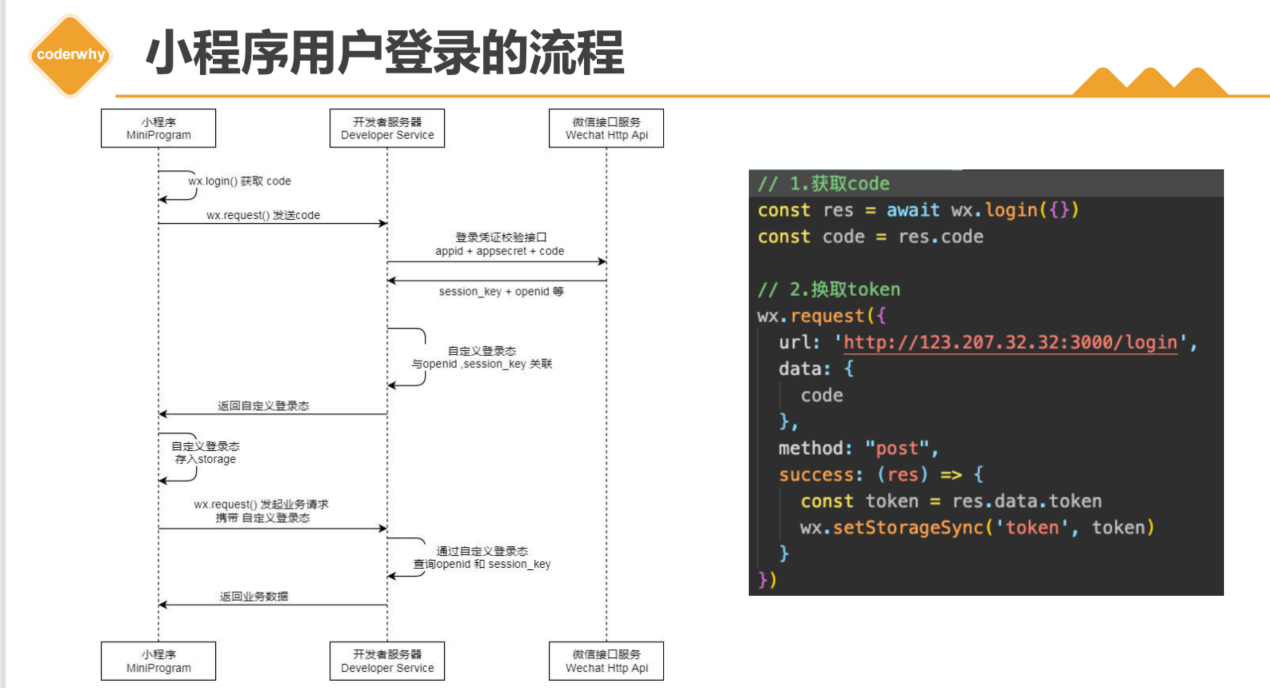
22_(掌握)登录流程-登录流程的解析和代码演练
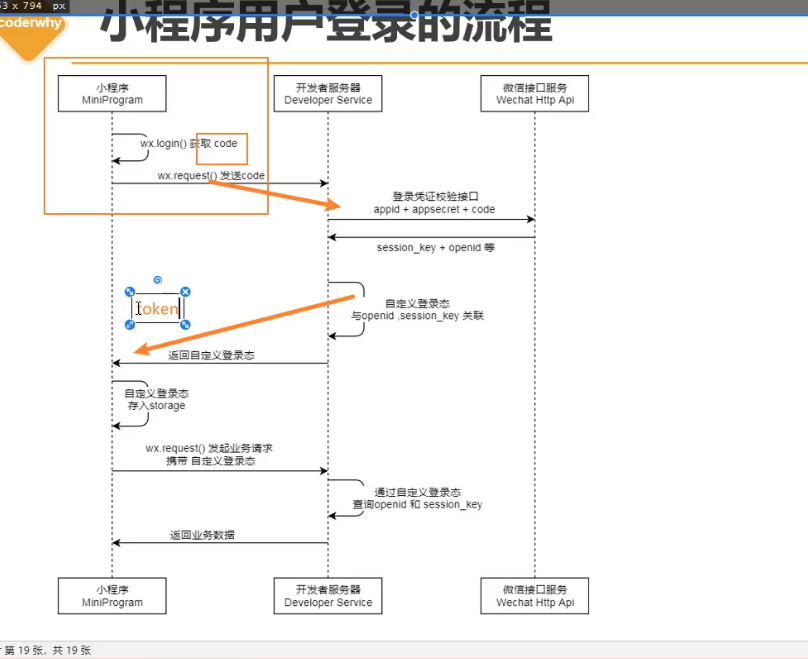
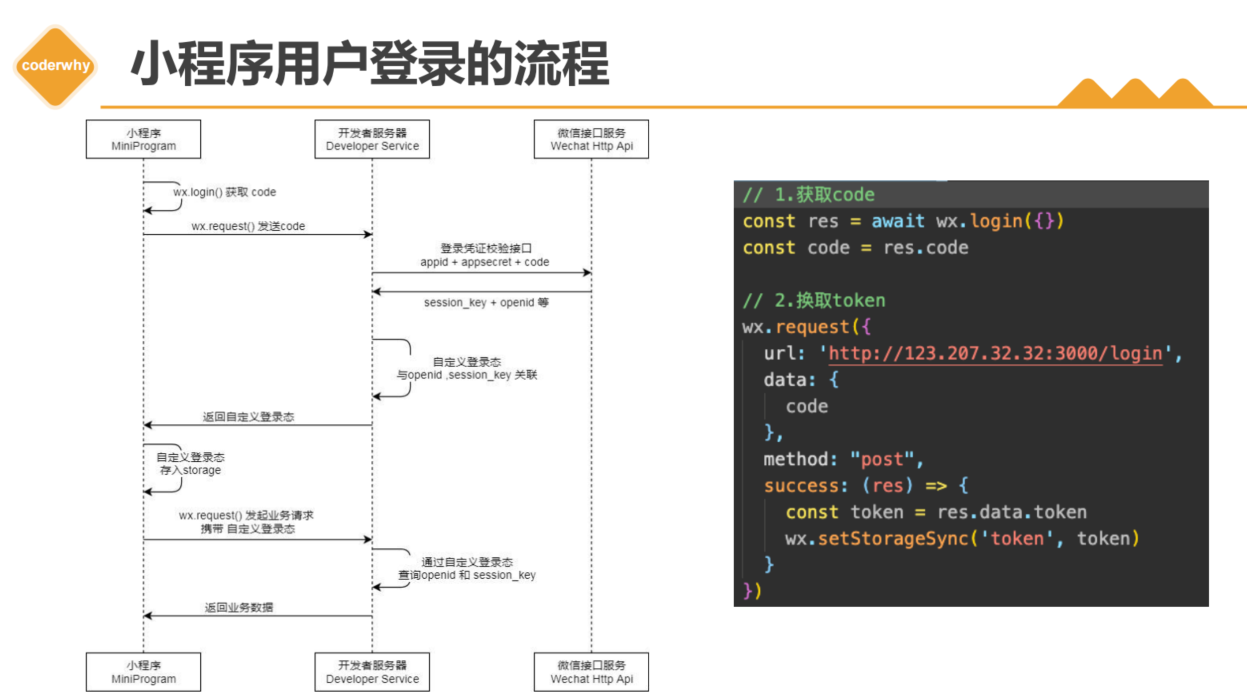
实现步骤登录逻辑
1.方式一:通过原生方法
import {

     hyLoginReqInstance } from "../../service/index"
// pages/12_learn_login/index.js
Page({


  // onLoad登录的流程
  async onLoad() {


    // 1.获取token, 判断token是否有值
    const token = wx.getStorageSync('token') || ""

    // 2.发起请求--判断token是否过期
    const res = await hyLoginReqInstance.post({


      url: "/auth",
      header: {


        token: token
      }
    })
    // console.log(res);

    // 2.如果token有值和无值的情况
    if (token && res.message === "已登录") {


      console.log("请求其他的数据");
    } else {


      this.handleLogin()
    }
  },


  // 第一种写法
  // handleLogin() {


  //   // 1.获取code
  //   wx.login({


  //     success: (res) => {


  //       const code = res.code

  //       // 2.将这个code发送自己的服务器(后端)
  //       wx.request({


  //         url: "http://123.207.32.32:3000/login",
  //         data: {


  //           code
  //         },
  //         method: "post",
  //         success: (res) => {


  //           const token = res.data.token
  //           wx.setStorageSync('token', token)
  //         }
  //       })
  //     }
  //   })
  // }
})
2.方式二:通过promise–
1.封装login的promise方法
2.封装成类的请求方法
3.onLoad登录的流程
3.1.获取token, 判断token是否有值
3.2.判断token是否过期
3.3如果token有值和无值的情况
4.第二种写法 --获取login接口处理函数获取token
login.js
export function getCode(){


  return new Promise((resolve,reject)=>{


    wx.login({


        success:(res)=>{


          resolve(res.code)
        }
    })
  })
}
export const hyLoginReqInstance = new HYRequest("http://123.207.32.32:3000")

import {

     getCode } from "../../service/login";
import {

     hyLoginReqInstance } from "../../service/index"

// pages/12_learn_login/index.js
Page({


  // onLoad登录的流程
  async onLoad() {


    // 1.获取token, 判断token是否有值
    const token = wx.getStorageSync('token') || ""

    // 2.发起请求--判断token是否过期--判断token是否正确
    const res = await hyLoginReqInstance.post({


      url: "/auth",
      header: {


        token: token
      }
    })
    // console.log(res);

    // 2.如果token有值和无值的情况
    if (token && res.message === "已登录") {


      console.log("请求其他的数据");
    } else {


      this.handleLogin()
    }
  },
 // 第二种写法 --获取login接口处理函数获取token
  async handleLogin() {


    // 1.获取code
    const code = await getCode()

    // 2.使用code换取token
    const res = await hyLoginReqInstance.post({


      url: "/login",
      data: {

     code }
    })

    // 3.保存token
    wx.setStorageSync('token', res.token)
  }

})
23_(理解)内容回顾和作业布置
第四章:内容回顾
一. 组件化开发
1.1. 直接调用子组件的方法
1.2. 插槽的使用
- 单个插槽
- 默认值
- 多个插槽
1.3. Behaviors混入
1.4. 生命周期函数
- 组件的生命周期函数
- 页面的生命周期函数
1.5. Component选项
二. 系统API调用
2.1. 网络请求API
- 基本使用
- 域名配置
- 工具封装:
- 函数封装
- 类封装
2.2. 弹窗和分享
- showToast
- showModal
- showActionSheet
- onShareAppMessage
2.3. 设备和位置信息
- wx.getSystemInfo
- wx.getLocation()
- app.json配置
2.4. Storage的存储
2.5. 页面跳转和数据传递
- navigateTo
- navigateBack
数据传递:
- ?queryString
- getCurrentPages -> prePage.setData
- events -> eventChannel
组件跳转
- navigator组件
2.6. 登录流程
-
登录的身份的标题
- openid
-
登录流程
-
登录代码演练