一、前言
论文源码:https://github.com/happinesslz/EPNet
注释版本:https://github.com/xueking1/EPNet-master/tree/main(仅写了li-fusion,之后有空了更新一下)
论文地址:https://arxiv.org/pdf/2007.08856
2、核心代码位置
1、cig文件:EPNet-master\EPNet-master\tools\cfgs\LI_Fusion_with_attention_use_ce_loss.yaml
LI-Fusion的代码段:
LI_FUSION:
ENABLED: True

ADD_Image_Attention: True
IMG_FEATURES_CHANNEL: 128

IMG_CHANNELS: [3, 64, 128, 256, 512]
POINT_CHANNELS: [96, 256, 512, 1024]

DeConv_Reduce: [16, 16, 16, 16]
DeConv_Kernels: [2, 4, 8, 16]
DeConv_Strides: [2, 4, 8, 16]
2、Li-Fusion位置:EPNet-master\EPNet-master\lib\net\pointnet2_msg.py
完整注释代码:
import torch
import torch.nn as nn
import torch.nn.functional as F
from pointnet2_lib.pointnet2.pointnet2_modules import PointnetFPModule, PointnetSAModuleMSG
from lib.config import cfg
from torch.nn.functional import grid_sample


BatchNorm2d = nn.BatchNorm2d

def conv3x3(in_planes, out_planes, stride = 1):
    """3x3 convolution with padding"""
    # 3*3的卷积层模块:在原文中使用3*3卷积模块对图像进行降维
    return nn.Conv2d(in_planes, out_planes, kernel_size = 3, stride = stride,
                     padding = 1, bias = False)


class BasicBlock(nn.Module):

    # 这个Block就是经典的卷积模块:Conv+BN+Relu
    def __init__(self, inplanes, outplanes, stride = 1):
        super(BasicBlock, self).__init__()
        self.conv1 = conv3x3(inplanes, outplanes, stride)
        self.bn1 = BatchNorm2d(outplanes )
        self.relu = nn.ReLU(inplace = True)
        self.conv2 = conv3x3(outplanes, outplanes, 2*stride)

    def forward(self, x):

        out = self.conv1(x)
        # conv层与层之间需要加入BN+ReLU,以保证非线性
        out = self.bn1(out)
        out = self.relu(out)
        # 输出
        out = self.conv2(out)

        return out

class Fusion_Conv(nn.Module):
    def __init__(self, inplanes, outplanes):

        super(Fusion_Conv, self).__init__()

        self.conv1 = torch.nn.Conv1d(inplanes, outplanes, 1)
        self.bn1 = torch.nn.BatchNorm1d(outplanes)

    def forward(self, point_features, img_features):
        #print(point_features.shape, img_features.shape)
        fusion_features = torch.cat([point_features, img_features], dim=1)
        fusion_features = F.relu(self.bn1(self.conv1(fusion_features)))

        return fusion_features


#================addition attention (add)=======================#
class IA_Layer(nn.Module):
    def __init__(self, channels):
        print('##############ADDITION ATTENTION(ADD)#########')
        super(IA_Layer, self).__init__()
        self.ic, self.pc = channels
        rc = self.pc // 4
        self.conv1 = nn.Sequential(nn.Conv1d(self.ic, self.pc, 1),
                                    nn.BatchNorm1d(self.pc),
                                    nn.ReLU())
        self.fc1 = nn.Linear(self.ic, rc)
        self.fc2 = nn.Linear(self.pc, rc)
        self.fc3 = nn.Linear(rc, 1)


    def forward(self, img_feas, point_feas):
        batch = img_feas.size(0)
        # 初始化图像和点云特征信息
        img_feas_f = img_feas.transpose(1,2).contiguous().view(-1, self.ic) #BCN->BNC->(BN)C
        point_feas_f = point_feas.transpose(1,2).contiguous().view(-1, self.pc) #BCN->BNC->(BN)C'
        # print(img_feas)

        # 将图像特征和点云特征分别输入到FC层中,目的:把两者变换到一个维度上去,以便于后面融合
        ri = self.fc1(img_feas_f)
        rp = self.fc2(point_feas_f)

        # 1、特征融合:图像特征和点云特征融合的方式是元素级相加的方式:即ri+rp
        # 2、然后经过tanh:将其分布变换到[-1,1]中
        # 3、FC3层变换维度,以便于后面与图像信息进行相乘
        # 4、通过sigmoid将值限制在[0,1]内,得到权重矩阵,这样图像或点云中每一个元素都有自己的权重值,我们自然也就能知道图像像素能贡献多少
        att = F.sigmoid(self.fc3(F.tanh(ri + rp))) #BNx1

        att = att.squeeze(1)
        att = att.view(batch, 1, -1) #B1N
        # print(img_feas.size(), att.size())

        # 原始图像维度变换:图像特征经过一个卷积层变换维度,使得其能够与权重矩阵进行相乘
        img_feas_new = self.conv1(img_feas)
        # 图像融合特征:用图像*权重矩阵,得到的是图像贡献的信息
        out = img_feas_new * att
        # 返回融合后图像的信息:out
        return out


class Atten_Fusion_Conv(nn.Module):
    # Li—Fusion融合函数
    def __init__(self, inplanes_I, inplanes_P, outplanes):
        super(Atten_Fusion_Conv, self).__init__()
        # 采用IA_Layer融合图像和点云信息
        self.IA_Layer = IA_Layer(channels = [inplanes_I, inplanes_P])
        # self.conv1 = torch.nn.Conv1d(inplanes_P, outplanes, 1)
        self.conv1 = torch.nn.Conv1d(inplanes_P + inplanes_P, outplanes, 1)
        self.bn1 = torch.nn.BatchNorm1d(outplanes)


    def forward(self, point_features, img_features):
        # print(point_features.shape, img_features.shape)
        # 利用IA_Layer得到融合后的图像信息
        img_features =  self.IA_Layer(img_features, point_features)
        # print("img_features:", img_features.shape)

        # 将原始点云信息和融合后的图像信息直接拼接,这样既保留了具有一定权重的图像信息(去除了不重要的图像信息),也保留了原始点云信息
        # fusion_features = img_features + point_features
        fusion_features = torch.cat([point_features, img_features], dim=1)
        # Conv+bn+relu得到最终融合结果
        fusion_features = F.relu(self.bn1(self.conv1(fusion_features)))

        return fusion_features


def Feature_Gather(feature_map, xy):
    """
    :param xy:(B,N,2)  normalize to [-1,1]
    :param feature_map:(B,C,H,W)
    :return:
    """
    # 插值
    # use grid_sample for this.
    # xy(B,N,2)->(B,1,N,2)
    xy = xy.unsqueeze(1)
    # grid_sample:torch官网提供的插值方法:
    # 	原型:torch.nn.functional.grid_sample(input,grid,mode='bilinear',padding_mode='zeros',align_corners=None)。
    # 	其中:mode为选择采样方法,有三种内插算法可选,分别是'bilinear'双线性差值、'nearest'最邻近插值、'bicubic' 双三次插值。

    # 具体参考:https://blog.csdn.net/jameschen9051/article/details/124714759
    interpolate_feature = grid_sample(feature_map, xy)  # (B,C,1,N)
    # 返回插值结果
    return interpolate_feature.squeeze(2) # (B,C,N)


def get_model(input_channels = 6, use_xyz = True):
    return Pointnet2MSG(input_channels = input_channels, use_xyz = use_xyz)


class Pointnet2MSG(nn.Module):
    def __init__(self, input_channels = 6, use_xyz = True):
        super().__init__()
        # PointNet++中的SA模块定义
        self.SA_modules = nn.ModuleList()
        channel_in = input_channels

        skip_channel_list = [input_channels]
        for k in range(cfg.RPN.SA_CONFIG.NPOINTS.__len__()):
            mlps = cfg.RPN.SA_CONFIG.MLPS[k].copy()
            channel_out = 0
            for idx in range(mlps.__len__()):
                mlps[idx] = [channel_in] + mlps[idx]
                channel_out += mlps[idx][-1]
            # 调用PointNet++中的SA模块,聚合信息
            self.SA_modules.append(
                    PointnetSAModuleMSG(
                            npoint = cfg.RPN.SA_CONFIG.NPOINTS[k],
                            radii = cfg.RPN.SA_CONFIG.RADIUS[k],
                            nsamples = cfg.RPN.SA_CONFIG.NSAMPLE[k],
                            mlps = mlps,
                            use_xyz = use_xyz,
                            bn = cfg.RPN.USE_BN
                    )
            )
            skip_channel_list.append(channel_out)
            channel_in = channel_out

        ##################
        # 根据cig文件中设定的参数,决定是否采用LI_FUSION模块
        # cig文件:LI_FUSION.ENABLED: True
        if cfg.LI_FUSION.ENABLED:
            # 这是图像特征抽象模块(图像降采样模块)定义
            self.Img_Block = nn.ModuleList()
            # 这是融合卷积模块定义
            self.Fusion_Conv = nn.ModuleList()
            # 反卷积模块定义
            self.DeConv = nn.ModuleList()
            for i in range(len(cfg.LI_FUSION.IMG_CHANNELS) - 1):
                # 下面是对Img_Block模块进行初始化:
                # 1、图像降采样模块Img_Block:根据cig文件里设定参数,将卷积层等添加到Img_Block模块中

                # 2、采用已经定义好的BasicBlock模块进行堆叠,堆叠的方法是按照:
                # 输入input:LI_FUSION.IMG_CHANNELS[i] 输出output:cfg.LI_FUSION.IMG_CHANNELS[i+1]

                # 3、cig文件中对于图像channel的设定:IMG_CHANNELS: [3, 64, 128, 256, 512]
                # 也就是说卷积层输出输出(input,output)设定应该为:(3,64),(64,128),(128,256),(256,512)
                self.Img_Block.append(BasicBlock(cfg.LI_FUSION.IMG_CHANNELS[i], cfg.LI_FUSION.IMG_CHANNELS[i+1], stride=1))
                # 根据cig文件中设定,决定是否加入图像注意力ADD_Image_Attention
                # cig文件:ADD_Image_Attention: True
                if cfg.LI_FUSION.ADD_Image_Attention:
                    # Fusion_Conv模块中添加Li-Fusion融合模块
                    self.Fusion_Conv.append(
                        Atten_Fusion_Conv(cfg.LI_FUSION.IMG_CHANNELS[i + 1], cfg.LI_FUSION.POINT_CHANNELS[i],
                                          cfg.LI_FUSION.POINT_CHANNELS[i]))
                else:
                    self.Fusion_Conv.append(Fusion_Conv(cfg.LI_FUSION.IMG_CHANNELS[i + 1] + cfg.LI_FUSION.POINT_CHANNELS[i],
                                                        cfg.LI_FUSION.POINT_CHANNELS[i]))
                # 反卷积模块DeConv:通过cig设定,添加转置卷积模块ConvTranspose2d
                # cig文件:① IMG_CHANNELS: [3, 64, 128, 256, 512]  ② DeConv_Reduce: [16, 16, 16, 16]
                self.DeConv.append(nn.ConvTranspose2d(cfg.LI_FUSION.IMG_CHANNELS[i + 1], cfg.LI_FUSION.DeConv_Reduce[i],
                                                  kernel_size=cfg.LI_FUSION.DeConv_Kernels[i],
                                                  stride=cfg.LI_FUSION.DeConv_Kernels[i]))
            # 图像特征融合模块
            self.image_fusion_conv = nn.Conv2d(sum(cfg.LI_FUSION.DeConv_Reduce), cfg.LI_FUSION.IMG_FEATURES_CHANNEL//4, kernel_size = 1)
            # BN
            self.image_fusion_bn = torch.nn.BatchNorm2d(cfg.LI_FUSION.IMG_FEATURES_CHANNEL//4)
            # 根据ADD_Image_Attention决定是否采用图像注意力
            if cfg.LI_FUSION.ADD_Image_Attention:
                self.final_fusion_img_point = Atten_Fusion_Conv(cfg.LI_FUSION.IMG_FEATURES_CHANNEL//4, cfg.LI_FUSION.IMG_FEATURES_CHANNEL, cfg.LI_FUSION.IMG_FEATURES_CHANNEL)
            else:
                self.final_fusion_img_point = Fusion_Conv(cfg.LI_FUSION.IMG_FEATURES_CHANNEL + cfg.LI_FUSION.IMG_FEATURES_CHANNEL//4, cfg.LI_FUSION.IMG_FEATURES_CHANNEL)

        # FP模块(逆距离加权平均)定义
        self.FP_modules = nn.ModuleList()
        # FP模块初始化
        for k in range(cfg.RPN.FP_MLPS.__len__()):
            pre_channel = cfg.RPN.FP_MLPS[k + 1][-1] if k + 1 < len(cfg.RPN.FP_MLPS) else channel_out
            self.FP_modules.append(
                    PointnetFPModule(mlp = [pre_channel + skip_channel_list[k]] + cfg.RPN.FP_MLPS[k])
            )

    def _break_up_pc(self, pc):
        # _break_up_pc函数:初始化点云参数

        # 截取点云前三个变量作为点云的xyz坐标
        xyz = pc[..., 0:3].contiguous()
        features = (
            # 截取点云pc[3:]作为点云特征
            pc[..., 3:].transpose(1, 2).contiguous()
            if pc.size(-1) > 3 else None
        )

        return xyz, features


    def forward(self, pointcloud: torch.cuda.FloatTensor, image=None, xy=None):
        # 点云坐标xyz及其特征features
        xyz, features = self._break_up_pc(pointcloud)
        # 将点云xyz坐标和特征升维后传给l_xyz和l_features
        l_xyz, l_features = [xyz], [features]
        # 根据cig文件,决定是否采用LI_FUSION
        # cig文件:LI_FUSION.ENABLED: True
        if cfg.LI_FUSION.ENABLED:
            #### normalize xy to [-1,1]
            size_range = [1280.0, 384.0]
            xy[:, :, 0] = xy[:, :, 0] / (size_range[0] - 1.0) * 2.0 - 1.0
            xy[:, :, 1] = xy[:, :, 1] / (size_range[1] - 1.0) * 2.0 - 1.0  # = xy / (size_range - 1.) * 2 - 1.
            # 保存归一化后的结果
            l_xy_cor = [xy]
            img = [image]
        # 遍历SA模块:S1,S2,S3,S4(原文图2),严格意义上来讲,应该是遍历SA和图像卷积模块,因为两者数量,所以用len(self.SA_modules)
        for i in range(len(self.SA_modules)):
            # 使用SA_modules对点云特征进行提取
            li_xyz, li_features, li_index = self.SA_modules[i](l_xyz[i], l_features[i])
            # 根据cig文件,决定是否采用LI_FUSION
            if cfg.LI_FUSION.ENABLED:
                li_index = li_index.long().unsqueeze(-1).repeat(1,1,2)
                li_xy_cor = torch.gather(l_xy_cor[i],1,li_index)  # 作用:收集输入的特定维度指定位置的数值
                # 得到图像卷积的结果
                image = self.Img_Block[i](img[i])
                #print(image.shape)
                # 对图像进行插值
                img_gather_feature = Feature_Gather(image,li_xy_cor) #, scale= 2**(i+1))
                # 采用Li-Fusion模块对图像和点云信息进行融合
                li_features = self.Fusion_Conv[i](li_features,img_gather_feature)
                # 保存数据
                l_xy_cor.append(li_xy_cor)
                # 图像每个尺度都要保存
                img.append(image)
            # 保存点云xyz
            l_xyz.append(li_xyz)
            # 保存li-fusion融合后的结果
            l_features.append(li_features)

        # FP模块:对应到原图中共有三个FP模块:P1,P2,P3(原文图2)
        for i in range(-1, -(len(self.FP_modules) + 1), -1):
            l_features[i - 1] = self.FP_modules[i](
                    l_xyz[i - 1], l_xyz[i], l_features[i - 1], l_features[i]
            )
        # 下面是Image Stream的反卷积
        if cfg.LI_FUSION.ENABLED:
            #for i in range(1,len(img))
            DeConv = []
            for i in range(len(cfg.LI_FUSION.IMG_CHANNELS) - 1):
                # 将img作为self.DeConv的输入进行反卷积
                # 注:这里的DeConv数组和self.DeConv[i]是不同的,前者保存上采样的结果,后者是反卷积层,具体可看其定义
                DeConv.append(self.DeConv[i](img[i + 1]))
            # 将反卷积的结果进行拼接
            de_concat = torch.cat(DeConv,dim=1)

            # 将反卷积后的结果经过Conv+Bn+Relu,对应到原文是FU层
            img_fusion = F.relu(self.image_fusion_bn(self.image_fusion_conv(de_concat)))
            # 最后一次FP插值:P4(原文图2)
            img_fusion_gather_feature = Feature_Gather(img_fusion, xy)
            # 最后一次Li-Fusion融合(原文图2)
            l_features[0] = self.final_fusion_img_point(l_features[0], img_fusion_gather_feature)

        return l_xyz[0], l_features[0]


class Pointnet2MSG_returnMiddleStages(Pointnet2MSG):
    def __init__(self, input_channels = 6, use_xyz = True):
        super().__init__(input_channels, use_xyz)

    def forward(self, pointcloud: torch.cuda.FloatTensor):
        xyz, features = self._break_up_pc(pointcloud)

        l_xyz, l_features = [xyz], [features]
        idxs = []
        for i in range(len(self.SA_modules)):
            li_xyz, li_features, idx = self.SA_modules[i](l_xyz[i], l_features[i])
            l_xyz.append(li_xyz)
            l_features.append(li_features)
            idxs.append(idx)

        for i in range(-1, -(len(self.FP_modules) + 1), -1):
            l_features[i - 1] = self.FP_modules[i](
                    l_xyz[i - 1], l_xyz[i], l_features[i - 1], l_features[i]
            )

        return l_xyz, l_features, idxs
三、 分模块介绍
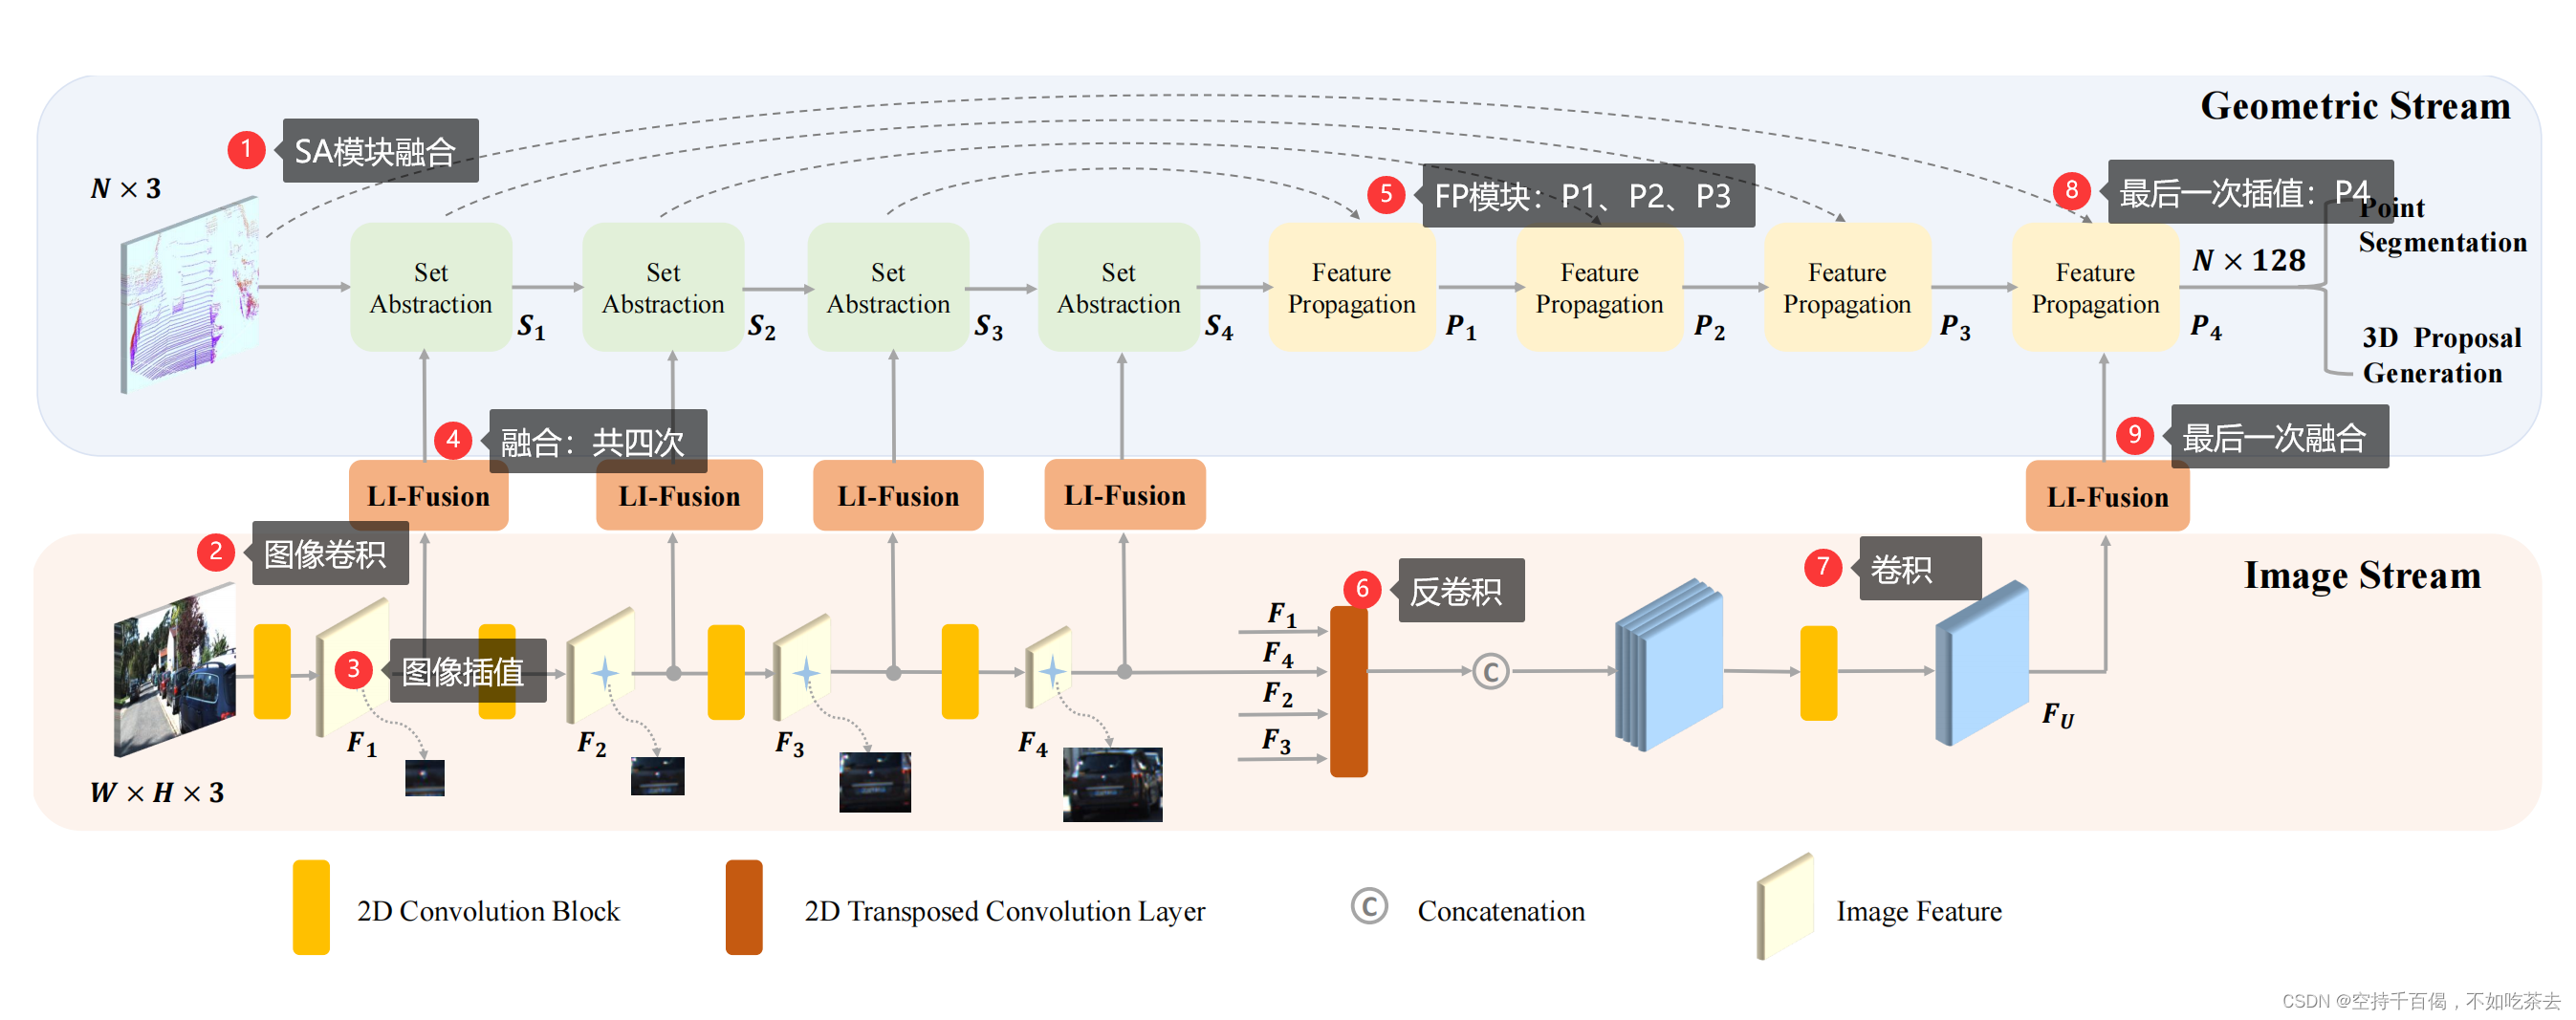
3、Two-stream RPN
双流RPN由Geometric Stream几何流(点云流) 和一个Image Stream图像流组成。
[其实也可叫做点云分支和图像分支,两个分支各司其职,同时也一定程度上相互交流信息]
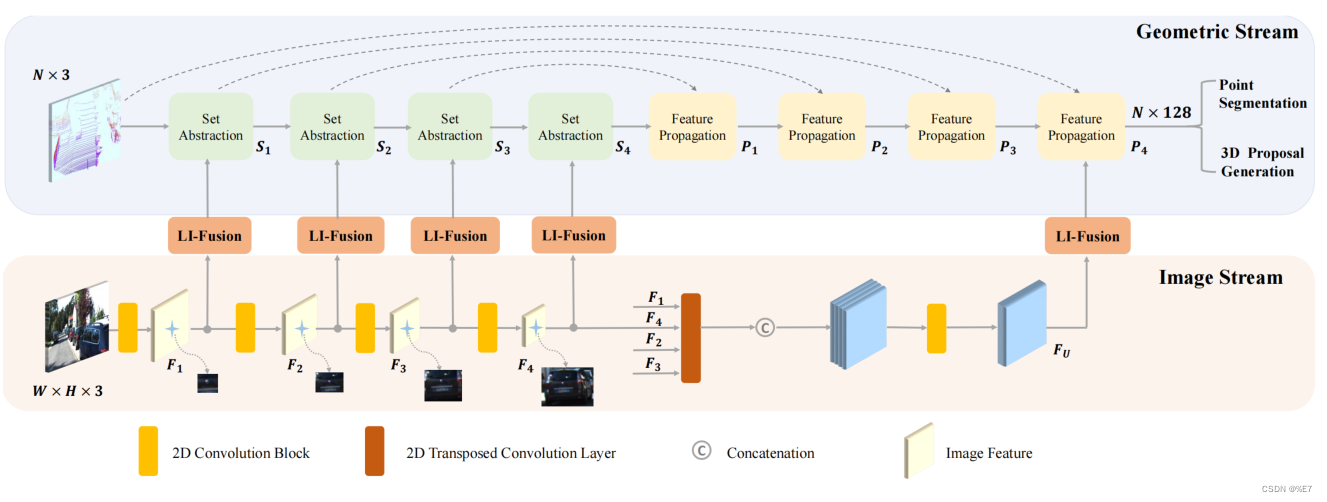
具体如上图所示。几何流和图像流分别产生点特征和语义图像特征。
EPNet使用多个LI-Fusion模块来增强具有相应不同的尺度上图像语义特征的点特征,产生出更有区别的特征表示。
3.1 Image Stream图像流
1、特征提取——图像编码
图像流以图像作为输入,并通过一组卷积操作提取语义图像信息。

组成:每个卷积块由两个3×3的卷积层组成,然后是一个批处理归一化层和一个ReLU激活函数。
位置:EPNet-master\EPNet-master\lib\net\pointnet2_msg.py
具体定义如下:
            for i in range(len(cfg.LI_FUSION.IMG_CHANNELS) - 1):
                # 下面是对Img_Block模块进行初始化:
                # 1、图像降采样模块Img_Block:根据cig文件里设定参数,将卷积层(BASIC_Block)添加到Img_Block模块中

                # 2、采用已经定义好的BasicBlock模块进行堆叠,堆叠的方法是按照:
                # 输入input:LI_FUSION.IMG_CHANNELS[i] 输出output:cfg.LI_FUSION.IMG_CHANNELS[i+1],
                # 前一个和后一个channel两两组合,生成卷积层,具体示例看第3点。

                # 3、cig文件中对于图像channel的设定:IMG_CHANNELS: [3, 64, 128, 256, 512]
                # 也就是说卷积层输出输出(input,output)设定应该为:(3,64),(64,128),(128,256),(256,512)
                self.Img_Block.append(BasicBlock(cfg.LI_FUSION.IMG_CHANNELS[i], cfg.LI_FUSION.IMG_CHANNELS[i+1], stride=1))
这个BasicBlock就是经典的卷积模块:Conv+BN+Relu
class BasicBlock(nn.Module):

    # 这个Block就是经典的卷积模块:Conv+BN+Relu
    def __init__(self, inplanes, outplanes, stride = 1):
        super(BasicBlock, self).__init__()
        self.conv1 = conv3x3(inplanes, outplanes, stride)
        self.bn1 = BatchNorm2d(outplanes )
        self.relu = nn.ReLU(inplace = True)
        self.conv2 = conv3x3(outplanes, outplanes, 2*stride)

    def forward(self, x):

        out = self.conv1(x)
        # conv层与层之间需要加入BN+ReLU,以保证非线性
        out = self.bn1(out)
        out = self.relu(out)
        # 输出
        out = self.conv2(out)

        return out
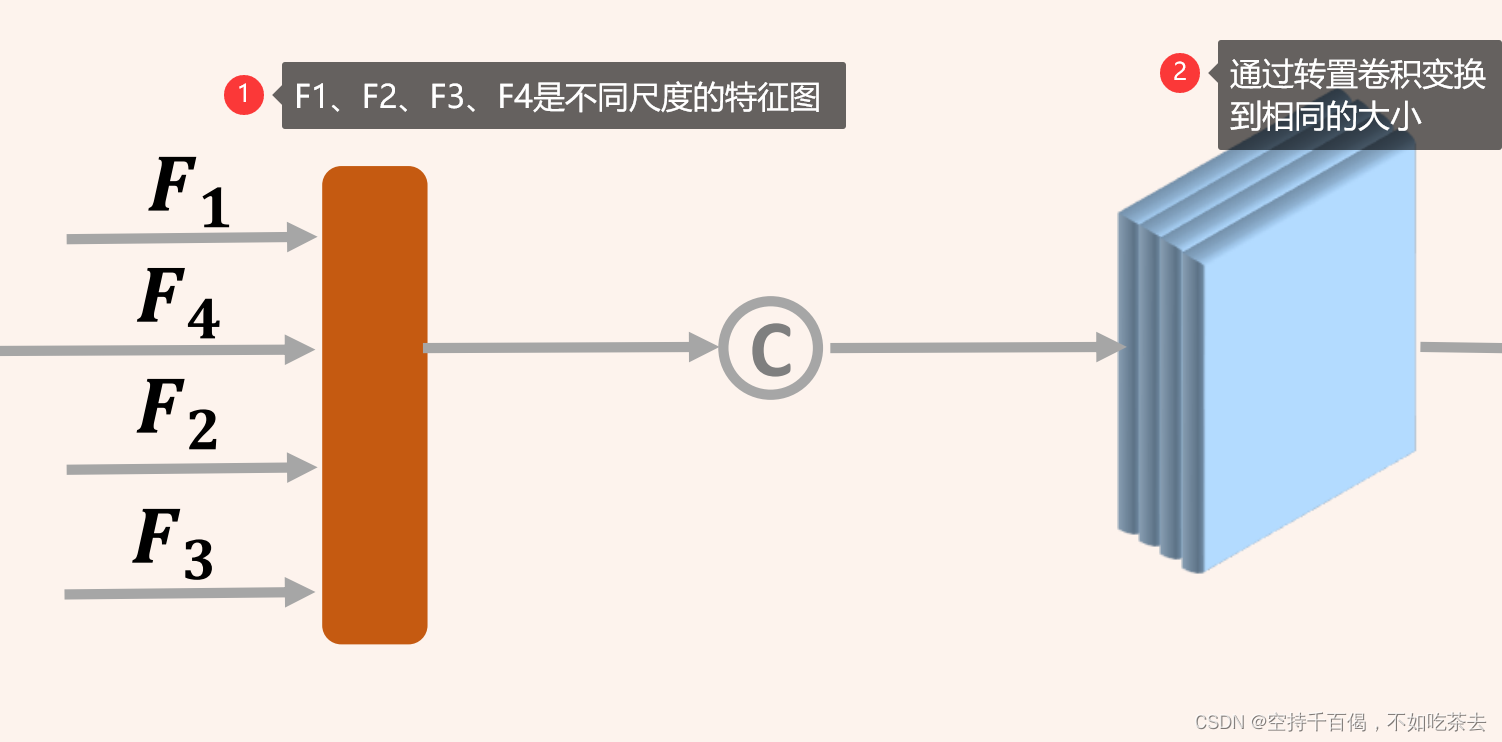
2、反卷积模块——图像解码
文中进一步采用四个不同步幅的转置卷积层来恢复图像分辨率,得到与原始图像大小相同的特征图。
(1)参数设定方法
采用nn.ConvTranspose2d来设定参数,具体设定方法就是根据cig文件里的DeConv_Reduce参数(作为output channel):
DeConv_Reduce: [16, 16, 16, 16]
DeConv_Kernels: [2, 4, 8, 16]
DeConv_Strides: [2, 4, 8, 16]
以及之前用来抽象图像特征的IMG_CHANNELS(作为input channel):
IMG_CHANNELS: [3, 64, 128, 256, 512]
由于是要把几个不同尺度的特征图同时scaling到一个大小上,所以输入channel由IMG_CHANNELS: [3, 64, 128, 256, 512]决定,输出channel一致都是DeConv_Reduce: [16, 16, 16, 16]。
具体过程,如下图所示
位置:EPNet-master\EPNet-master\lib\net\pointnet2_msg.py
具体代码:
                # 反卷积模块DeConv:通过cig设定,添加转置卷积模块ConvTranspose2d
                # cig文件:① IMG_CHANNELS: [3, 64, 128, 256, 512]  ② DeConv_Reduce: [16, 16, 16, 16]
                self.DeConv.append(nn.ConvTranspose2d(cfg.LI_FUSION.IMG_CHANNELS[i + 1], cfg.LI_FUSION.DeConv_Reduce[i],
                                                  kernel_size=cfg.LI_FUSION.DeConv_Kernels[i],
                                                  stride=cfg.LI_FUSION.DeConv_Kernels[i]))
3.2 Geometric Stream几何流(点云流)
该几何流由四对SA模块层和特征传播(FP)层组成,用于特征提取。
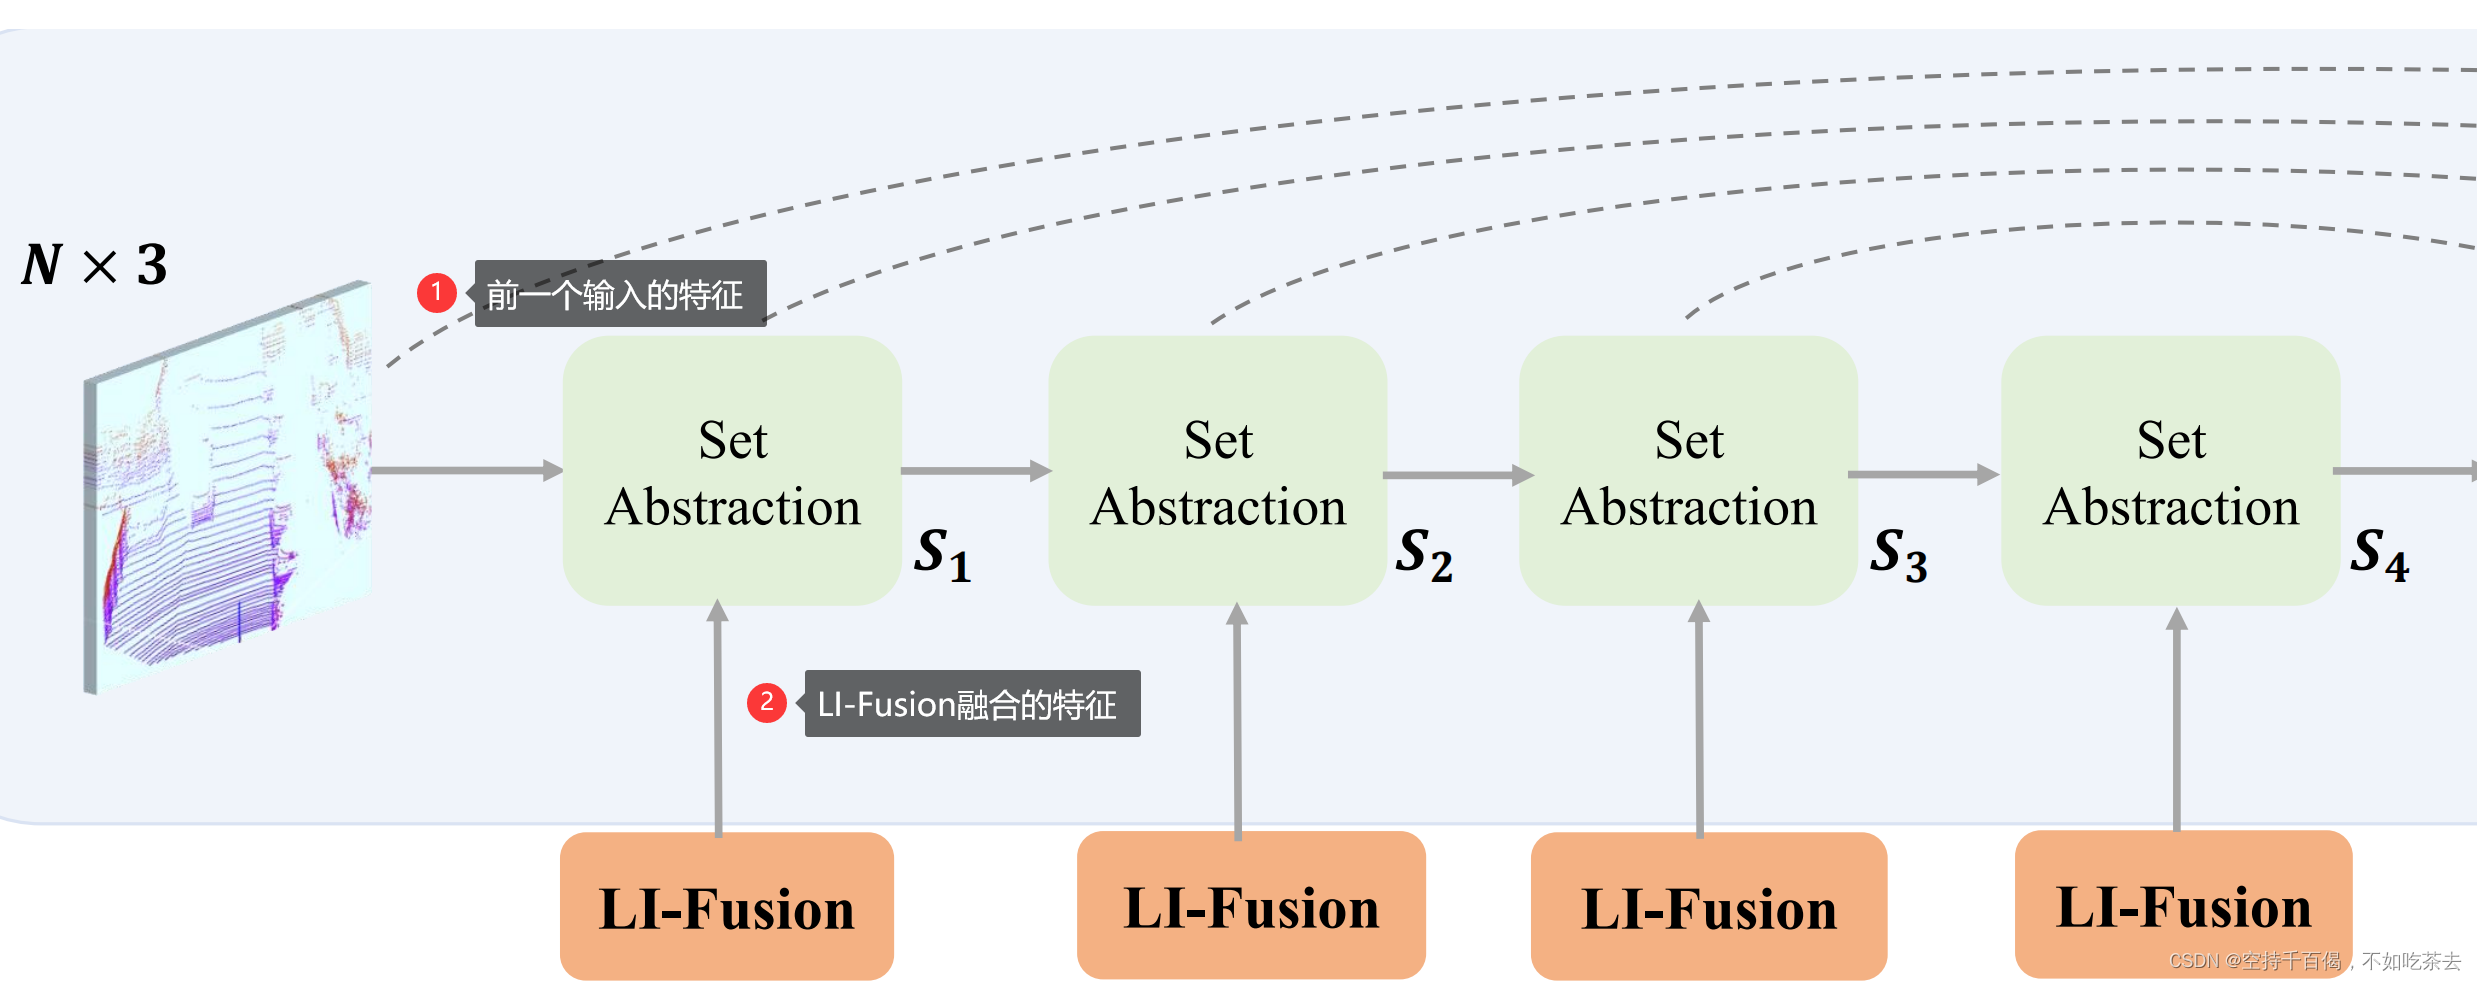
1、SA模块——点云编码
采用的是PointNet++中的SA模块来聚合点的特征,具体可参考:最全PointNet和PointNet++要点梳理总结
注意:这里的SA模块融合的是:LI-Fusion融合的特征 + 前一个输入的特征,实现如下:
li_xyz, li_features, li_index = self.SA_modules[i](l_xyz[i], l_features[i])
# l_xyz是前一个SA输出的xyz,l_feature是LI-Fusion融合的特征
可以参考原文中的图:
位置:EPNet-master\EPNet-master\lib\net\pointnet2_msg.py
SA定义代码如下:
        # PointNet++中的SA模块定义
        self.SA_modules = nn.ModuleList()
        channel_in = input_channels

        skip_channel_list = [input_channels]
        for k in range(cfg.RPN.SA_CONFIG.NPOINTS.__len__()):
            mlps = cfg.RPN.SA_CONFIG.MLPS[k].copy()
            channel_out = 0
            for idx in range(mlps.__len__()):
                mlps[idx] = [channel_in] + mlps[idx]
                channel_out += mlps[idx][-1]
            # 调用PointNet++中的SA模块,聚合点云信息
            self.SA_modules.append(
                    PointnetSAModuleMSG(
                            npoint = cfg.RPN.SA_CONFIG.NPOINTS[k],
                            radii = cfg.RPN.SA_CONFIG.RADIUS[k],
                            nsamples = cfg.RPN.SA_CONFIG.NSAMPLE[k],
                            mlps = mlps,
                            use_xyz = use_xyz,
                            bn = cfg.RPN.USE_BN
                    )
            )
            skip_channel_list.append(channel_out)
            channel_in = channel_out
由于SA模块是调用PointNet++的,所以下面的代码均是PointNet++的,不做过多介绍:
(1)SA模块采用的是PointNet++中的PointnetSAModuleMSG。
位置:\EPNet-master\EPNet-master\pointnet2_lib\pointnet2\pointnet2_modules.py
这里不详细赘述,详细可以看PointNet++源码,下面是PointnetSAModuleMSG代码:
class PointnetSAModuleMSG(_PointnetSAModuleBase):
    """Pointnet set abstraction layer with multiscale grouping"""

    def __init__(self, *, npoint: int, radii: List[float], nsamples: List[int], mlps: List[List[int]], bn: bool = True,
                 use_xyz: bool = True, pool_method = 'max_pool', instance_norm = False):
        """
        :param npoint: int
        :param radii: list of float, list of radii to group with
        :param nsamples: list of int, number of samples in each ball query
        :param mlps: list of list of int, spec of the pointnet before the global pooling for each scale
        :param bn: whether to use batchnorm
        :param use_xyz:
        :param pool_method: max_pool / avg_pool
        :param instance_norm: whether to use instance_norm
        """
        super().__init__()

        assert len(radii) == len(nsamples) == len(mlps)
        # 初始化
        self.npoint = npoint
        self.groupers = nn.ModuleList()
        self.mlps = nn.ModuleList()
        for i in range(len(radii)):
            # 球半径
            radius = radii[i]
            # 最大采样数
            nsample = nsamples[i]
            self.groupers.append(
                    # 采用ball query和grouping
                    pointnet2_utils.QueryAndGroup(radius, nsample, use_xyz = use_xyz)
                    if npoint is not None else pointnet2_utils.GroupAll(use_xyz)
            )
            mlp_spec = mlps[i]
            if use_xyz:
                mlp_spec[0] += 3
            # Shared MLP
            self.mlps.append(pt_utils.SharedMLP(mlp_spec, bn = bn, instance_norm = instance_norm))
        self.pool_method = pool_method
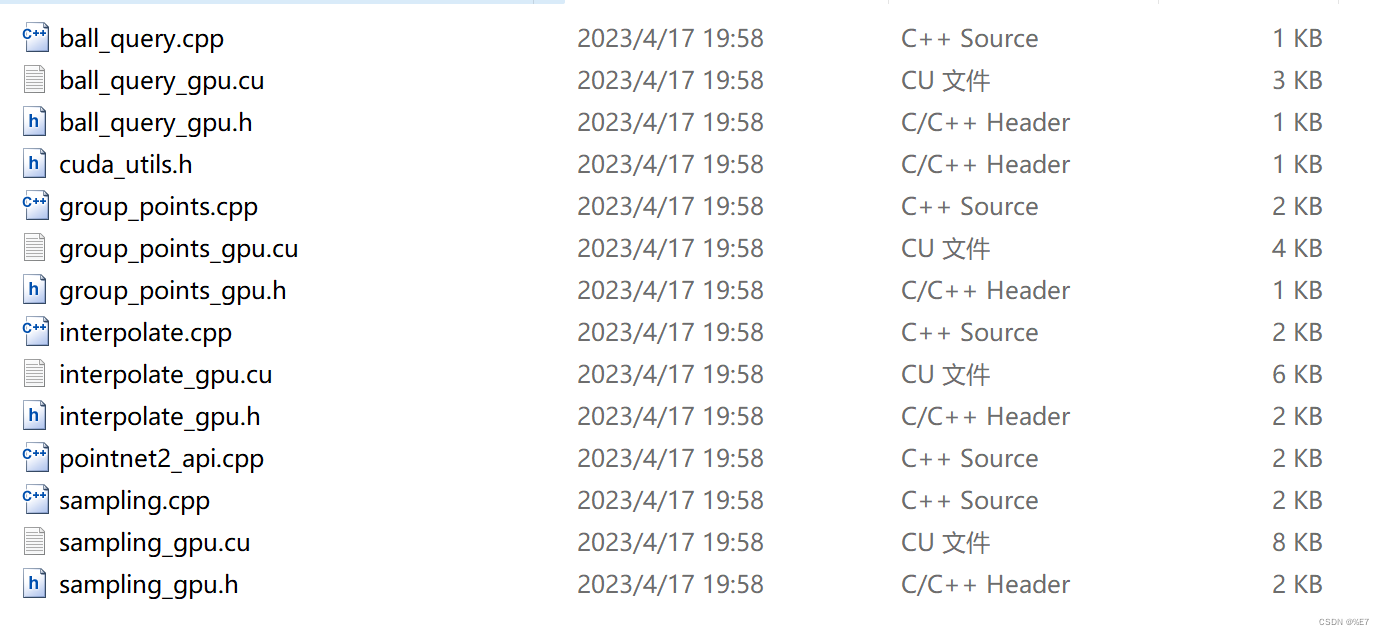
(2)SA的CUDA文件
其中需要注意的一点是:FPS,Ball_query,group均采用cuda编写,原因我认为是这些代码的计算量都很大,采用cuda并行计算能够提高模型效率。
代码注释我有写过,但是由于底层代码量太大的原因,就没有放上来,之后有需要我可以补充。
位置:EPNet-master\EPNet-master\pointnet2_lib\pointnet2\src
下面是文件截图:
2、Feature Propogation(FP)层——点云解码
(1)公式
FP采用的是PointNet++中反距离加权插值(Inverse Distance Weight,IDW) ,具体可参考:最全PointNet和PointNet++要点梳理总结
公式:
按照原图来说,共采用四个FP模块:前三个FP模块(P1、P2、P3) 用于和之前SA模块提取的特征进行插值,最后一个FP模块(P4) 会和原始点云信息进行插值。插值完后,再进行LI-Fusion。

位置:EPNet-master\EPNet-master\lib\net\pointnet2_msg.py
代码如下:
        # FP模块(逆距离加权平均)定义
        self.FP_modules = nn.ModuleList()
        # FP模块初始化
        for k in range(cfg.RPN.FP_MLPS.__len__()):
            pre_channel = cfg.RPN.FP_MLPS[k + 1][-1] if k + 1 < len(cfg.RPN.FP_MLPS) else channel_out
            self.FP_modules.append(
                    PointnetFPModule(mlp = [pre_channel + skip_channel_list[k]] + cfg.RPN.FP_MLPS[k])
            )
(2)代码
PointnetFPModule模块也在PointNet++代码里。
位置:\EPNet-master\EPNet-master\pointnet2_lib\pointnet2\pointnet2_modules.py
class PointnetFPModule(nn.Module):
    r"""Propigates the features of one set to another"""

    def __init__(self, *, mlp: List[int], bn: bool = True, activation = nn.ReLU(inplace = True)):
        """
        :param mlp: list of int
        :param bn: whether to use batchnorm
        """
        super().__init__()
        self.mlp = pt_utils.SharedMLP(mlp, bn = bn, activation = activation)

    def forward(
            self, unknown: torch.Tensor, known: torch.Tensor, unknow_feats: torch.Tensor, known_feats: torch.Tensor
    ) -> torch.Tensor:
        """
        :param unknown: (B, n, 3) tensor of the xyz positions of the unknown features
        :param known: (B, m, 3) tensor of the xyz positions of the known features
        :param unknow_feats: (B, C1, n) tensor of the features to be propigated to
        :param known_feats: (B, C2, m) tensor of features to be propigated
        :return:
            new_features: (B, mlp[-1], n) tensor of the features of the unknown features
        """
        # known 表示已知点的位置信息 [m,4]
        # known_feats 表示已知点的特征信息 [m,C]
        # unknown 表示需要插值点的位置信息 [n,4],一般来所,n>m
        # interpolated_feats 表示需要插值点的特征信息 [n,C],这是返回结果
        if known is not None:
            # 获取 unknown 和 known 之间的近邻关系和距离信息,three_nn:找到目标点最近的三个点
            dist, idx = pointnet2_utils.three_nn(unknown, known)
            # 权值是距离的倒数
            dist_recip = 1.0 / (dist + 1e-8)
            norm = torch.sum(dist_recip, dim = 2, keepdim = True)
            weight = dist_recip / norm
            # 根据近邻关系以及距离信息,直接插值特征信息
            interpolated_feats = pointnet2_utils.three_interpolate(known_feats, idx, weight)
        else:
            interpolated_feats = known_feats.expand(*known_feats.size()[0:2], unknown.size(1))

        if unknow_feats is not None:
            new_features = torch.cat([interpolated_feats, unknow_feats], dim = 1)  # (B, C2 + C1, n)
        else:
            new_features = interpolated_feats

        new_features = new_features.unsqueeze(-1)
        # 经过MLP:采用共享卷积改变维度
        new_features = self.mlp(new_features)

        return new_features.squeeze(-1)
(3)CUDA文件
插值的核心程序由CUDA编写,能够并行计算提高模型效率。
插值cuda文件:interpolate_gpu.cu(包含three_nn、three_interpolate)
位置在:\EPNet-master\EPNet-master\pointnet2_lib\pointnet2\src\interpolate_gpu.cu
具体参考:小白科研笔记:理解PointNet++中的three_interpolate前向计算和反向求导
代码示例:
①three_nn
__global__ void three_nn_kernel_fast(int b, int n, int m, const float *__restrict__ unknown,
    const float *__restrict__ known, float *__restrict__ dist2, int *__restrict__ idx) {


    // unknown: (B, N, 3)
    // known: (B, M, 3)
    // output:
    //      dist2: (B, N, 3)
    //      idx: (B, N, 3)

    int bs_idx = blockIdx.y;
    int pt_idx = blockIdx.x * blockDim.x + threadIdx.x;
    if (bs_idx >= b || pt_idx >= n) return;

    unknown += bs_idx * n * 3 + pt_idx * 3;
    known += bs_idx * m * 3;
    dist2 += bs_idx * n * 3 + pt_idx * 3;
    idx += bs_idx * n * 3 + pt_idx * 3;

    float ux = unknown[0];
    float uy = unknown[1];
    float uz = unknown[2];

    double best1 = 1e40, best2 = 1e40, best3 = 1e40;
    int besti1 = 0, besti2 = 0, besti3 = 0;
    for (int k = 0; k < m; ++k) {


        float x = known[k * 3 + 0];
        float y = known[k * 3 + 1];
        float z = known[k * 3 + 2];
        float d = (ux - x) * (ux - x) + (uy - y) * (uy - y) + (uz - z) * (uz - z); //计算两点之间的欧几里得距离
       //找到目标点最近的三个点
        if (d < best1) {


            best3 = best2; besti3 = besti2;
            best2 = best1; besti2 = besti1;
            best1 = d; besti1 = k;
        }
        else if (d < best2) {


            best3 = best2; besti3 = besti2;
            best2 = d; besti2 = k;
        }
        else if (d < best3) {


            best3 = d; besti3 = k;
        }
    }
    dist2[0] = best1; dist2[1] = best2; dist2[2] = best3;
    idx[0] = besti1; idx[1] = besti2; idx[2] = besti3;
}
②three_interpolate
__global__ void three_interpolate_kernel_fast(int b, int c, int m, int n, const float *__restrict__ points,
    const int *__restrict__ idx, const float *__restrict__ weight, float *__restrict__ out) {


    // points: (B, C, M)
    // idx: (B, N, 3)
    // weight: (B, N, 3)
    // output:
    //      out: (B, C, N)

    int bs_idx = blockIdx.z;
    int c_idx = blockIdx.y;
    int pt_idx = blockIdx.x * blockDim.x + threadIdx.x;

    if (bs_idx >= b || c_idx >= c || pt_idx >= n) return;

    weight += bs_idx * n * 3 + pt_idx * 3;
    points += bs_idx * c * m + c_idx * m;
    idx += bs_idx * n * 3 + pt_idx * 3;
    out += bs_idx * c * n + c_idx * n;
	//点*权重
    out[pt_idx] = weight[0] * points[idx[0]] + weight[1] * points[idx[1]] + weight[2] * points[idx[2]];
}
3.3 Li-Fusion
1、图
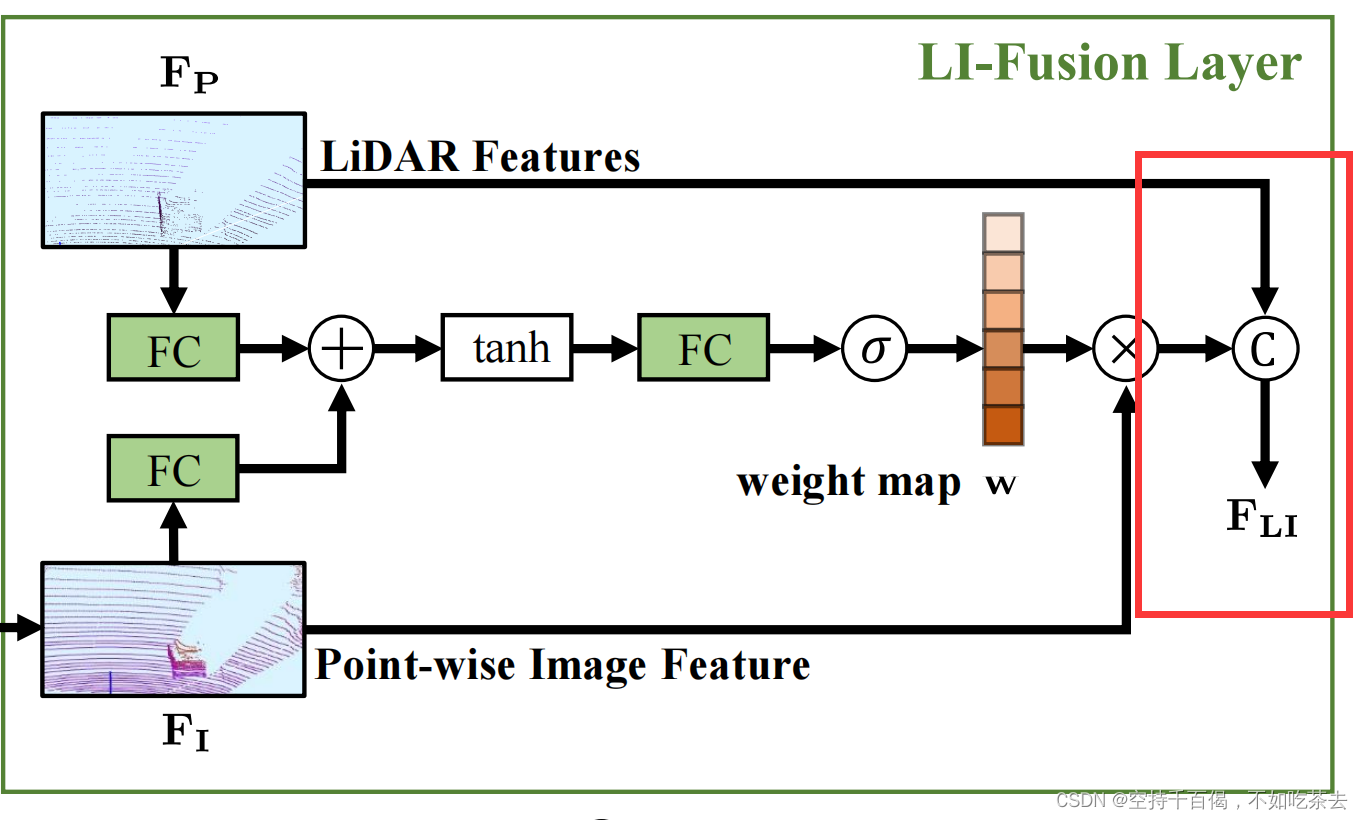
LI-Fusion其实就是按照下面的图,尤其是右半边图:图像点云元素级融合LI-Fusion Layer

图中上半支线是LiDAR Features(也就是点云特征),下半支线是Point-wise Image Feature(也就是含有点云信息的图像特征)。
2、步骤
两支线通过以下步骤进行融合:
(1)IA_Layer——元素级融合图像-点云特征
原代码中,采用IA_Layer融合图像和点云信息:

①缩放及融合:两者支线首先经过FC层缩放到一个维度,然后才进行元素相加操作(注意:此处的相加就是将两个特征向量直接相加,而非拼接。原代码中是:ri + rp,ri是图像特征,rp是点云特征)。
②经过tanh将数值分布变换到[-1,1],加入tanh既符合数据分布,也可以提高模型效率。
③通过FC层变换单维度通道,以便于生成一维权重矩阵,能够和图像信息相乘。其次,也起到了融合信息的作用。
④经过sigmoid激活函数,将数值限制在[0,1],得到权重矩阵,这样图像或点云中每一个元素都有自己的权重值,我们自然也就能知道图像像素能贡献多少。
⑤最后图像像素×权重矩阵得到具有一定贡献度的图像特征。
论文中的原话:
我们首先将激光雷达特征FP和点向特征FI输入一个完全连接的层,并将它们映射到同一个通道中。然后我们将它们加在一起,形成一个紧凑的特征表示,然后通过另一个完全连接的层压缩成一个单通道的权重映射w。我们使用一个sigmoid激活函数来将权值图w归一化到[0,1]的范围内。
代码如下:
位置:EPNet-master\EPNet-master\lib\net\pointnet2_msg.py
#================addition attention (add)=======================#
class IA_Layer(nn.Module):
    def __init__(self, channels):
        print('##############ADDITION ATTENTION(ADD)#########')
        super(IA_Layer, self).__init__()
        self.ic, self.pc = channels
        rc = self.pc // 4
        self.conv1 = nn.Sequential(nn.Conv1d(self.ic, self.pc, 1),
                                    nn.BatchNorm1d(self.pc),
                                    nn.ReLU())
        self.fc1 = nn.Linear(self.ic, rc)
        self.fc2 = nn.Linear(self.pc, rc)
        self.fc3 = nn.Linear(rc, 1)


    def forward(self, img_feas, point_feas):
        batch = img_feas.size(0)
        # 初始化图像和点云特征信息
        img_feas_f = img_feas.transpose(1,2).contiguous().view(-1, self.ic) #BCN->BNC->(BN)C
        point_feas_f = point_feas.transpose(1,2).contiguous().view(-1, self.pc) #BCN->BNC->(BN)C'
        # print(img_feas)

        # 将图像特征和点云特征分别输入到FC层中,目的:把两者变换到一个维度上去,以便于后面融合
        ri = self.fc1(img_feas_f)
        rp = self.fc2(point_feas_f)

        # 1、特征融合:图像特征和点云特征融合的方式是元素级相加的方式:即ri+rp
        # 2、然后经过tanh:将其分布变换到[-1,1]中
        # 3、FC3层变换维度,以便于后面与图像信息进行相乘
        # 4、通过sigmoid将值限制在[0,1]内,得到权重矩阵,这样图像或点云中每一个元素都有自己的权重值,我们自然也就能知道图像像素能贡献多少
        att = F.sigmoid(self.fc3(F.tanh(ri + rp))) #BNx1

        att = att.squeeze(1)
        att = att.view(batch, 1, -1) #B1N
        # print(img_feas.size(), att.size())

        # 原始图像维度变换:图像特征经过一个卷积层变换维度,使得其能够与权重矩阵进行相乘
        img_feas_new = self.conv1(img_feas)
        # 图像融合特征:用图像*权重矩阵,得到的是图像贡献的信息
        out = img_feas_new * att
        # 返回融合后图像的信息:out
        return out
(2)Atten_Fusion_Conv 融合——原始点云信息再融合
通过之前的IA_Layer已经得到了图像和点云的融合特征,该特征是由图像*权重矩阵得出,也就是包含大量的图像信息。可见,最后还需要加入原始点云的信息,如下图所示:
在代码中实现为Atten_Fusion_Conv类,实现步骤为:
①通过IA_Layer模块,得到融合后的图像特征(上一节已提到)
②通过将原始点云信息LiDAR Features和融合后的图像特征img_features进行**“拼接”**(注意,这里不是元素相加,而是直接拼接),
代码为:
      # 将原始点云信息和融合后的图像信息直接拼接,这样既保留了具有一定权重的图像信息(去除了不重要的图像信息),也保留了原始点云信息
      fusion_features = torch.cat([point_features, img_features], dim=1)。
③将拼接后的特征经过Conv1d+BN+relu,将其特征变换维度,得到最终的融合结果。
完整的代码实现为:
class Atten_Fusion_Conv(nn.Module):
    # Li—Fusion融合函数
    def __init__(self, inplanes_I, inplanes_P, outplanes):
        super(Atten_Fusion_Conv, self).__init__()
        # 采用IA_Layer融合图像和点云信息
        self.IA_Layer = IA_Layer(channels = [inplanes_I, inplanes_P])
        # self.conv1 = torch.nn.Conv1d(inplanes_P, outplanes, 1)
        self.conv1 = torch.nn.Conv1d(inplanes_P + inplanes_P, outplanes, 1)
        self.bn1 = torch.nn.BatchNorm1d(outplanes)


    def forward(self, point_features, img_features):
        # print(point_features.shape, img_features.shape)
        # 利用IA_Layer得到融合后的图像信息
        img_features =  self.IA_Layer(img_features, point_features)
        # print("img_features:", img_features.shape)

        # 将原始点云信息和融合后的图像信息直接拼接,这样既保留了具有一定权重的图像信息(去除了不重要的图像信息),也保留了原始点云信息
        # fusion_features = img_features + point_features
        fusion_features = torch.cat([point_features, img_features], dim=1)
        # Conv+bn+relu得到最终融合结果
        fusion_features = F.relu(self.bn1(self.conv1(fusion_features)))

        return fusion_features
3.4 forward函数
上面介绍完各个模块,接下来就是整体的流程如下:
①遍历SA模块,执行 SA模块融合
li_xyz, li_features, li_index = self.SA_modules[i](l_xyz[i], l_features[i])
②图像卷积抽象特征
image = self.Img_Block[i](img[i])
③对图像进行插值
img_gather_feature = Feature_Gather(image,li_xy_cor) #, scale= 2**(i+1))
④采用Li-Fusion模块对图像和点云信息进行融合
li_features = self.Fusion_Conv[i](li_features,img_gather_feature)
⑤FP模块:对应到原图中共有三个FP模块:P1,P2,P3(原文图2)
    for i in range(-1, -(len(self.FP_modules) + 1), -1):
        l_features[i - 1] = self.FP_modules[i](
                l_xyz[i - 1], l_xyz[i], l_features[i - 1], l_features[i]
        )
⑥Image Stream的反卷积
        if cfg.LI_FUSION.ENABLED:
        #for i in range(1,len(img))
        DeConv = []
        for i in range(len(cfg.LI_FUSION.IMG_CHANNELS) - 1):
            # 将img作为self.DeConv的输入进行反卷积
            # 注:这里的DeConv数组和self.DeConv[i]是不同的,前者保存上采样的结果,后者是反卷积层
            DeConv.append(self.DeConv[i](img[i + 1]))
        # 将反卷积的结果进行拼接
        de_concat = torch.cat(DeConv,dim=1)
⑦将反卷积后的结果经过Conv+Bn+Relu,对应到原文是FU层
img_fusion = F.relu(self.image_fusion_bn(self.image_fusion_conv(de_concat)))
⑧最后一次FP插值:P4(原文图2)
img_fusion_gather_feature = Feature_Gather(img_fusion, xy)
⑨最后一次Li-Fusion融合(原文图2)
l_features[0] = self.final_fusion_img_point(l_features[0], img_fusion_gather_feature)
具体代码实现如下:
 def forward(self, pointcloud: torch.cuda.FloatTensor, image=None, xy=None):
        # 点云坐标xyz及其特征features
        xyz, features = self._break_up_pc(pointcloud)
        # 将点云xyz坐标和特征升维后传给l_xyz和l_features
        l_xyz, l_features = [xyz], [features]
        # 根据cig文件,决定是否采用LI_FUSION
        # cig文件:LI_FUSION.ENABLED: True
        if cfg.LI_FUSION.ENABLED:
            #### normalize xy to [-1,1]
            size_range = [1280.0, 384.0]
            xy[:, :, 0] = xy[:, :, 0] / (size_range[0] - 1.0) * 2.0 - 1.0
            xy[:, :, 1] = xy[:, :, 1] / (size_range[1] - 1.0) * 2.0 - 1.0  # = xy / (size_range - 1.) * 2 - 1.
            # 保存归一化后的结果
            l_xy_cor = [xy]
            img = [image]
        # 遍历SA模块:S1,S2,S3,S4(原文图2),严格意义上来讲,应该是遍历SA和图像卷积模块,因为两者数量,所以用len(self.SA_modules)
        for i in range(len(self.SA_modules)):
            # 使用SA_modules对点云特征进行提取
            li_xyz, li_features, li_index = self.SA_modules[i](l_xyz[i], l_features[i])
            # 根据cig文件,决定是否采用LI_FUSION
            if cfg.LI_FUSION.ENABLED:
                li_index = li_index.long().unsqueeze(-1).repeat(1,1,2)
                li_xy_cor = torch.gather(l_xy_cor[i],1,li_index)  # 作用:收集输入的特定维度指定位置的数值
                # 得到图像卷积的结果
                image = self.Img_Block[i](img[i])
                #print(image.shape)
                # 对图像进行插值
                img_gather_feature = Feature_Gather(image,li_xy_cor) #, scale= 2**(i+1))
                # 采用Li-Fusion模块对图像和点云信息进行融合
                li_features = self.Fusion_Conv[i](li_features,img_gather_feature)
                # 保存数据
                l_xy_cor.append(li_xy_cor)
                # 图像每个尺度都要保存
                img.append(image)
            # 保存点云xyz
            l_xyz.append(li_xyz)
            # 保存li-fusion融合后的结果
            l_features.append(li_features)

        # FP模块:对应到原图中共有三个FP模块:P1,P2,P3(原文图2)
        for i in range(-1, -(len(self.FP_modules) + 1), -1):
            l_features[i - 1] = self.FP_modules[i](
                    l_xyz[i - 1], l_xyz[i], l_features[i - 1], l_features[i]
            )
        # 下面是Image Stream的反卷积
        if cfg.LI_FUSION.ENABLED:
            #for i in range(1,len(img))
            DeConv = []
            for i in range(len(cfg.LI_FUSION.IMG_CHANNELS) - 1):
                # 将img作为self.DeConv的输入进行反卷积
                # 注:这里的DeConv数组和self.DeConv[i]是不同的,前者保存上采样的结果,后者是反卷积层
                DeConv.append(self.DeConv[i](img[i + 1]))
            # 将反卷积的结果进行拼接
            de_concat = torch.cat(DeConv,dim=1)

            # 将反卷积后的结果经过Conv+Bn+Relu,对应到原文是FU层
            img_fusion = F.relu(self.image_fusion_bn(self.image_fusion_conv(de_concat)))
            # 最后一次FP插值:P4(原文图2)
            img_fusion_gather_feature = Feature_Gather(img_fusion, xy)
            # 最后一次Li-Fusion融合(原文图2)
            l_features[0] = self.final_fusion_img_point(l_features[0], img_fusion_gather_feature)

        return l_xyz[0], l_features[0]